Difference between revisions of "User:Yogi/Text OER"
| Line 21: | Line 21: | ||
One method of accessing existing OER is to search some text repositories. The most popular text OER repository is the digital encyclopedia, Wikipedia. You can search for your topic in Wikipedia, by simply typing this text in the search bar. We will do this for ‘Digital Story Telling’ (DST) which is the OER proposed to be created as an exemplar by this tool-kit. | One method of accessing existing OER is to search some text repositories. The most popular text OER repository is the digital encyclopedia, Wikipedia. You can search for your topic in Wikipedia, by simply typing this text in the search bar. We will do this for ‘Digital Story Telling’ (DST) which is the OER proposed to be created as an exemplar by this tool-kit. | ||
| − | <gallery mode=packed heights= | + | <gallery mode=packed heights=300px> |
File:COL_-_Searching_in_Wikipedia.png|Wikipedia page | File:COL_-_Searching_in_Wikipedia.png|Wikipedia page | ||
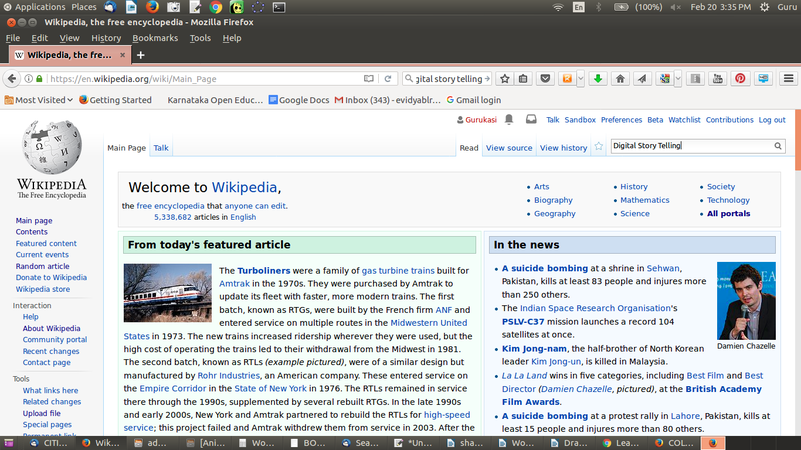
File:TextOER1.png|right|Digital Story Telling page on English Wikipedia | File:TextOER1.png|right|Digital Story Telling page on English Wikipedia | ||
Revision as of 07:43, 20 March 2017
Text is an important resource format and often OER have begun with digitizing of text materials - textbooks, papers, etc. While the digital allows creation multiple kinds of resources, text still holds an important position in terms of content creation. Textual OER includes text documents, web pages, PDF documents, spreadsheets and other resources which are primarily text based. Currently a large amount of textual OER is created using proprietary formats and made available in proprietary or PDF formats. PDF formats do not easily enable editing and hence limit re-purposing. In addition, in the absence of licensed proprietary applications, these OER may not be able to be legally reused or modified. Using free and open source tools to create textual OER can allow more and more users to create content; this can also support the expansion of the universe of OER creation in languages other than English.
One important advantage of the digital tools is the possibility of creating different kinds of textual resources. We are no longer thinking of linear typed text alone; it is now possible to create concept maps, flow charts, diagrams, combine text and images and create an info-graphic and so on. The hypertext which makes web pages possible is also another form of text. In this chapter of the toolkit, we will look at how to access, create and re-purpose textual OER; all the tools discussed are basically text editing tools.
Objectives
By the end of this chapter, you will be able to
- access text OER from popular repositories
- create your personal digital library for organizing your OER
- access, create and re-purpose concept maps using concept map editor (Freeplane)
- access, create and re-purpose text resources using a text editor (LibreOffice Writer).
- present text resources in a ‘slide presentation’ format (LibreOffice Impress)
Your personal digital library for OER
As a part of using this tool-kit to learn FOSS tools and create OER, you will be accessing and creating many documents / files. It is necessary for you to organize these files carefully on your computer so that you can access them easily later. You should create a folder on your computer with the <name of the topic> that you would like to create OER on; this can have sub folders for ‘Text OER’, ‘Image OER’ and ‘Audio Video OER’ for saving your save your text, image, audio and video files respectively. By organizing your files and folders carefully on any topic, you are creating what can be termed as a ‘Personal Digital Library’ on that topic. Having personal digital libraries allows you to access and re-use OER easily and effectively. You could instead create sub folders for different sub-topics for your topic and save your files based on the sub topic. For instance, the topic 'energy' could serve as the name of your folder, within which you could create sub-folders for heat, light, magnetism, electricity etc. You should think about the way you would want to access your OER later, and create the sub-folders (and sub sub-folders) on basis of this hierarchy.
In the last chapter on ‘Publishing OER’, we will explain how you can upload these resources on the world wide web, which can be considered as the ‘Global Digital Library’ accessible to anyone with connectivity.
Accessing text OER repositories
An OER creation process begins with reuse of existing OER; the Internet is a rich source of text OER. It is important to access OER while creating your own because you cannot use content not licensed for reuse. You could either access popular known OER repositories or you could search the internet for resources you want. A browser is needed for accessing the internet, a free and open source browser is Mozilla Firefox.
Search from known repositories
One method of accessing existing OER is to search some text repositories. The most popular text OER repository is the digital encyclopedia, Wikipedia. You can search for your topic in Wikipedia, by simply typing this text in the search bar. We will do this for ‘Digital Story Telling’ (DST) which is the OER proposed to be created as an exemplar by this tool-kit.
Wikipedia page

Digital Story Telling page on English Wikipedia


Wikipedia is available in more than hundred other languages, so you may also be able to search for text OER in your native language.

Other popular OER sites include http://www.wikieducator.org, https://oercommons.org. A list of OER sites is available on http://www.searchoer.com/list-of-oer.html.
Searching the web for OER
In addition to accessing OER on Wikipedia, you could also use a search engine such as Google search engine or DuckDuckGo search engine to access information. You could look for information by simply typing in Digital Story Telling in the search bar of the search engine; shown below are examples of how a search for "Digital Story Telling" would look like.
 |

|
|---|
The search engine will retrieve web pages for your topic that are both OER and non OER and you need to check each result you want to use, if it is OER.
When you visit any site returned by the search results, you need to look for copyright information to ascertain that the resource is OER and you can re-use it. If the resource is not explicitly declared to be an OER (allowing you to re-use), you should not use it in making your OER.
Introducing OER as a criteria in your search

Search engines allow for search results to be filtered and displayed by license. You can do this by specifying OER as a criteria while setting your search preferences. In Google search you need to select Settings → Advanced Search. In Advanced Search, you can select Usage Rights as ‘free to use, share or modify, even commercially’ to get OER that you can re-use with or without modification.
Popular OER repositories
Some of the large-scale repositories created through the OER movement include:
You should refer to these, while creating or re-purposing your OER. These repositories have OER in different formats, not only in text format. You should refer to them when you access image, audio and video OER repositories in subsequent chapters.
Pages or articles listing OER repositories
You can also get a list of OER repositories from the following web pages:
- Wikipedia
- WikiEducator
- COL Workshop on OER
- DiscoverEd from the Creative Commons
- Edutopia
- Nova Library
You should search for OER for the topic you have selected. You could download documents, web pages that you think you will use for creating and re-purposing OER on your topic, on relevant folders of your personal digital library. These sub-folders could be created by OER format (text, image, audio, video) or by concept- sub concept or any other taxonomy that you find meaningful.
Creating a text OER - a concept map
Concept maps are an effective way of creating a textual resource that can be organized graphically, in the form of a map or tree of ideas; it provides a pictorial overview of the concepts, related concepts / sub-concepts for a topic. A concept map helps you to create a textual OER with possibilities for linking to additional resources, adding annotations as well as graphically organizing ideas through links. A concept map can also be used to plan and design the OER by identifying areas of resource requirements as well as linking to additional resources, serving as a blue print for OER development. Concepts acquire power and meaning when they are connected to other concepts. Hence, organizing the concepts relevant to your topic is an important first step of OER creation.
Freeplane is a FOSS application that can be used to create concept maps; this toolkit will introduce you to use of Free plane and various functionalities.


In the custom distribution of the Ubuntu operating system, accompanying this toolkit, all FOSS applications have been bundled. To open Freeplane, select Applications → Office →Freeplane.
Inserting nodes
To learn working with Freeplane, we will start creating a concept map for Digital Story Telling; you will see above that Freeplane has opened a window with a box with text "New mindmap". This node, also called the "root node" will contain the core idea/ theme of the resource. Additional ideas are added by adding more nodes, called child nodes. The concept map gets built by adding further child nodes, for topics and sub-topics. Use the ‘insert’ key to create a ‘child node’ this is a sub-concept of your current concept. Use the ‘enter’ key to create a ‘sibling’ this is a parallel concept to your current concept. Thus you can create a concept map with knowing just two functions – add child node (insert) and add sibling node (enter).


As a part of this toolkit, we have developed a concept map on digital story telling. Concept maps can be stored on your folders; they are saved with an extension ".mm". We have created a concept map called Learning Digital Story Telling.mm and saved it on our folder for text resources as part of the personal digital library for digital story telling. The extension .mm stands for mindmap. Our map has nodes for the ‘why’, ‘what’ and ‘how’ of DST, with sub-nodes.
Likewise, please create a concept map and save it with the same name in your folder you have created with your topic name. Note that simply saving the file will save it with the name you have given in the root node. Create the sub-nodes for each node as per your imagination / thinking about the topic.
Inserting hyper links
Did you notice the red arrow in the root node of our concept map? This main node has a hyper-link which opens the wikipedia page on DST. You can embed a hyper-link on a node, such that clicking that node will open a page on the Internet or a file on your computer. This connects a node on your map to related resources you may want the reader to access.


In our Learning Digital Story Telling.mm concept map, we have inserted a hyper-link for the main node ‘Learning Digital Story Telling’. Move your cursor to this node and select Edit → Link → Add or Modify hyperlink (type). You can also use the keyboard shortcut CTRL-K. Freeplane will open an input bar. We will type in our webpage address https://en.wikipedia.org/wiki/Digital_storytelling into this input bar
You should identify a useful web resource for any one node. You should similarly insert this hyper link for that node following the same steps. Note that Freeplane provides a pink arrow in the node, to signify that the node has a hyper link. Clicking on this pink arrow will open the web page that is linked, when there is an internet connection. In this manner, your concept map OER can provide links for each node, to access information on the world wide web, enriching the OER.
Inserting a note
In our Learning Digital Story Telling.mm concept map, you will also see a yellow label beside the arrow and if you place your mouse over the yellow label, you will see a note description. To add a note, you can click on the node, go to View--->Notes--->Display note panel; this will open a window in which you can type your notes. You can change the position and size of this note window.

You should practice inserting a note for any one of your nodes in your concept map, following these steps. In this manner, your concept map OER can provide notes for each node, to provide richer and more detailed information for that node. (Advanced tip – If you export your concept map as a ‘odt’ or ‘doc’ text file, your note will be added to the section created for the node).


The aim here is to get you started with concept map OER creation using Freeplane. For advanced functions, you should refer to the User Manual for the application. The Freeplane tutorial is available within Freeplane itself, which you can access anytime by pressing the F1 function key.
Saving your concept map
By default your concept map is saved by Freeplane as a '.mm' format file. However, the concept map can be saved in many other formats. You can export the map to a text document file (in .odt or .doc formats). You can also export the map as an image (in .png or .jpeg formats) or as a web page (in .html format). We will discuss how you can use this image or html pages in the subsequent chapters. The images below show you how to save and export concept maps in Freeplane.


Freeplane on other platforms
Freeplane is also available on Microsoft Windows, on https://freeplane.en.softonic.com/download. In Android Mobiles we can view concept maps through Freeplane reader.
https://en.wikipedia.org/wiki/Freeplane has more information about Freeplane and https://freeplane.org is the official website of the application.
This information is also provided in an Annexure to this toolkit. For subsequent FOSS applications, please refer to the Annexure for this information.
You should create a concept map for your topic. Add nodes and child nodes. Insert hyper links to web pages and notes as you think will make your map richer and more useful. Save the concept map in your personal digital library, you could save in a sub folder called 'concept map'
Creating text OER as a text document
You are familiar with typing text to create a text document, you may have used a software like Microsoft Word. We will use the FOSS Office Suite application called LibreOffice Writer (LibreOffice Writer) to create a text document.
Open LibreOffice Writer on your computer, through Applications → Office – LibreOffice Writer.


You should create a ‘new’ document, giving the title as the topic name of your OER. We have created a document called- ‘Learning Digital Story Telling’ and this is saved in the personal digital library folder. You should save this document, on your folder created for your personal digital library. Saving this document, creates a text document “Learning Digital Story Telling.odt” where odt stands for Open Document Text. The concept map that you have prepared for your topic can give you a plan for writing the text document. You will also refer to the OER text resources from Wikipedia and other sites for your topic that you have searched.

You can similarly create your own text OER. You will learn the following basic functions in a text editor which you need to use in creating OER.
- Entering and formatting text
- Inserting a numbered list
- Inserting a table / box item
- Insert page numbers
- Insert section headings
Entering and formatting text
You can enter text by simply typing into this document. In our document, we have entered text under following four paragraphs
- Why Digital Story Telling
- Introduction to Digital Story Telling
- Creating a simple text story
- Adding a concept map on ‘Digital Story Telling’
UNICODE font
It is important that you choose only UNICODE font for the text entry. Non-UNICODE fonts are likely to not render correctly on a web page. Ubuntu GNU/Linux uses only UNICODE fonts, hence you will not have any problems. However if you are using Microsoft Windows, your system may have non-UNICODE fonts, which you should not use.
Formatting text
You can format your text in many ways either through Format--->Text or Format--->Character or by changing the parameters on the tool bar. Click on the Format menu option of LibreOffice Writer to see the options. Commonly used formatting includes selecting text to highlight it through the ‘bold’ ‘italic’ or ‘underline’ functions, changing the font color or size and adding text highlighting. All these functionalities are also available on the tool bar.


Here we will take a section from our document and format to make it bold, italicized or underlined. Remember to select the text before clicking on these options.

_using_LOW.png)

Inserting a numbered list
You may be making a list of items in your document. Instead of manually entering the numbers, you could use automatic numbering.
You can select Format → Bullets and Numbering and select the numbering type you want.
In our document, we have created a numbered list under Objectives.


Hit the ‘enter’ key to go to the next line with the next number. For indenting and sub numbering, you can use the ‘Tab’ key.
Inserting a table / box item
You may want to put a specific information inside a box to highlight it separately. You can also use box to provide additional information, which the reader may skip, if they want to read the article quickly.
You can select Table. Select number of rows and number of columns as ‘1’. You will get a box (which is nothing but a table with one row and one column). Enter your text in this box.
In our document, we have created a box for providing the license information for the document.

You should create a box for providing similar license information for your document. You can insert this box at the beginning of the document.
Inserting a hyper-link
You can provide a hyper link in your text document to a web page. Clicking this link in the text document will open the web page (this requires internet connectivity).
We will now open our 'Learning Digital Story Telling.odt' and insert a hyper-link to the Wikipedia page which discusses 'digital storytelling'. We will type "Read Wikipedia page on 'digital storytelling' in the text document. We will select the text 'digital storytelling' and then (step 1) select Insert -> Hyperlink. In the window that opens, we need to (step 2) click on the 'Internet' icon on the left frame, and then type the web page address (URL), to specify the web page https://en.wikipedia.org/wiki/Digital_storytelling.


Inserting hyper links in relevant places in your text document, allows you to lead the reader to web resources that supplement or complement the information you are providing in your text OER document. This way you need not provide information that is already publicly available, and instead focus on information or a perspective that is not available, in your document.
It is useful to have page number and name of your document on every page, this is specially useful if the reader wants to read a print copy. LibreOffice Writer allows you to easily insert this information at the bottom or top of each page. This can be done using Insert--->Footer. Once a footer has been inserted, you can go to the bottom of the page and insert multiple fields of information using Insert--->Fields. You can type any text in this footer, it will come on all pages. Other than page number, other dynamic information you can provide is the date/time stamp of the document.A similar method can also be adopted for inserting a header as well. Page numbers can also be inserted directly using Insert--->Page Number.
In our document, we have inserted the document name and page number in the footer.


Insert section headings

It is sometimes useful to create sections in a document to allow for east reading and referencing. This can be done using the Styles--->Styles and formattingoption. Select the text you want to mark as a section and then go to the Select the heading level (Heading 1, 2, 3, etc) you want to set it at. Headings can be at multiple levels to indicate sub-points. You should create similar section headings in your document.
Continuing editing text OER
You can re-open this file from this folder anytime to continue editing your text document using LibreOffice Writer. You can add, move, modify and remove text. You can format your text in different ways. In this way, you can keep enhancing your text OER on your topic regularly.
Note that this tool-kit is not intended to provide the complete user manual for the applications explained. The aim here is to get you started with OER creation using the tool. For advanced functions, you should refer to the User Manual for the application. The LibreOffice Writer User Manual is available on https://help.libreoffice.org/Writer/Welcome_to_the_Writer_Help
Short videos on LibreOffice Writer are available on http://spoken-tutorial.org/tutorial-search/?search_foss=LibreOffice+Suite+Writer&search_language=English. Each video is less than 10 minutes and focuses on select features of the application. The information about user manuals and tutorials is provided in Annexure for all FOSS applications used in this toolkit.
You should create a text document for your topic. Add sections for different ideas related to the topic. Insert your concept map image in the document and write about it. Insert hyper links to web resources, as you think will make your document richer and more useful. Save the text document in your personal digital library, you could save in a sub folder called 'text document'
Creating a slide presentation (LibreOffice Impress)
A slide presentation is a useful method of sharing information, or in training or teaching. While a text document is useful as a descriptive resource, a presentation can be more useful as a summarized view. A presentation can be created from scratch or as a summary of a text OER. Like in a text document, you can embed images, audio links, video links in the presentation. You can do a ‘slide show’ of this presentation.

We create a slide presentation - ‘Learning Digital Story Telling’ using LibreOffice Impress (LibreOffice Impress).
Open LibreOffice Writer on your computer, through Applications → Office → LibreOffice Impress.
You will learn the following basic functions in LibreOffice Impress which you need to use in creating OER.
- Managing slides
- Entering text
- Formating text
- Inserting a numbered list
- Inserting a text box
Managing slides
A slide presentation is a document that consists of slides, each slide can be considered as a ‘page’ which will contain a coherent set of information, usually presented as bulleted points.

You can create a slide presentation with as many slides (Slide → Create New slide) as you want using LibreOffice Impress. You can duplicate a slide (Slide → Duplicate Slide) if you want to create a slide using the contents (or the format) of another slide. You can move slides across using the drag-drop in the slide sorter view (View → Slide Sorter).
Entering text, formating text, inserting a numbered list and inserting a text box
A useful feature of the LibreOffice suite is that the Writer and Impress products are fully integrated and have the same interface.

When you select File → Open, you get to chose if you will create a text file or a presentation file. Hence, these four functions mentioned above for LibreOffice Impress are identical to perform as was explained in the LibreOffice Writer section.
In our slide presentation, we have entered text (by simply typing the text) and formatted text (changed font colour – Format → Character → Font Effects → Font color) on the first slide.
In the second slide, we copy pasted the objectives from our text file. We created a numbered list (Selecting the text and then → Format → Bullets and Numbering → Numbering Type).

We have also inserted a text box (Insert → Shape → Basic → Rectangle) at the bottom of the slide and typed the text ‘Can you suggest more possible objectives of DST?’. The background colour in this box is blue, to change the colour, select Format → Style → Edit Style → Area. Select the colour you want (white is a good background). Similarly, if you do not want a border for the text box, you can remove it. Select Format → Style → Edit Style → Line → Style → None.
You should create a slide presentation for your topic. Add slides for different ideas related to the topic. Insert text boxes and images in the presentation document. Insert hyper links to web resources, as you think will make your slide presentation richer and more useful. Save the slide presentation in your personal digital library, you could save in a sub folder called 'slide presentation'
Text OER editors on other platforms
- Freemind is an alternative to Freeplane for making concept maps. Its features and interface is similar to Freeplane.
- An alternative to LibreOffice for creating text resources and slide presentations is OpenOffice.org. OpenOffice.org also has a similar Writer and Impress applications.
- gedit is a plain text editor. If you are copying content from a website into your LibreOffice Writer document and the formatting will get lost. You could instead copy from the website and paste into a gedit file and then copy from the gedit file to your LibreOffice Writer document, this will remove all formatting and help you organize the text more easily.
- LibreOffice Writer is also available on Microsoft Windows, on http://www.libreoffice.org/download/download. LibreOffice Writer is part of the LibreOffice suite on Windows. Wikipedia has more information about LibreOffice Writer.
- LibreOffice Impress is also available on Microsoft Windows, on http://www.libreoffice.org/download/download. LibreOffice Impress is part of the LibreOffice suite on Windows.
- Short videos on LibreOffice Impress are available here.
- In Android Mobiles we can view text documents through "OpenDocumentReader" App or WPS Office App
See Annexure for more information on alternative applications and platforms.