Explore an application/Print version
Explore a computer

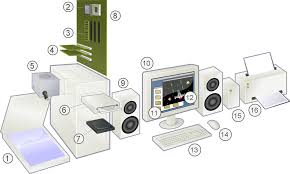
ICT refer to an entire range of devices that use digital methods to process represent and communicate information. The desktop computer, laptop, tablet and the smart phone are all ICT devices. Let us explore below the parts of a desktop computer.
Parts of a computer
Computer peripherals

| 1. Scanner (nowadays scanning function is available in the mobile phone, hence a separate scanner is not often used) | 2. CPU (Central Processing Unit): does the processing work of the computer. It contains “chips” which determine the speed of computer. For example i5 is a chip manufactured by Intel. |
| 3. RAM (Random Access Memory): This is the storage space in the computer. Temporally it will store frequently used applications and data in it, to increase the speed of the computer. The size of RAM determines how fast the computer works | 4. Expansion cards. |
| 5. Power supply unit, which supplies power to the computer. | 6. CD Drive – External storage device. This is now becoming obsolete as USB storage devices / 'pen drives' are becoming more popular |
| 7. Hard disk: Hard disk stores the user data as well as the software. This storage capacity of the computer is specified in terms of GB (Gigabytes), 1 GB = 109 bytes or 1000,000,000 bytes | 8. Motherboard: This is where all instructions are wired together and helps the computer work |
| 9. Speakers, these amplify any audio played on the computer | 10. Monitor, for displaying our instructions to the computer and its responses. Monitor consumes quite a bit of electricity, so should be kept in the 'off' mode when the computer is not being actively used |
| 11. Operating System. An operating system (OS) is system software that manages computer hardware and software resources and provides common services for computer programs. All computer programs (application software) require an operating system to function. | 12. Application Software - An application program (app or application for short) is a computer program designed to perform a group of activities. Examples of an application include a text editor, a spreadsheet, a web browser, or a photo editor. The collective noun application software refers to all applications collectively |
| 13. Keyboard, similar to a type writer keyboard. It is an input device, used for typing instructions (text, numbers, special characters) to the computer. | 14. Mouse, another input device, that works on the Graphical User Interface of the computer |
| 15. External Hard Disk, additional storage space. | 16. Printer, output device |
Hardware: Parts 2-8, 10, 13 and 14 constitute basic hardware and are parts of all computing devices. These have now all been combined into one unit in a laptop or mobile. Largely, the hardware is divided into input devices and output devices and storage functions.
| Input Devices | Output Devices |
|---|---|
| Mouse | Monitor |
| Keyboard | Projector |
| Microphone | Printer |
| Scanner | Speakers |
| Web cam |
Using the keyboard
The keyboard is usually the main device to providing instructions to the computer. The keys on the keyboard can be divided into several groups based on function:
- Typing (alphabets and numbers) keys: These keys are arranged as in a traditional 'QWERTY' typewriter
- Special purpose keys: These keys are used alone or in combination with other keys to perform certain actions, such as CTRL, ALT, ESC, Function keys etc.
- Navigation keys: These keys are used for moving around in documents / editing text. They include the arrow keys, HOME, END, PAGE UP, PAGE DOWN, DELETE and INSERT.
- Numeric keypad: The numeric keypad is handy for entering numbers quickly. The keys are grouped together in a block like a conventional calculator or adding machine.
Special typing keys
SHIFT: Press shift in combination with a letter to type an uppercase letter. Press shift in combination with another key to type the symbol shown on the upper part of that key.
ENTER: Press enter to move the cursor to the beginning of the next line.
SPACEBAR: Press the spacebar to move the cursor one space forward.
BACKSPACE: Press backspace to delete the character before the cursor or the selected text.
ALT: Activates the menu of the application. Can be used along with arrow keys to select applications
The navigation keys allow you to move the cursor, move around in documents and edit text. The following table lists some common functions of these keys.
LEFT ARROW, RIGHT ARROW, UP ARROW or DOWN ARROW : Move the cursor or selection one space or line in the direction of the arrow.
HOME : Move the cursor to the beginning of a line.
END: Move the cursor to the end of a line.
CTRL+HOME: Move to the top of a document.
CTRL+END: Move to the bottom of a document.
PAGE UP: Move the cursor or page up one screen.
PAGE DOWN: Move the cursor or page down one screen.
DELETE: Delete the character after the cursor, or the selected text; in Windows, delete the selected item and move it to the Recycle Bin.
INSERT: Turn insert mode off or on. When insert mode is on, text that you type is inserted at the cursor. When insert mode is off, text that you type replaces existing characters.
| Storage devices |
|---|
| External HDDs |
| Pendrives |
| DVD/CD |
Internet connectivity devices: A modem is used for connecting the computer- laptop or mobile to the internet, through a broadband connection. In a networked environment, this modem will be used together with a Local Area Network (LAN). Your school ICT Lab should be configured as a LAN, to get the benefits of local networking, such as sharing data (files) and services (printing etc).
Peripherals: Speakers, external hard disk and printers are important peripherals that are used for storing and output and these can be connected to the computer or laptop.
Safely operating a computer
Nowadays computer usage is increased all over the world. Safely using and maintaining computer/computers lab is very important. Safely operating the computer involves both the hardware and software.
Hardware Safety
1. A proper electrical circuit and good quality wiring is essential for the physical safety of the computer as well as the user's safety.
- Make sure electric earthing is done properly
- Always run your computer on a UPS as this will help protect it from electric surges.
- If you don't have UPS at least use a spike protector. It will protect against power surges. This is essential, especially if using a desktop computer.
2. Computer lab or room should always be clean without dust.
- Clean the floor regularly
- Clean the computers by using dry cloths
- Remove the non-working computers or peripherals from the lab to avoid dust.
3. If you are going to open the CPU cabinet, do so only after powering off the computer.
4. Never have liquids or solids near a computer you are working on.
5. Be careful when plugging in USB, ethernet, speakers, printer etc. into your computer. Ports such as USB and Ethernet can easily be damaged from careless placement. These repairs can be costly and these ports are a necessity.
6. Don’t leave the computer without shutting down it, after your work completes.
Software Safety
Nowadays we are using many applications software in our works and many times we will install applications without knowing about it. This is the main cause to damage our computer software regularly.
1. Before installing any applications in your computer, you should know about its functionality and use.If you are not sure about it please contact the concern person and do it.
2. Make sure you know what you are doing while dealing with the software of your computer.
3. Regularly take back of your computer - at least once in a three months.
4. Remove the unwanted software which installed in your computer.
5. If the computer is used by multi users, create separate login account for each of them.
5. If your computers is using by multiple users, don't share the administration password with all of them.
6. Use the firewall to protect internet misuse from the users.
7. Always need to shut down the computers from the software.
8. Keep updating your computer software and application software for better performance.
Different Computer ports
A computer port is also called as a Communication Port as it is responsible for communication between the computer and its peripheral device. There are two kinds of ports - Male port and Female port. The female port has the necessary indentations for the male port to be connected. The images below describe the two kinds of ports.
- Male and female ports

Female VGA connector

Male VGA connector


Here we will give brief introduction to different types of ports along with their applications.

Different Ports in Computer/Laptop

- USB Port :USB is an abbreviation of Universal Serial Bus. The USB port is the most widely used port. The USB lets you to connect several types of devices to your laptop or computers such as external hard drives, pen drives, USB modem, cameras, keyboard, mice etc. It also helps in charging mobile phones and such small devices as it supplies small amount of power the connected devices. When the standard USB version 2.0 offers a transfer speed of 480 Mbps, the latest version 3.0 offers higher speed of 5Gbps.
- Network Port or RJ 45/Ethernet Port: This port is basically use it for connecting internet through LAN cable.
- Audio Port : It is the most commonly found audio port that can be used to connect Headphones, mic and external speakers.
- Memory Card Reader: This port is available only in Laptops. which is pretty common on modern day laptops as it allows you to insert any kind of memory card into your system.This way you can avoid connecting USB cables to transfer the files.
- VGA port : is an abbreviation of Video Graphics Array. This is used to connect your system to any analog monitor, LCD TV and projectors.Nowadays VGA ports are gradually being replaced by HDMI port.
- HDMI port : HDMI is an abbreviation of High Definition Media Interface.HDMI is a digital interface to connect High Definition and Ultra High Definition devices like Computer HD monitors, HDTVs, Blu-Ray players, High Definition Cameras etc. All old laptops or computers will not have this HDMI port.

Learn Ubuntu
Introduction
Operating system is also called system software as it works with the hardware. Every computer must have an operating system to run other computer programs. Even your mobile phone will have an operating system. Operating systems start automatically when you turn on the computer, this process is termed as booting. All the other computer programs like programs to paint, type, listen to music, learn mathematics etc., are called application software or 'Apps' which work with the system software.
Ubuntu is a ‘Free and Open Source Software’ (called FOSS in short) operating system. You may be familiar with Microsoft Windows operating system or used an application called Adobe Reader. Windows or Adobe Photoshop are ‘proprietary’ , meaning they cannot be copied or shared or modified by us; FOSS applications are licensed under the ‘General Public License’ which allows all of us to share the software freely, we can also modify the software as per our needs. Hence it is important to use FOSS in our schools. Teachers must learn and teach FOSS and avoid use of proprietary software, since it is not possible for all to access and use proprietary software, and not possible for anyone (other than the vendor) to study or improve the software.
Since all the software like Office suite, web browser, educational software can be bundled with Ubuntu GNU/Linux operating system, all these applications can be installed on the computer at one time. On proprietary software Windows, each software has to be separately installed, which can make it cumbersome and time consuming. Operating systems use a program called the Graphical User Interface (GUI) to access other computer with a mouse. The popular operating systems are Microsoft Windows, GNU/Linux and Mac OS. In this section, you will learn about the functions of an operating system, using an example of Ubuntu GNU/Linux operating system. With this learning, you can also operate a computer with Windows of Mac operating systems. Remember that we are focusing on learning the processes of any software application, so that we can, with that learning, use similar other applications.
Basic information
| ICT Competency | Ubuntu GNU/Linux is an operating system for the computer. The operating system is the foundation, which supports the interface between the user and other software applications. Hence learning Ubuntu constitutes basic digital literacy. |
| Educational application and relevance | There are a large number of freely shareable educational tools on Ubuntu pertaining to mathematics, science, social sciences, languages etc which can be used in all schools. There are a large number of additional freely shareable tools on GNU/Linux, such as IBUS which support word processing in more than 50 languages, including all languages used in Telangana such as Telugu, Urdu, Kannada, Tamil, Marathi, Hindi etc. The ORCA screen reader can be used by the visually handicapped for reading content on the computer screen. Scribus can be used for for desktop publishing. |
| Version |
Once in six months, Canonical releases a new version of the Ubuntu. The first Ubuntu release was in April 2004. The recently released version of Ubuntu is 18.04 (as April 2018), but Ubuntu 18.04 is the latest LTS (Long Term Support) version, which you will use. |
| Configuration | To install and use Ubuntu on your computer, it should have following configuration:
Processor: 2 GHz dual core processor or better If your computer does not match the above hardware specifications, or is old, install Lubuntu OS. Lubuntu is an Ubuntu based distribution meant for low hardware configuration computers. Lubuntu is a fast and lightweight operating system. It has low hardware requirements. Download Lubuntu ISO 32 bit from here and 64 bit here. |
| Other similar applications | Mint, Debian, OpenSUSE, and Fedora are popular Linux distributions. |
| The application on mobiles and tablets |
Ubuntu is available on select Mobile phones and tablets |
| Development and community help |
There are many community forums are helping Ubuntu users. |
Overview of Features
Ubuntu performs all the basic functions expected of an operating system.
- It allows the user to login and logout and keeps the user data secure within that login
- Users can browse the folders and files using a file browser
- Users can use different applications on their computer for creating and accessing files. This includes accessing, creating, editing text, image, audio, video, animation files.
- Users can connect to other devices - printers and scanners, mobile phones, pen drives, external hard disks and other storage devices, external DVD writers etc.
- Users can connect to the internet.
Ubuntu is shipped with many applications relevant to education including GCompris, KDE Edutainment Suite, Ubuntu Menu editor, LibreOffice, Gnome Nanny etc. Ubuntu is available to freely download. Edubuntu's default GUI is Unity while GNOME is also available.
Working with the application
Starting and shutting down your computer
- Starting and shutting down your computer
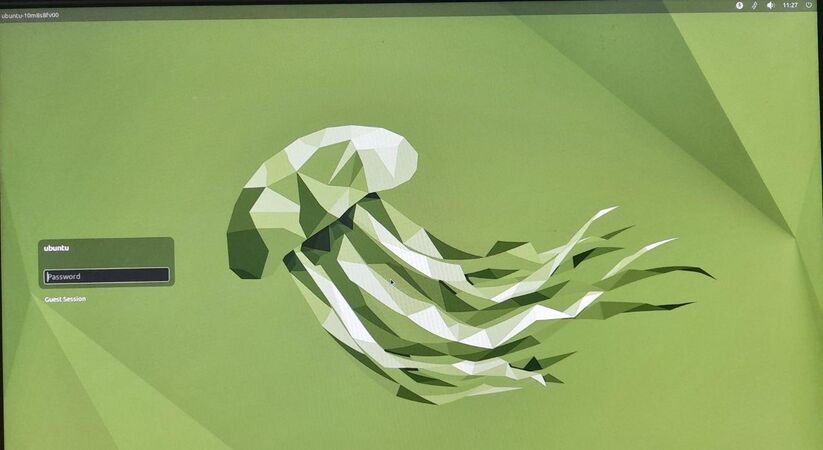
Ubuntu Login screen
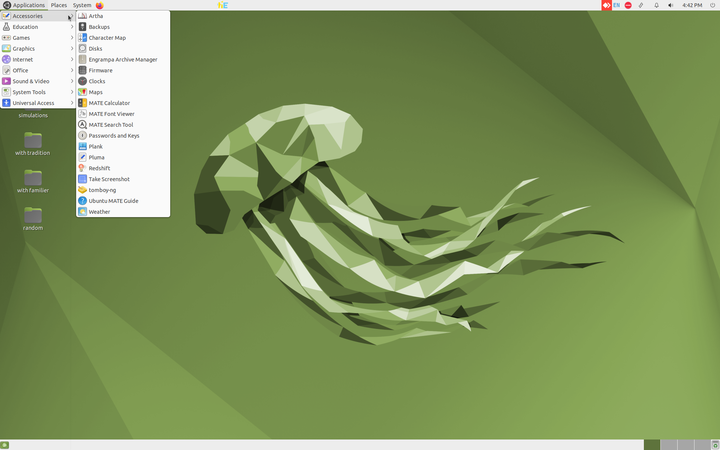
Ubuntu home screen
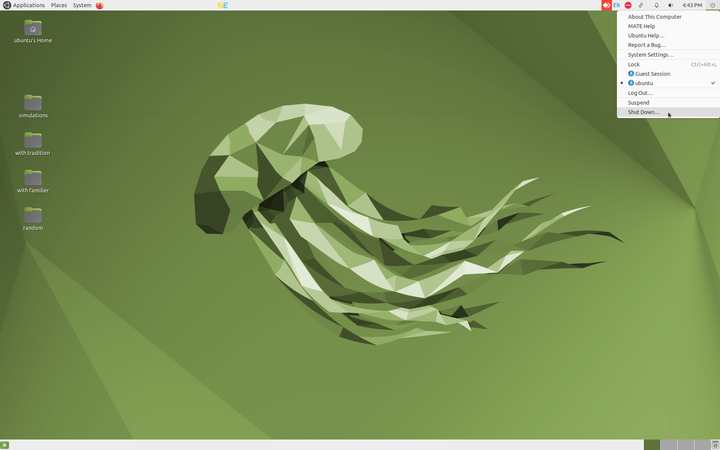
Shutdown the computer


The above images show you the basic Ubuntu interface.
- Logging in: When you switch on your computer, you will see a login screen. Login with the user id (name) and password created by the system administrator. Ubuntu allows you to have a user interface in your own language, by specifying your language as the user language, during your user id creation. Once you have logged in, the home screen will appear.
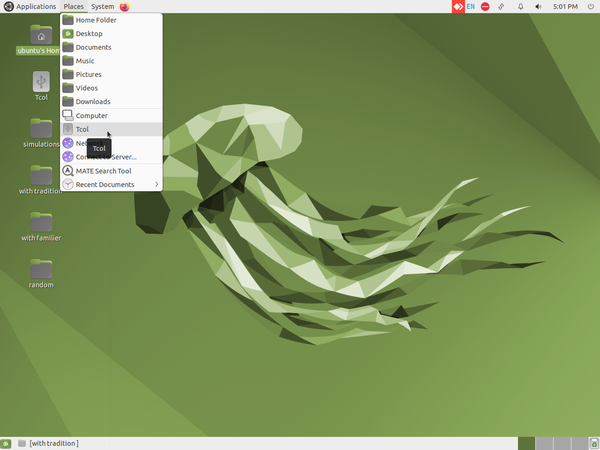
- Home screen: The second image shows you the Ubuntu home screen. The applications menu at the top left has a list of all the programs (apps) on your computer. The Places menu, next to it, lets you access the 'places' on your computer including the hard disk, CD/DVD or pen drives. Digital cameras and MP3 players are also listed here when plugged-in. The Applications menu has sub menus for Education, Office, Internet, Games etc. Each sub-menu has many applications. You can try to learn them yourselves by clicking and selecting options.
- Shutting down the computer: What will you do after you have finished your work? You have to turn off the computer. You must turn it off by clicking on the last button on the right hand top corner and select shut down. Never turn off the power button without shutting the computer properly.
Changing Ubuntu interface (Mate Tweak)
- After login into your Ubuntu and if it is not showing Applications and places menu option, Just open "Settings->System setting". Another dialog box will open in that click on "MATE Tweak" option
- After login into your Ubuntu and if it is not showing Applications and places menu option, Just open "Settings->System setting". Another dialog box will open in that click on "MATE Tweak" option
- After login into your Ubuntu and if it is not showing Applications and places menu option, Just open "Settings->System setting". Another dialog box will open in that click on "MATE Tweak" option
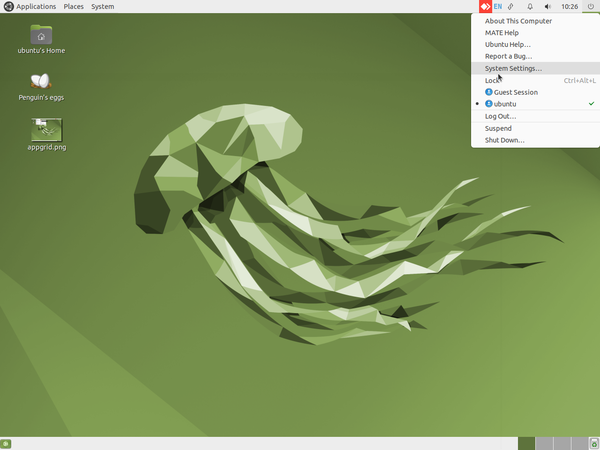
Opening the system settings
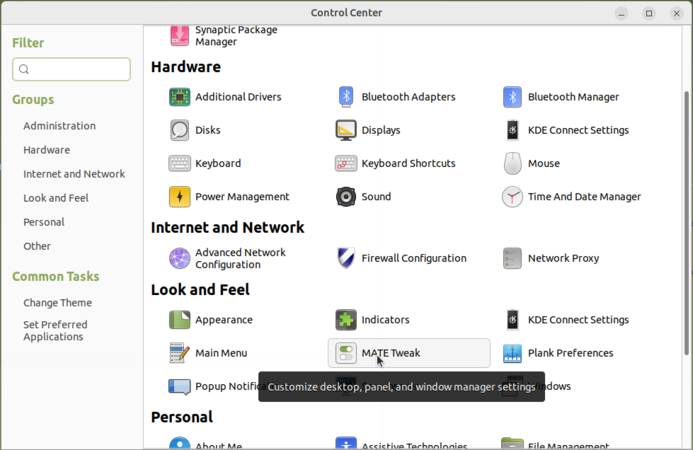
Opening the Mate Tweak


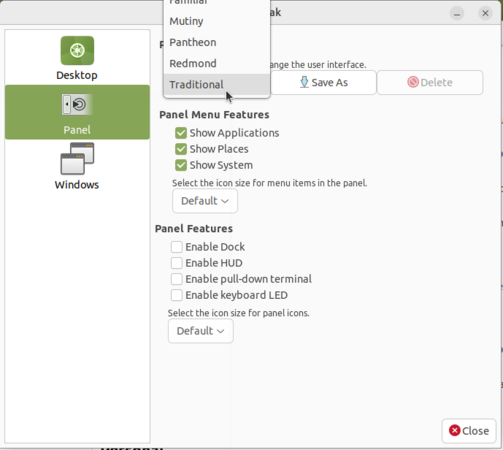
Selecting the panel
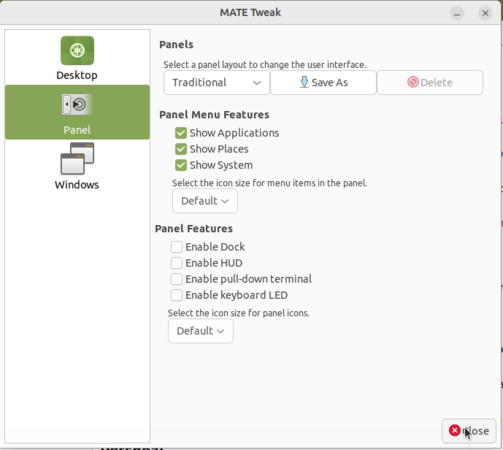
Closing the Mate Tweak


Once you have chosen the option from drop down it will ask you to click on "OK" or "Cancel", Click on "OK" to apply the format
Home page overview
- In home page we can see the below mentioned options,
- Application menu:- You can see the list of software's from this option.
- Places:- You can see the folder locations from this option.
- System settings:- You can see the setting options from this.
- Shortcuts:- You can see the shortcuts created for shortcuts to the top panel.
- Top panel:- It's a panel which includes Application menu, Places, System settings, Shortcuts, Top panel, Ibus language preferences option, Time & Settings.
- Ibus language preferences option:- It's used to change the typing language.
- Time & Settings:- Time will reflect the present date and time. Setting will open the settings options.
- Short cut for Desktop:- Used to go to the desktop directly.
- Minimized tabs:- It will show the list of minimized tabs in your system.
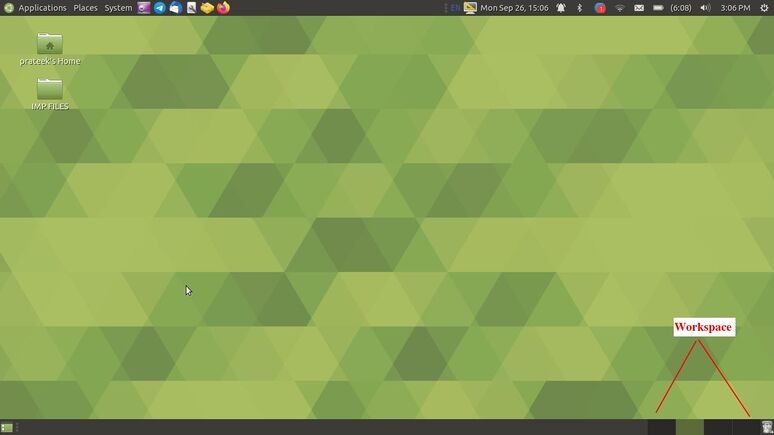
- Down panel:- It includes Minimized tabs, Short cut for Desktop, Workspace and Trash
- Trash:- Trash will work just like recycle bean(The deleted files will be moved to trash).
- Workspace:- It is just like a room where if we change workspace the entire tabs will be kept in previous room and a new room will open with blank home page.
- Home page overview

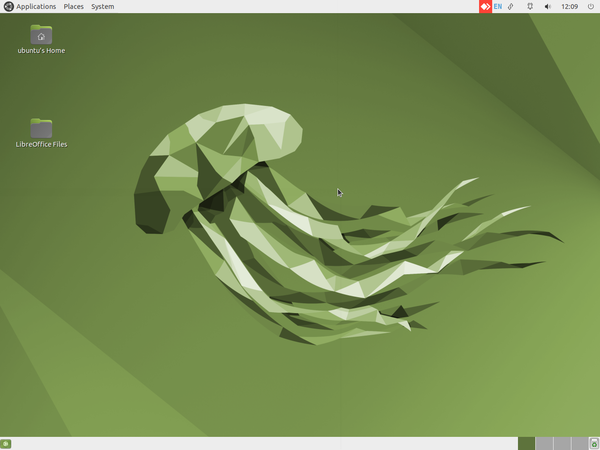
Home screen
Once changed the workspace


Creating and managing folders and files
- Creating and managing folders and files
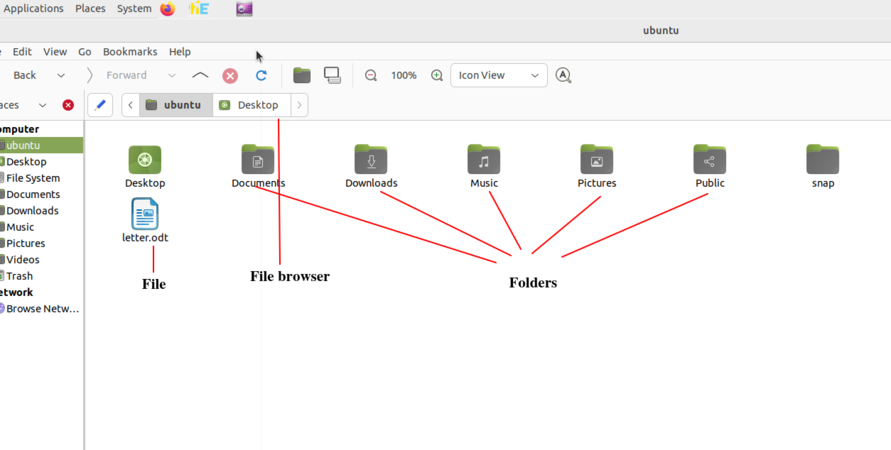
Managing files & folders

- Creating and managing files and folders - When you write an essay or paint something on a paper, you would like to keep it for future, right? You would probably put it in a hard bound folder. Maybe, if you have more than one essay or painting, you would have one folder to hold your essays and one folder to hold your paintings.
- To create new folder right click on your mouse and click on "New Folder". Rename the folder and save your files in it. You can also create many sub folders within that.
- Always give meaningful names for folders, so that you can easily search for them later.
- You can move folders, and files across folders.
- You can create a file by opening a application, and creating a new file to prepare your content. You can create text documents with LibreOffice Writer, Images with Tux Paint etc.
- Creating folders with meaningful name

Creating new folder

Once the new folder created
Giving a meaningful name


- To delete a file or folder right click on the particular file or folder and click on the "Move to Trash" option.
- Deleting the folder or files
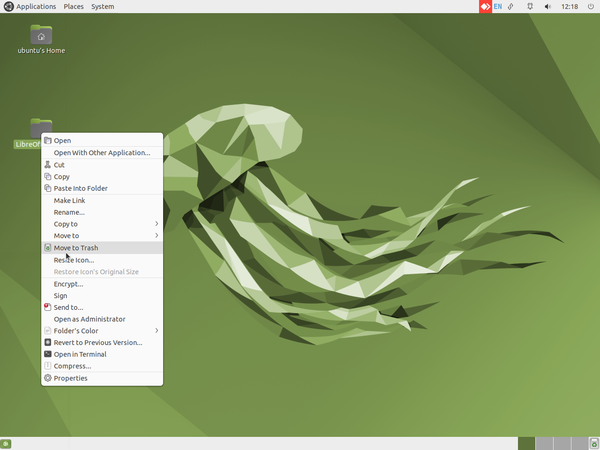
Deleting the folder

- From HOME folder you can search any files and folders which you have saved in your computer, click on search option on the toolbar and type the keywords of the file or folder, it will show the all files contains our searching keywords in your computer. If you have an idea about the location of the file you are searching, you can launch the search from within that folder itself, instead of the Home folder, this will show you a lesser number of files
- Creating and managing folders and files
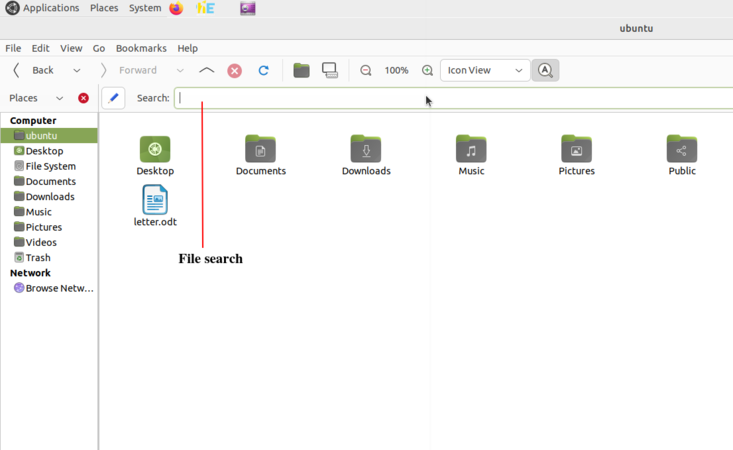
File search

- To access the hidden files of your system open the Home folder and click on "View->Show Hidden Files" or open using the shortcut "Ctrl+H" and if you want to hide a file or folder then click on rename and add".(dot)" before the file or folder.
- Opening Hidden files
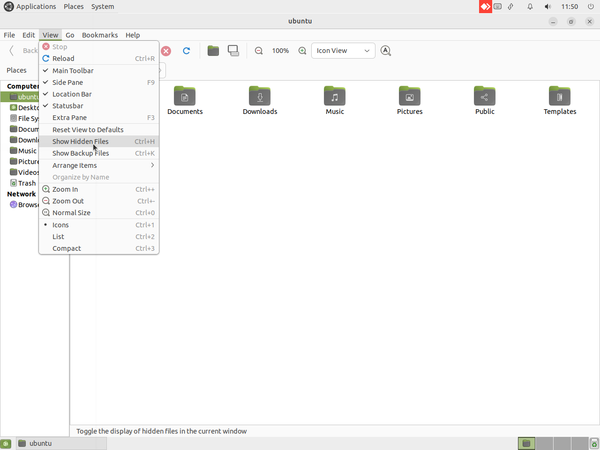
Opening the Hidden Files option
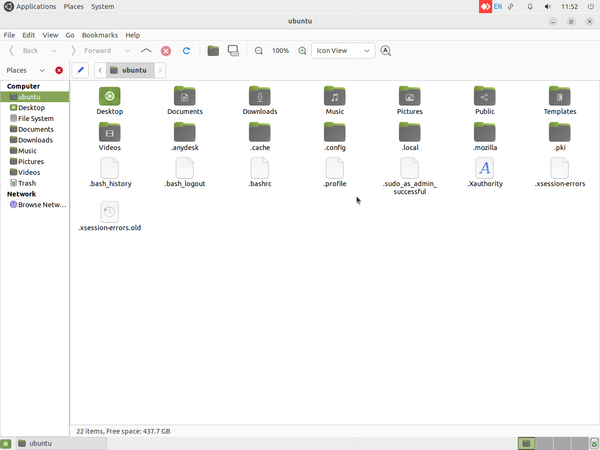
After opening the hidden files


- To access the recent files click on the "Places" option from the top panel and we can see the recently viewed documents fro "Recent Documents" option.
- Accessing recently opened files

Recently opened files

- To create a shortcut of software to the "Top panel" or to the "Desktop" follow the below steps,
- Open the software by clicking on the "Application menu"
- Right click on the particular software
- If shortcut need to be created on "Top panel" click on "Add this launcher to panel", If needs to be created on "Desktop" click on "Add this launcher to Desktop".
- Creating shortcut to Top panel and Desktop

Creating shortcut to top panel and desktop

Opening files by "open with" option
- Opening files with application
Opening files with application

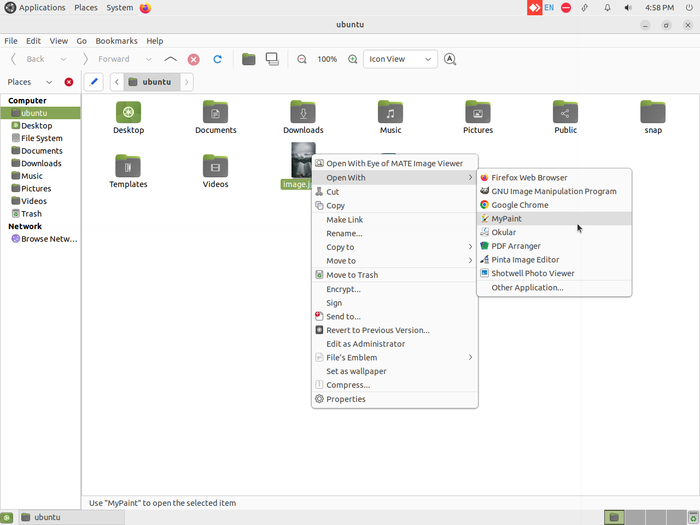
- A file can usually be opened with any given application in Ubuntu which supports that particular file. For example, an image file can be opened with image viewer, gimp, etc. So if you want to open with a application of your choice, right click on file select "Open with" to see the available options.
- File can be opened with multiple application in Ubuntu which support that particular file. For example, an image file can be opened with image viewer and also can be with Gimp, Mypaint, Kolorpaint, Shotwell viewer etc. So if you want to open the file with a application of your choice, right click on file select "Open with" to see the available multiple options.
Import files and folders from external device
- Import files and folders from external device
Access external device

Copy from external device


- You can import files from other devices. You can insert devices such as CDs, DVDs or memory cards into your computer.
- Connect the devices such as pen drives, memory card holders, external DVD drives using a cable, to your computer.
- Click on "Places" from your desktop top panel. You can see your device name.
- Click on your device name to view the files from that device.
- To import files from devices, right click on that file and click on "Copy", then paste it into your computer folder.You can copy audio and video files, that you have recorded on your mobile phone, to your computer. You can edit these files. In the same way, you can copy these and other files from your computer to your mobile phone.
You should periodically take back up of important files on your computer and store it on a pen drive or an external hard disk. So that if the hard disk of your computer has a problem or crashes, you would not lose your data entirely.
| Study how there are different kinds of connecting cables, for different devices / ports on your computer. Use the appropriate cable in each case. You can connect printers, scanners, projectors to suitable ports on your computer. |
Connecting to the WiFi or Wired Network
- To connect to the WiFi or Wired Network click on the "WiFi" symbol from the top panel and make sure "Enable Network" and "Enable WiFi" are check marked.
- Ensuring Enable Network and Enable WiFi are check marked

Clicking on WiFi symbol from the top panel and Ensuring "Enable Network" and "Enable WiFi" are check marked

- If you are connecting through Wired network connect the LAN cable to the computer and you will get a option as "Wired connection 1" below the "Ethernet Network" option. once you click on "Wired connection 1" your system will be connected to the wired network.
- Connecting to Wired Network
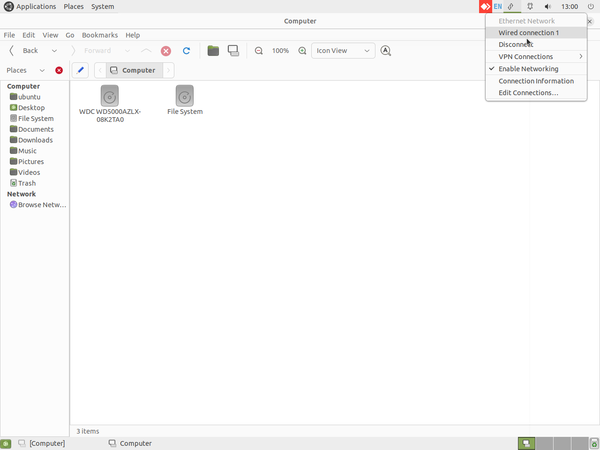
Connection to the Wired Network

Once connected to the Wired Network


- If you are connecting through WiFi click on your WiFi name shown in the list you may asked to enter your WiFi password if the WiFi is protected, Once you enter the password click on "Connect" your system will be connected to the "WiFi" Network selected by you.
![]() Note:Ensure that your computer must have a WiFi drive if you wish to connect through WiFi.
Note:Ensure that your computer must have a WiFi drive if you wish to connect through WiFi.
- Connecting to WiFi
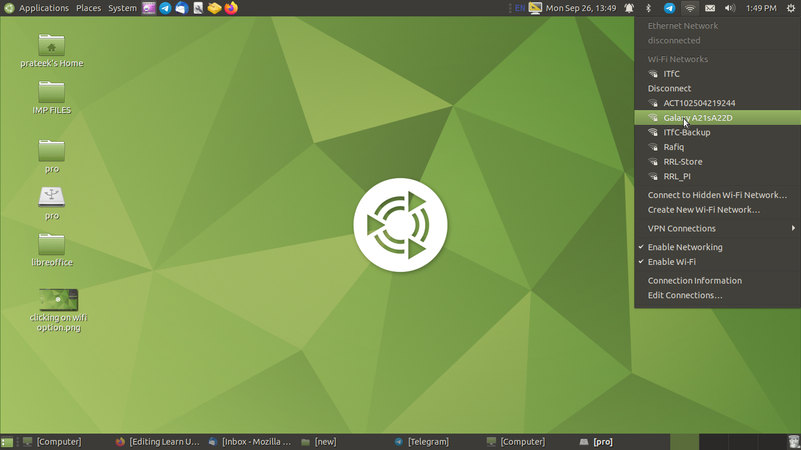
Selecting and clicking on WiFi network name

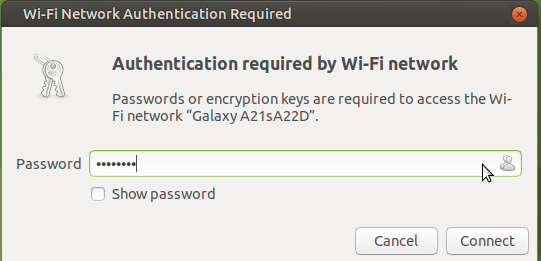
Asking to enter the password
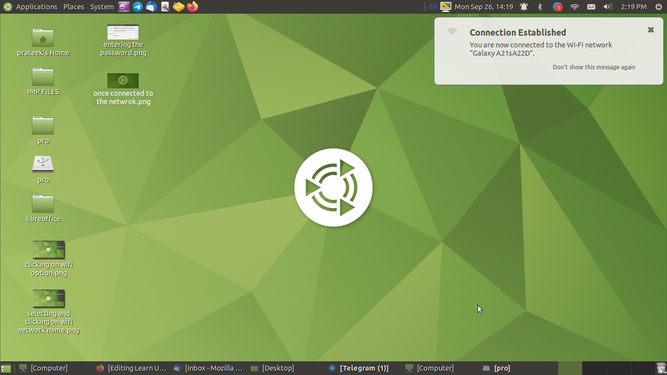
Once connected to the WiFi network


Changing user interface language in Ubuntu
English will be default interface in Ubuntu but you can also use Ubuntu in you local languages like Telugu, Kannada or Tamil.
- Changing user interface language in Ubuntu

Select language support from system settings
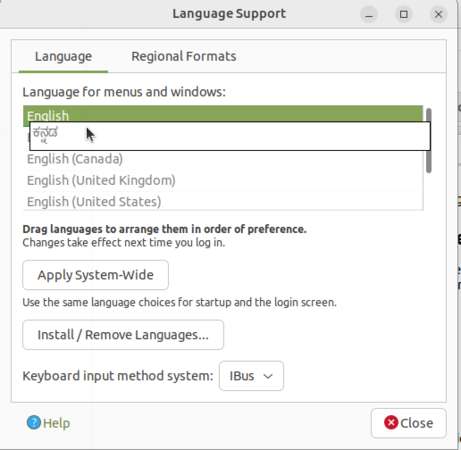
Changing the language from English to Kannada
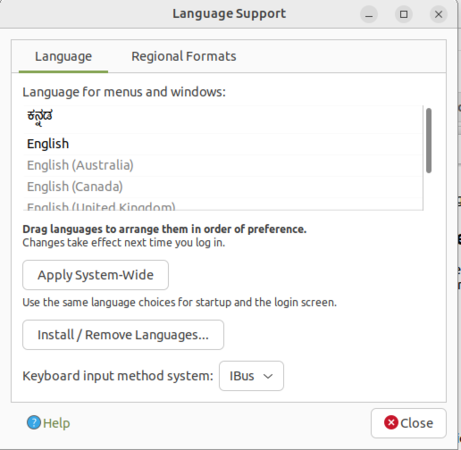
Arrange language list


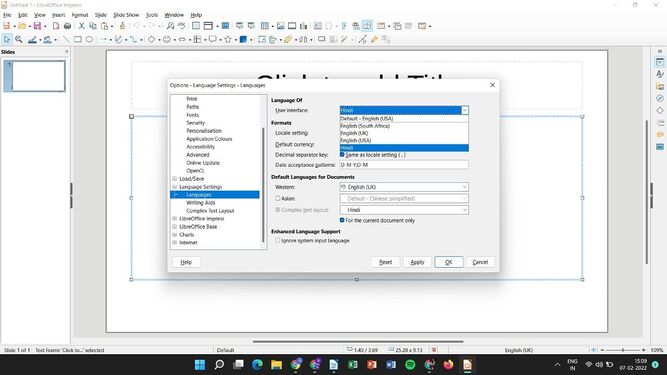
- To get started, go to Applications -> System tools -> System settings -> Language support.
- It may ask you to update or add components to your current default language when you first open the dialog. If you do not have internet connect then click "Remind Me Later" and If you have good internet connection, select install to update your language lists.
- Now we are ready to change our Ubuntu interface language. Find your new language in the list, and then click and drag it to the top of the list and click Apply System-Wide.
- Once you have set you language as first and click on "system-wide", you will need to log out of your account and log in to see your new interface language.
- Ubuntu may ask if you want to update your user folders names to your new language, Select Rename folder option.
- Changing user interface language in Ubuntu
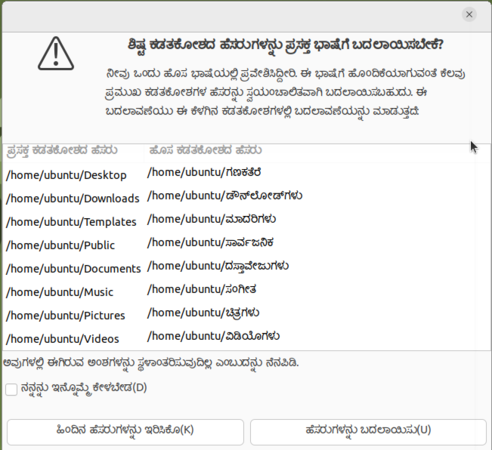
Renaming folders
Kannada Ubuntu interface


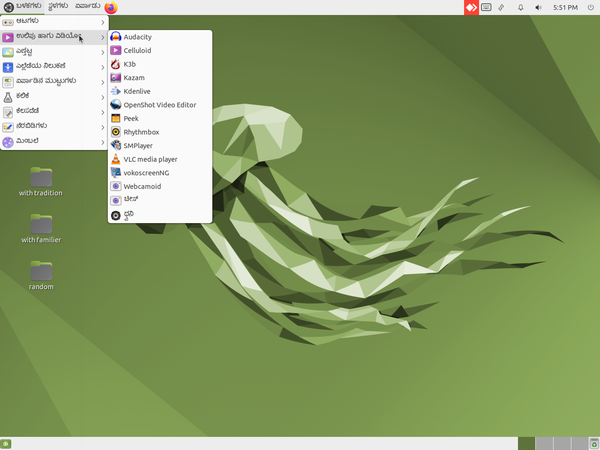
Adding software applications to your computer system
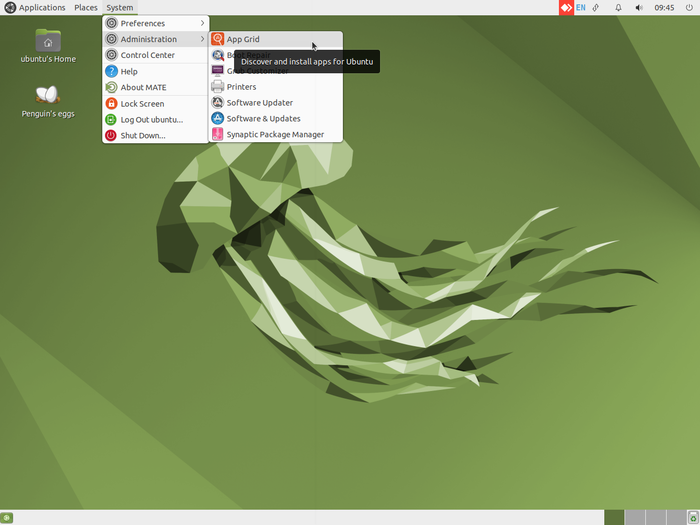
Adding software's to computer system using App Grid

You can add many more FOSS applications to your computer. Select the "System->Administration->App Grid" - You can download applications from the Internet. Teachers can explore new FOSS educational tools and utilities.
Go to Applications > System Tools -> App Grid. You will need to type the required application name in the search bar. It will show all applications with the words you have entered and you will get an option for "Install". Click on "install" if you want to install the application. If your search does not get the application(s) you want, try with fewer letters / words to search.
It may ask your Ubuntu log in password for authentication, just type your Ubuntu password press enter.
If you have doubts or difficulties in using the Ubuntu operating system or any of the applications, you can search for solutions on the Internet using a search engine or refer to 'Frequently asked questions'.
Adding your languages to type in Ubuntu
In Ubuntu by default you can type English in any application and by default it will use only Unicode fonts unless you manually changing it to non-Unicode.
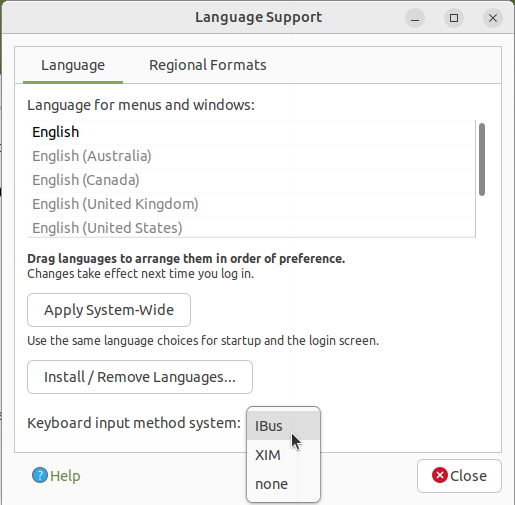
Selecting Ibus for typing language

Also you can type any your local languages in Ubuntu by adding those languages in Ibus. For typing in any local language, Ubuntu will use application called Ibus. You can follow the below step to set up Ibus and to add languages in the typing list.
- Go to Applications -> System tools -> System Settings -> Language Support ->Look at the Keyboard input method system Select IBus and close the window.
- Log-out your computer and log-in to applying this changes.
Now you have to add your languages in "Text Entry" to type it. You can type multiple language in any application by adding it in this list.
- Adding language to text entry

Selecting preferences

Adding language to text entry


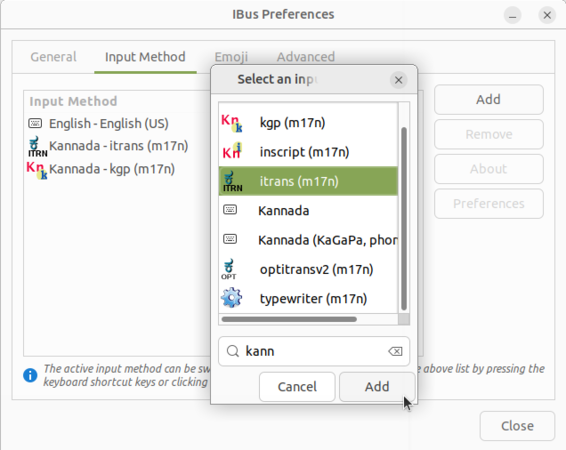
- Right click on "En" from the top panel and select "Preferences".
- Once the Preferences window opens, click on "Input method->Add" option, as shown in image.
- The language list window will open, search your languages by typing it in search box and click on the language. It will show the all the typing methods for the language. Choose a keyboard layout you are comfortable with and click "Add".
- Yes, you are finished all the set up, after this your language list looks like below.
- Adding language to text entry
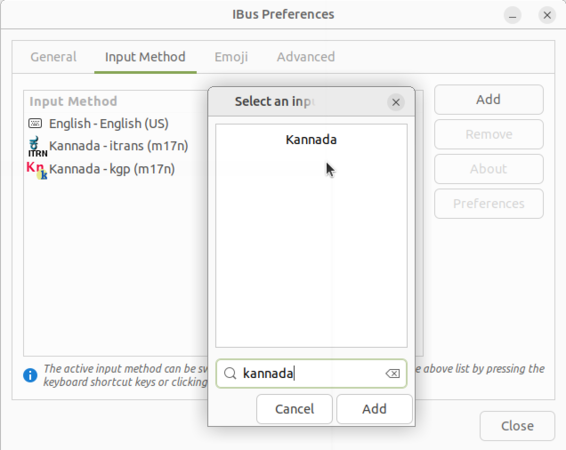
Searching Kannada language in search box
Selecting keyboard layout
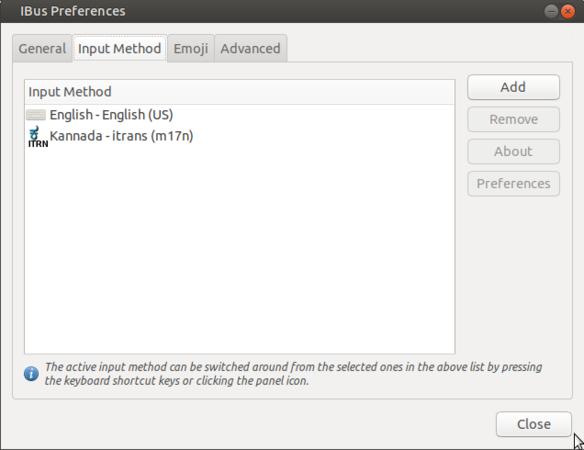
after adding language


Now its time to type your added language in most of the applications. Click on the language panel "En" (right top corner of the screen) and select language in which you want to type. When you select language, icon will change to that language. The very important is you can add multiple languages in this list.
Advanced features
Ubuntu contains a wide range of software that includes LibreOffice, Firefox, Thunderbird and several games and Educational tools. Many additional software packages are accessible from the built in Ubuntu Software Center known as "App Grid". More complex commands can be given to the computer using the 'Terminal' interface, this is really for those who have technical expertise.
![]() Note:To Know the installation process of Ubuntu please go through the below link
Note:To Know the installation process of Ubuntu please go through the below link
Click here to Know the Installation process.
References
Learn Tux Paint
Introduction
Basic information
| ICT Competency | Tux Paint is a free and open source application for supporting basic digital literacy by getting familiar with the mouse as a method of input.
This tool can also be used for graphic resource creation and editing. |
| Educational application and relevance | Tux Paint is useful for creating pictures, simple animations and adding text to images to create picture stories. |
| Version | Version - 0.9.28 |
| Configuration | No specific configuration requirements |
| Other similar applications | GIMP, MyPaint, Kolourpaint |
| The application on mobiles and tablets | There are graphics editors on the mobile / tablet platform like 'Photo Editor' |
| Development and community help | Tux paint tutorials |
Overview of features
Tux Paint is a graphics editor. It can be used for digital art introduction as well as to make simple animation in the form of slide show. It has a simple interface with a drawing area, drawing tools, color palettes, shapes and stamps. The paint brushes can be used to draw free hand or with previously defined shapes. It has been designed to encourage young learners with cartoon mascots and with cartoon sound effects. You can view detailed features here. Selector, providing various objects you can select from (e.g., brushes, fonts or sub-tools, depending on the current tool).
Installation
For Ubuntu OS
- The application is part of the Ubuntu custom distribution.
- In case you do not find it on your computer, you can install by choosing “Tux Paint” in Ubuntu Software Center
- If you would like to install through the terminal follow these steps below:
- Open terminal by clicking (Ctrl+Alt+T),
- Once Window page is open, in front of dollar($) symbol just type below command.
- sudo apt-get install tuxpaint
For Windows OS
Tux Paint for Windows comes as two parts, the main program and the optional add-on 'stamps' collection.
- You can visit this link to download the install able files in to your computer.
- Go to those downloaded place and install both files by double clicking on it.
For MAC OS
Tux Paint for macOS comes as three disk image (.dmg) files. One contains main program (Tux Paint), another contains the configuration program (Tux Paint Config.) for parents and teachers.
- You can visit this link to download files to your computer.
- Once your download these files, copy three of them to your hard drive's
Applicationsfolder. The third contains an application that installs the optional 'stamps' collection.
Working with the application
Getting familiar with the application
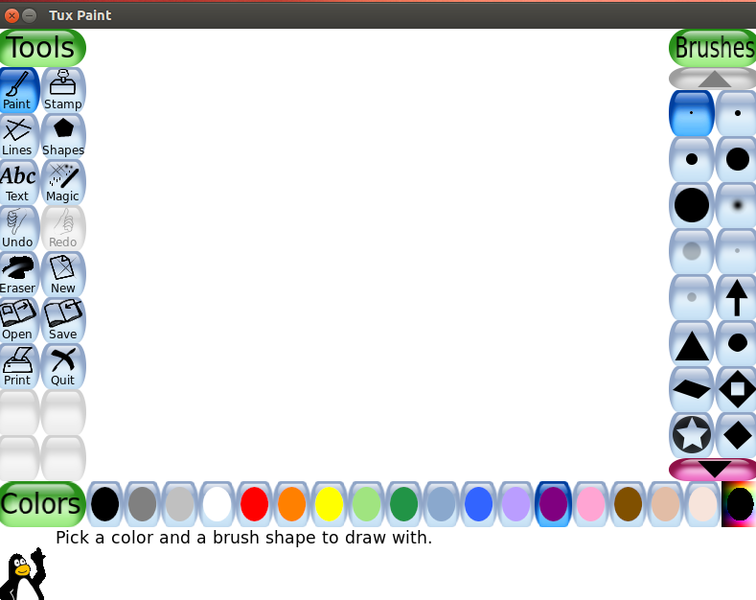
The Tux Paint interface

When we open the Tux Paint we will see this image. This window or main screen contains following sections:
- Left side: Tool bar contains drawing and editing controls.
- Middle: Drawing canvas. The largest part of the screen, in the centre, is the drawing canvas.
- Right Side: Selector; depending on the tool selected, the the selector shows different options available for the tool. For example, when the Paint Brush tool is selected, it shows the various brushes available. When the Rubber Stamp tool is selected, it shows the different shapes you can use.
- Lower: Colours; a palette of available colours are shown near the bottom of the screen.
- Bottom: Help Area at the very bottom of the screen, Tux, where the Linux Penguin, provides tips and other information while you draw.
Creating images with brushes and shapes
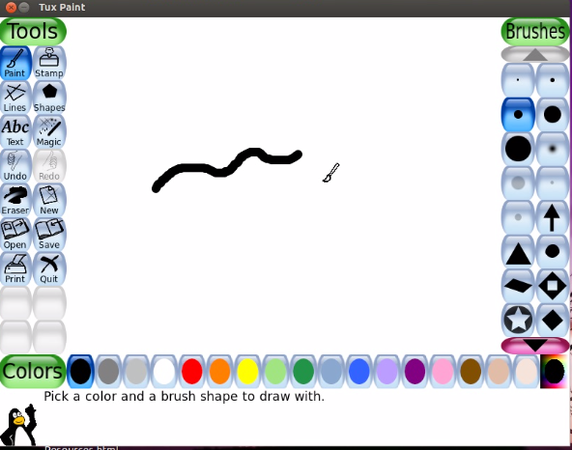
Freehand drawing using the brush

Working with stamps (black and white)


Working with stamps

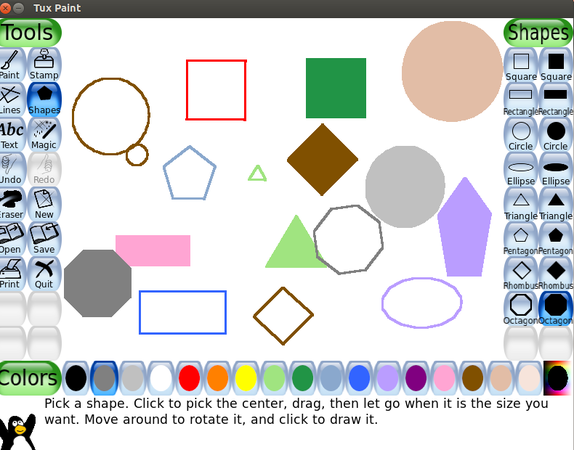
The above images show the different ways of creating images with Tux Paint.
- The first image shows you how to draw freehand. You can use the "Brush" tool, select the kind of "Brush" from the selector, and draw freehand. By choosing from the "Color palette", you can also make a color sketch. For more fun, you can also listen to sounds as you draw. The bigger the brush, the lower the pitch. You can, of course, mute the sound.
- The second and third images show shapes unfilled and filled in different colors. In addition to freehand, Tux Paint allows you to select predefined shapes and stamps to use in your creation. This makes the tool quite versatile. You can select the shapes tool and select the kind of shape from the right hand side selector panel. For example, select "rectangle" shape, draw a rectangle with drag (press left click and keep pressed) and drop (release left click), if you didn't keep press mouse and release, it will keep moving. Press and release is required to complete the drawing.
Adding text to images
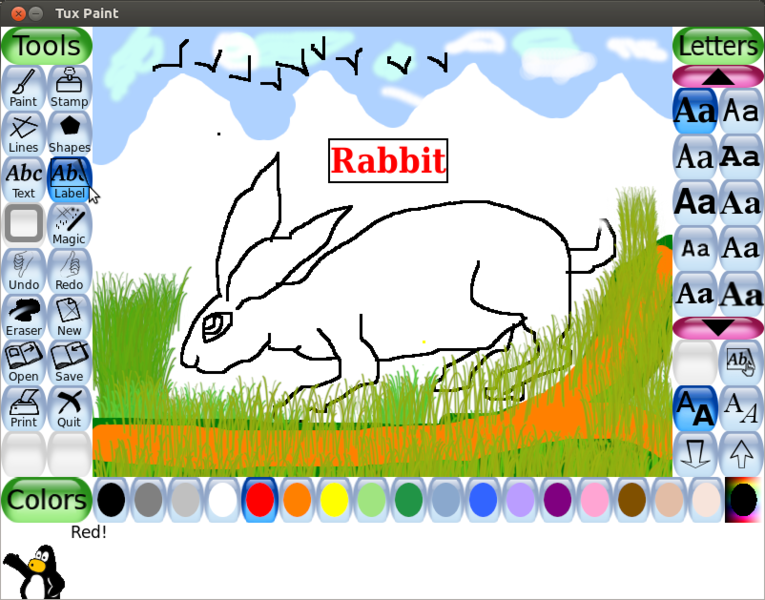
Adding text

There is also a "text" tool, which allows you to type in text in the canvas. By combining images and text, you can create simple cartoon strip. For adding text, Select "Text" tool from left tool bar, click on the screen where you need to add text and start typing. from the right side font window you can change the text font. Also change the text color from the bottom color tool bar.
Creating animations
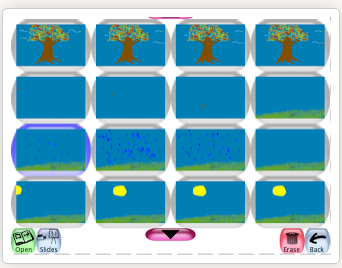
Creating a sequence of images
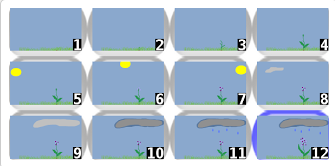
Numbering the images


Animating the images using a slideshow

- It is possible to make simple animations with the pictures you created. In the first step, shown in the first image, you can use Tux Paint to create a series of images you want to build the animation with. For example, draw the life stages of a plant and you can start with a seed being blown from a mature plant. You can add as many images as you want to tell your story. Each time you can make slight changes to each drawing to create the idea of animation.
- The next step is to number the images and play them using slideshow, shown in the second image above. Numbering is done by simply clicking on slides. The bars that you see next to the play button allow you to select the speed at which the slideshow will run and hence determine how your animation will look.
Saving the files and formats
- Once you have created/ edited your images, you can click on the "Save" button on the left panel. If it is a new creation, Tux Paint will simply save. If you are editing an existing image Tux Paint will give you an option of replacing the older file or saving a new file.
- The files will be saved as ".png".
To View the saved files the files saved by Tux Paint are available in your home folder, under the sub folder .tuxpaint saved. The "." preceding the tuxpaint makes this folder 'hidden'. To unhide (show) and open this folder you can do 'CTRL+H' when you have opened your home folder. You can then see all hidden folders. You can copy these files to any other folder you want.
- To access Tux Paint saved images in windows look in "
C:\Users\Username\AppData\Roaming\TuxPaint\saved" - To access Tux Paint saved images in UBUNTU look in "
/home/username/.tuxpaint/saved/" - To access Tux Paint saved images in Mac OS X look in "
/Users/Username/Library/Applicaton Support/TuxPaint/saved/"
Advanced features
You can copy image files (only in png format) to the Tux Paint folder for saved files under the sub folder /.tuxpaint saved in your home folder. You can open these using Tux Paint and edit it within Tux Paint.
Ideas for resource creation
- It is easy to use Tux Paint to create simple drawings. These drawings can be a combination of what you can draw, combined with the stamps or images already available in the application. Thus image/graphics resources can be created with Tux Paint. These images can be inserted in documents to create picture essays.
- It is also possible to create simple animations in Tux Paint. You can create a series of drawings, with small modifications as required. You can sequence these drawings to show one after another. You can then "Play" the slides for to create an animation.
References
Learn Tux Typing
Introduction
Basic information
| ICT Competency | Tux Typing is a free and open source application for supporting basic digital literacy by getting familiar with the keyboard as a method of input.
Tux Typing can be used by children and adults alike for developing this skill. |
| Educational application and relevance | Tux Typing is a free and open source typing tutor created especially for new computer learners.
Familiarity with keyboard input is important for creating with ICT. |
| Version | 1.8.1 |
| Configuration | No specific configuration requirements |
| Other similar applications | Rapid Typing, Klavaro |
| The application on mobiles and tablets | Typing Speed, Typing Master |
| Development and community help | Official Website |
Overview of Features
The application includes two video game-style activities for younger players and finger lessons for experienced users. It is designed to be fun and to improve words per minute speed of typists. Tux Typing is a free and open source typing tutor created especially for children. It features several different types of game play, at a variety of difficulty levels.
Installation
For Ubuntu OS
- The application is part of the Ubuntu custom distribution.
- In case you do not find it on your computer, you can install by typing
Tux Typingon top search bar in Software Centre. - If you would like to install through the terminal follow these steps below:
- Open terminal by clicking "Applications --> System Tools --> Terminal" or through Keyboard shortcut
Ctrl+Alt+T - In the terminal window, type below command and press enter to start the installation by providing your machine password:
sudo apt-get install tuxtype
- Open terminal by clicking "Applications --> System Tools --> Terminal" or through Keyboard shortcut
For Windows OS
- To download the Tux Typing for Windows OS you can click this link.
- Go to the Downloaded folder and double click on that to install it to your system.
- Follow the instructions and finish the installation
For MAC OS
- To download the Tux Typing for MAC OS you can click this link.
- Once your download these files, copy that to your hard drive's
Applicationsfolder.
Working with the application
To open Tux Typing go to "Application --> Education -->Tux Typing".
Starting typing practice on Tux Typing
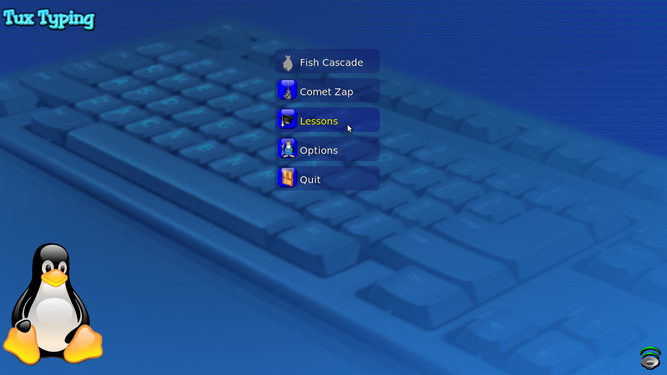
TuxTyping Main Page
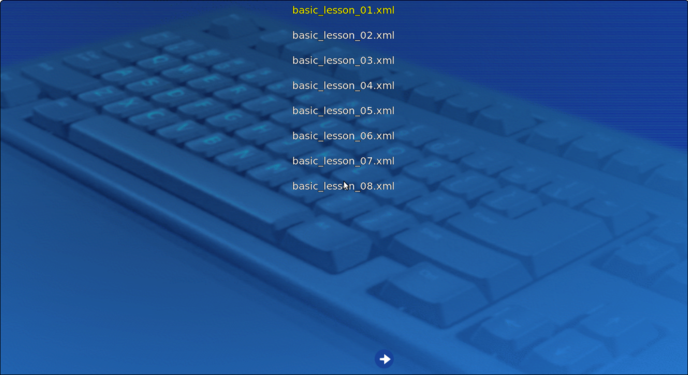
Lessons in TuxTyping


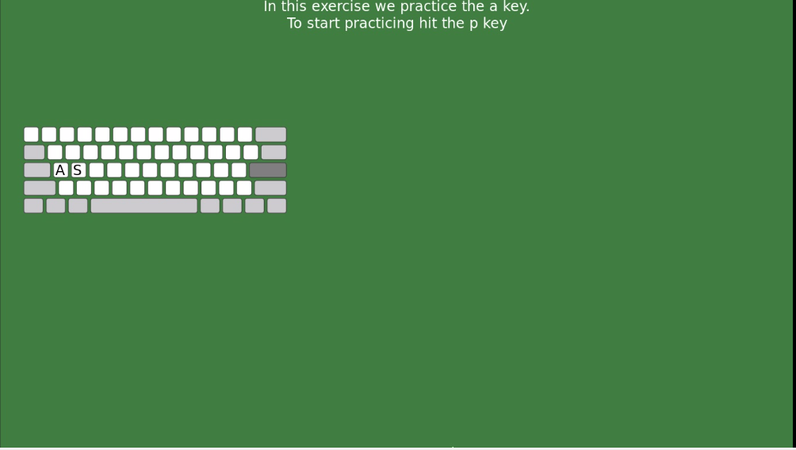
An interface of TuxTyping

- When you open the Tux Typing it will show the window as shown in the first image that is "Tux Typing main page". Typing can be practiced by selecting games and lessons.
- When you select the lesson option it will show the window as in the second image that is "Lessons in Tux Typing". There are 43 basic lessons. Go through the each lessons to practice typing.
- When you select a lesson, Tux Typing will show a window and ask you to press Space bar and then the "p" key. If the Caps Lock key is on (to type CAPITAL Letters) then Tux Typing won't work. Hence make sure this key is not on.
- After you practice these lessons, you will find that you can use all your fingers for typing. This speeds up your typing hugely. You need not look at the keyboard to type, so you can see the monitor as you type, which enables you to identify mistakes in typing.
Start practice typing
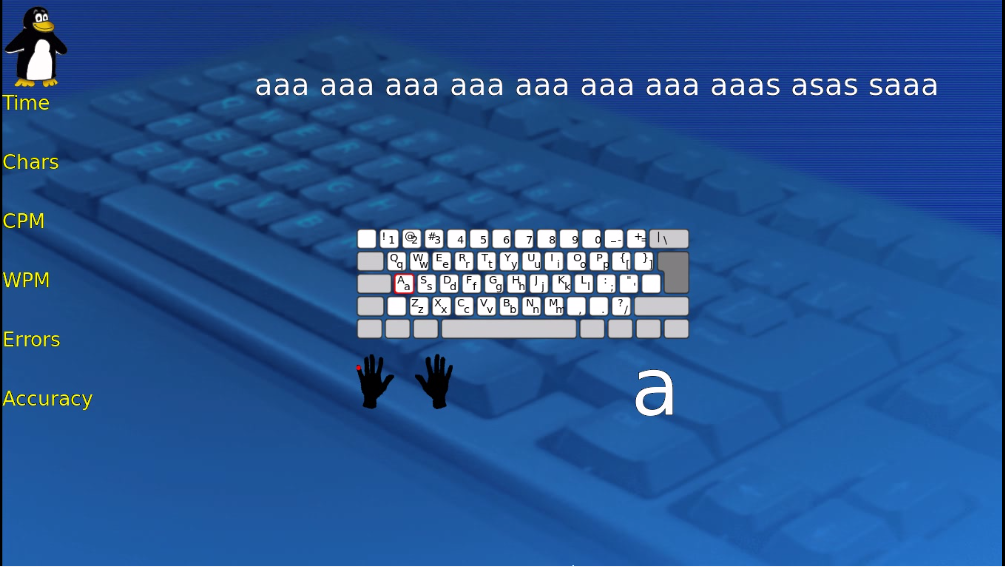
Tux typing interface

After pressing space bar and "p" key it will show the window as above. On the screen you can see items - Time, Chars (characters), CPM, WPM, Errors and Accuracy. These basically tell you how well you are typing. You will find a blinking button on each finger to guide you as to which finger to be used for typing a given character. There will also be a blinking light around the character to be typed.
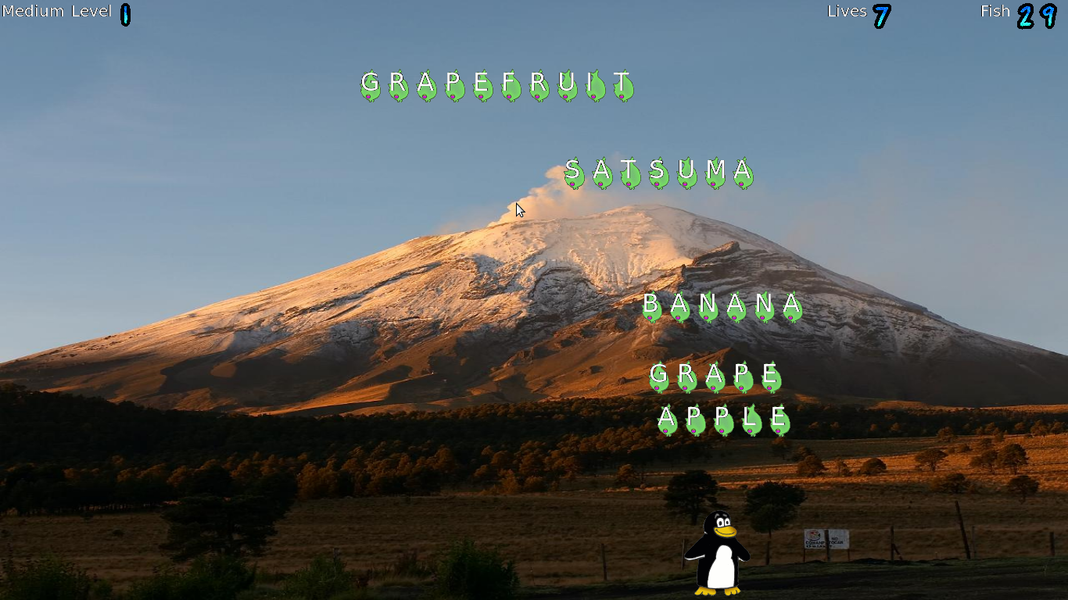
Comet Zap - Typing words based on selected subject

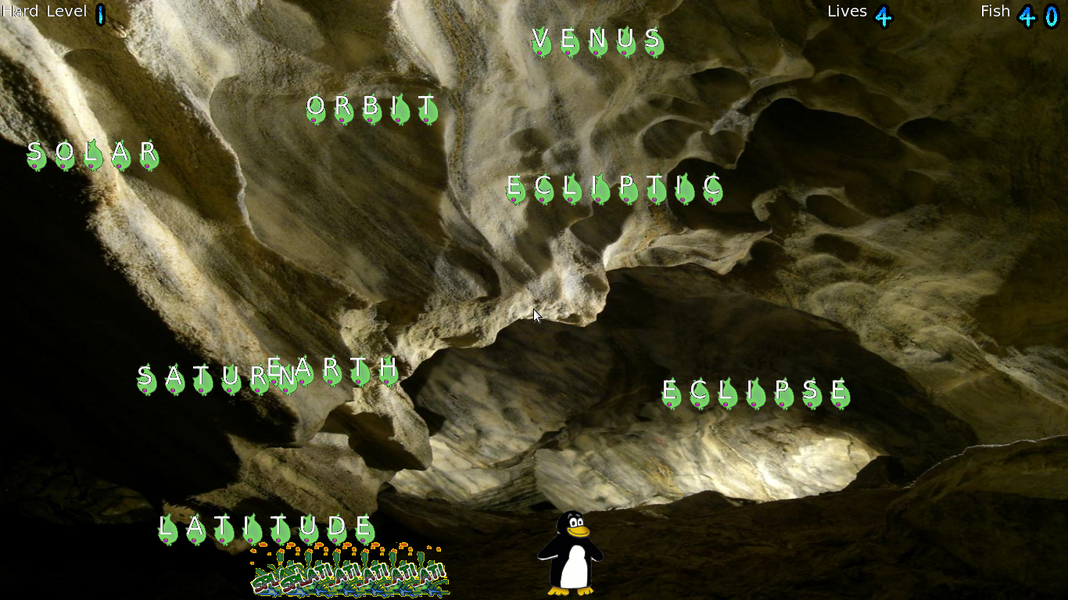
Fish Cascade - Typing words based on selected subject

- You can also find the practicing of words based on the subject such as Color, Fruit, Number etc. For this you can choose "Comet Zap" or "Fish Cascade" in the main menu.
Advanced features
None. The interactive lessons in Tux Typing will teach you the proper keyboarding. The 43 interactive lessons in Tux Typing give players a firm foundation on which to build both speed and accuracy, you should practice all lessons in sequence a few times to become comfortable with ten (or nine) finger typing.
Ideas for resource creation
None
References
Learn Text Editor
Introduction
Basic information
| ICT Competency | ICT for creating generic resources; this can be used to enter text in English and local languages |
| Educational application and relevance | Text editor is a software used for creating (including writing, editing and printing) text resources. This can be used or gaining familiarity with text entry. |
| Version | 1.26.0 |
| Other similar applications | Sublimetext, Kate |
| The application on mobiles and tablets | Text Editor for Android |
| Development and community help | Pluma Text Editor |
Overview of features
Text editor has very basic features of text editing. It does not allow formatting or embedding of other objects like images in a document. It is very simple to use. You can use it to prepare simple notes and documents. This also has tools for editing source code and structured text such as markup languages. In Addition it can,
- Text editor has tabs for editing multiple files. Tabs can be moved between various windows by the user.
- It supports a full undo and redo option as well as search and replace.
- It has an optional side pane displaying the list of opened files.
- Spell check option allows user to check with the spelling and rectify those.
- Text editor allows to mix up various language in a single document without issue.
Installation
- The application is part of the Ubuntu custom distribution.
- In case you do not find it on your computer, you can install by choosing Text editor in Ubuntu Software Center
- If you would like to install through the terminal follow these steps below:
- Open terminal by clicking (Ctrl+Alt+T),
- Once Window page is open, in front of dollar($) symbol just type below command.
- sudo apt-get install pluma
- Then, just type your ubuntu password(it will not display on your screen), press Enter.
Working with application
Getting familiar with application
Open Text editor from "Applications --> Accessories --> Text editor"
The application has a menu bar and the standard toolbar which help you to open saved files, create new and also save a file.
Creating a text document

Entering text in different languages
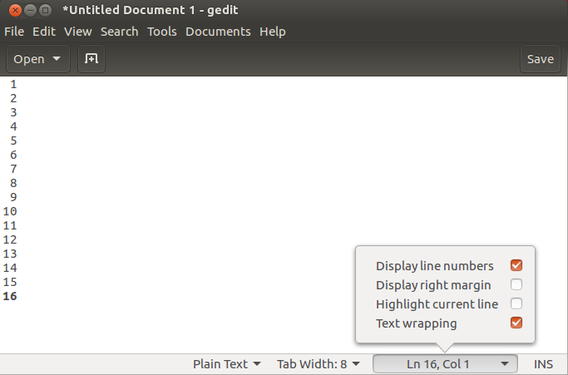
Displaying the line numbering


- In the first image you see text in multiple languages. Once you open the text editor directly you can start entering text in the new page. you can also type any language like Telugu, Tamil and Kannada etc by changing language from the top bar language option. You have an option for highlighting misspelled words under the "Tools" option. The text editor also allows you to search, find and replace words from the search option on the tool bar.
- By default in the latest versions of text editors you can have a look at the line numbers in the document.
Editing the Document
You can edit your document in a place called "Preferences". You can click on "Edit --> Preferences" to get the options. You can even customize the Text editor in this tool. In "Fonts & Colors" you can change the default editor font and its theme.

Pluma preferences window

Spelling checker
Spell Checker shows the options

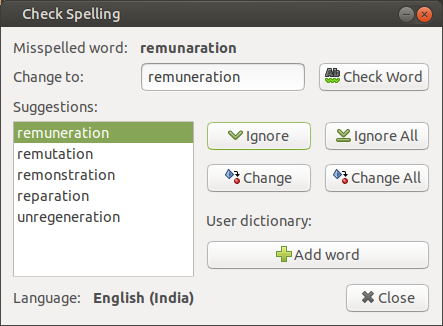
Text editor provides an important feature called "Check Spelling" which automatically checks for the spelling and underlines it as indication of error. You can manually check the errors of each such words and make them correct. To do this you click "Tools --> Check Spelling". It shows you the Misspelled word in bold. It gives an option "Change to:" with which you can replace word with the given suggestion or you can manually enter the correct word in the box given. Then click on "Ignore". If it is a new word that the inbuilt dictionary could not recognize then you can add it to the dictionary by clicking on "Add word".
Text editor options
Text editor is not only used for simple texts but can also be used for various types of content such as programming. Basically it makes user to get comfort with the selected text editor format. For example, if you select "C++" option for this, it shows various elements of programming in variety of colors as it does in any programming editors.
Text editor option is available at the bottom of the editor screen which is by default set as "Plain Text".
Multiple tab options
You can open any number of tabs related to variety to subjects in one window as we mostly do with a browser like firefox. With this feature you can simply switch among the various tabs which makes your work more efficient.
To open a new tab go to "File --> New" or keyboard shortcut "Ctrl+N"
Saving and exporting
Save the document in you computer

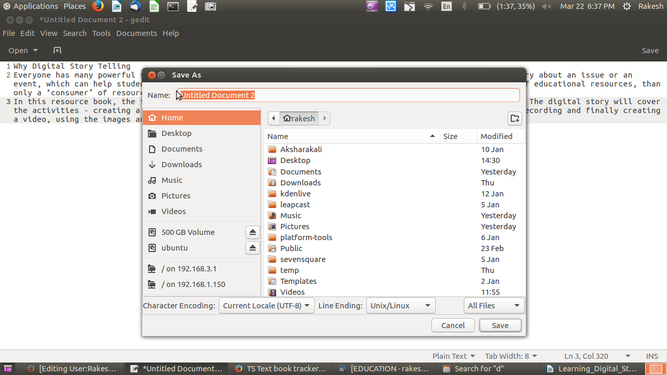
To save the text document, click on save from "File --> Save" option or you can press "Ctrl+S" and give the file name and the location to save the file.
The text document will be saved as a ".txt" file.
Advanced features
Since the objective of text editor is to add and edit the text we can hardly expect any advanced feature here. You can refer this link for more details on text editor.
Ideas for resource creation
You can use Text editor to create plain text resources.
References
Learn LibreOffice Writer
Introduction
LibreOffice Writer is the free and open-source text editor application of the LibreOffice software package. Writer is a text editor similar to Microsoft Word.
Basic information
| ICT Competency | ICT for creating generic resources |
| Educational application and relevance | LibreOffice Writer is a software used for creating (including writing, editing, formatting, and possibly printing) text resources. Apart from entering and editing text, you can insert images and links also. |
| Version | LibreOffice Writer is also available on the Windows (visit download LibreOffice on Windows to install LibreOffice on a Windows system) and Macintosh operating systems.
This tool has no specific configuration requirements but in this application you can use many extra features by installing extensions |
| Other similar applications | Microsoft Word, OpenOffice writer, Google Docs |
| The application on mobiles and tablets | Collabora Office for Android and for iOS |
| Development and community help | The Document Foundation |
Overview of features
LibreOffice Writer lets you design and produce text documents that can include graphics, tables, or charts. In this application you can save the documents in a variety of formats, including the standardized Open Document Format (ODF), Microsoft Word format(.doc), or HTML. Here you can easily export your document to the Portable Document Format(PDF).
Installation
Please click on the below link to learn about LibreOffice Installation & Configuration
Working with the application
Starting a new document
From the Start Center
You can start a new, blank document in Writer in several ways. If a document is already open in LibreOffice, the new document opens in a new window.
- From the Start Center
When LibreOffice is open but no document is open, the Start Center is shown. Click the Create: Writer Document button to create a new text document.
- From the operating system menu
You can open the LibreOffice Start Center or the Writer component from the operating system menu in the same way that you start other programs. When LibreOffice was installed on your computer, in most cases a menu entry for each component was added to the system menu.
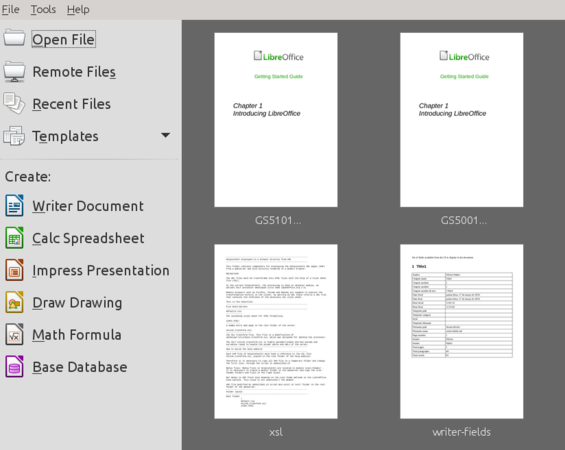
LibreOffice start center

Opening an existing document
You can open an existing document in any of the following options.
Option1: Choose "File --> Open" on the Menu bar.
Option2: Press "Ctrl+O" on the keyboard.
Option3: Click on the "Open icon" on the Standard toolbar
LibreOffice Writer interface
The LibreOffice menu bar has multiple options for file operations including saving, editing, viewing the document, inserting images, links, tables, etc in the document and formatting and defining styles in the document. The commonly used parts of the window are discussed below.
- LibreOffice Writer menu

LibreOffice Writer (Parts of the window)

1. Title bar
The Title bar is located at the top of the Writer window. It shows the file name of the current document. When the document is not yet named, the document name will appear as Untitled X, where X is a number. Untitled documents are numbered in the order in which they are created.
2. Menu bar
The Menu bar is located just below the Title bar in Windows and Linux and at the top of the screen in macOS. When you select one of the menus, a sub menu drops down to show further options,including:
- Commands that directly cause an action, such as Close or Save, in the File menu.
- Commands that open further sub menus.
3. Standard toolbar
In a default LibreOffice installation , the top toolbar, just under the Menu bar, is called the Standard toolbar. This gives quick access to different types of elements and tools to the users.
4. Formatting toolbar
The second toolbar at the top is the Formatting toolbar. It is context-sensitive; that is, it shows the tools relevant to the current position of the cursor or the selected object. For example, when the cursor is in text, the Formatting toolbar provides tools for formatting text. When the cursor is on a graphic (image), the tools are for formatting images. Other toolbars are available at "View --> Toolbars".
5. Rulers
The horizontal ruler across the top of the workspace is visible by default but the vertical ruler on the left is hidden by default.
To enable the vertical ruler, choose "View --> Rulers --> Vertical Ruler" from the Menu bar, or choose "Tools --> Options --> LibreOffice Writer --> View". To quickly show or hide both rulers, use the key combination "Ctrl+Shift+R".
Editing document
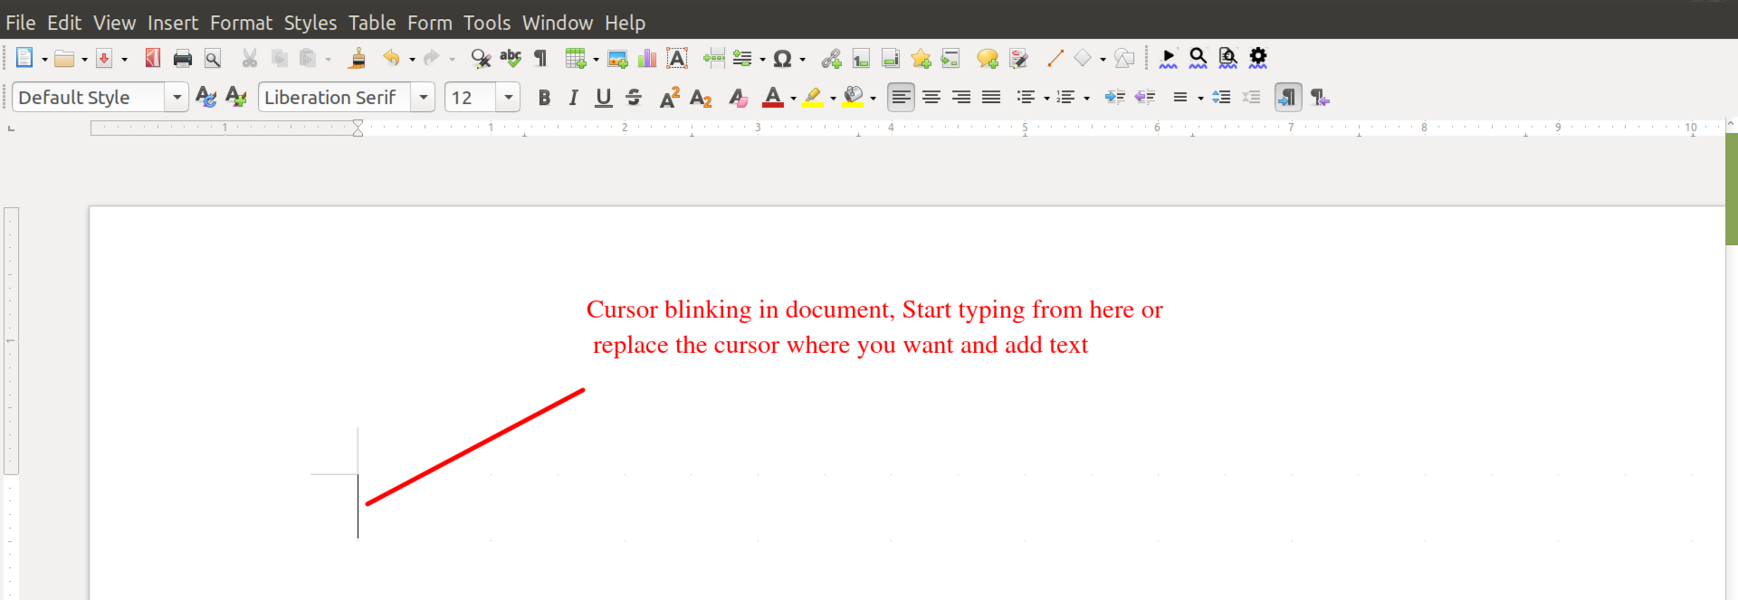
You can start adding the text from where the cursor blinks. You can also reposition cursor as per the requirement in the document.
- Cursor

Changing default fonts
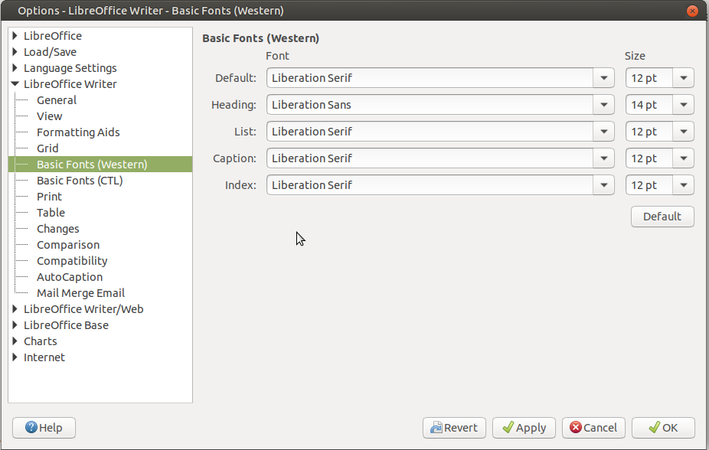
Changing the Font settings in Writer

- LibreOffice Writer has some of the fonts set by default which can be customized any point of time.
- To do this, Go to "Tools-->Options".
- In the left panel "Double click on LibreOffice Writer--> Click on Basic Fonts (Western)".
- Right side panel shows you the things that are fonts setup for your software by default. It is further classified as Default, Heading, List, Caption and Index. Based on your requirement you can click the drop down on their respective options and change the Font. Also note that you can customize the font size.
- Once you are done, "Click Apply-->OK".
Cut, copy, and paste text
- Using cut, copy and paste options are similar to any other applications. You can copy or move text, image or any other objects within a document, or between documents. These features can be used by dragging or by using keyboard shortcuts.
![]() Note: You can also copy text from other sources such as Web pages and paste it into a text document.
Note: You can also copy text from other sources such as Web pages and paste it into a text document.
- To move (drag and drop) selected text using the mouse, drag it to the new location and release it; the cursor changes shape while dragging. To copy selected text, hold down the Ctrl key while dragging. The text retains the formatting it had before dragging.
- To move (cut and paste) selected text, use "Ctrl+X" to cut the text, insert the cursor at the paste-in point and use "Ctrl+V" to paste. Alternatively, use the buttons on the Standard toolbar.
- When you paste text, the result depends on the source of the text and how you paste it. If you click the Paste button, then the pasted text keeps its original formatting (such as bold or italics). Text pasted from Web sites and other sources may be placed automatically into frames or tables as part of the format when you paste. If you do not like the results, click the Undo button or press "Ctrl+Z".
To make the pasted text show the paragraph style at the insertion point:
- Choose "Edit --> Paste Special", or
- Click the arrow on the combination Paste button, or
- Click the "Paste" button without releasing the left mouse button.
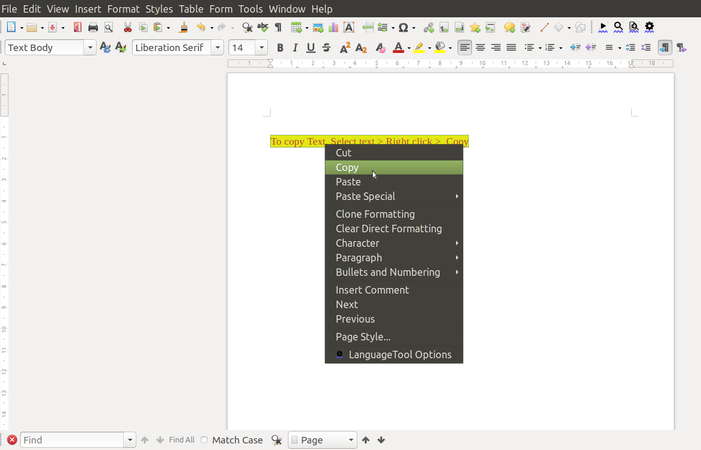
Copy text
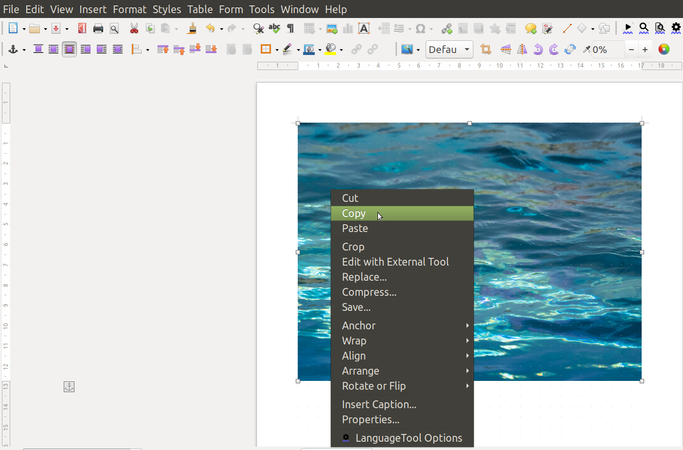
Copy image


Using text formatting
The format option is for changing the text styles like text font, text size and text color options. For many of these options, we can use shortcut icons from formatting toolbar as shown below.
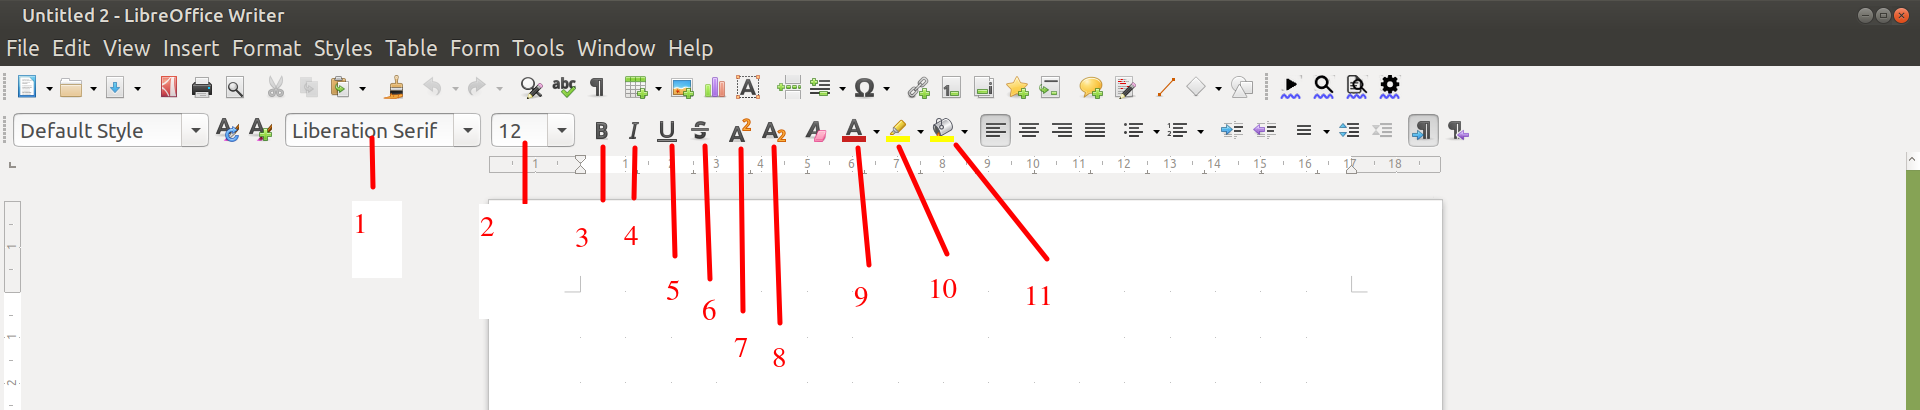
Formatting properties

- Font name: Choose font name from dropdown
- Font size: Choose font size from the dropdown
- Make selected text Bold
- Make selected text Italic
- Make selected text Underline
- Make selected text strikethrough(Eg:
strikethrough) - Make selected text as superscript
- Make selected text as subscript
- Choose Font color from the dropdown
- Make selected text to highlight with color
- Change the background color
Using Bulleting and Numbering
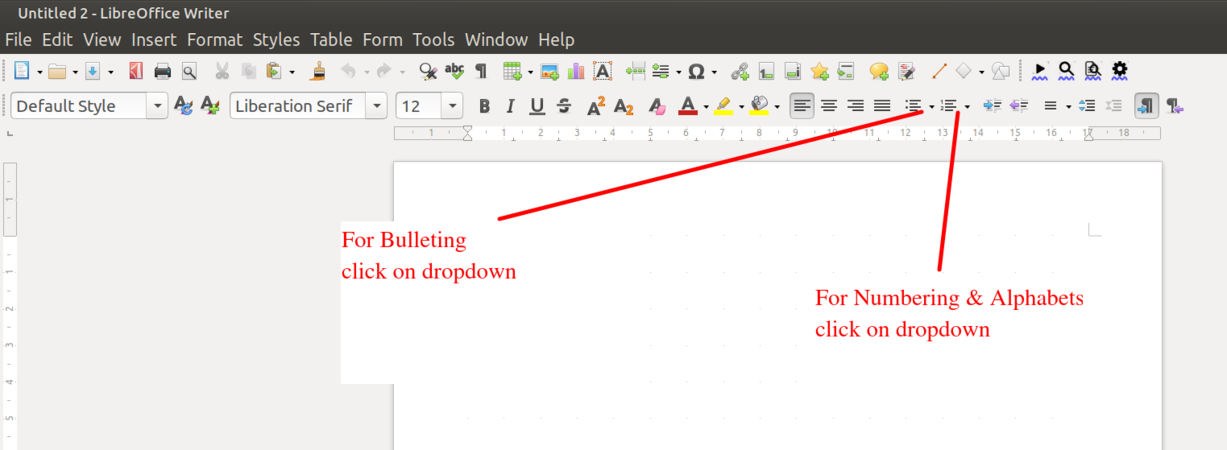
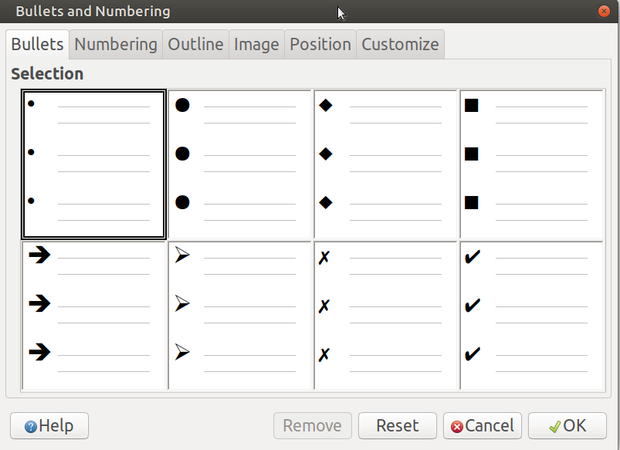
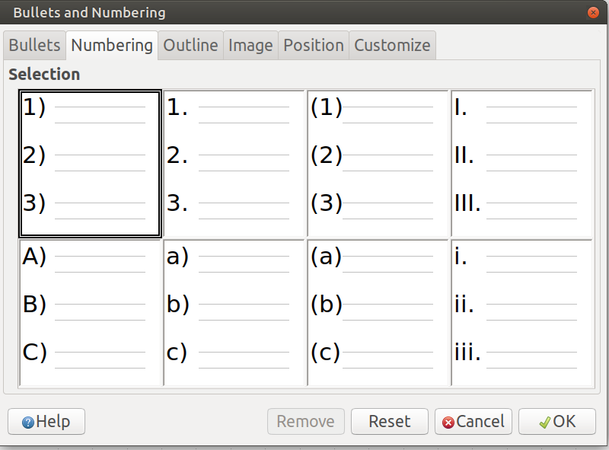
The Bullets and Numbering feature on the formatting toolbar can be used to create nested lists and access the Bullets and Numbering dialog.
- To add the bullets and numbers to text information, choose "Format --> Bullets and Numbering". You can also select the different symbols of bullets and numbers here. You can also find the Bullets and Numbers in the formatting toolbar
- An important feature of Writer is to enable you present your information through simple and short points ('bullet points').
- For the selected text input that has been entered, go to "Format --> Select Bullets and Numbering" and choose the numbering type that is needed. You can create sub-numbered lists.
Bulleting and Numbering
Bulleting Dialogue
Numbering & Alphabetical Dialogue


Using paragraph formatting
You can apply many formats to paragraphs using the icons on the Formatting toolbar. Other formatting options are provided under the format option from the menu bar.
On the Formatting toolbar, the icons and formats include( As labeled in below paragraph properties image)
- Apply "Paragraph Style" from formatting toolbar .
- Align Left, Center Horizontally, Align Right, or Justified.
- Line Spacing (choose from 1, 1.15, 1.5, 2, or custom spacing. Line spacing refers to the distance from one baseline (the imaginary line at the bottom of a letter like “n” or “m”) to the next baseline. It is determined by the size of the font.
- Increase Paragraph Spacing, Decrease Paragraph Spacing. (Paragraph spacing refers to the vertical spacing between one paragraph and the paragraphs above and below it").
- Increase Indent, Decrease Indent.
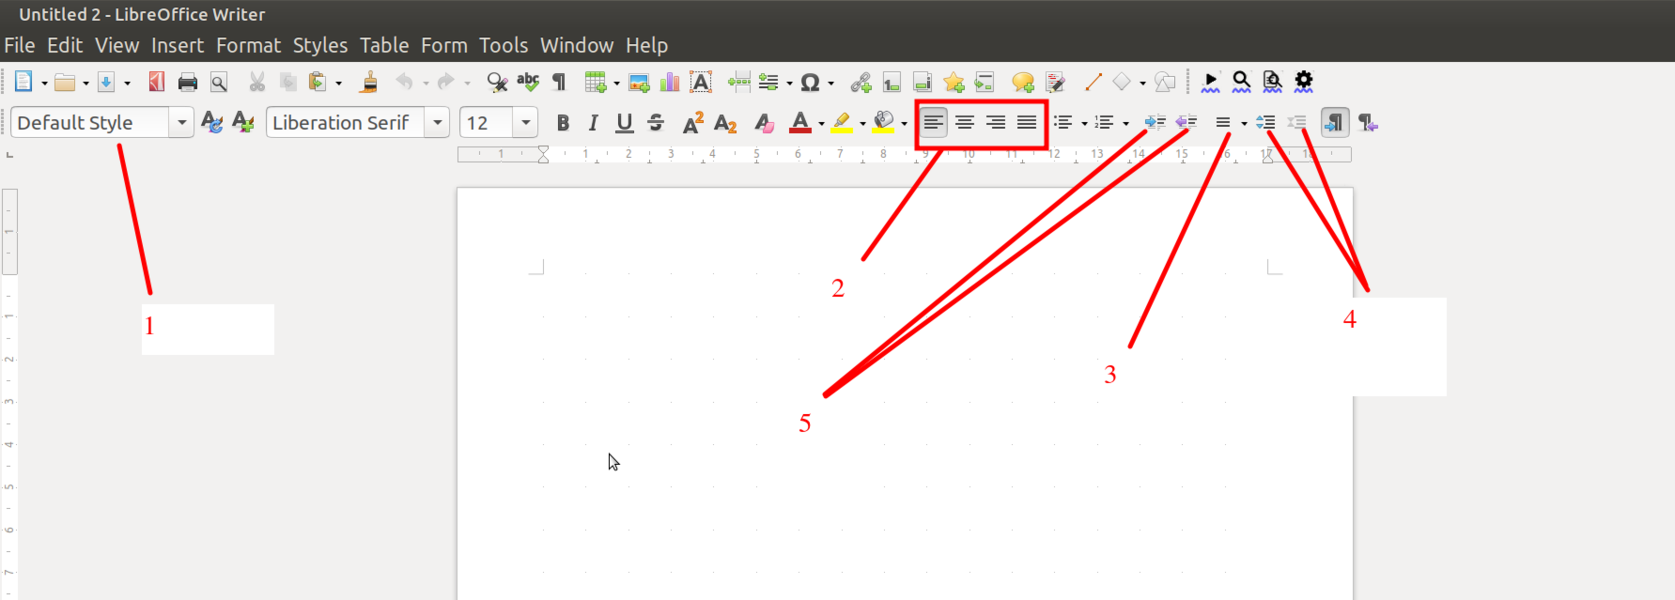
Paragraph properties

Inserting & Formatting Images
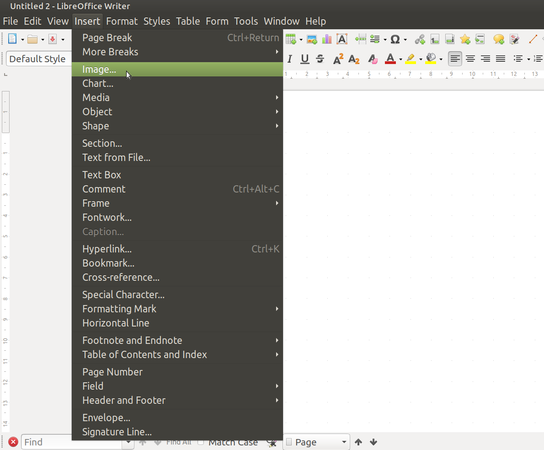
- The insert menu option is for inserting images, hyperlinks, charts, page numbers, page breaks, formulas and etc...
- To insert an image, Go to "Insert --> Image" This will open a folder from which images are to be inserted (Images need to be browsed from your computer local folders).
- The inserted image (triangle) will looks like below "Inserted Image View" image.
Insert Menu
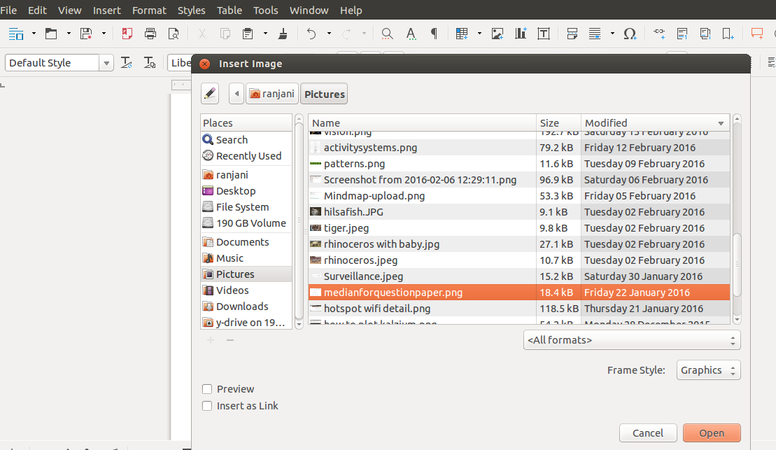
Inserting Image

Inserted Image View


After you insert any image if you want to resize (height*width), "Click on the image and select any of the dots on the corner of the image and drag to increase or decrease the size of the image".
Editing image
1. Using the Crop tool: To use the Crop tool "Click on the Crop icon" as shown in Image1 or right-click on the image and select Crop from the context menu. Cropping handles appear at the corners and mid-points of the sides of the image. Drag a handle to cut off part of the image. Click outside the image to turn off cropping mode.
2. Compressing images ("Inserting Image" image)
- If you insert a large image in your document and resize it to fit into the layout of the page, the complete original image is stored in the document file to preserve its content, resulting in a large document file to store or send by mail.
- If you can accept some loss of quality of the image rendering, you can compress or resize the image object to reduce its data volume while preserving its display in the page layout. You probably don’t want to compress something that will be professionally printed.
- "Right-click to select the image and open the context menu". Then choose "Compress" to open the Compress Image dialog. Click "OK" to apply the compression settings. If the resulting image is not acceptable, press "Ctrl+Z" to undo and choose another compression setting.
3. Transparency: set the transparency options for the image using this button as shown in Image1.
4. Rotating images: Rotate images if required using button showed in Image1:Image Formatting features
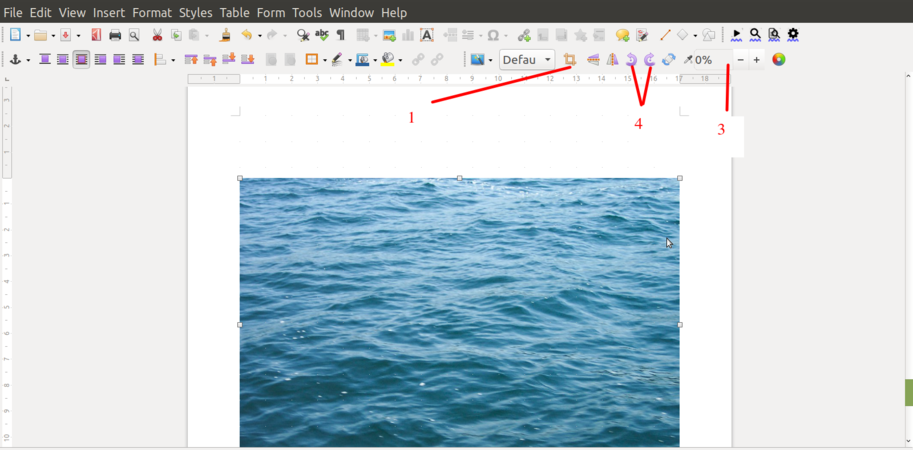
Image1: Image Formatting features
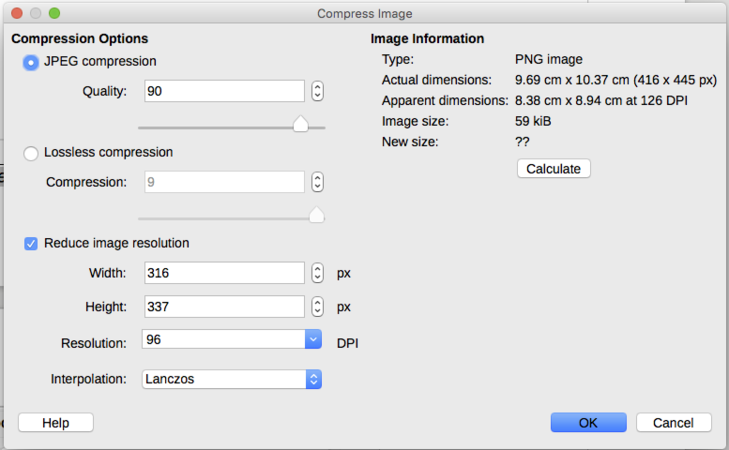
Image 2: Image compressing window


Inserting & Formatting Table
- To insert Table, go to "Table" from Menu bar and select "Insert Table", in given window choose required number of rows and columns. Alternatively you can also insert table from standard toolbar, Click on "table grid" from toolbar and move the cursor over the grid until you highlight the number of columns and rows you want. Click and the table appears in the document.
- You can format your table by selecting the options in 'Table'. Move your cursor inside the table and "Select --> Table". You can then adjust the row and column widths ("Table --> Size"), add or remove borders ("Table --> Properties --> Borders"), split or merge cells ("Table --> Merge Cells", "Table --> Split Cells") etc.
- You can also copy data from a spreadsheet. You can simply copy that data (in rows and columns) from the spreadsheet and paste into the document, it will create a copy of the spreadsheet in your document. If you do not want it as a spreadsheet, but only as a table, you need to select "Paste Special -> Formatted text option".
- Inserting Table
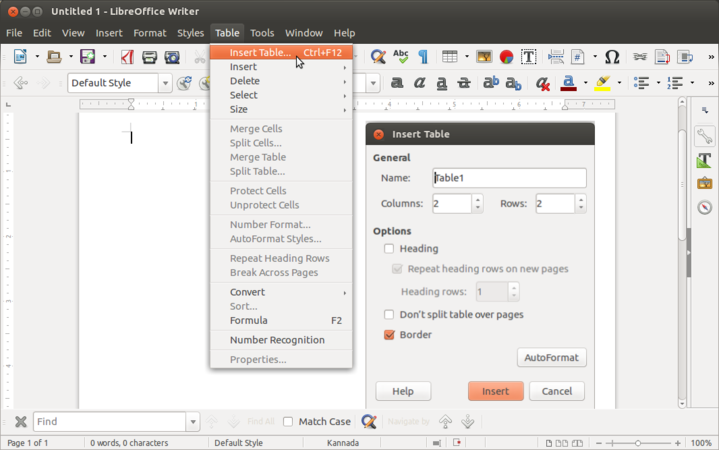
Insert Table
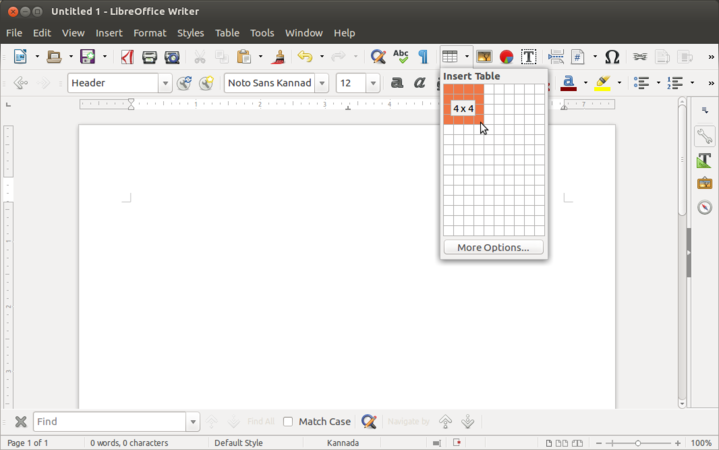
Select rows and columns


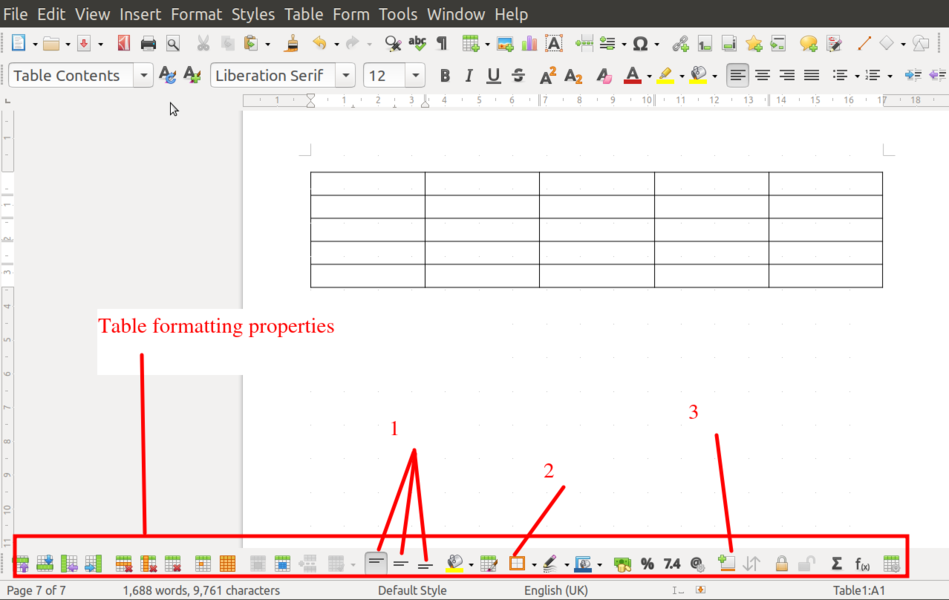
Table Formatting

- Align text to the top, middle and to the bottom
- Apply Borders to cells and tables
- Insert caption for the table
Finding and replacing text
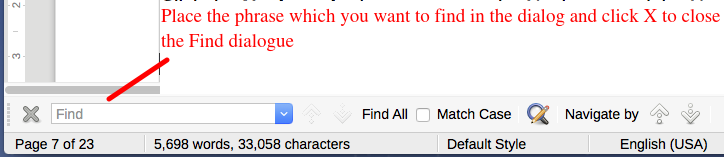
Writer has two ways to find text within a document: The Find toolbar for fast searching and the Find & Replace dialog. If the Find toolbar is not visible, you can display it by choosing "View --> Toolbars --> Find" from the Menu bar or by pressing "Ctrl+F".
Using the Find toolbar
- To use the "Find" toolbar, click in the text input box and type your search text, then press "Enter" to find the next occurrence of that term from the current cursor position. Click the "Find Next" or "Find Previous" buttons as needed.
- Click the "Find All" button to select all instances of the search term within the document.
Using the Find toolbar

Using the Find & Replace dialog
To display the Find & Replace dialog, use the keyboard shortcut "Ctrl+H", or choose "Edit --> Find & Replace" from the Menu bar. Use the Find & Replace dialog:
- Type the text you want to find in the Find box.
- To replace the text with different text, type the new text in the Replace box.
- You can select various options, such as matching the case or matching whole words only. The other options include searching only in selected text, searching from the current cursor position backwards toward the beginning of the document, searching for similar words, and searching in comments.
- When you have set up your search, click "Find Next". As the document view moves to each found instance, replace the text by clicking "Replace".
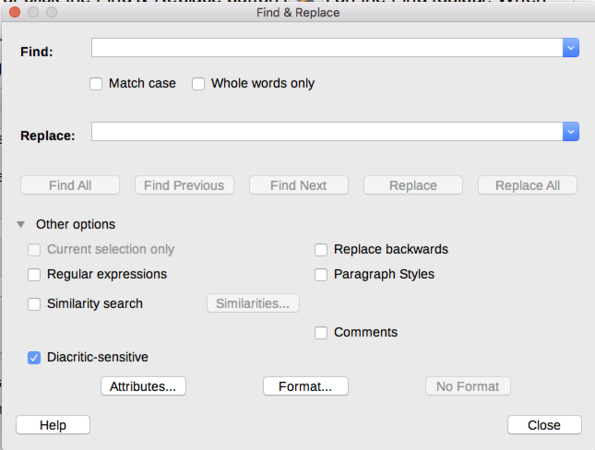
Expanded Find & Replace dialog

Creating an automatic Table of Contents
- Often it is useful to create text documents which are organize into headings and sub headings to denote different sections. This can be done in two ways,
- You can select the text you want to define as a heading and choose from the predefined headings style, by selecting from the first drop down box as shown in the first image.
- You can also define this from the Style menu by clicking on Style and selecting the given heading.
- You can define the appearance of each heading under the Styles and formatting option by changing the default font colour, size, etc.
- Once the headings are defined, you can insert the Table of Contents. Click in your document where you want to create the table of contents. Choose "Insert --> Table of Contents and Index --> Index Entry", just click on “OK”. For updating table of content, right click on the table of content and Update Index or Table of Contents. Note that if you add any headings in the document, it will not automatically update the Table of Contents, hence you will need to come to the Table of Contents and do the update manually.
- Inserting Table of Content
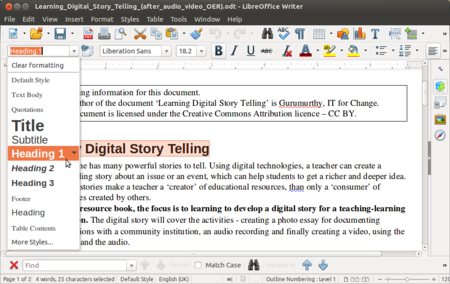
Paragraph style for Table of Content
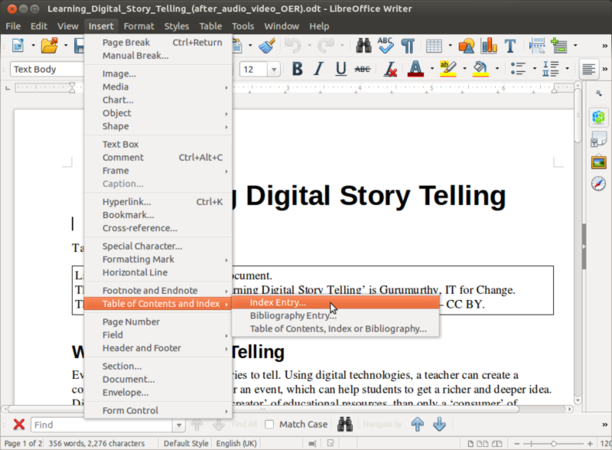
Insert Table of Content


- You can add a header and/or footer to your document. You could provide the name of the document (or any other static information) in the footer. You can also insert page number in the header or the footer, which will be dynamically generated by Writer. It is useful to have page number and name of your document on every page, this is specially useful if the reader wants to read a print copy. LibreOffice Writer allows you to easily insert this information at the bottom or top of each page. This can be done using "Insert--->Footer".
- Once a footer has been inserted, you can go to the bottom of the page and insert multiple fields of information using "Insert --> Fields". You can type any text in this footer, it will come on all pages. Other than page number, other dynamic information you can provide is the date/time stamp of the document. A similar method can also be adopted for inserting a header as well.
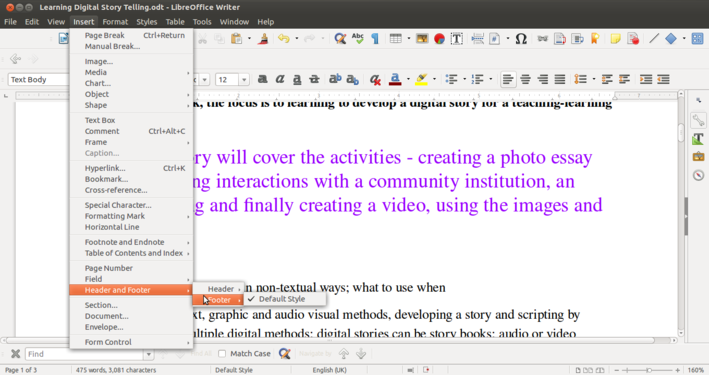
Adding header and footers for the page
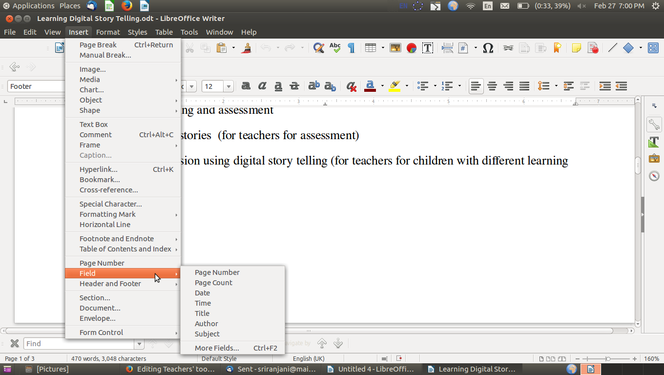
Inserting page fields


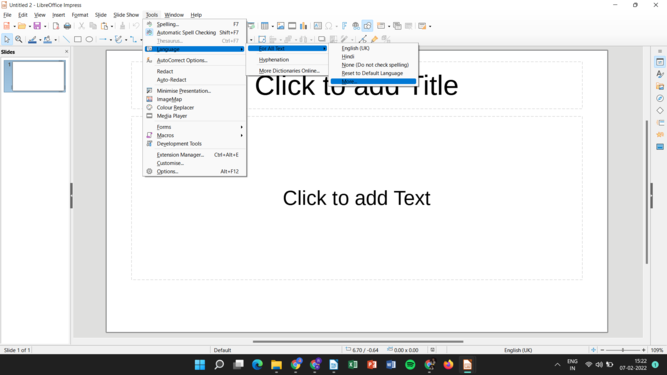
Spelling check
- Spelling - By enabling "Automatic spell checking" under Tools, you can check spelling within your document. You will see a red underline below a word spelt wrongly. (If you see a green line below a word, it suggests a grammatical error). You can move your cursor to the word and right click to get suggestions for correcting the spelling. In case you are clear your word is correct, you can also "Add your word to the dictionary" so that the next time you use it, it will not be treated as a wrong spelling.
- You can also do a manual spelling and grammar checking of the document. Select the text and click on "spelling and grammar" under "Tools" option. it will start looking spelling and grammar for the document. It is a good habit to always run a spelling check on your document before sharing.
- To check the spelling and the grammar of a text, the appropriate dictionaries must be installed. You can have dictionaries for your own language (Telugu, Urdu etc) installed, apart from the one in English.
- Formatting in LibreOffice Writer
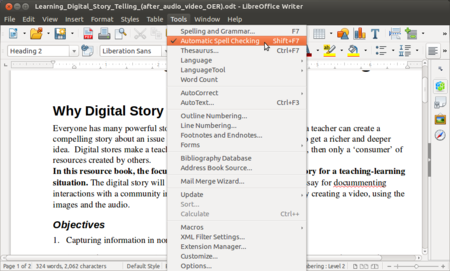
Auto spell checking
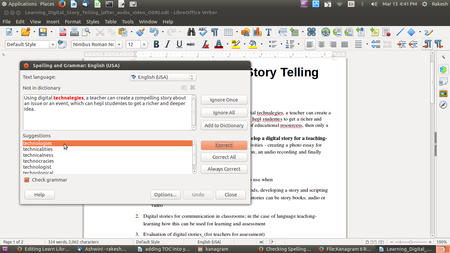
Spelling and grammar checking


Customizing the Toolbar
- LibreOffice is a Open source application and therefore it allows the users to customize the interface.
- Menu is most useful section of Writer and its structure must be familiar to the user.
- The structure of menu and its items can be customized easily so that it becomes user friendly.
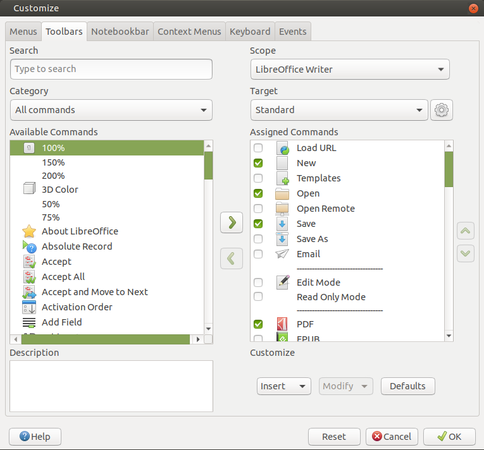
- To do this, go to "Tools-->Customize".
- Customize window will be having all the "Available Command" list on the left side. "Assigned command" on the right. If you want to remove the already assigned command then click on that particular command on the Assigned command list and move it towards Available command by clicking the left arrow button.
- Similarly if you want an additional command to your menu then choose the command from the "Available command" list. Click right arrow button to move it to the "Assigned command" list.
- You can also change the name of a particular command by clicking that command and click on "Modify --> Rename". Give the new name to that menu and click OK.
Customizing Toolbar

- To customize Toolbar, click on "Toolbar" tab in Customize window. As explained earlier, "Assigned Commands" will be having list of tools. The checked tools are already there in the toolbar and unchecked ones are available to move them to the toolbar. If you want any particular tool to be easily accessible and move to the toolbar then just check mark those and click "Apply-->OK".
- In the way you can change or assign the Keyboard shortcuts. For this Click on Keyboard tab in the Customize window. You can choose a command and click on "Modify?" to change its shortcut or functionality.
Menubar tools
Languages interface


Tracking changes to a document
You can use several methods to keep track of changes made to a document.
- Make your changes to a copy of the document (stored in a different folder, under a different name, or both), then use Writer to compare the two files and show the changes you made. This technique is particularly useful if you are the only person working on the document, as it avoids the increase in file size and complexity caused by the other methods.
- Save versions that are stored as part of the original file. However, this method can cause problems with large or complex documents, especially if you save a lot of versions. Avoid this method if you can.
- Use Writer’s change marks (often called “revision marks”) to show added or deleted material or changed formatting. Later, you or another person can review and accept or reject each change.
Preparing a document for review
When you send a document to someone else to review or edit, you may want to prepare it first so that the editor or reviewer does not have to remember to turn on the revision marks.
- Open the document. Check whether it contains multiple versions by clicking "File --> Versions". If multiple versions are listed, save the current version as a separate document with a different name and use this new document as the review copy.
- With the review copy open, make sure that change recording is turned on. The "Edit --> Track Changes --> Record Changes" menu item has a check mark next to it when recording is turned on.
- To begin tracking (recording) changes, click "Edit --> Track Changes --> Record Changes". To show or hide the display of changes, click "Edit --> Track Changes --> Show Changes".
- To stop recording changes, click "Edit --> Track Changes --> Record Changes" again.
The results of accepting or rejecting a change are as follows:
- Accept: Incorporates the alteration into the document and removes the change indication marking.
- Reject: Reverts the document to its original state and removes the change indication marking.
Changing Page orientation within the document
Creating a new style
Giving a name for a style

Changing page orientation
Inserting a page break


- LibreOffice Writer allows you to change the page orientation in between the document as per your needs.
- For example, If you have a document having data of three pages you can make the second page landscape and rest two to remain as portrait orientation.
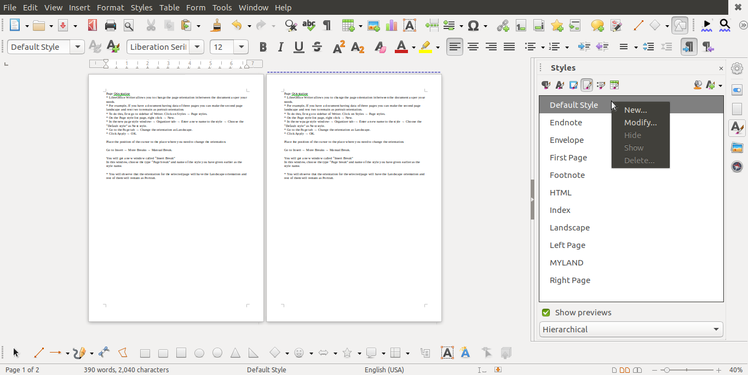
- To do this, first go to sidebar of Writer. Click on "Styles --> Page styles".
- On the Page style list page, "right click --> New".
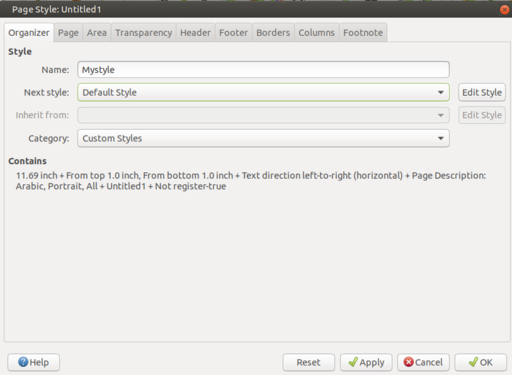
- In the new page style window click on "Organizer tab --> Enter a new name to the style --> Choose the 'Default style' as Next style".
- Go to the "Page" tab --> Change the orientation as Landscape".
- Click "Apply --> OK".
- Place the position of the cursor to the place where you need to change the orientation.
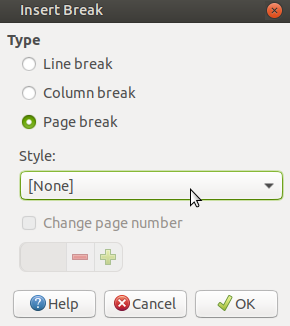
- Click on Insert --> More Breaks --> Manual Break". You will get a new window called "Insert Break"
- In this window, choose the type “Page break” and name of the style you have given earlier as the style name.
Sometimes it may happen that your cursor point becomes Landscape but remaining pages also changes their orientation and become Landscape. The solution for this is,
- Place the cursor from which you want your orientation to be Portrait. Click on Insert --> More Breaks --> Manual Break". You will get a new window called "Insert Break". In this window, choose the type “Page break” and name of the style as Default Style. (Usually this Default style will be having the page orientation as portrait. In this way your can make the rest of the pages again as Portrait.
Saving the file
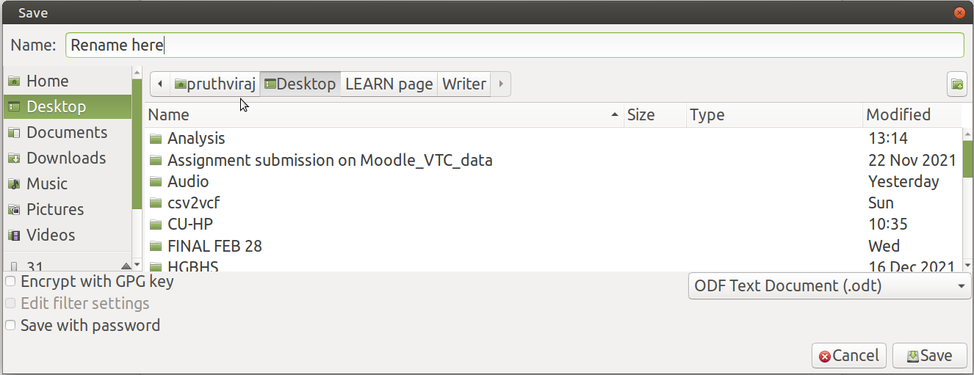
- Like in most applications, a file can be saved using the "File --> Save" command, or by the shortcut key "Ctrl+S". Always give a meaningful file name, reading which you should get an idea of the file contents. Often adding the month-year information when the file was created can be useful later File will save in .odt format, ODT is the short form of Open Document Text. ODT conforms to Open Document Format (ODF) which is recommended by the Government of India through its website Policy on open standards””.
- Like in most applications, a file can be exported to a PDF format. This is useful when you only need to print the file and do not want any changes to it. You can also export a document to a 'html' (web page) format, which can be opened by a web browser or MS word format which is supported by Windows operating system.
Save as ODT
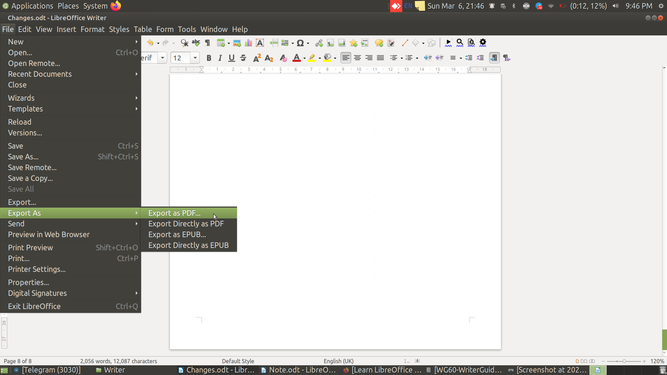
Export as PDF
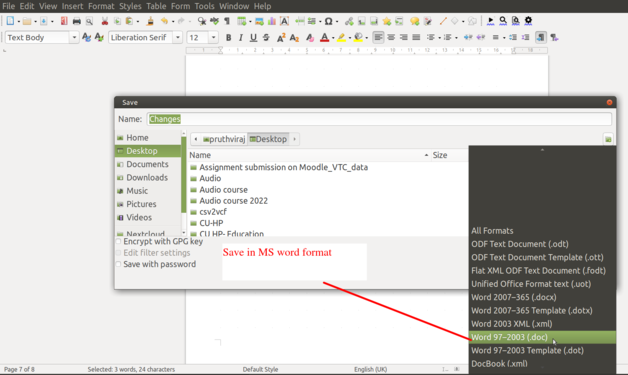
Save in MS word format


Advanced features
- Track changes (Recording editing changes by another person in another colour in the document, which can be accepted or rejected by the author)
- Multiple columns (Useful for making newsletters and magazines) and other page layout functions
Ideas for resource creation
- You can use this application to create and edit text resources. You can insert images, web links, hyper links in the document and connect the text to other resource formats. You can insert and edit tables, create sections (with section headings) and format it in many ways to create a text document.
- Infographics, posters, comic strips are some resources you can create using text editors in addition to making reports.
References
Learn Freeplane
Introduction
Basic information
| ICT Competency | Freeplane is a free and open source software application that helps you create and edit concept map, as a generic resource. For the purpose of this section, we can treat 'concept mapping' as nearly synonymous with 'mind mapping'. |
| Educational application and relevance | Making concept maps can support thinking, brainstorming, sharing information and documenting meetings and group processes.
Educators consider that concept mapping is a good approach for building skills in students for ideating and organizing ideas; they also find it a great asset for teaching. It is a great tool for students to help them organize their thought processes when writing. Teachers and students can use this application to collaboratively or individually create concept maps on an idea or explore a problem. |
| Version | Version - 1.10.2 |
| Configuration | This tool has no specific configuration requirements. It is available as a part of Ubuntu custom distribution.
Freeplane is part of the Ubuntu GNU/Linux operating system. It is also available for download on Windows and Mac operating systems as well. |
| Other similar applications | Freemind |
| The application on mobiles and tablets | MiMind |
| Development and community help | Freeplane website |
Overview of Features
Freeplane helps you to create a textual OER with possibilities for linking to additional resources (on your computer as well as on the web), adding annotations as well as images. It allows you to organize and order ideas into a hierarchy connected by lines (edges). Freeplane is a tool to create concept map that can be organized graphically, in the form of a map or tree of ideas. It provides a pictorial overview of the concepts, related concepts / sub-concepts for a topic. Nodes can also be linked with free lines (connectors) and labels. The concept map can be exported as an image as well as a text document.
Installation
For Ubuntu OS
- The application is part of the Ubuntu custom distribution.
- In case you do not find it on your computer, you can install by typing Freeplane on top search bar in Software Centre(App Grid).
- If you would like to install through the terminal follow these steps below:
- Open terminal by clicking Applications->System Tools->Terminal or through Keyboard shortcut
Ctrl+Alt+T - In the terminal window, type below command and press enter to start the installation by providing your machine password:
sudo apt-get install freeplane
- Open terminal by clicking Applications->System Tools->Terminal or through Keyboard shortcut
For Windows OS
To install and use Freeplane on your Windows computer, you need to install both Freeplane and Java runtime packages in your Windows computer.
- Download the Freeplane installable file from this link and download Java Runtime Environment from this link. You can save these two .exe files on your computer (preferably on Downloads folder).
- Now, go to the downloaded path on your computer and double click on "Freeplane-Setup-...exe" file to begin the installation.
- Click "Yes" if it ask your permission to allow this program make change to the computer, Keep clicking on "Next" button to continue and complete the installation.
- Install the downloaded Java runtime package using the same method described above.
![]() Note: To use Freeplane on your computer, Java runtime tool is compulsory, make sure you have installed both Freeplane and Java.
Note: To use Freeplane on your computer, Java runtime tool is compulsory, make sure you have installed both Freeplane and Java.
Watch this video tutorial for Freeplane installation steps
For MAC OS
- Download the installation file from this link.
- When the download is complete, find the downloaded .dmg file and double on click it.
Working with the application
- To download mindmap file click here (To download the example mindmap file, "Right click on 'click here' in the above line--> Click Save link as". Then give the path to save the file.)
Creating a map
- Creating a concept map

Opening Freeplane

Main window of Freeplane


To learn working with Freeplane, we will start creating a concept map for Digital Story Telling; you will see above that Freeplane has opened a window with a box with text "New mindmap". This node, also called the "Root node" will contain the core idea/ theme to be discussed in the concept map. You can click on "File" option to "Save" this map; when the map is saved it will get saved with the name in the root node. Concept maps can be stored in your folders; they are saved with an extension ".mm".
Inserting nodes
Here as an example, we have created a concept map called Learning Digital Story Telling. After the root node is created, additional ideas are added by adding more nodes, called child nodes. The concept map gets built by adding further child nodes, for topics and sub-topics. You can keep adding child nodes to any node.
- Use the ‘insert’ key to create a ‘child node’ this is a sub-concept of your current concept.
- Use the ‘enter’ key to create a ‘sibling’ this is a parallel concept to your current concept.
Thus you can create a concept map with knowing just two functions – add child node (insert) and add sibling node (enter). In this manner, a concept map can be used to classify and categorize information.
- Child and sibling nodes
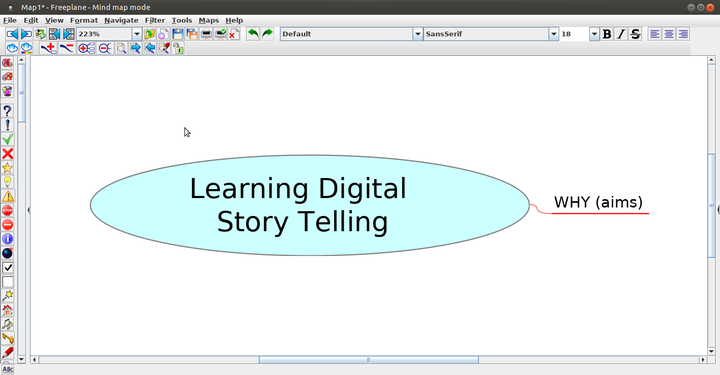
Child Node
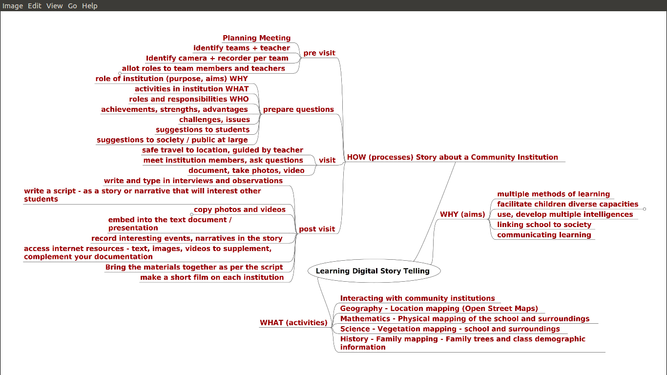
Sibling Node


Our map has nodes for the ‘why’, ‘what’ and ‘how’ of DST, with sub-nodes.
- The first image shows the creation of a concept map with the first child node.
- The second image shows the completed concept map with child nodes and sibling nodes.
You can go to the next line in a node for text by giving pressing SHIFT+ENTER. This command will make the cursor to go the next line.
![]() Note: You can Zoom in and Zoom out the map according to your requirement. To do this, Click on "View --> Zoom --> Zoom In/Out".
Note: You can Zoom in and Zoom out the map according to your requirement. To do this, Click on "View --> Zoom --> Zoom In/Out".
Linking nodes

Connect two nodes
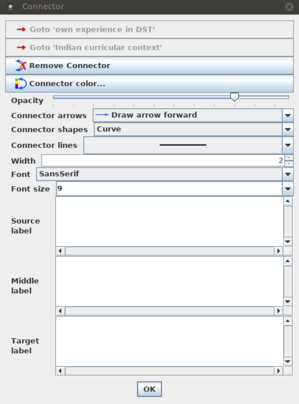
Connector properties


- When you discuss the concepts, you can notice that sometimes concepts are related, but not in a parent-child-sibling relationship and you want to link them to study in detail. For doing this you can add a graphical link (an arrow) to connect two nodes. To do this select two nodes, then go to Menu Bar and choose "Edit --> Connect" option. Then you can see graphical link which is connected to two nodes. You can click on the arrow and move it around.
- By right clicking on graphical link(connector) you will get the window as shown in second image. In that you can change connector color, shape, size and direction. You can also add or remove the source node label, middle node label, target node label.
![]() Note: If you want to select more than one node, you can press and hold Ctrl key and click on the the nodes. This process allows you to select multiple random things at a time.
Note: If you want to select more than one node, you can press and hold Ctrl key and click on the the nodes. This process allows you to select multiple random things at a time.
Adding notes
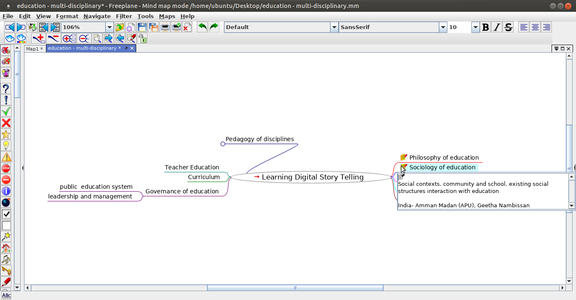
Node with a note added

How to add a note
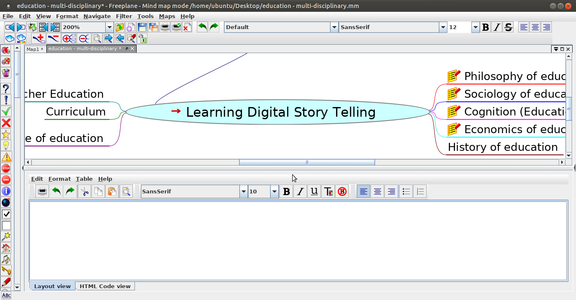
Typing in the note window


- In our Learning Digital Story Telling concept map, you will also see a yellow label beside the arrow and if you place your mouse over the yellow label, you will see a note description.
- To add a note, you can click on the node, as shown in the second image, go to "View--->Notes--->Display note panel". Alternatively, you can "right click on the node you want to add a note --> Click on Edit note in a dialogue"
- You can type your note in the note window which opens as shown in the third image. You can change the position and size of this note window.
Moving nodes
Moving nodes

To move nodes from one position to other position or to disconnect a node from its current parent and connect it to another parent you can simply click and drag it to its new location. Each node has two positions where you can drop another node. These positions are visible if the cursor is above it.
- If the cursor is near the top of the target node, the whole upper half lights up. If you drop a node here, the node will become a sibling above the target node.
- If the cursor is near the child side of the target node, the left or right side of the node lights up. If you drop the node here it will be connected as a child node.
Inserting Images to the Map

Inserting Image

- To insert an image to the map, you must have the image stored in your computer. You can insert the image to the map first by selecting the node under which the image should be displayed.
- To insert an image, You can go the menu "Insert-->Image-->Add Image". You can browse for the image you have on your system.
- Alternatively, you can right click on the "Node-->Add Image --> Add Image".
- Once image gets inserted onto the Map, you can resize it by moving the cursor to the right bottom of the image and then dragging it as per your requirement.
Hyperlinking files and web links
- Adding hyperlinks
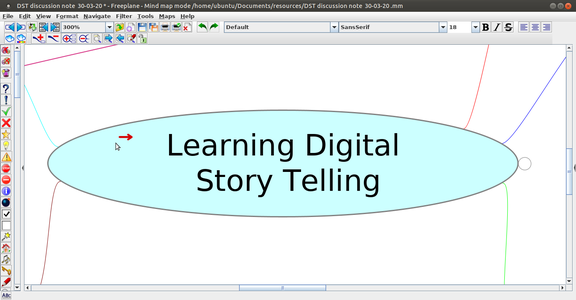
Node with a hyperlink

Linking to resources on the internet


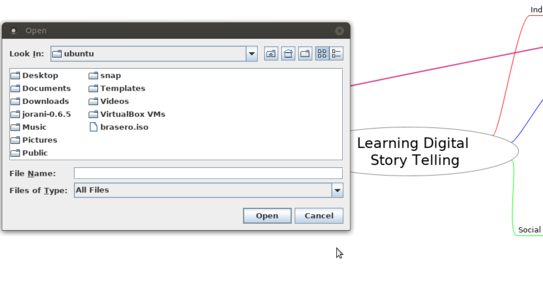
Linking to resources on the computer

- In the first image, did you notice the red arrow in the root node of our concept map? This main node has a hyper-link which opens the Wikipedia page on digital story telling. You can embed a hyper-link on a node, such that clicking on the node can connect to related resources. In our Learning Digital Story Telling .mm concept map, we have inserted a hyper-link for the main node ‘Learning Digital Story Telling’.
- To do this Move your cursor to this node and select "Edit --> Link --> Add or Modify hyperlink" (type). You can also use the keyboard short cut CTRL-K. Freeplane will open an input bar as shown in the second image. We will type in our web page address https://en.wikipedia.org/wiki/Digital_storytelling into this input bar.
- You can also add a hyperlink to a local file on your computer. If you select When you click on "Edit-->Link-->Add Hyperlink" (choose) allows you to link to a file on a folder on your computer. The third image shows how to choose a file from your folders to link.
Adding different shapes to the node
In Freeplane node need not be a plain one. Node and its content can be well customized with different shapes. Generally we call it as Cloud. A cloud covers the entire area of a node and its contents and can take shape like Arc, Star, Rectangle etc.

Inserting cloud to the node

Node core properties


- The nodes can be designed in variety of attractive ways and we can also customize it according to our needs.
- To do that, Select the particular node for which the cloud properties need to be customized.
- Go to "Insert--> Cloud". Select the style of cloud you want.
- You can also change the cloud color.
- Some of the properties for a node can be changed in Format menu such as style, look etc. For this, Go to "Format--> Node core". Choose the various properties and make your map attractive.
Saving and exporting
Like in most applications, a file can be saved using the "File --> Save" command, or by the shortcut key CTRL+S. Always give a meaningful file name, reading which you should get an idea of contents. Freeplane saves files with a .mm extension. You can also export a concept map to image (png or jpeg), text (odt and html) and pdf formats.

Saving the Map
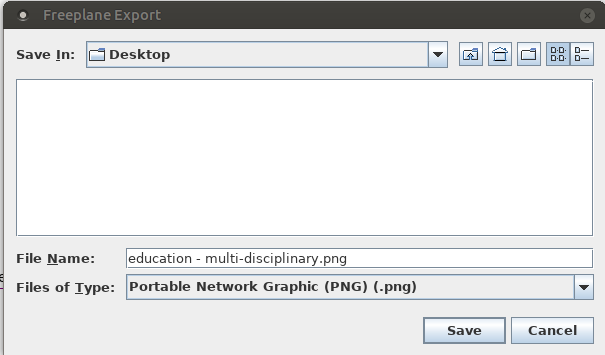
Exporting the Map


- By default your concept map is saved by Freeplane as a '.mm' format file as shown in the first image. While saving the file, Freeplane will display the file browser, to allow you to select the folder in which you can save your file. By default, the file is saved in your home folder
![]() Note: If you save the Map in .odt format all the content in your map will appear as table of contents. The Main node will be the name of the chapter, sub nodes will be the sub points and so on. Whenever it is required to print the map as it is then better option will be to export it in .pdf extension.
Note: If you save the Map in .odt format all the content in your map will appear as table of contents. The Main node will be the name of the chapter, sub nodes will be the sub points and so on. Whenever it is required to print the map as it is then better option will be to export it in .pdf extension.
Like other softwares, Freeplane also contains keyboard shortcuts which makes our work much simpler. For such short Shortcut keys
Advanced Features
Typing in regional language in concept map
To type any Indian regional languages in your concept map, you need to download and install the Sakal Bharati font from this link (after your download, double click on the downloaded "SakalBharati.ttf" file, click on install font to install the font in your computer).
Now, configure SakalBharathi as the default font in your Freeplane tool.
Open a Freeplane tool, Goto "Format --> Manage styles --> Edit Styles". This will open a concept map standard template (like in below gif).
Configuring the Sakal Bharati font

- From the Menubar, Goto "Navigate -> click all visible nodes".
- Now on the right-side properties window go to "Font of whole core", Font family select "Sakal Bharati font".
- After you configure, click on the right mark (green colour) on the top left window.
- Now you just close and reopen concept map to see the Sakal Bharati is your default font.
Now, you should able to type regional languages in your concept map using Sakal Bharati font. ![]() Note: After installing the font in your computer, If you are not able to configure Sakal Bharati as a default font. You can follow below steps to type regional language at one time.
Note: After installing the font in your computer, If you are not able to configure Sakal Bharati as a default font. You can follow below steps to type regional language at one time.
Regional Language typing

Open Freeplane, select the node where you want to type, change the font from sans serif to Sakal Bharati from the font list on top. Now, you can type any Indian regional language in the node. For every new node before typing, you have to select Sakal Bharati font and type.
Inserting Icons to the map
Icons are special symbols which makes the map more attractive and understanding. User can include variety of Icons to the Node or data just to give a hint to the viewer about its background. For example, you want to set a reminder for a particular item in the map. In this case you can put a symbol to make the viewer understand its status. To insert Icon to the map, click on node to which the Icon need to be placed --> Insert --> Icons --> Icons by Table.
Blinking nodes
You can make a particular node to blink in Freeplane. Blinking simply highlights the things with various colors. To do this, you can select any Node to which the effect should apply --> Format --> Node core --> Tick 'Blinking Node'.
Ideas for resource creation
Freeplane a good tool to start your resource creation work. You should develop a concept map for the topic you want to develop a resource on. The ideas you have about the topic, the sequencing of ideas and sub concepts, the specific points for each idea / sub-concept can be developed on the map. Links between nodes, with web pages, notes explaining concepts can all be inserted in the concept map. The power of the digital concept map is that you can keep revising the nodes, adding and deleting, moving and copying nodes as you want. This makes the process quite dynamic.
Once you have completed your concept map you can share it with your colleagues for feedback with which you can refine the concept map still further. Even it is easier to share when the map is exported as a PDF (.pdf) or an image (.png) file.
Exporting a concept map to a document for further fleshing out
The advantage of a concept map is that you can categorize and arrange your thinking the way you want to. You can enter detailed notes for any node. When you export it to a ODT, you can see this as a document, with the 'note' information being the text in the note, and all the nodes will become headings. This way you can even write a document using Freeplane. Use this whenever you are writing an essay or an article or a paper
![]() Note: Before exporting it into ODT you should format freeplane file to automatic layout for all nodes. To do this follow this step. "Go to Format-> Automatic Layout-> for all nodes" and select it. This will format nodes to headings, child nodes to sub headings and notes to text source.
Note: Before exporting it into ODT you should format freeplane file to automatic layout for all nodes. To do this follow this step. "Go to Format-> Automatic Layout-> for all nodes" and select it. This will format nodes to headings, child nodes to sub headings and notes to text source.
Frequently Asked Questions
I am unable to open Freeplane on my system
It is to be noted that Freeplane requires latest version of Java to be present in your system. Sometimes the issue can also be because you are trying to install Freeplane with a latest version but Java is obsolete or even vice versa. So make sure that you have the latest version of Java in your system. If not, click on this link to download the latest version of Java. To check the version of Java installed on your system, Open Command prompt or Terminal and type "java -version" and press Enter.
After upload/share my concept map on the Internet, inserted Images are not displaying
When you insert an image into your concept map, you do not actually 'save' the image inside the concept map. Freeplane will only store the 'path' information, that is the location of the image file on your computer. Now when you mail the concept map to someone else or upload it on a web page, the image is not shared along with the concept map. When the map is opened by another person, Freeplane will try to locate the image again in the same location as it is in your computer, and will fail to find it. Hence, the image will not appear.
One way of not facing this problem would be to hyperlink to an image on the web/internet. In which case when you click on the link, Freeplane will try to get the image from the web, and if there is connectivity you will be able to access the image. Hence, the images not appearing subsequently is not a problem.
I am unable to edit the map in any way, what can I do?
When you unable to do anything on the map, you will be inside the 'View Mode'. Kindly change it to 'Edit mode', so that you can edit the map. To do this, Click on "Maps-->Edit Mode".
I am getting a pop window with some version ?
Click on OK to get the new concept map, The standard version is 1.6 mm.
Standerd template version is 1.6 mm
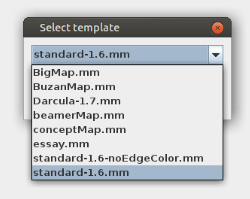
Other template options


I am getting the example/another concept map when I open Freenplane to create a map?
Click on File→New map to create new file.

How to move node or sub-child Left/Right, Up/Down?
Select and use Ctrl+left/right keys to move node left/right and Ctrl+up/down to move nodes up/down.

How to move sub-child Up/Down?
Select and use Ctrl+up/down to move nodes.

When I Hit Insert key not able to create sub-child (sub-node or child node) node?
Tab key is another option to create sub-child (sub-node or child node) node.
I am not finding the Note window, hyperlink,node?
In new version of Freeplane you need to Right click and you will get edit option in which you find the option Note window, hyperlink, link node.
How to zoom in/out the concept map?
Click on white space in the map and then use Ctrl+scroll on mouse (or) you will find the percentage icon on the top menu bar you can click on this and increase or decrease the value .

I am not getting the Emoji where do I get?
You will have a arrow icon on the left side of your freeplane window, click on it you will get the Emoji.

I am not finding the Tool or Menu bar?
Right click on the white space you will get option where Menu and Tool bar is unticked you need to tick it to enable.

I am not able to click on the link/note which I have inserted after the export to PDF or Image?
Exporting to PDF or Image is not Dynamic, its a Static page/Image so you will not be able to click the link or see the note window
Which version of java need to be installed to run freeplane?
Freeplane need requires Java 11 to 17 to be installed.
Where can I get all the shortcut keys?
Click on Help(menu bar)→Key-reference to know the shortcut keys.

Can I resize the embedded images size?
Yes you can resize your Image, when you take your cursor on the bottom right of the image the arrow cursor get changes , now click and drag up(smaller size) and down(Large size) to resize the image according to your need.

How to update/remove inserted hyperlinks?
You need to right click on the link, go to link→ Add or modify the link →delete the link. This will remove your inserted hyperlink.
Can I embed video and audio files to the concept map?
No we can’t embed Video or audio files to concept map, But you can hyperlink the local file path so that you can open it by clicking the link when presenting it.
References
Learn Firefox
Introduction
Mozilla Firefox (or simply Firefox) is a Free and Open Source web browser developed by the Mozilla Foundation and its subsidiary. Firefox is available for Linux, Windows and Mac OS operating systems; Firefox is also available for smartphones. It provides an interface between the server and the client and requests to the server for web documents and services to the client machines.
Basic information
| ICT Competency | Firefox is a Free and Open Source web browser for connecting and learning.
It is web browser (or Internet browser) to browse information and resources from the web. |
| Educational application and relevance | Accessing resources from the web for one's learning as a global digital library is one of the most important advantages of ICT. A browser is essential for accessing Information, downloading resources or participating in the virtual platforms on the web. |
| Version | Firefox 100.0.2 |
| Configuration | No need to configure, its a web based application and need internet connection to browse. |
| Other similar applications | Chromium, Brave |
| The application on mobiles and tablets | Android version for Firefox can be downloaded from Fdroid. |
| Development and community help | Mozilla Foundation and contributors - Mozilla Corporation |
Overview of Features
When we need any kind of information, digital resources or virtual support from the others or participating in the virtual platform, essentially we need to connect Internet/web. To connect to internet or web, we need web a software and that is web browser. Firefox is one of the most popular web browser which gives more stable and useful functionalities to connect to web.
For more detail visit this link
Installation
For Ubuntu OS
- The application is part of the Ubuntu custom distribution and any Linux based OS.
- If you would like to install through the terminal follow these steps below:
- Open terminal by clicking "Applications --> System Tools --> Terminal" or through Keyboard shortcut
Ctrl+Alt+T - In the terminal window, type the below command and press enter to start the installation by providing your machine password:
sudo apt-get install firefox
- Open terminal by clicking "Applications --> System Tools --> Terminal" or through Keyboard shortcut
For Windows OS
- Visit this Mozilla Firefox page in any other browser such as Microsoft Edge, Google Chrome.
- Click the "Download Now" button.The Firefox Installer that downloads will automatically offer you the best available version of Firefox for your computer.
- If you see an security Warning dialog, click "Open" or "Run" (see below images)
- The "User Account Control" dialog may open, to ask you to allow the Firefox Installer to make changes to your computer. If the below dialog box appears, click "YES" to start the installation.
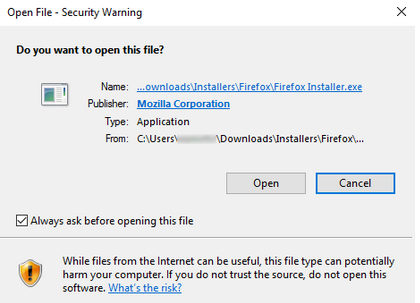
Click on 'Open'
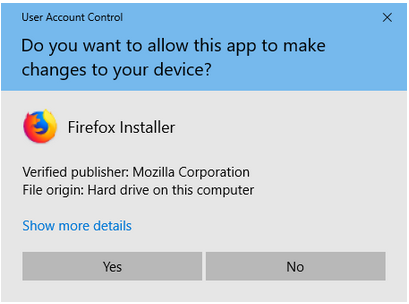
Click on 'YES' to start the installation


- Wait for "Firefox" to finish the installation (In windows search bar, type firefox and click to open)
- When the installation is complete "Firefox" will open.
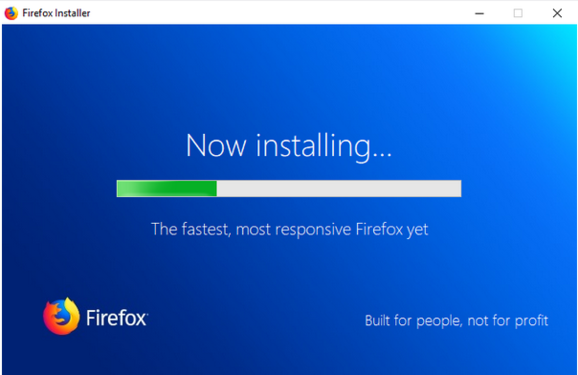
Finishing the installation
Finished Installation


Watch this video tutorial on Firefox installation on Windows computer
For MAC OS
- Click here to open the download Firefox installation file for MAC OS.
- Click "Download Firefox" option.
- After completing the download, the file (Firefox.dmg) may open a Finder window containing the Firefox application. Drag the Firefox icon to the Applications folder.
Working with the application
Opening and accessing Firefox
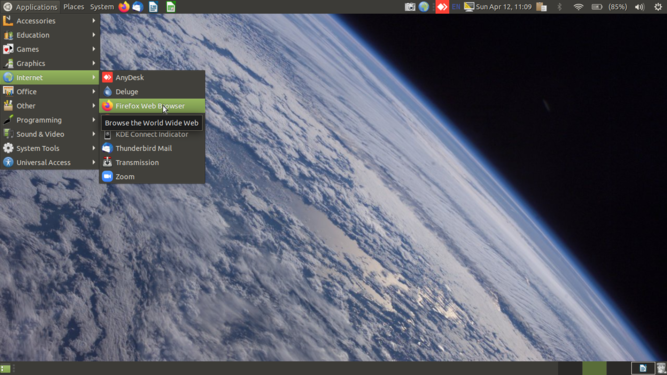
Opening Firefox in ubuntu

Opening Firefox in windows


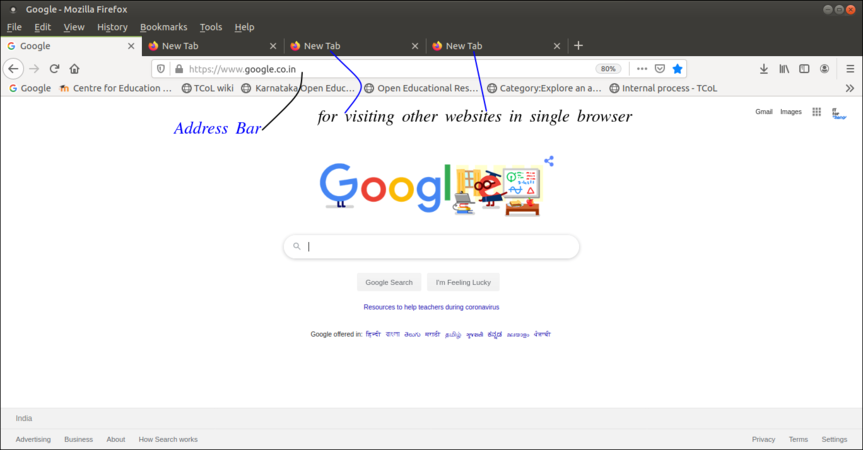
The menu bar in Firefox

- Mozilla Firefox will appear under "Applications --> Internet -->Firefox Web Browser".
- Main page will look like the third image. If you know the web address you can type it in the address bar. Ex; http://www.upsc.gov.in

Searching resources
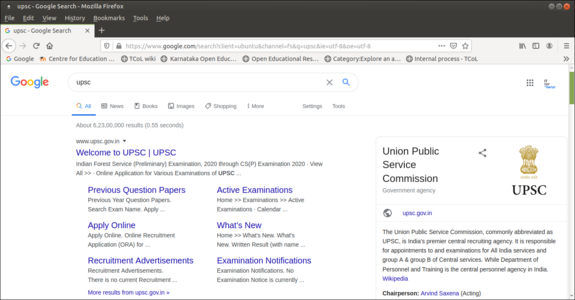
Browsing information


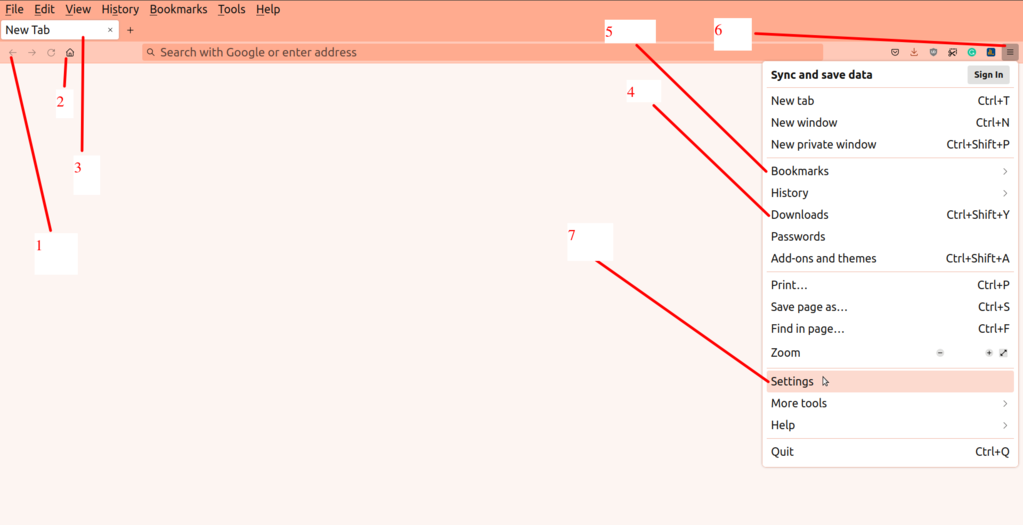
Firefox features

- As shown in the firefox features
- Go back to previous visited page using this button
- Go to browser home page
- New tab is used to search multiple web pages in a browser
- Once you download any file, click on this button to check access your downloaded files.
- Bookmarks menu is available from here
- Application menu can be accessed using this button
- Click on settings button to change browser settings
- If you don’t know the particular web address, you can type the key word of searching object Ex: UPSC. you can search not only for text, but also for images, videos using search engine. In Google search engine (there are also other search engines like DuckDuckgo, Wikipedia etc), the search results has options for searching the web, or images or videos. You can download the file (video, text file, image file) to your computer. Check if the copyright of the file allows to copy and use.
- The search results will appear like in the third image. You can click on the links to access the information retrieved.
Tabs allow you to open and organize multiple websites inside a single Firefox window. This keeps your screen from getting filled fully and makes it easy to switch between sites.
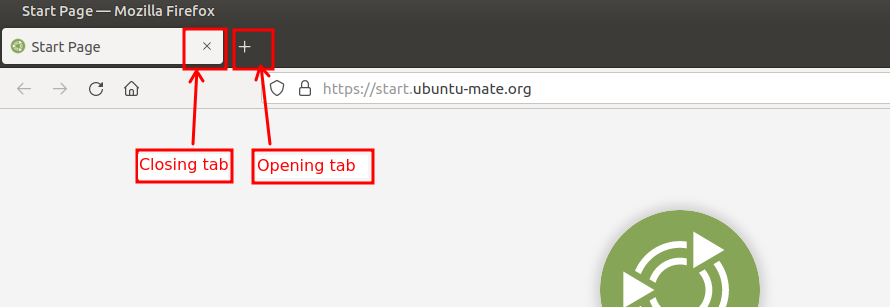
Opening and Closing a tab

As indicated in the image above, '+' option lets you to open a new tab. Alternatively you can press "Ctrl+T" to open the new tab and to close any particular tab click on 'X' mark on the side of the tab indicates, alternatively you can press "Ctrl+W" on the keyboard.
Opening a new tabs is very useful feature when you searched for a topic and not sure the result link might end up your search. In such case you can right click on that link and click on "Open in a new tab", just to avoid going back to the searched result in the same page.
Changing browser default homepage
Set your favorite/most accessible website as your homepage so you can see it every time you open Firefox.
- Click the menu button at the top-right corner of the browser, then Settings
- Click "General", Click on the box next to "Homepage and new windows" and choose "custom URLs" from the drop-down menu (see the below gif).
- Enter a URL which you want to make it default home page (example: https://duckduckgo.com) in new window and tabs.
- Close your browser and open your browser to apply the changes you have done.
change browser default homepage
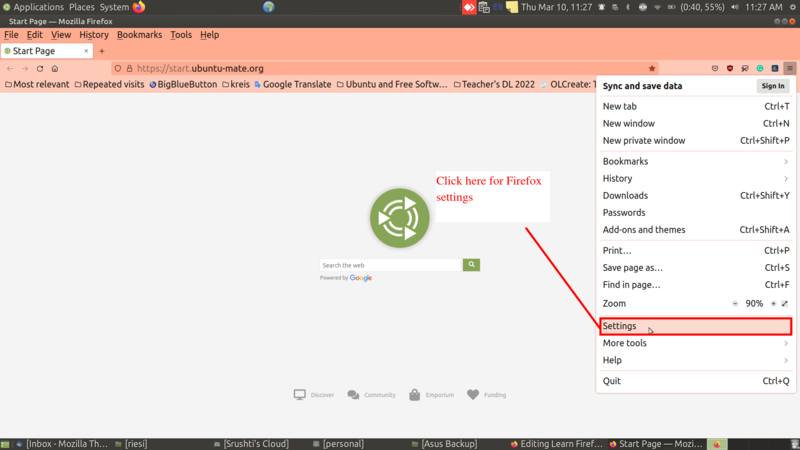
Firefox settings


Default Search Engine
Search engine produces the number of results for any topics that you search for. In Firefox you can set particular search engine as your default one so that whenever you search for a particular topic, it would redirect you to the search result in accordance to that default search engine. Try to use search engine which will not share your data to the public or for the commercial purpose. You can use DuckDuckGo search engine. DuckDuckGo does not store IP addresses or user information. Billed as the search engine that doesn't track you, DuckDuckGo processes around 1.5 billion searches every month.
To do this, click on "Settings in the firefox browser --> Click Search tab on left --> In the Default Search Engine option choose the required search engine".
Customizing toolbar
Firefox's toolbar provides easy access to common features. The toolbar is easy to customize. You can change the items that appear in the menu or your toolbar. Click the "Menu" button , click "More Tools" and choose "Customize Toolbar".
A special tab will open which allows you to drag and drop items in or out of the menu and the toolbar. Feel free to experiment with what works best for you. You can always start over by clicking the Restore Defaults button at the bottom of the screen.

Searching Image resources
- You can search and download the images from Firefox web browser.
- For example: If you want to search images about Digital Story Telling you can follow these steps.
- Simply type "Digital Story Telling" in the search bar of the search engine.
- Select "Images" tab from the top tab of the search engine.
- If you want to download or save images to your computer, click on the images and once it open on the right side of the window, right click on the image and click on "Save image as".
- Rename the image file and select appropriate folder to save.
- Searching for resources from web
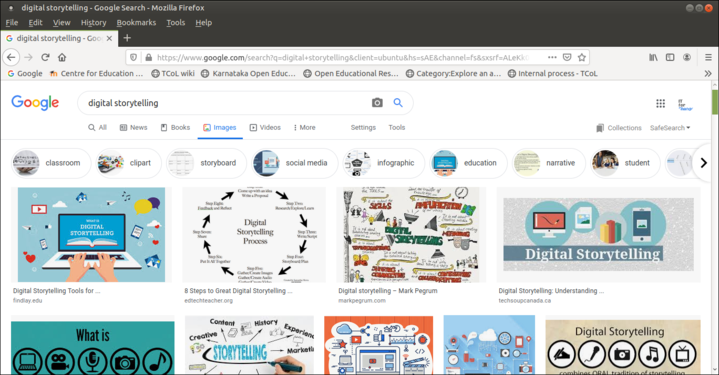
Searching image resources

Accessing and Downloading OER images from web
All the content which are available on internet need not be open. Open in the sense of accessing and using the resources. Some of them could be copyrighted. Therefore, you need to be careful while accessing some particular content in the internet.
OER stands for Open Educational Resources, that are open to public for using, changing, reproducing and publishing the reproduced content. This is applicable for text, image and audio or video.
- You can search for OER images from Firefox web browser, For example: If you want to search images about Digital Story Telling, simply type "Digital Story Telling" in the search bar of the search engine and select ‘Images’ link.
- Click on "Tools". Here you can work with various filtering options such as size, color, type, time, usage rights.
- Under usage rights select creative commons licenses to filter OER images.
If you want to download or save images to your computer, right click on the image and click on "Save image as". Rename the image file and select appropriate folder to save.
![]() Note: Filtering the images makes your search more optimized. For example you need a picture of planet Earth, but your color preference is Orange not Blue. In such case you can click on "Tools --> Color --> Pick up the color Orange".
Note: Filtering the images makes your search more optimized. For example you need a picture of planet Earth, but your color preference is Orange not Blue. In such case you can click on "Tools --> Color --> Pick up the color Orange".
- Searching for OER image resources from the INTERNET

Filter OER Images
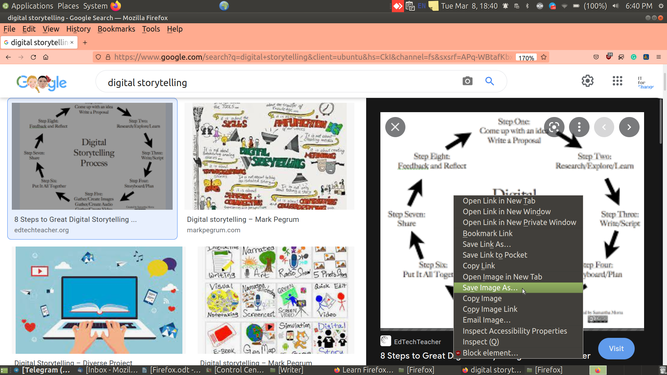
Save image resources


You can also download the images from other web repositories such as Wikimedia and Creative Commons.
Wikimedia being a sister website of Wikipedia stores the OER images in a broader context. Users are allowed to upload their images and can explore much more options here. In Creative Commons, you can search for "CC images" which allows user to filter the choice based on their requirement.
Accessing and downloading text resources from web
You could look for text information by simply typing the key word of your searching content, In the below image (Image1) you can see text information accessed for "Digital Story Telling" in the search bar of the search engine.
You can search the content in larger OER repositories like Wikipedia, OER commons, KOER.
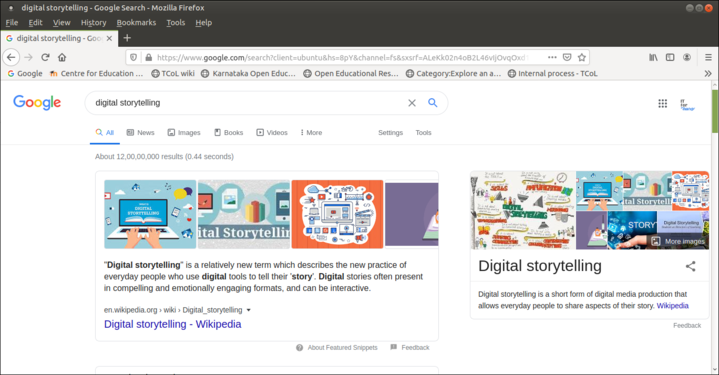
Searching text resources
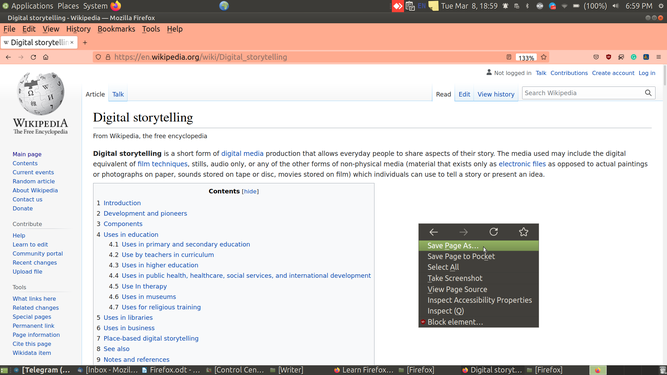
Save in HTML format


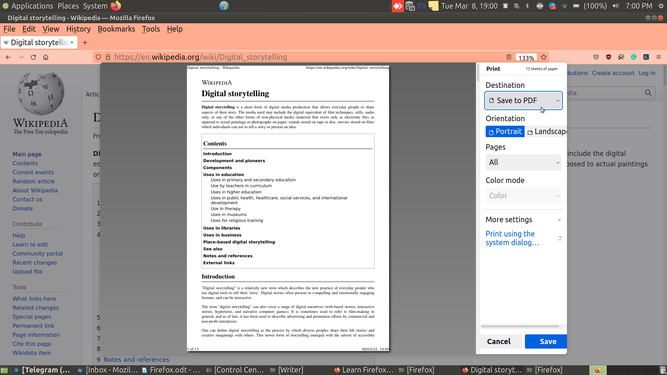
Save as PDF

Screenshot in Firefox


Wikipedia, being one of the largest free text resource repository gives you enough of information related to almost everything all over the globe. As you search for a particular topic in Wikipedia, the search bar shows the pages related to your searches which you can choose and click which is most relevant to you. You can select some or any portion of the text, copy those and paste it in the text editor for the future reference.
You can save webpages in 3 formats to use in offline mode without the need of having internet connection.
- Save as HTML: If you are looking to save any webpage in HTML format for your offline use, right click on the "webpage" and click on "Save page as" and select a folder where you want to save this file and click on "Save". Videos in the webpage will not be loaded in HTML format.
- Save as PDF: If you are looking to save any webpage in PDF format for your offline use, Click on "Application" menu and goto "Print" and select "Save as PDF" to save your file. Please note that video content will not work in this format. This format is specifically used for sharing the content or to take the print out of the text.
- Save the screenshot : This is a special feature on Firefox that saves the required data as per your needs.
- Full Page: If you need the entire webpage but need it to be as an image then you can select the Full page option in the screenshot. Although the image looks very small the original clarity will not be affected so that you can zoom the image and get the clarity as in the original format.
- Visible : If you want only the visible thing on the webpage to be captured as an image then you can select the option visible.
- Area : If you are looking for a particular area of data in a webpage then you can drag the cursor to the area which needs to be captured.
Accessing and downloading Audio resources
Audio plays an important role in any multimedia form. Voice and Music makes any content more richer and interesting.
You can listen and download the OER Audio resources from some of the sites like Bensound. Basically bensound makes you listen and download the OER music files which you can use for any purpose.
Accessing and downloading videos from YouTube
Using computer
YouTube is the largest video repository we have on internet. The videos can be watched on YouTube by simply going to the URL of youtube, that is "www.youtube.com" and on the search bar searching the content which is relevant to you. Once you search your topic you would get a list of result from various YouTube channels.
Immediately below the the search result you can find the filter option where you can filter out only the things you require. There is an option "Creative Commons" which allows you to freely download the videos of OER content that can further be modified and used according to the user needs.
The following animation will teach you how to use the "ss" prefix to easily download YouTube videos:
Downloading YouTube video

- Go to your browser and find the video you want to download from YouTube.
- Click a video to play it, then pause it.
- Navigate to the video URL, add "ss" before "youtube.com ..." and press Enter.
- You will be redirected to another page where you can save the video.
- This page is the parent site of ssyoutube.com known as savefrom.net.
- You will find out information such as duration, title of the video, and also get a download link.
- To the right of the green download icon, you will see a drop-down menu. Click on it and select the format in which you want to download the video (with or without sound).
![]() Note: To download OER videos from the internet you can follow these steps:
Note: To download OER videos from the internet you can follow these steps:
- Go to Youtube website and search for your required video.
- Click on "Filters" option.
- You can explore various filtering options available such as upload date, type, duration, features, sort by. In case of OER videos, click on "Creative Commons" under the "Features" category.
- It filters and displays only the OER videos
Alternatively, you can watch the videos on Vimeo, Wikimedia Commons, Archive.
Using Mobile phone

Using Bookmark feature to save useful webpages links
All modern web browsers include bookmark features. Bookmarks are also called "Favorites". You can use this features to store all your website links within the firefox browser. This will help you to access these links when required.
To add any links to the bookmark section, Go to "Menu Bar" and click the bookmarks and click on "Add this to bookmarks" to save the current page as a bookmark. By default, new bookmarks are saved to the Unsorted bookmarks folder. If you want separate folder, you can also create as per our requirements.
To enable bookmark : Right clicking on the free tab space of the browser like shown in the below screenshot.
In Bookmark menu You can add name to the bookmark, Add location where to save it and also you can give tags so that it will be easy to search web pages.
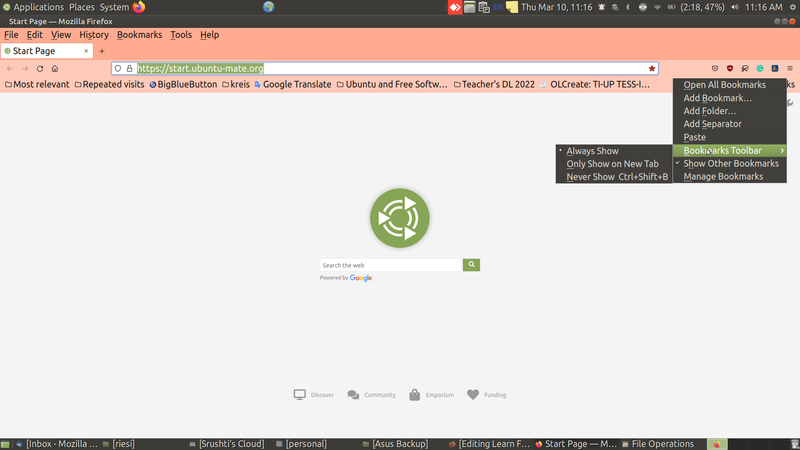
Click on * to bookmark any web page
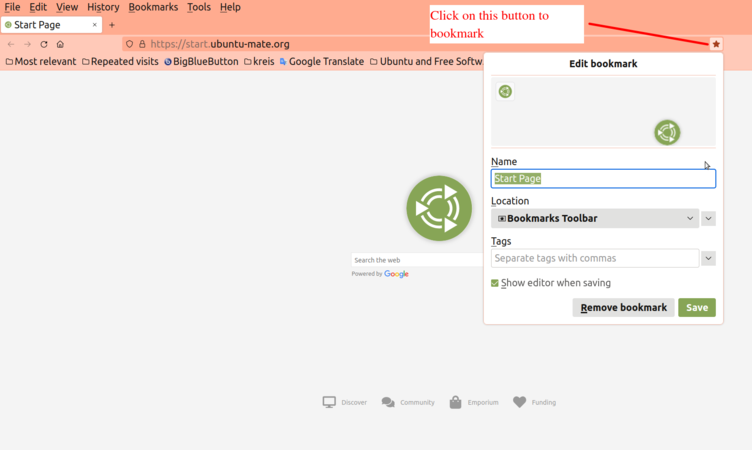
Bookmark menu


Using History feature to revisit the webpages
Firefox keeps track of the websites you visit in your browsing sessions.
To view your browsing history:
- Click on the "Application" menu button to open the menu panel. Click "History" and then click the "Manage History" bar at the bottom to open the Library window.The Library window that opens when you click the Manage History bar will show your browsing history.
- Left side pane shows you the time of the access and corresponding right side pane shows the detailed description of the webpage you visited those respective time. Therefore, if you have visited a page on a particular day but you are unaware of the URL, you can just choose the History date and can refer the page.
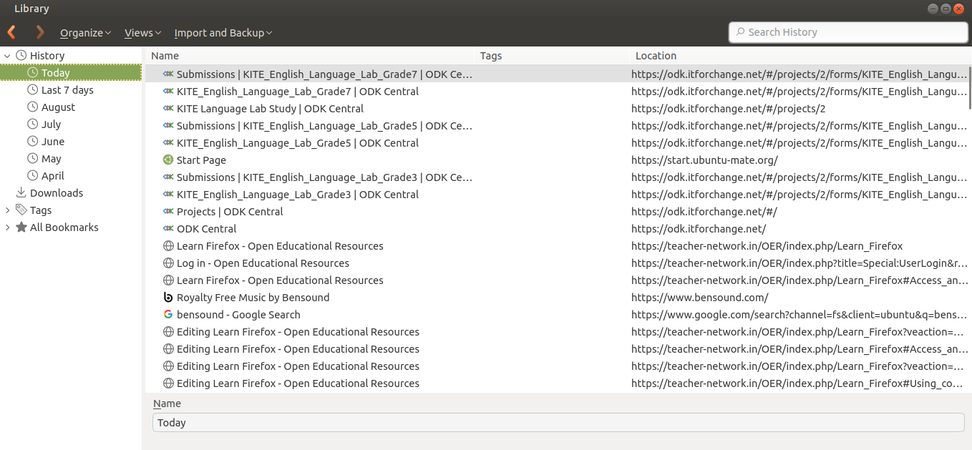
History tab

Accessing downloaded files
By default in firefox browser the download path or download folder is downloads folder in your computer (means if you download any resource from the internet it is saved in downloads folder). You can locate the downloaded files from that folder.
Suppose if you want to change the download path settings then click on application menu at the top right side of the screen and go to settings ("Application menu --> Settings --> General section --> Files and Applications"). You will get two options here, one is to "Save files to where you can browse your folder" and set the download path and another is to "Always ask you where to save files" using which you can save files to the selected folders.
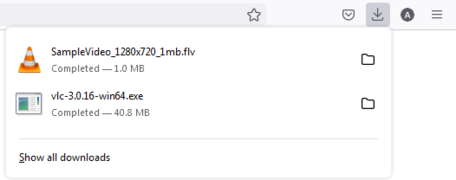
Downloads
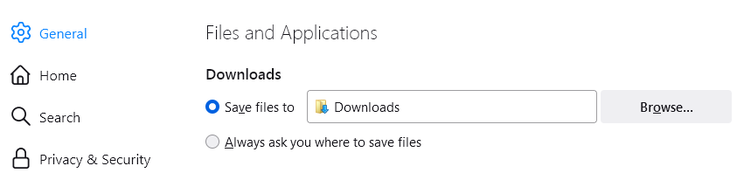
Change download settings


Keyboard Shortcuts
Shortcuts help us to do our work much faster, you can access all the Firefox browser shortcut keys from this link
Ctrl++ Zoom-in
Ctrl-- Zoom out
Ctrl+F Find
Ctrl+C Copy
Ctrl+X Cut
Ctrl+V Paste
Ctrl+H History
Ctrl+Z Undo
Ctrl+D Bookmark webpage
Advanced features
- Open Source : Firefox is the only open source Web browser among the most used browsers on the Web as of March 2013. The open source nature of Firefox enables developers from all over the world to contribute code to the browser and extend the functionality of Firefox with add-ons and themes.
- Add-ons : Firefox is one of the most easily customized browsers, thanks to its extensive library of add-ons. Add-ons are small bits of code that can extend the functionality of Firefox in an almost infinite number of ways. You can customize your browser with a couple of addons that makes your browser more rich and advanced.
For example, you can block the advertisements that disturb your work while surfing on internet by embedding an addon called Adblocker Ultimate.
- Security : Firefox features a number of tools designed to prevent malicious websites from causing harm.
- Android version for Firefox can be downloaded from Fdroid.
Ideas for resource creation
From the web browser, we can easily download whatever we want related to the subject (text,audio-video) and use them for any Resource creation such as presentation, video, document etc.
References
Learn Learn YouTube
Learn Gmail
Introduction
Gmail is a web based mail service.
Basic information
| ICT Competency | One of the important benefits of using technology is for connecting with each other to share and learn. Working with email applications allows you to get familiar with communicating using digital methods. |
| Educational application and relevance | E-mail (electronic mail) is the exchange of computer-stored messages by telecommunication. E-mail was one of the first uses of the Internet and is still the most popular use. Mails and mailing forums are very useful and essential to share resources. |
| Version | Not applicable |
| Other similar applications | Yahoo, Rediff. |
| The application on mobiles and tablets | Mobile app is available in a Google Play store (Search for gmail ) and you can install the Gmail app in your android mobile. |
| Development and community help | Gmail is an internet based service. Official Gmail |
Overview of features
Gmail is a free Web-based e-mail service currently being hosted at Google that provides users with 15 Giga Byte(GB) of storage for messages and provides the ability to search for specific messages. The Gmail program also automatically organizes successively related messages into a conversational thread.
Using the application
To open Gmail, first you have to open a web browser(Ex:- Firefox, Google Chrome, etc) After opening the browser have to type www.gmail.com in address bar or you have to type in search bar (gmail).
Working with application
Using Gmail

Once you open the browser from (Application -> Internet -> Firefox) type www.gmail.com in address bar and press Enter. The Gmail window will open, as shown in the image here. You can either sign in from the top right side of your screen or create a new Gmail ID follow below.
To Create new Gmail ID, click on Create Account or sign up from the gmail home page and follow the below steps.

- Enter user name and password. Your username will be your email address.
- Enter password (Remember your password)
- Google asks for a phone number or email address so they can help you retrieve your account in case you forget your password. You are not required to provide an email address.
- And give all rest of the necessary information and complete the process.
- Check the privacy and terms and conditions box.
- Click on Next Step and your new gmail account is successfully created.
- If you are seeing your new username in the top right side, means you are already logged into your account.
- Next time, If you want to login to your gmail account, follow the first step.
Signing in to access emails
- Gmail sign in and features
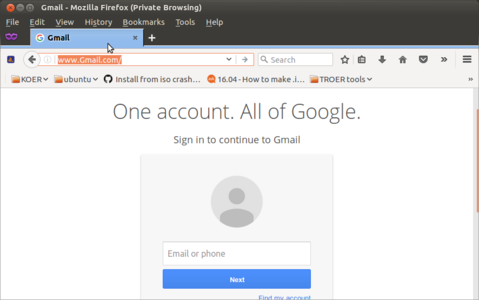
Gmail sign in page
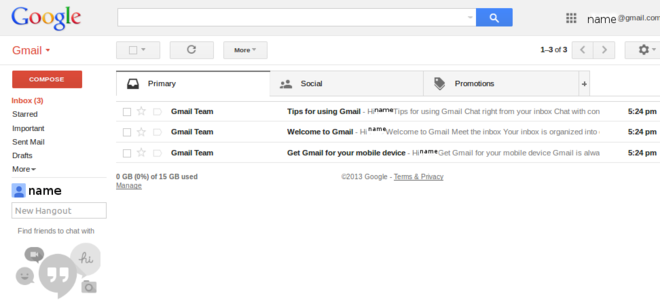
Home page for after logging in


Accessing emails
- When you want to check your email, simply type gmail.com or mail.google.com into any browser address bar. Be sure to type your email and password EXACTLY as you typed it in when you created your account (including whether letters are capitalized or not). DO NOT click “Stay signed in.”
- In the second image you will have following options.
- Refresh button : to refresh your gmail folders
- Compose : To send a new mail
- Search bar : To search for mails.
- Inbox : All the mails you have received will be in this folder
- Sent : This will have all your sent mails
- Draft : Draft is where your unfinished mails are saved
Composing new mail
- Compose and Sending mails
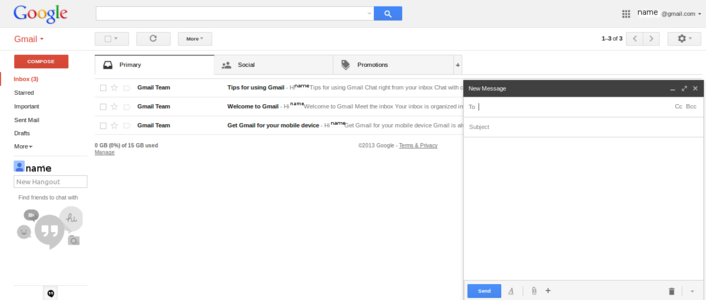
Select compose to compose mail
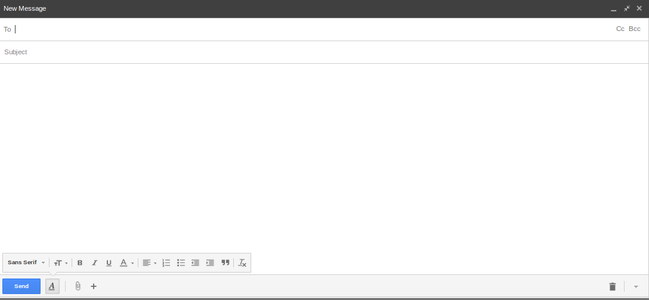
Composing mail, adding all the information


- To compose a new message, click "Compose". This can be found on the left panel. When you click on that you see a panel open for composing a new mail.
- Now you can start composing your new mail
- To: enter in an email address
Cc: “Carbon copy” or “courtesy copy” another email address (not the main recipient; meant to keep others in the loop)
Bcc: “Blind carbon copy” another email address (any email addresses entered here will be hidden from one another) - Subject: a few words to describe what your email is about
- Body of the email: type your message
- Click on attachment icon (next to send icon) to attach your local files(text files, images, etc.) with the mail and send it to the receipt.
- After you done all the above steps and if are ready to send your mail, just click on Send icon.
- To access your sent mails, click on Sent from the left side gmail panel.
- To: enter in an email address
Checking mails and replying
Your inbox displays all email messages you have received. By default, unread messages in your inbox have a white background and display in bold lettering while read messages have a gray background and normal type.
However, you must remember that these formatting settings are subject to change and you need to remember that there will be a separate way of displaying "read" and "unread" mails.
Checking received emails
Replying and forwarding mail


- To open an email, simply click it in your email list and start reading it. To respond to an email, open it and in the box under the email, click Reply, Reply to all, or Forward.
- If you are going to reply to any group mailing list select reply all, all the group members will receive your reply mail. To reply to an single person(sent person), click on Reply, Type your message click on Send.
Same mail if you want to forward, click on forward from the option as shown in the second image, Enter the email address and send.
Download an attachment

- A paperclip icon next to an email indicates that there is an attachment with the mail
- To download an attachment in an email, open mail and scroll down the message and come to the file attached.
- You can either view or download the file (down arrow mark).
- Click on Download
- A window will appear Click on Save
- Choose the location where you want to save the file
- Click on Save to finish
Sign out from the account

This is a very important step to secure your mails from others. Logging out of your Gmail account is essential if you use public computers or even in personal computer. Your Gmail account can contain a lot of sensitive information, and signing out will help protect it.
- Click on your name or small circle with your starting letter of your username, which displayed on top right side of your screen, as in this screen.
- Click on it and select sign out or logout.
Advanced features
- Adding your default signature
- Email filtering
- Folder creation
- Setting up gmail with your language
- Managing spam mails and folder
- Setting up a high security for the account.
Ideas for resource creation
This very useful to sharing resources from each other.
References
Learn LibreOffice Calc
Introduction
The spreadsheet is a sheet with a collection of columns and rows. It contains number of cells. A cell is a combination or intersection of a row and a column, in which information both text and numeric can be input. A sheet can be simply understood as an array of cells. Altogether Spreadsheets are useful for capturing and analyzing data.
Basic information
| ICT Competency | LibreOffice Calc is a free and open source application for creating generic resources. Spreadsheet is used for handling numeric data, analyzing and publishing through tables and graphs. |
| Educational application and relevance | Data analysis is an important mathematical competency. Spreadsheets can be very effective for introducing data analysis and statistics for students. It can also be used to explore patterns as an introduction to algebraic thinking. The power of the digital spreadsheet is that many types of data processing can be done on the information entered. |
| Version | Version: 7.3 (LibreOffice Calc is also available on the Windows and Macintosh operating systems) |
| Configuration | No specific configuration requirements |
| Other similar applications | OnlyOffice, Collabora Office, Free Office |
| The application on mobiles and tablets | OnlyOffice for Android |
| Development and community help | Calc Manual |
Overview of features
Spreadsheet application is used for recording, processing and analyzing data. It is also used for creating text and graphical outputs. The application has many arithmetical, statistical, text processing functions which make it a very powerful desktop tool. Data can be sorted, filtered and processed into outputs, including multi-variate tables.
Installation
Please click on the below link to learn about LibreOffice Installation & Configuration
Working with the application
- Download this file to practice on a simple sample data sheet.
- Download this file of additional sheets with analyses, reports etc.
Opening a spreadsheet

Basic spreadsheet interface

- LibreOffice Calc can be opened from "Applications --> Office --> LibreOffice Calc". This opens a ‘work book’. A work book can have many ‘sheets’. When you open the LO Calc application, it will show the window like as mentioned in the image above (Basic spreadsheet interface). The spreadsheet consists of rows and columns. Each column-row intersection is a cell; this is the place you will enter data in a spreadsheet. You can click the cursor on any cell and type in the information you want to enter.
- Select Cell A1 and type “Name of city”, Hit enter. Next select cell B1 and type “Average annual rainfall (cms). Hit enter, and select cells of Column A to enter names of cities and Cells of Column B to enter annual average rainfall.
- You can click on the A1 and B1 cells and click on the BOLD function icon (or simply type Ctrl+B) to make the headings bold.
Like in the case of text document, you can use the File menu to save your spreadsheet. The file will be saved with a .ods extension. ODS is the short form of Open Document Spreadsheet.
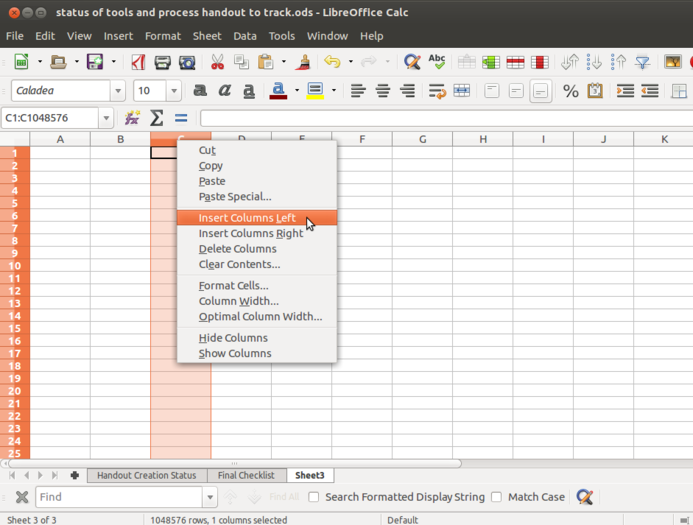
Navigation from various sheets

- You can move across cells using the arrow keys. You can also quickly go to the ends of the sheet using "Ctrl" Key, such as Ctrl+Home (go to Cell A1), Ctrl+End (bottom rightmost part of filled cells / entered data), Ctrl + Up Arrow (next cell in same column, before an empty cell) etc.
- It is useful to become comfortable using keyboard to move across the spreadsheet.
- Columns and rows can be inserted or deleted or hidden in a spreadsheet. You can right click anywhere on the spreadsheet and insert/ delete rows and columns. You can also go to Sheet menu and insert rows/ columns.
Inserting a new sheet
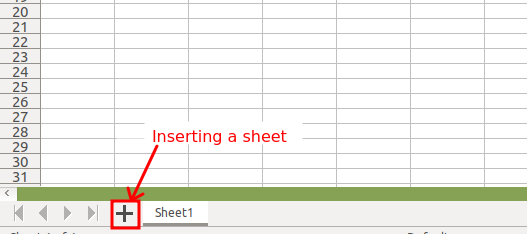
Inserting a new sheet
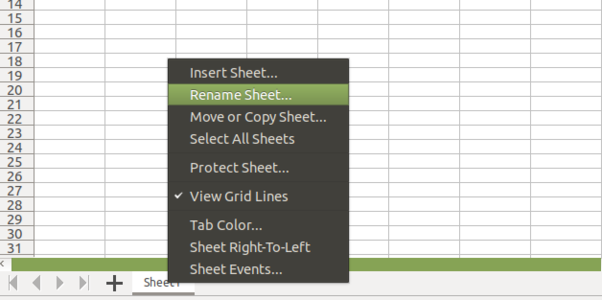
Renaming a sheet


Sheets can be added or deleted from a work book using the "+" symbol seen next to the sheet name. Sheets can be named and renamed by right clicking on the name of the sheet visible in the bottom panel.
Formatting a spreadsheet
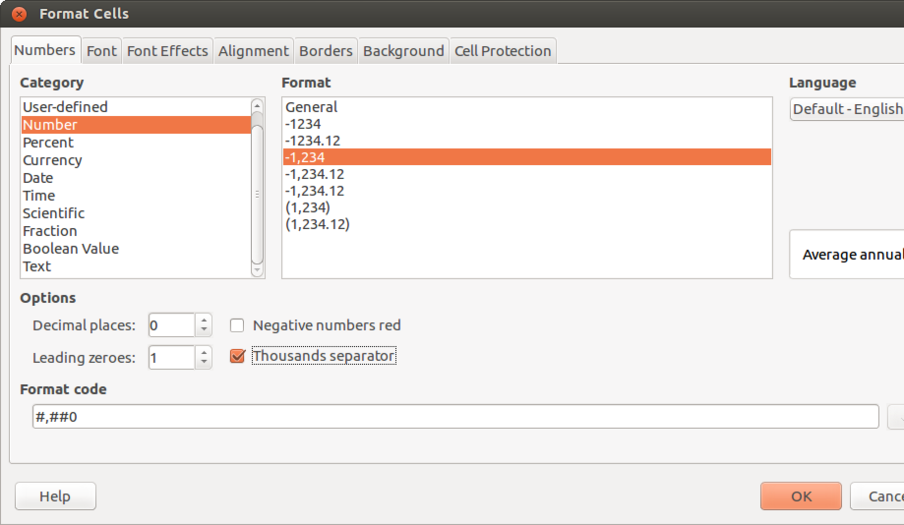
Formatting in Calc

Formatting a spreadsheet involves two important formats.
- Text formatting : Text formatting involves making the text bold, italicized, increasing/reducing font size, font color etc. Data can also be formatted based on what it represents - date, time, currency, etc. The numeric information display format in terms of "000" separators or number of decimal places can be configured.
- Alignment of Text inside the cell : Since Calc gives much importance for cells, the text alignment inside the cell also needs to be taken care of. Such alignments can be Top, center and bottom. Wrap text option allows the text which gone out of the cell to be aligned within the cell boundary.
There are two useful options associated with cells known as Merge cell and Split cell.
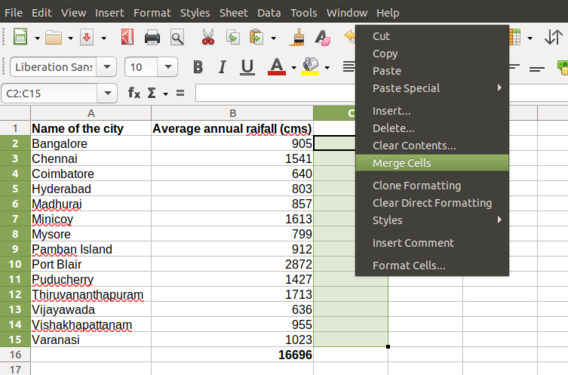
Merging the cell
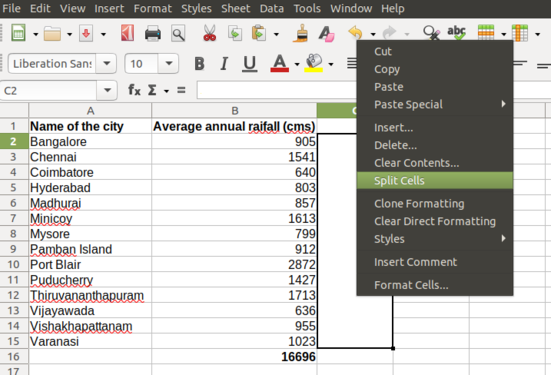
Splitting the cell


- "Merge cell" combines two or more cells together to make it as one. For example, If you want the main heading to be given in a particular column which is having two or more sub menus or subsections you can use this feature.
To merge cells, select two or more cells and right click on anyone of the selected cells and click on "merge cell". For example, in the above image (Merging the cell) if you want to calculate the average rainfall of all the cities then you can merge the cells as shown in the image which indicates the calculated value is related to the entire column.
- "Split cell" is needed when you accidentally merged the cells which are no longer required and you want them to be the separate cells.
To Split a merged cell, right click on the merged cell and click "split cell".
Freeze or Unfreeze rows and columns
If you enter data for a large number of rows or columns, you will not be able to read the row/column headings. To be able to see the column (and row) headings, you should move your cursor to the cell above which (and to the left of which) you want to be able to see your headings and click on "View --> Freeze Cells --> Freeze Rows and Columns".

Freezing the cells

Inserting formulae for computations
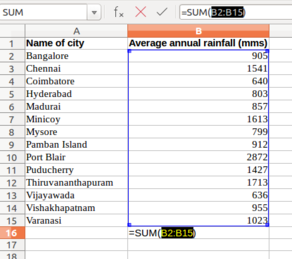
Inserting the formula

You can do almost any kind of computation or processing with a spreadsheet.
For example, here you can calculate the total rainfall for the cities. You can go to the cell below last row with data in Column B, which has the rainfall information and simply type in "=Sum(B2:B15)", assuming the data is in rows 2 through 15 of column B. Any computation or formula must begin with an "=" sign. Or you can simply use the shorthand icon on the menu bar “∑” where you will get various options like SUM, AVERAGE, MIN, MAX. Choose "SUM" here and hit "Enter" and the application will insert the same formula.
- When the cursor is on this cell, the formula will be seen in the ‘formula’ bar on top of the sheet, below the menu.
All arithmetic operations, statistical operations are possible with spreadsheet. - You can ‘copy paste’ a formula from one cell to other cells in the same column, here ‘copy paste’ by default will copy paste the formula and not the content. This 'copy' and 'paste' of formula is not useful, when you want to 'fix' one value in our formula.
- For instance, if you are computing 'Percentage of total' in the example of Average annual rainfall (cms) then, You can input in column C2 "=B2*100/B16". If you copy this cell C2 to C3, Calc will change the formula to "=B3*100/B17", since it will increment both numerator and denominator cells.
- However consider you want to fix the denominator to 'B16'. To 'fix' the reference, you should insert '$' before the cell reference. So you should give formula C2 "=B2*100/B$16" since you want to fix the value in the 16th row. When you copy paste the formula to C3, it will copy as "=B3*100/B$16", which is what you want.
Sorting the data

Sorting the Data

You can sort the data in anyway you want. You could sort it on the descending order of the rainfall (Column B) to see the data by the cities with the heaviest rainfall at the top. You can sort the data by cities (Column B).
![]() Note: You should select the entire sheet ("Edit --> Select All", or simply Ctrl+ A) or keep the cursor on a single cell, else you may sort only the data selected which will be incorrect.
Note: You should select the entire sheet ("Edit --> Select All", or simply Ctrl+ A) or keep the cursor on a single cell, else you may sort only the data selected which will be incorrect.
Preparing charts and graphs

Selecting data for inserting charts
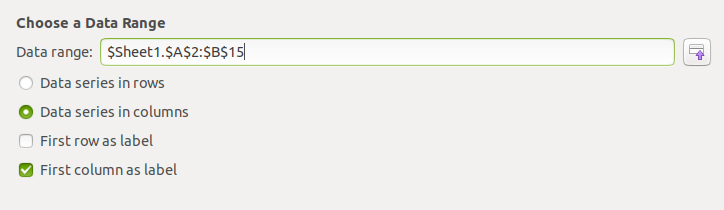
Selected Data Range
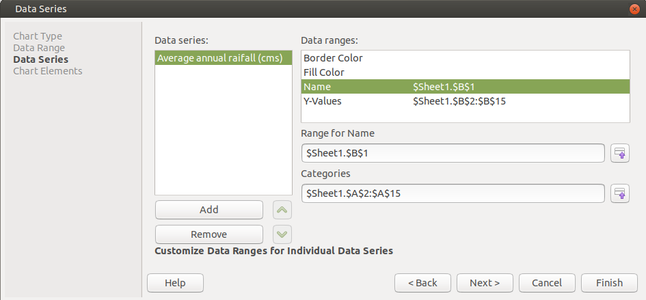
Renaming the Legend

Chart showing the annual rainfall


- Select the data (columns A and B) and select "Insert --> Chart" option. You will get the chart wizard. You can select Bar chart to get a Bar chart of the rainfall. You should experiment with different graphical formats to learn about all the other charts.
- Choose the Data Range. In this example it is A2 to B15.
- Click on "Data series" column name on the left and on the right side modify the "Range for name" as done in the above image (Data Series image). At first it will show you the name of the column as "Column B". But if you want to modify it as the name of the column as mentioned in the spreadsheet then click on the "Name" in the "Data Ranges" table. Click on small icon which says "Select Data Range" --> A small window appears where you must click on the Column B1. Automatically it will consider the clicked column as the name for that field. Click "Next".
- In the Last window Give the title if you want it to be appeared on the top of the chart. Click "Finish".
Working with Pivot tables
The pivot table (formerly known as Data Pilot) allows you to combine, compare, and analyze large amounts of data. You can view different summaries of the source data, you can display the details of areas of interest, and you can create reports. A table that has been created as a pivot table is an interactive table. Data can be arranged, rearranged or summarized according to different points of view.

Data sheet

Inserting Pivot


- Position the cursor within a range of cells containing values, row and column headings.
- Choose "Insert --> Pivot Table --> Create". The Select Source dialog appears. Choose Current selection and confirm with OK.
- The table headings are shown as buttons in the Pivot Table dialog. Drag these buttons as required and drop them into the layout areas "Page Fields", "Column Fields", "Row Fields" and "Data Fields".
Drag the desired buttons into one of the four areas.
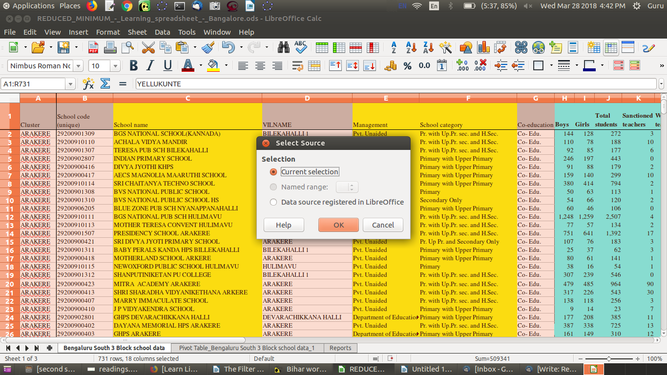
Selection wizard
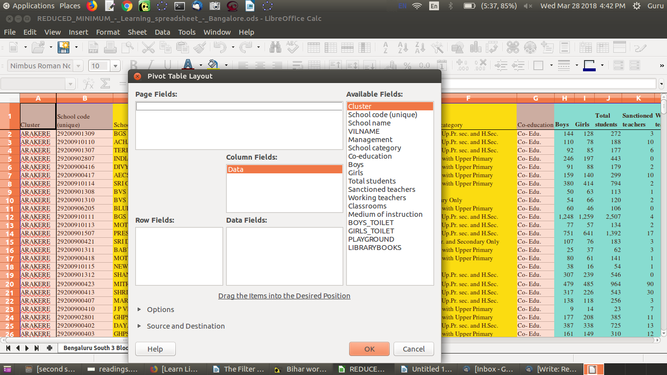
Pivot Table wizard


Drag a button to the "Page Fields" area to create a button and a listbox on top of the generated pivot table. The listbox can be used to filter the pivot table by the contents of the selected item. You can use drag-and-drop within the generated pivot table to use another page field as a filter.
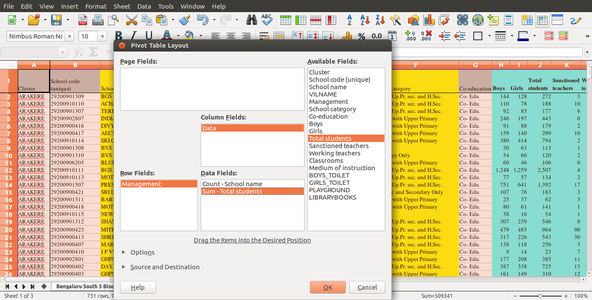
Insert data, row and column fields
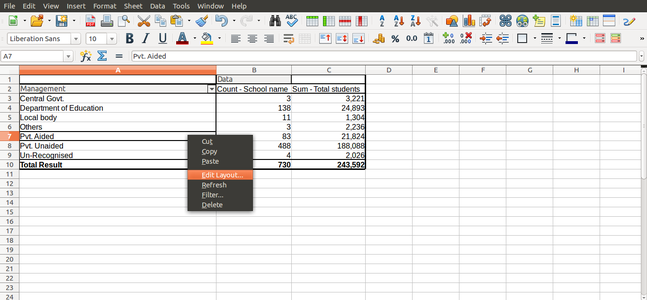
Revising the data pivot for a new table


If the button is dropped in the "Data Fields" area it will be given a caption that also shows the formula that will be used to calculate the data.
- By double-clicking on one of the fields in the "Data Fields" area you can call up the "Data Field" dialog.
- Use the "Data Field" dialog to select the calculations to be used for the data. To make a multiple selection, press the "Ctrl" key while clicking the desired calculation.
Print Preview
Before printing any document you must make sure about the overall preview of the page. So get that you can click on "File--> Print Preview". This gives user the broader idea of how the printed material looks like.

- Click on margin icon for the flexible movement of margins in the spreadsheet.
- Click on "Format Page" option to get various options such as "Page settings" to get the orientation of the page, Page borders to choose the style of the border, Inserting Header, Footer and other settings can be done.
In the image dotted lines represent the margins. They can be adjusted according to the printing needs.
Before printing the document go through these tips:
- Use the "text wrap" feature to wrap all the text input in a cell so that it won’t overflow to the next cell.
- Increase or reduce the column width so that all columns you want to print are included.
- Delete (or hide) columns if you don’t want them in the printout.
- Use "Format --> Page" option to insert header / footer information, such as file name, page number etc.
Use "Print preview" feature to keep checking if the formatting is satisfactory

Header/Footer option in Print Preview

Adding Header/Footer


Header or Footers make the document a neat presentation. Text added to the top of the margin is a Header. Text added to the bottom of the margin is a Footer. Header can include the name of the Book, Chapter name etc, whereas Footer may indicate the page number. In the "Print Preview" option, there will be a "Header and Footer" option as shown in the above image (Header/Footer option in Print Preview). Once clicked it gives you three areas where you can insert the Header, that is Left area, Center area and Right area. You can add the text at any area to apply it to all the pages. The same is applicable for Foote
Saving the files and formats
- Like in most applications, a file can be saved using the File –-> Save command, or by the shortcut key Ctrl+S. Always give a meaningful file name, reading which you should get an idea of the file contents. This file has been named “Rainfall information for cities in South India, October 2016.ods”. Often adding the month-year information when the file was created can be useful later.
- The files will be saved as ".ods". You can save a spreadsheet as a Microsoft Excel format also ("File --> Save As").
- Main difference between "Save" and "Save As" is that Save Saves the document whereas Save As saves the document with another name.
The file you worked with can be exported to a PDF format. This is useful when you only need to print the file and do not want any changes to it. All the settings need to be done in the LibreOffice Calc and can be converted to PDF format.

Exporting the file to PDF

To do this, "File --> Export as PDF". A window appears which lets you to change the default settings. You can do the required changes and click "Export". In the next window it asks you to give the path where to export the file.
Advanced features
- Calc is a very sophisticated software application and can even be used as a database, by cross referring data across sheets and books.
- You can also generate multi-variate tables using the 'Pivot' feature.
- The 'functions' in Calc are many and can meet statistical, logical, textual, mathematical functions which can be useful for exploring topics in Mathematics and Statistics.
- You can use Calc to store contact information, which can be used along with the Thunderbird email client, to generate customized mass email messages (this functionality is called 'mail merge').
- User defined formulae can be created and added to make the application more relatable.
- You can repeat the column or row headings automatically across printed pages (hint – define print area). You can refer the references section for learning these advanced features.
- Vlookup is an interesting feature with which you can query for a particular information using a simple syntax.
Ideas for resource creation
- Calc can be used for analyzing data sets generated by your students as part of projects. Large secondary data sets can also be analyzed. Some of these project ideas include information about family members, houses in the area, crops / vegetation in the area, goods sold and prices in local shop and programs of the local government and budgets etc. The collected information can be analyzed and published in tabular cum graph formats.
- Spreadsheets are also useful for helping solving numeric puzzles by setting up formulas and extrapolating.
References
- Wikipedia
- User manual for LO Calc
- Community support
- Videos to learn LO Calc are available in English, Telugu and other Indian languages on the Spoken-tutorials site, created by the NMEICT program of MHRD.
Learn Screenshot
Introduction
"Screenshot" is the term used to describe the action of capturing your computer desktop or anything shown on your computer screen to a static image file.
Basic information
| ICT Competency | Screenshot is a Free and open source software application that can be used for creating graphics for resource creation. |
| Educational application and relevance | Screenshot can be very helpful when you want to demonstrate something that would be difficult to explain in words.
Screenshots can be used to demonstrate a program, a particular problem a user might be having, or generally when display output needs to be shown to others |
| Version | 3.18.0 version. |
| Configuration | No specific configuration requirements. |
| Other similar applications | |
| The application on mobiles and tablets | Screenshot manages to capture the screen of simple to Android mobile phone.
There are many apps available in Android play store. few are listed here:-
In any Android mobile, if you press and hold the Power key, it will give you a Screenshot option. |
| Development and community help |
Overview of Features
The screenshot application allows you to save snippets of anything you have on your screen - whether static or dynamic. The screenshot of a video, will be a still snapshot. Screenshot will capture the images matching the resolution of your computer. Screenshot images can be edited and used for creating resources. The Screenshot application in Ubuntu allows you different options for taking screenshots, discussed below.
Installation
- The application is part of the Ubuntu custom distribution.
- In case you do not find it on your computer, you can install by typing
Screenshoton top search bar in Software Centre. - If you would like to install through the terminal follow these steps below:
- Open terminal by clicking Applications->System Tools->Terminal or through Keyboard shortcut
Ctrl+Alt+T - In the terminal window, type below command and press enter to start the installation by providing your machine password:
sudo apt-get install screenshot
- Open terminal by clicking Applications->System Tools->Terminal or through Keyboard shortcut
Working with the application
Use Print Screen
This is the most common method to take Screenshot. Pressing the “Print Screen” button will take the Screenshot of the “Entire Visible Screen”.
You can also generate open the screenshot application from Applications--->Accessories--->Screenshot.
- Using Screenshot to capture images from your screen
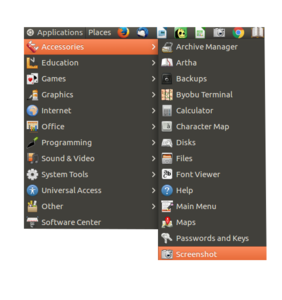
Opening Screenshot
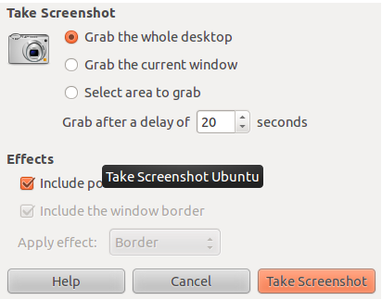
Options to select area
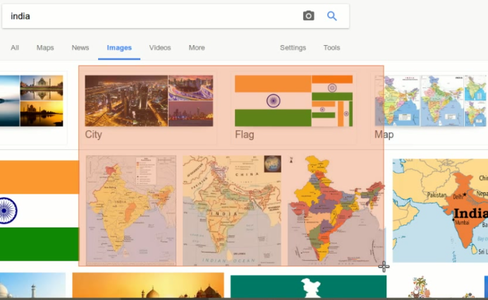
Select area to grab


- To open "Screenshot" go to Application-Accessories-Screenshot. see above image.
- Once you click on the Screenshot option. it open the above window. Here there will be three options to take pictures.
- Grab the whole desktop -To take a Screenshot with entire screen, select “Grab the whole desktop” and click “Take Screenshot”.
- Grab the Current Window-To take the Screenshot of the current active window alone, select “Grab the Current Window” and click “Take Screenshot”.
- Both the above two options allow you to grab the screen after a time delay of a defined number of seconds. This is useful when we need to take screen shots of the different tool bar functionalities and demonstrate the changes from different commands in an application. This is also useful when you want to take screenshots of dynamic displays - like an animation or video or simulation.
- Select Area to Grab- To take a particular rectangle area alone, select “Select Area to Grab” and click “Take Screenshot”. You will need to mark out a rectangle on the screen, which will be covered by the Screenshot. Begin at the one end and move to the diagonally opposite end, to complete the rectangle, keeping the left mouse click pressed. When you reach the diagonally opposite end, release the mouse to complete the rectangle, which will be the 'area' of the Screenshot.Supposing you are playing a video on one part of the screen and you want only the video to be captured, you can use this feature, to take a photo of the video (which will be the image which is displayed in the video at the time of the taking of the screen shot.
Saving the files and formats

Once you click on Take Screenshot, the picture of the screen will be taken and you will be shown a Save-->Dialog box. Screenshots will be saved in the Pictures folder by default. The application will also name the file as Screenshot....date..time.png. You can edit the file name as required and save. Screenshot images will be saved in .png format.
Advanced features
- Timed captures to allow you prepare the work space (desktop) before capturing the image.
- Options to include or exclude the mouse cursor. The mouse cursor can be used to point out a particular point in your image.
Ideas for resource creation
You can take a picture of your screen (a screenshot). This is useful if you want to show someone how to do something on the computer, for example. Screenshot are just normal picture files, so you can email them and share them on the web.
References
Learn Image Viewer
Introduction
Basic information
| ICT Competency | An image viewer is a computer program that can display stored graphical images. |
| Educational application and relevance | Images have the potential to convey meaning powerfully and support story telling. Image Viewer allows you to present a slide show of images in a folder, these images can be organized in the order of the story to be told. |
| Version | version 1.26.0 |
| Configuration | No specific configuration requirements. |
| Other similar applications | Nomacs, Eye of Gnome |
| The application on mobiles and tablets | There are some application available in android versions. Perfect Viewer, Photo Gallery (Fish Bowl), Image Viewer and Nexus Photo Viewer. |
| Development and community help | Manual pages |
Overview of Features
Image viewer allows you to view images and present as a gallery or a slideshow. You can zoom in or rotate your images as well as change display options. You can change image formats as well as print images.
Installation
- The application is part of the Ubuntu custom distribution.
- In case you do not find it on your computer, you can install by choosing “Image Viewer” in Ubuntu Software Center.
- If you would like to install through the terminal follow these steps below:
- Open terminal by clicking (Ctrl+Alt+T),
- Once Window page is open, in front of dollar($) symbol just type below command.
- sudo apt-get install eom-common
- Then, just type your Ubuntu password(it will not display on your screen), press Enter.
Working with the application
Opening Image Viewer
- Opening the image viewer application

Opening from applications
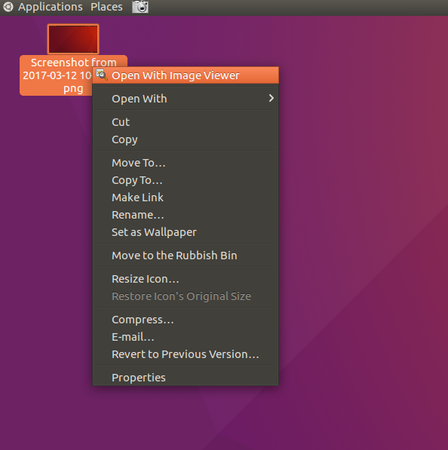
Opening through image


- To open Image Viewer go to "Application --> Graphics --> Image Viewer". This will open the Image viewer application, as shown in the first image.
- In the second image, another way of opening the Image Viewer application (or any other application) is shown. The method is to click on an image and right click and choose "Open with Image Viewer".
- Opening an image
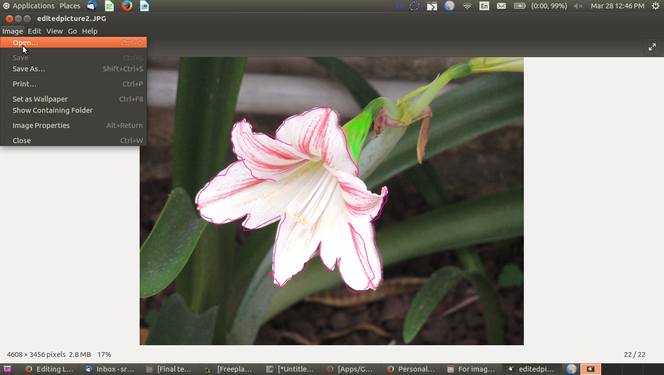
Application with an image open
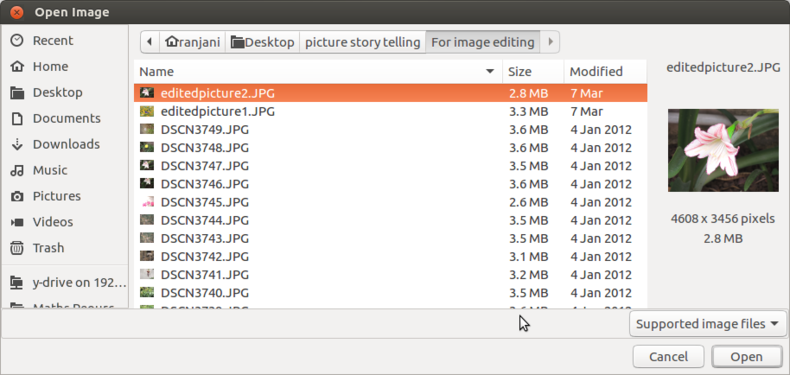
The image opening dialog box


- The first image shows you the Image viewer window with an image open. To open an image, you can click on "Image--->Open".
- Once you click on "Image-->Open", you will see a dialog box open as shown in the second image and you can select the image you want to open.
Editing images in Image Viewer
Once the image is open using Image Viewer application, you can use the edit option to control the display.
- Changing the way the image looks
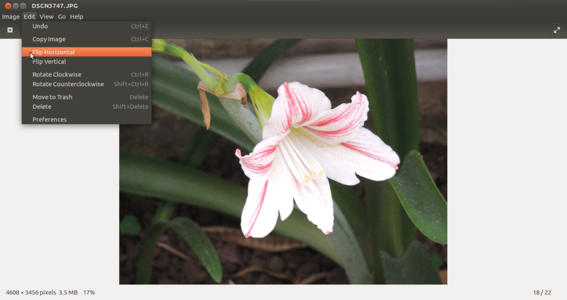
Flipping horizontally
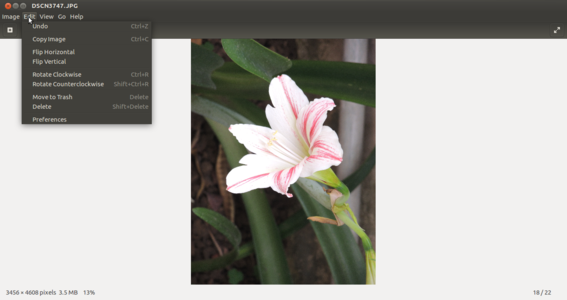
Rotating clockwise


- You can flip the images horizontally or vertically. In the first image you see a horizontally flipped image.
- You can also rotate the images clockwise or counterclockwise. In the second image, the image has been rotated clockwise
These changed display options can also be saved as new images using the "Image--->Save as". If you use "Image--->Save", the existing image will be replaced.
Viewing images in Image Viewer
A very useful functionality of the Image Viewer application is the view option which allows a display or presentation of images. When you have a large collection of images, you can show them as a gallery or a slide show. The images below show you the various viewing options

Viewing an image

Viewing images a gallery


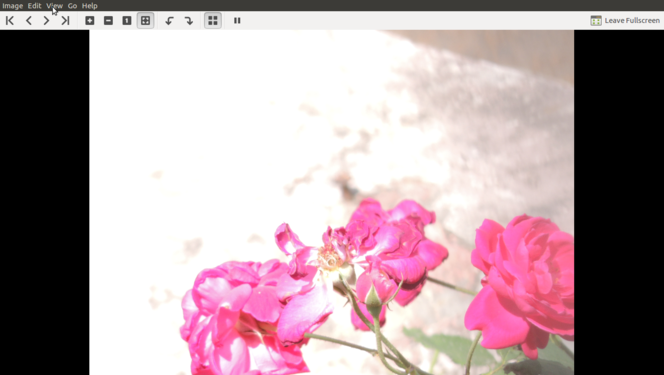
Viewing images as a slide show

- You can go to the folder of images and click on one image to open with Image Viewer. Once you have opened an image, you can use the arrow keys to click and view the other images. The default view shown in this image is the Best fit view. You can also select "View--->Full Screen". The images will be shown in the order in which they are shown in the folder (sorted by the file name). If you would like to see or show the images in a different order, you could do so by renaming the files, and prefixing file name with a serial number. In this case the file with prefix 1 will be shown first file with prefix 2 in its name.
- The second image shows a gallery view of images, with arrows for scrolling forward or backward
The slideshow option is shown in the third image. You can see a tool bar on top of the slide show which allows you to navigate the slide show. Under "Edit-->Preferences-->Slide show", you can set the preferences for the slide show, in terms of time between images and also whether images should be displayed in a loop.
Zoom in and Zoom out the images
- Image can be zoom in or zoom out based on the user requirement. To do this you can click on "View--> Zoom in" or "View--> Zoom out".
- Alternatively there is a '+' and '-' in the toolbar to zoom in and zoom out the image respectively.
To set an image to desktop background
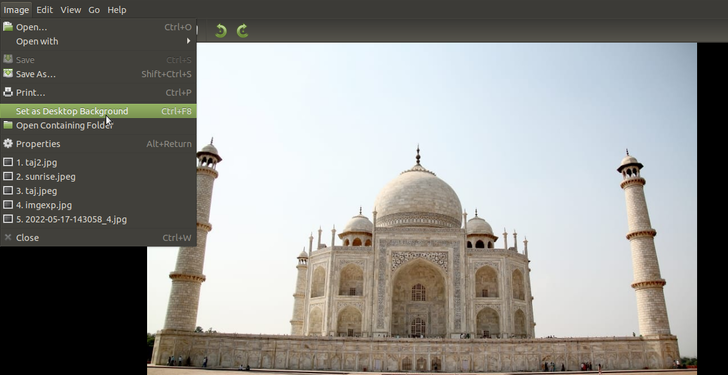
Setting the desktop background

- You can set an image as desktop background.
- To do this, Open Image Viewer from "Applications --> Graphics--> Image Viewer".
- In the Image Viewer interface, Click on "Image --> Open" to open the image.
- Click "Image --> Set as Desktop Background".
Checking the image resolution
- It is sometimes required to know the size of image to resize it to some standard resolution. In such situation we can go to "View-->Side Pane" to see the image properties for any image. It will give you size and type of the image and other related information.
- Once you click on Side Pane the settings will preserve and will show you the properties for all the images that you open until you uncheck the option Side pane again for any image.
Saving the files and formats

Save window

We saw earlier that you could change the display option of the images. Once you have changed this, you can click on "Image-->Save As" and save it as a different file.
You can also use the "Save as" option to convert the image to a png, jpeg or bmp format through "File --> Save as" option.
Ideas for resource creation
- Images can be flipped and saved and the collection can be shown as a resource for lesson on symmetry, orientation.
- Creating a photo or image essay in the form of a slide show to tell a story.
- Using a Vokoscreen-NG tool you can create an audio visual story with pictures and narration.
References
Learn Kanagram
Introduction
Kanagram is a free and open source word game application. It has in-built word lists for different categories. A vocabulary editor is included, and the user can download other word lists and create their own word lists for existing or new categories.
Basic information
| ICT Competency | Kanagram is a free and open source application for creating subject (language) resources.
This tool can be used to strengthen language skills (vocabulary). |
| Educational application and relevance | Kanagram is an educational game that uses anagrams. It provides a set of jumbled letters and the user needs to guess what the original word is. There is no time limit or limitations at attempts, and a hint system is built in.
It can also be used to build general knowledge, by providing different examples of a category (such as different kinds of spices, or different festivals etc) |
| Version | Version - 1.2. It is a part of the Kde.edu package. |
| Configuration | No specific configuration requirements |
| Other similar applications | Tanglet |
| The application on mobiles and tablets | Anagram mobile applications for Android similar to Kanagram are available on Fdroid - AnagramSolver and Agram. |
| Development and community help |
|
Overview of Features
- Kanagram features several built-in word lists, hints, and feature which reveals the original word.
- Kanagram also has a vocabulary editor, so you can make your own vocabularies.
Installation
- The application is part of the Ubuntu custom distribution.
- In case you do not find it on your computer, you can install by typing
Kanagramon top search bar in Software Centre. - If you would like to install through the terminal follow these steps below:
- Open terminal by clicking Applications->System Tools->Terminal or through Keyboard shortcut
Ctrl+Alt+T - In the terminal window, type below command and press enter to start the installation by providing your machine password:
sudo apt-get install kanagram
- Open terminal by clicking Applications->System Tools->Terminal or through Keyboard shortcut
Working with the application
Kanagram interface
- Kanagram Interface
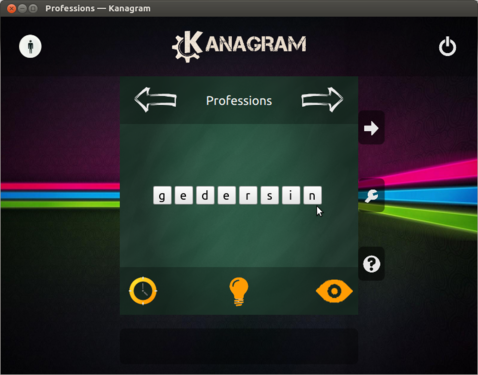
Kanagram home screen
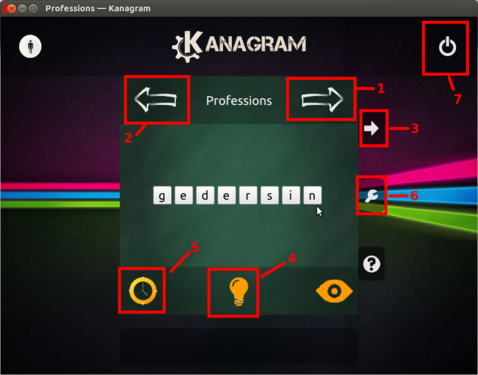
Kanagram menu

Hint for the jumbled word


- You can open Kanagram through Applications -> Education -> Kanagram. You will see this interface
- The Kanagram menu options / features are as follows (as per number indicated in the image)
- 1 and 2: use to change the vocabulary category.
- 3: It changes to next word
- 4: Hint key5: Timer : You can set timer for each word to complete
- 6: Configure Kanagram : You can add extra categories and words to it
- 7: Quit: exits from Kanagram
- 3. Hint key gives the hint for guessing the jumbled word. Hint will display in the right part of the screen.
Playing a word game
- Playing Word Game
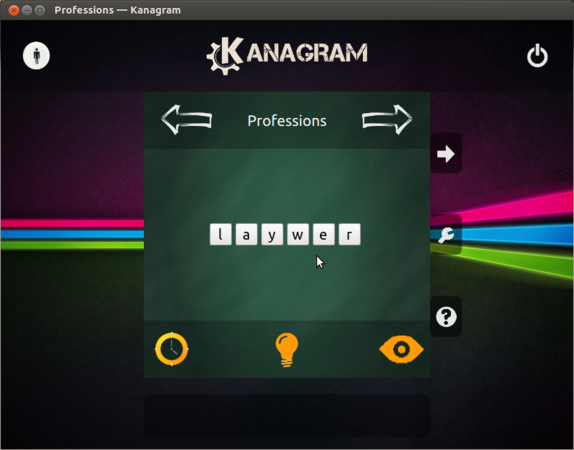
Jumbled word
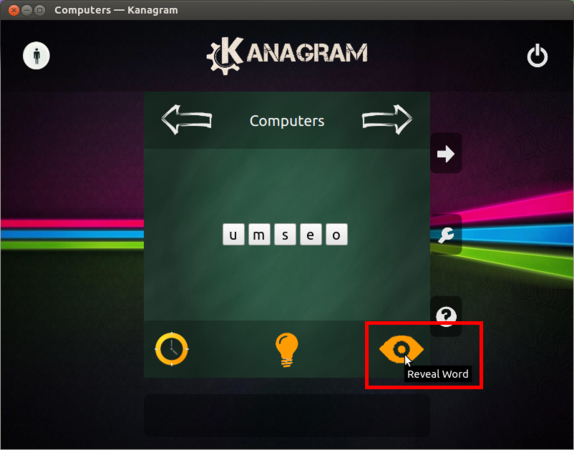
Correct word revealed


- If we type the correct word and press the Enter key, it will take you to the next word. If your guess is wrong, it will not go next word, manually you have to click on next.
- Reveal word - shows the answer (correct word is shown by arranging the jumbled words)
Creating your own word lists
Kanagram will allow you to create your own vocabularies files (word lists) and also you can edit it when you needed.
- Creating own word list
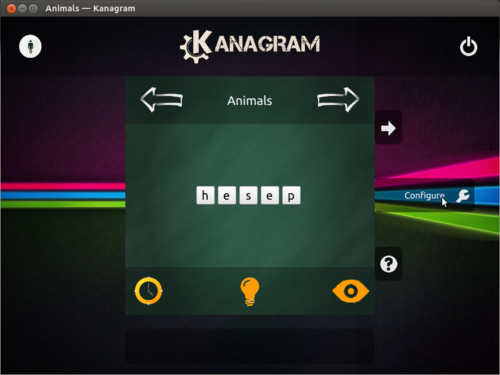
Open Kanagram configuration window
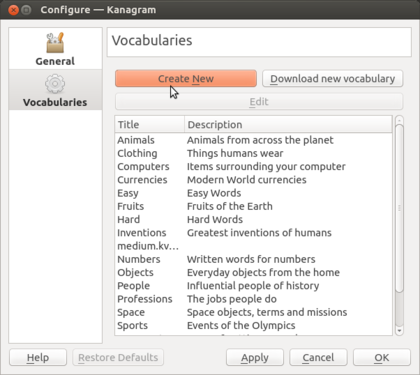
Creating vocabularies
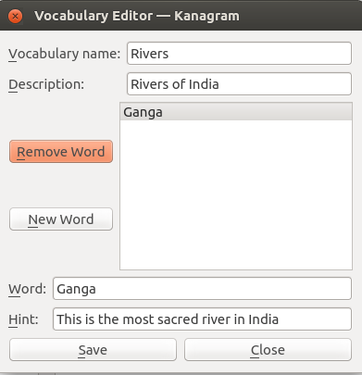
Add vocabularies words and hints


- Create your own vocabularies by clicking on Configure Kanagram -> Vocabularies.
- You can create vocabulary lists for new categories that you can create on Kanagram, such as 'Rivers of India' or 'Telangana districts' etc. To create 'Rivers of India', Click on "Create New" in Vocabularies. Here add Vocabulary name (Rivers) and description (Rivers of India). Then click on "New word". Now enter district name and hint. then click on "SAVE".
Currently in Kanagram v1.2 which is shipped with Ubuntu 16.04, Kanagram is unable to use saved vocabularies created through above method unless you create a link to .local/share/kvtml folder inside .local/share/apps folder.
Also create |
- Editing your vocabularies files
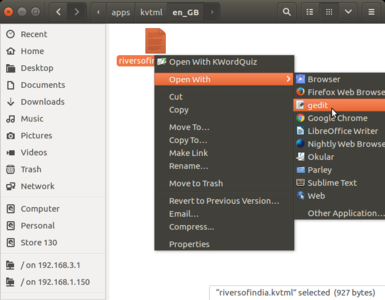
Open .kvtml file with option
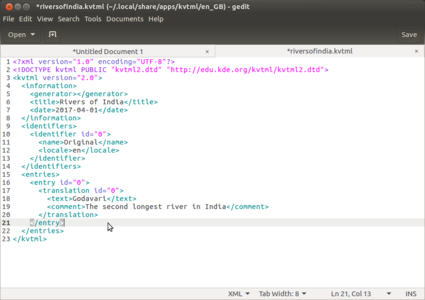
Open .kvtml file by using gedit

Adding words to vocabulary


- Presently you cannot edit new vocabularies in English, which you create from within Kanagram application. To do that, you need to do the following
- Go to
.local/share/apps/kvtml/enfolder. - Right click on your kvtml file and open with "gedit" (Application -> Accessories -> Text Editor).
- Copy the code as shown with box at 3rd image.
- Change
entry id, (increase the entry id by 1), add river name withintextand add hints withincomments. - In same way you can create any number of words for your vocabulary. You need to increase the entry id by another count of 1,every time.
- Save your gedit file in the above mentioned Kanagram folder and open Kanagram to view added word list.
- (Another option is to simply create a new list in Kanagram with the revised list of words)
- Go to
- Below is the sample entry for word in kvtml file:
<entry id="0">
  <translation id="0">
    <text>Word</text>
    <comment>hint</comment>
  </translation>
</entry>
Creating vocabulary in your local language (other than English)
- Creating local language vocabulary
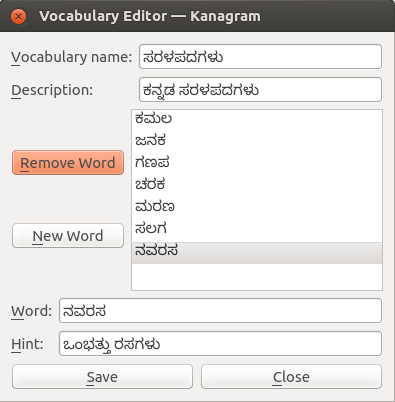
Create local language vocabulary
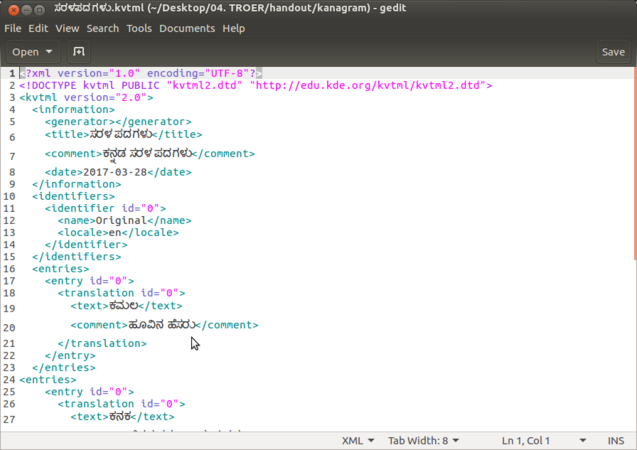
Editing local language vocabulary


- Kanagram also supports Indian languages. You can create categories and word lists within a category. You can also provide 'hints' for each word. Currently the local language functionality is not working with complex words which are peculiar to Indian languages (like joint words or ottakshara). We currently can use Kanagram only for creating simple words in Telugu or other Indian languages. This issue may get solved in future upgrades of Kanagram.
- To edit new vocabularies which you create from within Kanagram application go to
.local/share/apps/kvtml/enfolder. Right click on your kvtml file and open with "gedit". Edit in the same manner explained in the earlier section.
While playing with local language vocabulary in Kanagram application, please select your language to type in Kanagram. To select your language, go to desktop top panel and click on "En" and choose "KaGaPa phonetic" keyboard.
Saving the files and formats
Not Applicable
Advanced features
None
Ideas for resource creation
You can use this to build quiz and question puzzles to learn language. You can also create word lists for concepts in other subjects.
References
Learn PhET
Introduction
PhET is an educational resource that contains computer demonstrations of experiments and activities. It is a collection of science simulations that can be integrated in classroom teaching-learning.
Basic information
| ICT Competency | PhET is a free and open source educational software for subject resource creation. (Science and Maths) It is a collection of free, interactive, research-based science and mathematics simulations. |
| Educational application and relevance | All simulations are free and open source. Simulations allow students to explore in detail scientific concepts and phenomena. The simulations show dynamic processes and these can be slowed down, sped up, or paused, depending on the concept being shown; the invisible is made visible; and multiple representations are linked. The sims can be easily adjusted by the teacher during discussions. These features often make simulations more effective for learning and more practical to use than static drawings or live demos. Simulations can also be used for formative assessments. |
| Version | PhET Version - 1.1.7 |
| Configuration | No specific configuration requirements. |
| Other similar applications | Virtual Laboratory , Chemistry virtual lab, Biology virtual lab |
| The application on mobiles and tablets | PhET Sims app can be downloaded from android versions Google Playstore. |
| Development and community help | The simulations are written in Java, Flash or HTML5, and can be run on-line or downloaded to your computer. It is an initiative from University of Colorado. Official Website |
Overview of Features
PhET is a virtual lab with simulations for sciences and math. Simulations are categorized by physical science biological science and earth sciences. Simulations are also classified by grade level and by device. Translated simulations are also available.
Installation
If its not available under Applications > Education, then you install PhET in your computer through the following steps
Select System tools → Preferences → Main menu → Select Education→ Click on New Item → Name – PhET → Command- firefox /opt/PhET/index.html → OK
Working with the application
Working with PhET application
- Opening PhET & Simulations

PhET main page
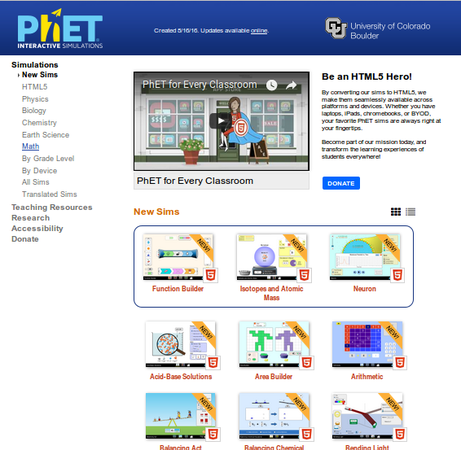
PhET Simulations


- You can find PhET under Applications> Education> Science. PhET is an educational resource that contains computer demonstrations of experiments and activities.
- When you click on "Play with Simulations" – it will open simulations in various subjects. You just click on Physics and scroll down to the simulation on Pendulum Lab. When you want to open a simulation, click on the green rectangle which says “Run Now”.
Working with Pendulum Simulation
The power of a simulation is in capturing different points in a phenomenon and using discussion questions to facilitate student learning. The following example describes a lesson using a simulation.
- Working with Pendulum Simulation


- Notice where the pendulum is:
- is it higher, lower or at the same level as the central position?
- Notice the graph – what are the two variables on the bar chart?
- What do you think will happen to the pendulum next?
- Notice where the pendulum is – has it moved? What can you say about its movement? Notice the graph – what are the variables on the bar chart? What are the values of PE and KE as compared to total energy?


- Notice where the pendulum is:
- Has it moved? Is it higher or lower than the central position?
- Did you notice anything about the speed of the bob as it moves from one extreme position to another?
- Notice the graph – what are the variables on the bar chart?
- What has happened to the values of the KE and PE as compared to total energy?
- What do you think is happening? Is this what you will think will happen when you try this experiment? Why? Why not? What is different?
- Notice where the pendulum is:
- This extreme position to the right is at a different height than. Why? What role does friction play and where does it come from
- Look at the graph – what are the variables in the bar chart? Where has the thermal energy come from? What do you expect will happen to the simple pendulum?
Saving the files and formats
PhET simulation does not have its own file format, which you can save the web link in .html format. However you can create image files of the PhET simulation you are working on, by using the Screenshot application. Screencast recording of a simulation can be done to create resources for the classroom.
Advanced features
Ideas for resource creation
You can use the activities in PhET to create resources in video format as mentioned earlier. You can also create a set of screenshots of a simulation and present it along with explanatory text as a slide show
References
Learn Audacity
Introduction
Audacity is a free and open source multi-track audio editor and recorder. Audacity is a high-quality sound recording application, designed to be easy to use. It works on GNU/Linux, Windows, Mac OS X and other operating systems. We recommend Audacity to most computer users, because it is simple and has many features and capabilities
Basic information
| ICT Competency | It is a generic audio resource creation and editing tool. |
| Educational application and relevance | You can use this tool to create own voice recordings, modify existing audio recordings as per your academic requirements. You can mix multiple audio's together to create educational resources. |
| Version | Audacity Version 3.1.3 |
| Other similar applications |
Ardour, Qtractor, or Rosegarden tools can be used for audio resource creation. |
| The application on mobiles and tablets | Ringdroid using Fdroid |
| Development and community help | Audacity Team |
Overview of Features
Audacity features importing and exporting of various audio formats such as wav, aiff, mp3, ogg, vorbis. It enables to record and playback sounds. Sound effects can be added in variety of ways. Editing is possible via cut, copy, and paste, with unlimited levels of undo. It supports multitrack features including navigation controls, zoom and single-track edit, project pane, audio file manipulation etc.
Installation
For Ubuntu OS
- The application is part of the Ubuntu custom distribution.
- In case you do not find it on your computer, you can install by typing
Audacityon the top search bar in the Software Center. - If you would like to install through the terminal follow these steps below:
- Open terminal by clicking "Applications --> System Tools --> Terminal" or through Keyboard shortcut
Ctrl+Alt+T - In the terminal window, type below command and press enter to start the installation by providing your machine password:
sudo apt-get install audacity
- Open terminal by clicking "Applications --> System Tools --> Terminal" or through Keyboard shortcut
For Windows OS
- To install Audacity in Windows OS click this link and click on "Audacity windows Installer" to download .exe file, save this file in your computer.
- You can save Audacity executable (.exe) to your desktop or to a folder.
- Double-click on Audacity executable to begin the installation.
- Click "Yes" when asked. "Do you want to allow this app from an unknown publisher to make changes to your PC?".
- Choose "English" when asked to select the language to use during installation and click "OK".
- Close any other opened programs before clicking "Next" in the audacity Installation window.
- Read the information section on licenses, Click "Next"
- Click "Next" on the Select Destination installer window, Click "Next" in the "Desktop Icon" screen.
- Click "Install" The installation wizard will now show a progress bar during the installation
![]() Note: After you installed Audacity in your windows computer, you need to install this .mp3 plugin to export your audio in mp3 format. Without installing this you will not be able to export audio in .ogg, .wav and any other audio format
Note: After you installed Audacity in your windows computer, you need to install this .mp3 plugin to export your audio in mp3 format. Without installing this you will not be able to export audio in .ogg, .wav and any other audio format
For MAC OS
- click on this link to download audacity installable file and save this file in your computer.
- Once the download is completed and the downloaded file has been saved in your Downloads folder, double-click the DMG file to mount it. (Some browsers may offer the option to automatically open the DMG file for you.)
- Drag the Audacity.app icon rightwards onto the Applications folder shortcut.
- You can also drag Audacity.app out of the DMG to any other location. You need the administrator password to copy Audacity to Applications.
- Launch Audacity.app from Applications or from your chosen location.
Working with the application
You need an audio interface to use Audacity. If you will record audio with Audacity, you must have at least one microphone connected to your audio interface and you need speaker to listen and edit existed audio file.
Obtaining Audio from different sources
Audio files can be obtained from many different sources such as audio recorders in phone, camera, or laptops devices and transferred to a laptop to edit them using Audacity. The audio recording in laptops can be done using Audacity which is explained in "Step 3" Screenshot.
Testing the Mic and Speaker
- Since Audacity deals with recording, we need to take care of the Mic and Speaker settings first. A very simple method to check and monitor the audio levels in the Audacity software is as follows.
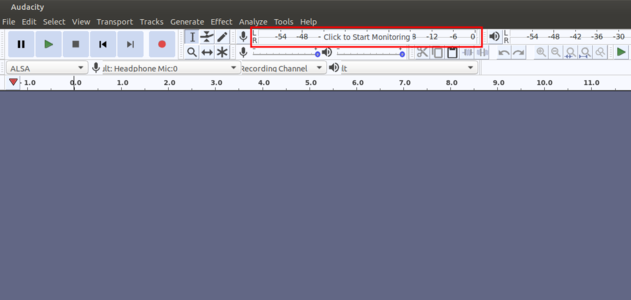
Monitoring Audio levels

Showing input levels


- In the above picture you can observe there is an option near the toolbar that is, "Click to Start Monitoring". Once you click on that it will show you the levels of Mic audio. At this time, you can try your mic by speaking something just to verify your hardware peripheral is working fine. If the levels in audio varies that means the device is working without any issue. If the levels are not varying then there must be some issue with your hardware.
- To test the speaker you can look at the levels in right side of this "Mic monitoring". If your output device and all its settings are well and good then it shows the levels of output audio.
Recording with Audacity
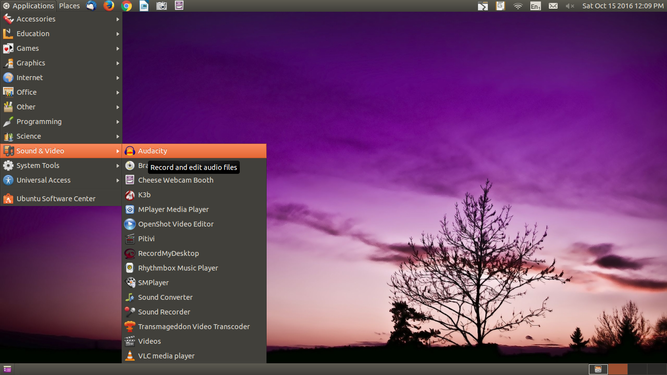
Step 1 -This can be opened from Applications --> Sound & Video --> Audacity
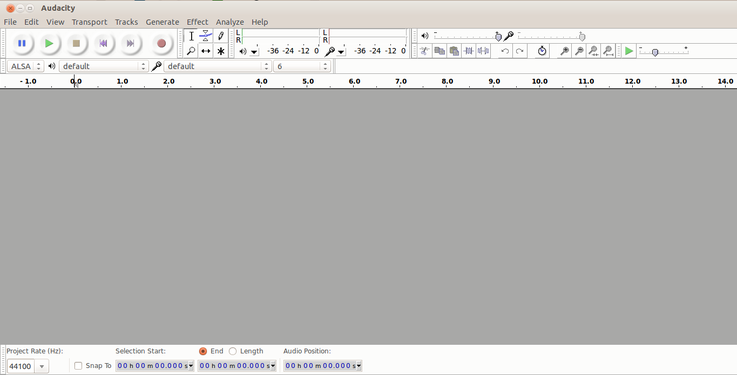
Step 2 - When you open the Audacity application, it will show the window as above
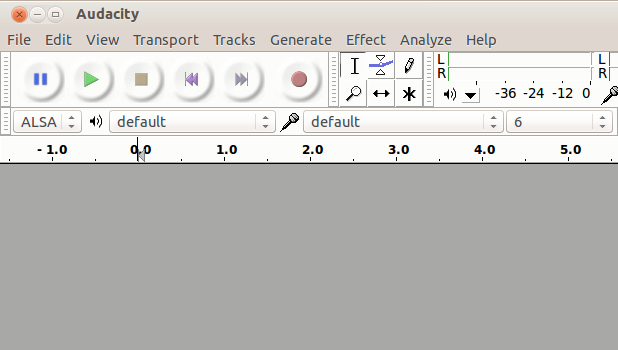
Step 3 - Recording and other tools


To start recording, click the "Red record" button in the Toolbar as shown in the left image. Begin talking or playing any audio and continue for as long as you want. When you feel you've recorded enough, click the "Yellow stop" button. Until you stop the recording, other functions on the Menu and Toolbar will be disabled. You can record audio playing on your computer itself, or playing in another external audio device.
Importing audio and multiple tracks
Audacity allows you to import more than one tracks to the audio thereby making your audio more effective and attractive.
For example, If you are narrating a story, effects related to the elements of the story can be added at the required positions. Even the background music can be added which does not make your audio boring.
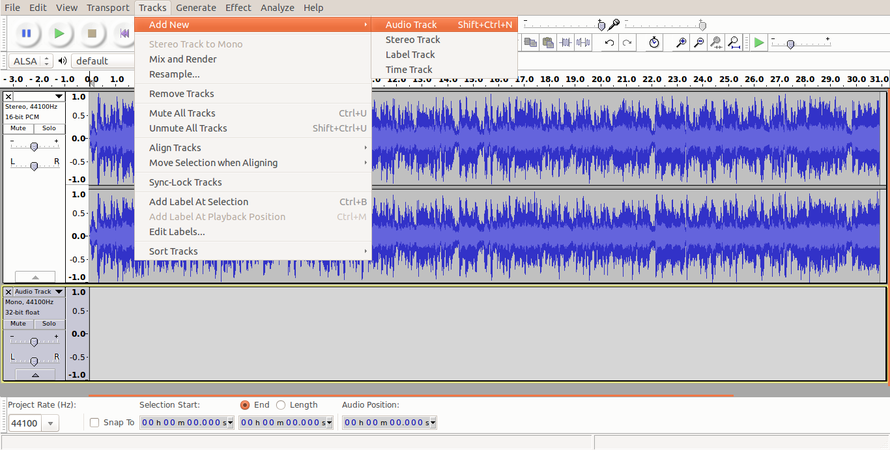
Audio track and adding new track
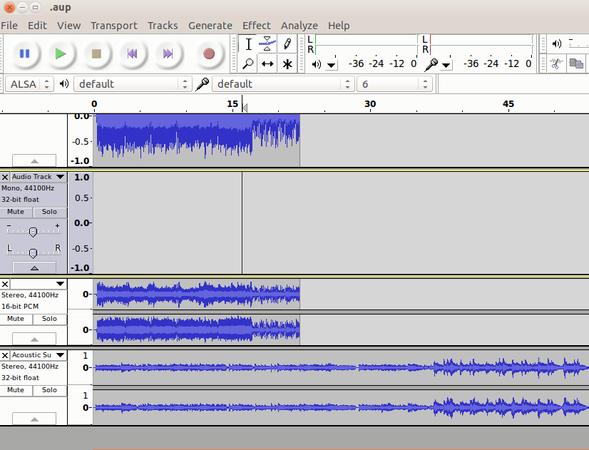
Multiple tracks


- To import audio, click "File --> Import --> Audio" from the menu as shown in the first image above. Choose the music file from your computer, and then click on "Open". Once you import an audio clip it will appear in Audacity as an audio track as you can see in the second image.
- If you want to add multiple tracks, you can do so by clicking on "Tracks --> Add new --> Audio track" from the Menu as shown in the same second image. With the use of multiple tracks, you can record and at the same time import several audio tracks to work in Audacity as shown in the third image above.
See below animation to know the steps to import second track.

Basic audio editing
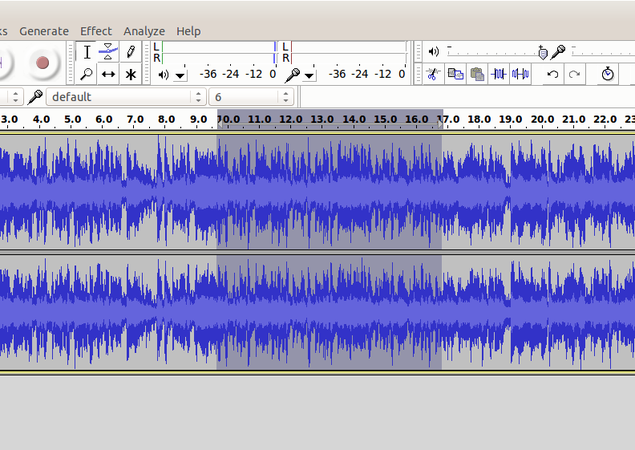
Selection of Audio

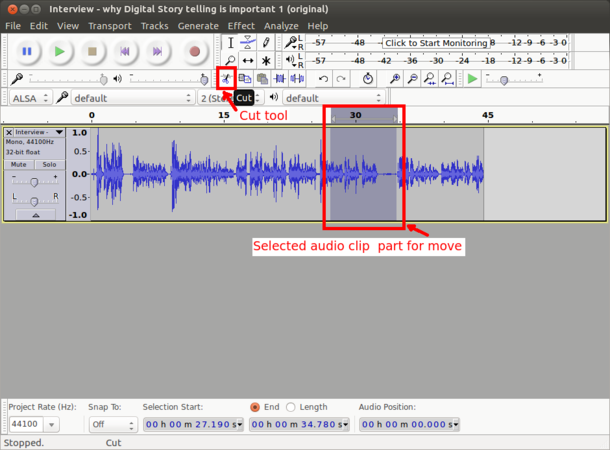
Cutting selected audio
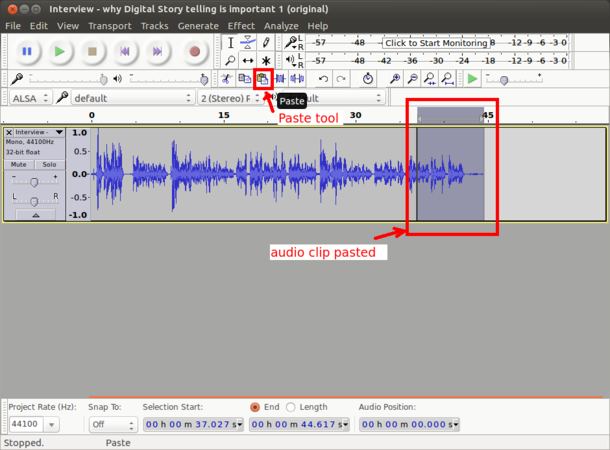
Pasting selected audio


Similar to how we do cut (or copy) paste a selection of text in a text document, we can cut (copy) and paste a selection of audio in an audio file in Audacity. To delete a part of the track, we can select the area of the track we wish to delete as shown in the first image above and then press "Delete" key on the keyboard to delete. To move a part of the audio to another place on the same track or to another track, we need to select it first as we did before and then click on the cut icon on the toolbar as shown in the second image. Then the same audio can be pasted by clicking on the paste icon on the toolbar as shown in the third image above. The usual keyboard shortcuts for "Cut" (Ctrl+X), "Copy" (Ctrl+C) and "Paste" (Ctrl+V) will also work on Audacity. Once you are done with editing, the final audio can be exported to any audio format from the Menu by clicking on "File -->Export" and then "Save".
Repeat an Already-Recorded Segment
You can repeat a segment of audio that is already recorded.
- Click "Selection Tool", then select a portion of audio.
- Choose "Edit --> Copy" or press Ctrl+C in your keyboard.
- Click in a track near where you want the copy to start playing.
- Choose "Edit --> Paste" or press Ctrl+V in your keyboard.
- You can repeat this steps to repeat as many times you want, by using copy, paste feature.
Zoom in and Zoom out tracks
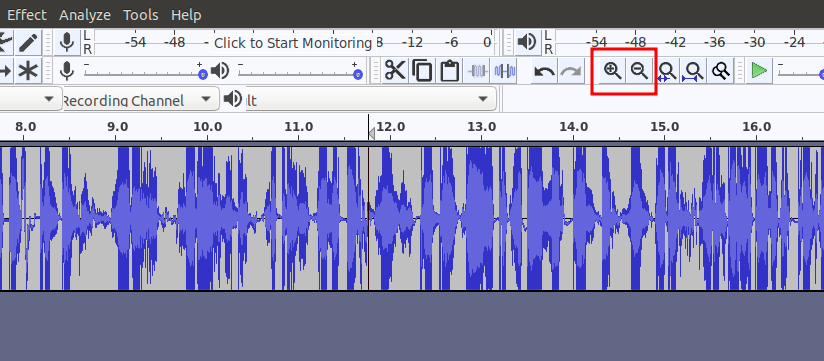
Zoom in Zoom out tool

Sometimes it may be required to zoom in and zoom out the particular segment in the audio. To do this, there is an option in toolbar icon for both as marked in the image. You can keep on click '+' to zoom in and '-' to zoom out respectively.
Adjusting the volume of the audio
Occasionally, you may find that recordings are either too quiet or of poor quality once you come to edit them. This can be remedied to a certain degree in Audacity.
- Increase your recorded volume by using amplify feature

Select amplify tool from effect menu
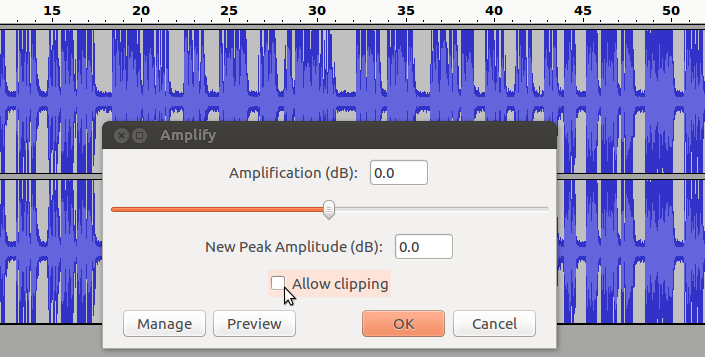
Select "allow clipping" to increase the volume


To amplify the clip select the track which you want to increase (amplify) the volume, go to "Effect" tab from the top of the screen and choose "Amplify" from the drop-down menu and Finally, use the slider in the new dialogue box to tell Audacity how much you wish to amplify your clip and click "OK" to apply.

You have to select "Allow clipping" to increase the volume. See below animation to use amplify function to adjust the volume,
Changing the Pitch, Speed and Tempo
Pitch change option changes the pitch of your original recording without changing its speed. This is useful when you have some conversation in your recording involving more than one person. You can make your normal voice to be a magnetic voice, cartoon voice, male to female voice and viceversa and many more depending on the value given as input.
Change Speed option changes the speed of a selection which affects its tempo, pitch and frequency. When reducing speed, all frequencies become lower. When increasing speed, all frequencies become higher.
Change Tempo option changes the tempo and thus the length or duration of a selection, without changing its pitch.
Basic difference between Speed and Tempo is that Speed affects the pitch whereas Tempo does not!
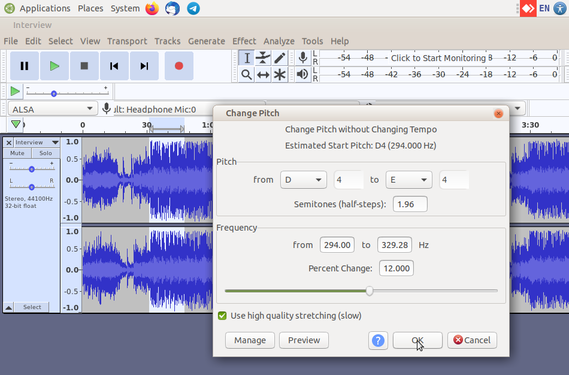
Changing the Pitch

Changing the Tempo


Pitch: Audacity allows you to change the pitch of the entire audio or a part of it. You can directly mention the percentage of change which the music file expects or can change if having some basic idea of pitch notes in music. For changing the pitch you can click on "Effects--> Change pitch". In the dialogue box you can simply increase and decrease the slider to change the pitch. You can preview the changes you made to the portion of the audio by clicking on "Preview", Click "OK" if changes are final.
Speed: You can change the speed of the audio by clicking on "Effects-->Change Speed". It shows the multiplier column where you can put the value and those much of time audio gets the speed also you can move the slider to adjust the speed. You can preview the changes you made to the portion of the audio by clicking on "Preview", Click "OK" if changes are final.
Tempo: You can also change the tempo of the audio by clicking on "Effects -->Change Tempo". It also shows the multiplier option, beats per minute and Length of the selected portion options. Here you can change according to your needs and You can preview the changes you made to the portion of the audio by clicking on "Preview", Click "OK" if changes are final.
Adding Echo Effect to the music
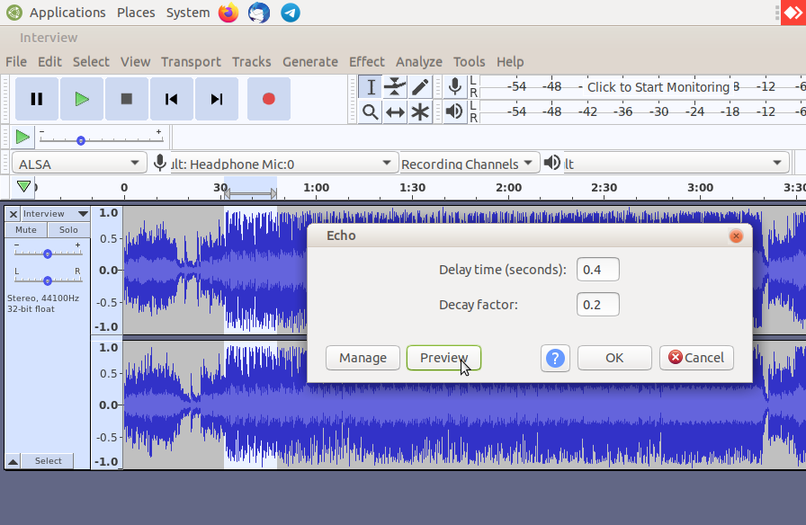
Adding Echo Effect

You can include Echo effect on to your audio by clicking on "Effects-->Echo". Delay Time indicates the amount of delay between the echoes, Delay Factor increases or decreases the amplitude or loudness of the each echo.
Removing noise
Noise is part of an audio signal that is not the intended signal. When you listen to music on the radio, you can hear the music, and usually also some noise. When computers record or play audio, the electronic components sometimes create extra noise. Sometimes it can be your background noise recorded your audio.
In order to remove ‘noise,’ we must first tell Audacity what the ‘noise’ sounds. Do this by selecting a portion of the audio where nobody is talking and noise has recorded – like a break in the conversation, so you just get the ‘noise’.
- Remove noise by using noise reduction option

Select Noise reduction tool from effect menu

Select get noise profile and select OK


- Choose "Effect --> Noise Removal". The "Noise Removal" window appears. Click Get Profile. The Noise Removal tool uses the selected audio as an example of the noise to remove.
- Select the whole track.
- Open the "Noise Removal" window. Click "OK". The Noise Removal tool processes the audio. The Noise Removal tool is not effective in this example because most of the signal is noise.
Fade a section in or fade it out
Audacity has tools to fade in and out. When you "fade in," it means to gradually increase the volume level from silence to the original level. When you "fade out," it means to gradually decreased the volume level from the original level to silence. Professional recordings of concerts often fade out after a song, while the audience applauds. Fading out avoids an abrupt stop at the end of the recording, because the volume level is decreased gradually to silence.
- Add fade in or fade out for your track

After added fade in for the track

After added fade out for the track


- Click "Selection Tool", then select a portion of audio to fade in or out.
- Choose "Effect --> Fade In" or "Effect --> Fade Out".
Generally fade in at the beginning of an audio segment, and fade out at the end of an audio segment. You can use Audacity to create special effects if you fade in or fade out in the middle of an audio segment. You can make a surprising effect by setting Audacity to fade in or out over a few second, then adding the opposite fade inside the first fade.
Saving and exporting to different formats
Audacity saves its data in a format that only Audacity can use. Audacity saves more information than just the audio files, and this information cannot be stored in conventional audio files like OGG, MP3, or WAV.
When you want to share your work, or use it in another application, you must export it. When you "export" audio, Audacity converts the Audacity-only file into a conventional audio file. Audacity does not delete the original Audacity-only file, but the exported file cannot be converted into the Audacity-only format.
- Save Project: All the edits including files can be saved in uncompressed, lossless quality using the "AUP" format. An "AUP" project file is created, along with a folder with the same name as the AUP file that contains the project's audio data. For example, if you save a project as
independence day.aup, a folder calledindependence day_datawill contain the audio data. We can save the "AUP" project file with keyboardCtrl+Sshortcut or through "File --> Save Project" from the Menu. - Export Audio: Audio can be exported to many formats such as mp3, ogg, wav. According to your need you can export the audio.
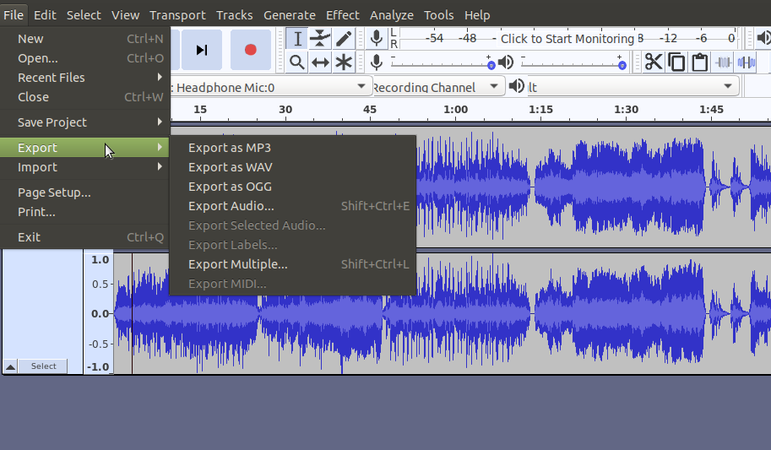
Exporting to various formats

- Choose "File --> Export".
- Select the format, filename, and directory of the audio that will be exported. Click "Save" when you are finished.
- Depending on which format you choose, the "Metadata" window appears. You can input this information if you wish (Don't forget mention creative common license under the comment section. In this way you will other to reuse your audio). Metadata basically contains information about the Audio that is exported. Artist name, Track title, Album title, Track number, Year, Genre and Comments are included here. They are optional.
- Audacity processes the audio to export. This may take some time, depending on the audio.
List of all available export formats supported by Audacity can be found here.
Advanced features
Audacity is a full-fledged audio editor which has many advanced features. Click This page which lists tutorials that provide step-by-step instructions for performing all the interesting things with audio in Audacity.
Ideas for resource creation
This tool can be used to create own voice recordings, modify existing audio as per academic requirements and to mix multiple audio files together to create educational resources.
References
Video Tutorials
Learn Record My Desktop
Introduction
Basic information
| ICT Competency | RecordMydesktop is an free and open source application for supporting to record your computer screen along with your input voice.
|
| Educational application and relevance | Creating video resources, combining audio, text, image and video. This can be used in digital story telling activities |
| Version | recordMyDesktop v0.3.8.1 |
| Other similar applications | Kazam, Simple screen recorder |
| The application on mobiles and tablets | There are many similar application are available in android mobile phones. Example,. AZ screen recorder |
| Development and community help | RecordMydesktop Help |
Overview of features
The RecordMyDesktop software records the computer output display as the video and audio. This can be used to record the functioning of a software or any educational application. In addition to the audio played on the computer as part of the running of the application, additional audio spoken and provided as an input to the computer can also be recorded as a part of the video. Only you have to make sure that, when you are recording, you are not displaying any copy righted materials on the screen.
Installation
- The application is part of the Ubuntu custom distribution.
- In case you do not find it on your computer, you can install by choosing “gtk-recordmydesktop” in Ubuntu Software Centre
- If you would like to install through the terminal follow these steps below:
- Open terminal by clicking (Ctrl+Alt+T),
- Once Window page is open, in front of dollar($) symbol just type below command.
- sudo apt-get install gtk-recordmydesktop
- just type your password(it will not display on your screen), press Enter.
Working with application
Getting familiar with application

When we open the RecordMyDesktop we will see this main window. This main window contains the following sections.
- Select window : From this option we can define area to record.
- Record : This will start you recording session.
- Video and Audio quality : These two options will use to configure quality of your video and audio.
- Save as : From this option you can give file name and the path for your future recording videos.
- Quit : This will close the recordmydesktop application.
- Advanced : Under this advanced option, we can set up record my desktop more effectively like number of frames, audio jacks set up, and the CPU performance.
Getting start with simple screen casting with full window
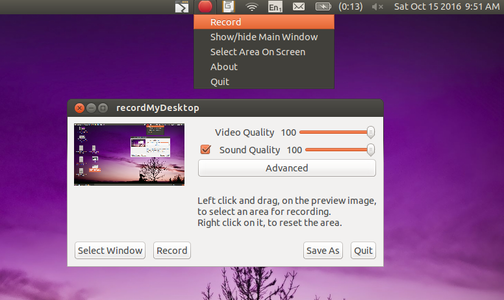
Selecting record option from top bar menu
Exporting video


1. The simplest way to start a recording is to simply left click on the tray icon on the top menu (as see this image), or click the record button on the main window.
When you click on Record button, desktop recording will start. The recording can be paused and resumed at any time, by right clicking on the RecordMyDesktop icon in the top panel and selecting Pause (and later Resume when you want to continue recording). Clicking on ‘Stop’ will stop the recording and initiate the export of the video output.
2. Once we click on the "Stop" button, we need to wait till the export is completed, to get the output file. If we close the process before, we will lose the output file. The output file will be saved in your "Home" folder by default, with .OGV format. The file will usually have a name like ‘out.ogv’, however you can use the ‘save as’ button on the RecordMyDesktop screen to give a file name.
Defining area to Record
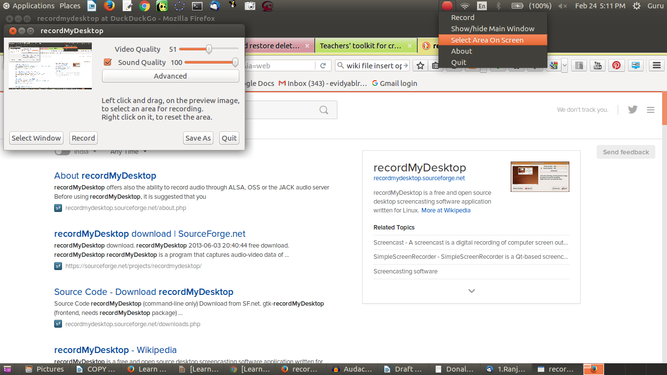
Click on select area on screen
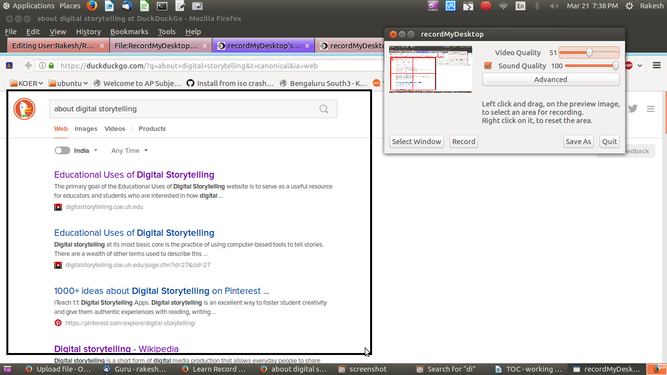
Area is defined to record


- It is possible to select the screen window you want to record. Click on Select window, you will be asked to grab the area to select. You can select only that part of the screen that you want to record. This is useful if you are opening photos or playing a video on only part of your screen and want to record that part only.
- After you have finished a selecting area, the area you have selected will be shown in the the preview window. Depending on your settings, an optional frame (see the highlighted box in the second image) might also appear on your real display, around the recording area. Now its ready to start recording, click on the "Record" option from the top panel "recordmydesktop" icon(small red circle).
- If you are adding a narration, make sure you have connected headphones for audio input and set the input volume settings (from sound settings) in your computer to 100%. Make sure the input is not muted before you start the recording. Otherwise, the audio will not get captured.
- Once you want finish the video, click on "Stop" button from the top recordmydesktop menu. It will start exporting your session as video.
Saving and exporting
File export and saving process are same in this application. After you start the recording, by clicking on "Stop" to stop the recording it will start to export your session in video formate. This video will be in the .ogv format. These video will be save in your "Home folder"
Advanced features
If you select "advanced" option from main menu, you will find following options.
- Frames per second : Setting it to a higher value will produce smoother recordings, but it will require more processing power. It will also increase the size of the video.
- Sound : The sound tab lets you configure the quality of the sound capture, or the recorded ports, when using JACK.
Ideas for resource creation
- This is very useful for creating simple video resources by adding narration to a process being done using an application. For example, you can run a simulation on your screen or an image slide show and add your narration to it as the application runs.
- You can also use an existing video and dub it in another language
- Please make sure that in both (1) and (2) the original visual resource/ video is licensed for reuse with modification.