Difference between revisions of "Learn Tupi"
m (1 revision imported: from troer) |
|||
| Line 4: | Line 4: | ||
| style="padding-left:2px;"| Go back to <br/>[[ICT student textbook]] <br/> [[ICT teacher handbook]] | | style="padding-left:2px;"| Go back to <br/>[[ICT student textbook]] <br/> [[ICT teacher handbook]] | ||
|}</div> | |}</div> | ||
| − | =Introduction= | + | ===Introduction=== |
Tupi (formerly KTooN) is a software application for the design and creation of 2D animation. This tool, inspired by and for animators, is being developed by an open community. It is covered under the terms of the GNU General Public License v2, meaning that Tupi is free and open-source software. After Tupi was forked from KToon, KToon's official website was changed to redirect to the website for Tupi. | Tupi (formerly KTooN) is a software application for the design and creation of 2D animation. This tool, inspired by and for animators, is being developed by an open community. It is covered under the terms of the GNU General Public License v2, meaning that Tupi is free and open-source software. After Tupi was forked from KToon, KToon's official website was changed to redirect to the website for Tupi. | ||
| − | == | + | ====Basic information==== |
| − | |||
| − | |||
| − | |||
| − | |||
| − | |||
| − | |||
| − | |||
| − | |||
| − | |||
| − | |||
| − | |||
| − | |||
| − | |||
| − | Basic | ||
| − | |||
| − | |||
| − | |||
| − | |||
| − | |||
| − | |||
| − | |||
| − | |||
| − | |||
| − | |||
| − | |||
| − | |||
| − | |||
| − | |||
| − | == | ||
{| class="wikitable" | {| class="wikitable" | ||
|- | |- | ||
| − | | | + | |ICT Competency |
| − | | | + | |It is a generic visual resource creation and editing tool. |
| + | |- | ||
| + | |Educational application and relevance | ||
| + | |You can use this tool to create short 2D animations, modify image sequencing as per your academic requirements. You can mix multiple visual formats such as images, graphics together to create educational resources. It will help teachers and students to teach and learn things easily. | ||
| + | |- | ||
| + | |Version | ||
| + | |Tupi version 0.2 git02 | ||
| + | |- | ||
| + | |Other similar applications | ||
| + | | | ||
| + | # [https://www.pencil2d.org/ Pencil2D] Pencil2D is an animation/drawing software which lets you create traditional hand-drawn animation (cartoon) using both bitmap and vector graphics. It is free and open source cross-platform audio editor. | ||
| + | # [https://www.synfig.org/ Synfig] An industry quality software designed for 2D animations | ||
| + | # [https://www.blender.org/ Blender] 3D design and animation tool | ||
|- | |- | ||
| − | | | + | |The application on mobiles and tablets |
| − | + | |No application for mobile platform | |
| − | | | + | |- |
| + | |Development and community help | ||
| + | |Tupi Tutorial on YouTube is available on [https://www.youtube.com/watch?v=KIQmv3NYU_E tupi youtube]<br> | ||
| + | [http://www.maefloresta.com/portal/ Official Website] | ||
| − | + | |} | |
| − | + | ====Overview of Features==== | |
| − | + | One of the main objectives of this project from the beginning has been to provide an easy user experience, starting at the design of the GUI which allows the creation of simple animations in only 5 steps. | |
| − | |||
| − | |||
| − | |||
| − | + | Despite still being in early development, the software includes many features: | |
| − | |||
| − | |||
| − | |||
| − | |||
| + | * Modular user-friendly interface[clarification needed] | ||
| + | * Animation and preview modules | ||
| + | * Basic tools for vector illustration | ||
| + | * Timeline and exposure sheet | ||
| + | * Import of Bitmap images (useful for Stop Motion animation) | ||
| + | * Export to various formats (Ogg Theora, AVI, MPEG, SWF and a sequence of PNG images) | ||
| + | ====Installation==== | ||
| + | #The application is part of the Ubuntu custom distribution. | ||
| + | #In case you do not find it on your computer, you can install by typing <code>Tupi</code> on top search bar in Software Centre. | ||
| + | #If you would like to install through the terminal follow these steps below: | ||
| + | ##Open terminal by clicking Applications->System Tools->Terminal or through Keyboard shortcut <code>Ctrl+Alt+T</code> | ||
| + | ##In the terminal window, type below command and press enter to start the installation by providing your machine password: | ||
| + | ##<code>sudo apt-get install tupi</code> | ||
| − | | | + | ===Working with the application=== |
| + | ===Tools overview=== | ||
| + | Tupi has many features as an animation software which can be explored to make simple and complex animations. We've explained tools provided in tupi which users can explore. <br> | ||
| + | <gallery mode="packed" heights="250px"> | ||
| + | File:Screenshot from 2017-09-19 19-48-34.png|Editing tool | ||
| + | File:image - Tools over view.png|Tupi main window | ||
| + | </gallery> <br> | ||
| + | Users can use various tools available on the left panel to draw, also they can use import tab on the top panel to import any svg or bit map files. | ||
| + | # Pencil : users can use pencil to draw free hand drawing. | ||
| + | # Ink : Users can use this tool to draw using different colors as ink. | ||
| + | # PolyLine : User can sketch various diagrams or shapes using this tool. | ||
| + | # Brushes : Users can use rectangle, ellipse and lines brushes to draw. | ||
| + | # Object selection : Objects made in different layers or frames can be selected using this tool. This helps users to modify using flips, orders and also we can group objects based on our needs. | ||
| + | # Nodes selection- This tools helps to reorder nodes which were created while sketching. Users can only use this if they've used PolyLine option. | ||
| + | # Internal fill- This tool is a bucket fill option which allows users to fill in the objects drawn. Users can choose the colours from palette below. | ||
| + | # Line fill- This tool allows users to fill into the lines drawn while drawing or sketching. | ||
| + | # Tweening- tweening is a software feature that allows you make this process easier and faster for some specific kind of animations by calculating and generating some frames for you between an initial and a final state. | ||
| + | # Misc tools- These tools include exporting that single frame as image, storyboarding, camera (which users can use to put their photos),Papagayo lip sync features which can used for advanced animation including motion of characters etc. | ||
| − | ==File | + | ==Functionalities== |
| − | + | <gallery mode="packed" heights="350px"> | |
| + | File:Image 1 - Opening Tupi.png|Opening TUPI application | ||
| + | File:image 2 - Openening new project.png| Opening new project in tupi | ||
| + | </gallery> | ||
| + | Step 1 - Goto to applications -> graphics -> Tupi to start resources creation. <br> | ||
| + | Step 2 - After the application window opens, go to file and click on new project and it will ask you to select the presets for project, click OK. <br> | ||
| − | == | + | <gallery mode="packed" heights="250px"> |
| − | + | File:frame1-draw.png| First frame | |
| + | File:frame2-daw.png| Second frame with 1st frame as reference | ||
| + | </gallery> | ||
| − | + | Initially to create the animation there will be frames in the tupi each frame consists of separate drawings in it. The above image it shows how we can use frame idea to get animation. <br> | |
| − | we can | ||
| − | |||
| − | |||
| − | |||
| + | In second frame we will be having transparent frame type so we can keep frame1 as reference and draw the 2nd frame to make slight changes in it.<br> | ||
| + | The frames starts executing, creating an animation of objects or shapes drawn. <br> | ||
| + | <gallery mode="packed" heights="250px"> | ||
| + | File:all-frames.png|create multiple frames for better animation | ||
| + | File:player.png| Preview animation by using player | ||
| + | </gallery> | ||
| + | Once all the frames are done we have to click on player button there we can select the speed of the frames. <br> | ||
| − | = | + | ==Saving the file== |
| − | + | After users have finished creating animations of their choice, they can save it as a project which will save the entire project as .tup file. Users can also export the project into images or video formats. | |
| − | |||
| − | |||
| − | = | + | ==Export and publishing files== |
| − | + | We can export this into many formats and save it in our local system<br> | |
| + | [[File:Export-dialog.png|500px|Multiple formats to export our project]] | ||
| + | # Video format - This is the most versatile format which can be played in any platforms like OGV, FLV etc. <br> | ||
| + | # Open video formats - This is another format which can be played as a video in any platform <br> | ||
| + | # Image arrays - Each frames in the animation can be saved as .PNG format which will hlep us in saving it as .GIF file in another application, also we can save them as .JPEG, .SVG image sequencing formats <br> | ||
=Ideas for resource creation= | =Ideas for resource creation= | ||
| Line 89: | Line 110: | ||
=References= | =References= | ||
[https://sourceforge.net/projects/tupi2d/ Tupi website] | [https://sourceforge.net/projects/tupi2d/ Tupi website] | ||
| − | [https://en.wikipedia.org/wiki/ | + | [https://en.wikipedia.org/wiki/Tupi_(software) wikipedia] |
[[Category:Explore an application]] | [[Category:Explore an application]] | ||
Latest revision as of 15:06, 19 September 2017

Introduction
Tupi (formerly KTooN) is a software application for the design and creation of 2D animation. This tool, inspired by and for animators, is being developed by an open community. It is covered under the terms of the GNU General Public License v2, meaning that Tupi is free and open-source software. After Tupi was forked from KToon, KToon's official website was changed to redirect to the website for Tupi.
Basic information
| ICT Competency | It is a generic visual resource creation and editing tool. |
| Educational application and relevance | You can use this tool to create short 2D animations, modify image sequencing as per your academic requirements. You can mix multiple visual formats such as images, graphics together to create educational resources. It will help teachers and students to teach and learn things easily. |
| Version | Tupi version 0.2 git02 |
| Other similar applications |
|
| The application on mobiles and tablets | No application for mobile platform |
| Development and community help | Tupi Tutorial on YouTube is available on tupi youtube |
Overview of Features
One of the main objectives of this project from the beginning has been to provide an easy user experience, starting at the design of the GUI which allows the creation of simple animations in only 5 steps.
Despite still being in early development, the software includes many features:
- Modular user-friendly interface[clarification needed]
- Animation and preview modules
- Basic tools for vector illustration
- Timeline and exposure sheet
- Import of Bitmap images (useful for Stop Motion animation)
- Export to various formats (Ogg Theora, AVI, MPEG, SWF and a sequence of PNG images)
Installation
- The application is part of the Ubuntu custom distribution.
- In case you do not find it on your computer, you can install by typing
Tupion top search bar in Software Centre. - If you would like to install through the terminal follow these steps below:
- Open terminal by clicking Applications->System Tools->Terminal or through Keyboard shortcut
Ctrl+Alt+T - In the terminal window, type below command and press enter to start the installation by providing your machine password:
sudo apt-get install tupi
- Open terminal by clicking Applications->System Tools->Terminal or through Keyboard shortcut
Working with the application
Tools overview
Tupi has many features as an animation software which can be explored to make simple and complex animations. We've explained tools provided in tupi which users can explore.

Editing tool
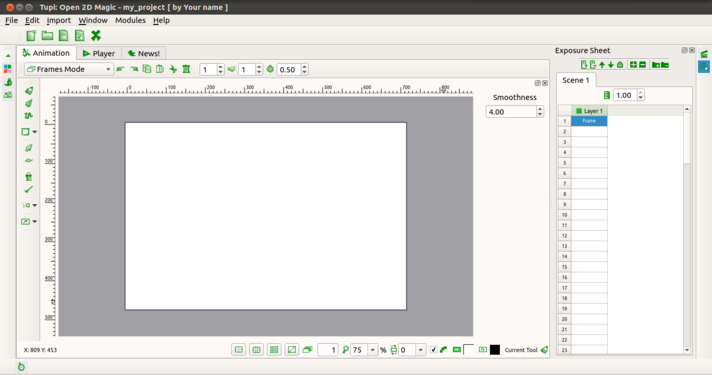
Tupi main window


Users can use various tools available on the left panel to draw, also they can use import tab on the top panel to import any svg or bit map files.
- Pencil : users can use pencil to draw free hand drawing.
- Ink : Users can use this tool to draw using different colors as ink.
- PolyLine : User can sketch various diagrams or shapes using this tool.
- Brushes : Users can use rectangle, ellipse and lines brushes to draw.
- Object selection : Objects made in different layers or frames can be selected using this tool. This helps users to modify using flips, orders and also we can group objects based on our needs.
- Nodes selection- This tools helps to reorder nodes which were created while sketching. Users can only use this if they've used PolyLine option.
- Internal fill- This tool is a bucket fill option which allows users to fill in the objects drawn. Users can choose the colours from palette below.
- Line fill- This tool allows users to fill into the lines drawn while drawing or sketching.
- Tweening- tweening is a software feature that allows you make this process easier and faster for some specific kind of animations by calculating and generating some frames for you between an initial and a final state.
- Misc tools- These tools include exporting that single frame as image, storyboarding, camera (which users can use to put their photos),Papagayo lip sync features which can used for advanced animation including motion of characters etc.
Functionalities
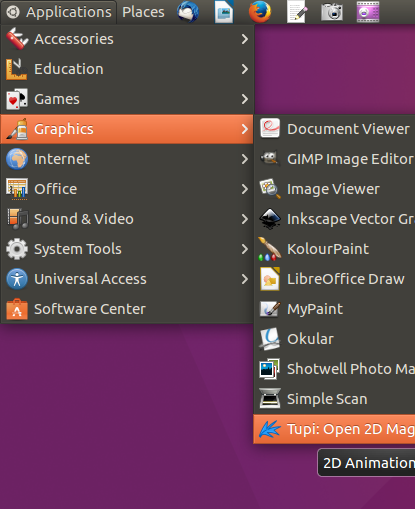
Opening TUPI application
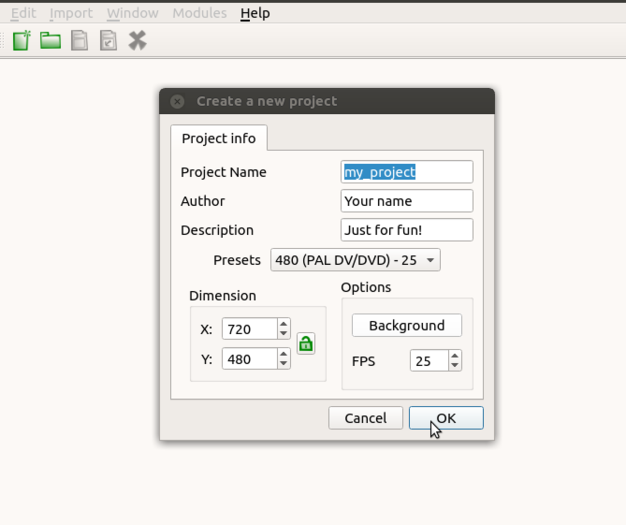
Opening new project in tupi


Step 1 - Goto to applications -> graphics -> Tupi to start resources creation.
Step 2 - After the application window opens, go to file and click on new project and it will ask you to select the presets for project, click OK.
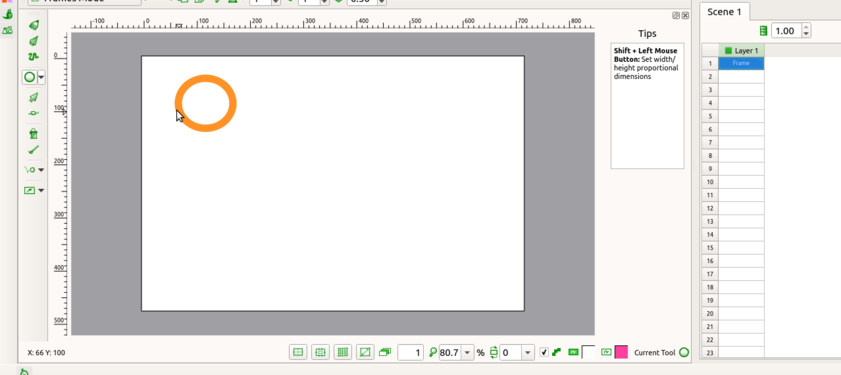
First frame
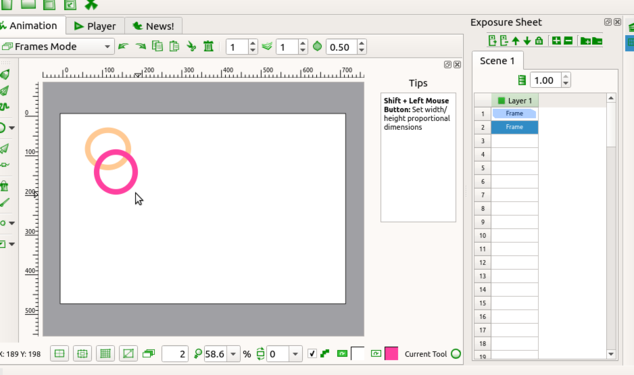
Second frame with 1st frame as reference


Initially to create the animation there will be frames in the tupi each frame consists of separate drawings in it. The above image it shows how we can use frame idea to get animation.
In second frame we will be having transparent frame type so we can keep frame1 as reference and draw the 2nd frame to make slight changes in it.
The frames starts executing, creating an animation of objects or shapes drawn.

create multiple frames for better animation
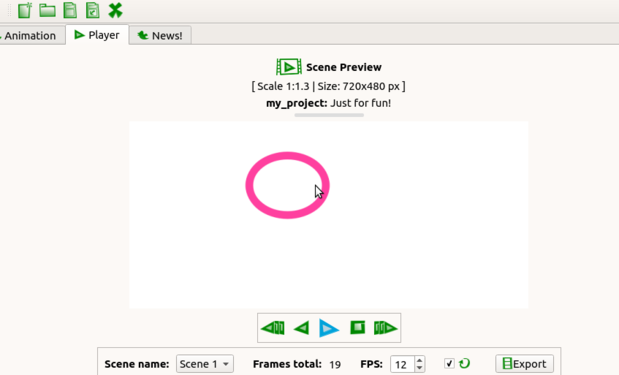
Preview animation by using player


Once all the frames are done we have to click on player button there we can select the speed of the frames.
Saving the file
After users have finished creating animations of their choice, they can save it as a project which will save the entire project as .tup file. Users can also export the project into images or video formats.
Export and publishing files
We can export this into many formats and save it in our local system

- Video format - This is the most versatile format which can be played in any platforms like OGV, FLV etc.
- Open video formats - This is another format which can be played as a video in any platform
- Image arrays - Each frames in the animation can be saved as .PNG format which will hlep us in saving it as .GIF file in another application, also we can save them as .JPEG, .SVG image sequencing formats
Ideas for resource creation
It is tool for animation to learn things