Difference between revisions of "Learn Moodle"
| Line 58: | Line 58: | ||
You can login to Moodle, through a phone Moodle app or through any web browser. | You can login to Moodle, through a phone Moodle app or through any web browser. | ||
| − | =====Logging | + | =====Logging in from Web browser===== |
Click on your Moodle course link and click on the login to view or to edit the course. Click on https://karnatakaeducation.org.in/lms/ to view a Moodle courses managed by Centre for Education and Technology, IT for Change. | Click on your Moodle course link and click on the login to view or to edit the course. Click on https://karnatakaeducation.org.in/lms/ to view a Moodle courses managed by Centre for Education and Technology, IT for Change. | ||
<gallery mode="packed" heights="250px" caption="Moodle - Login to the course"> | <gallery mode="packed" heights="250px" caption="Moodle - Login to the course"> | ||
| Line 67: | Line 67: | ||
Once you login, you can see the list of enrolled courses and you will see your login name on the top right corner of the screen. | Once you login, you can see the list of enrolled courses and you will see your login name on the top right corner of the screen. | ||
| − | =====Logging | + | =====Logging in from Moodle app===== |
<gallery mode="packed" heights="450px" caption="Moodle - Login to the course"> | <gallery mode="packed" heights="450px" caption="Moodle - Login to the course"> | ||
| Line 110: | Line 110: | ||
'''Note:''' In ''your theme the'' icons ''may be ''different''. However the functionality is the same for different themes of Moodle.'' | '''Note:''' In ''your theme the'' icons ''may be ''different''. However the functionality is the same for different themes of Moodle.'' | ||
| − | Once you click on edit - edit topics, it will take | + | Once you click on edit - edit topics, it will take you to edit page (see the below screen shots). |
<gallery mode="packed" heights="300px" caption="Moodle - editing course content sections"> | <gallery mode="packed" heights="300px" caption="Moodle - editing course content sections"> | ||
| Line 118: | Line 118: | ||
</gallery> | </gallery> | ||
| − | You can embed your files | + | You can embed your files, images or videos by dragging and dropping the file to the summary section. You can also adjust the size of the file. |
Un-check "Use default section name" to give your custom heading for your section. | Un-check "Use default section name" to give your custom heading for your section. | ||
| Line 124: | Line 124: | ||
Start adding section summary under the summary box (you can copy paste from an existing text document also). Use the top 'basic formatting' toolbar to format your text, you can '''bold''' or ''italicise'' your text and perform basic text editing functions. | Start adding section summary under the summary box (you can copy paste from an existing text document also). Use the top 'basic formatting' toolbar to format your text, you can '''bold''' or ''italicise'' your text and perform basic text editing functions. | ||
| − | Under the restrict section, you can restrict the page | + | Under the restrict section, you can restrict the access to the page as in the screen shot below. |
<gallery mode="packed" heights="300px" caption="Moodle - editing course content sections"> | <gallery mode="packed" heights="300px" caption="Moodle - editing course content sections"> | ||
| Line 130: | Line 130: | ||
File:moodle add or remove sections.png|To add or remove sections | File:moodle add or remove sections.png|To add or remove sections | ||
</gallery> | </gallery> | ||
| − | Once you have completed your editing and added the text, images, videos in the section, you should | + | Once you have completed your editing and added the text, images, videos in the section, you should click on "save changes" button to save your content under that section. |
Scroll to the bottom of the course main page and, below the last section, look for the small '''+''' and '''-''' icons (at right). Click the '''plus''' ('''+''')/'''minus(-)''' to add and remove sections. | Scroll to the bottom of the course main page and, below the last section, look for the small '''+''' and '''-''' icons (at right). Click the '''plus''' ('''+''')/'''minus(-)''' to add and remove sections. | ||
| Line 138: | Line 138: | ||
===== Embedding the resource directly in the section ===== | ===== Embedding the resource directly in the section ===== | ||
| − | Web links can be provided directly in the section itself. You can give the link directly or 'embed' the link to existing text (which will show as a hyper link). You can also embed images and videos directly on the section page, by providing the URL where the image or video file is stored | + | Web links can be provided directly in the section itself. You can give the link directly or 'embed' the link to existing text (which will show as a hyper link). You can also embed images and videos directly on the section page, by providing the URL where the image or video file is stored (using the Insert -> Media option). |
<gallery mode="packed" heights="250px" caption="Moodle - Editing the section"> | <gallery mode="packed" heights="250px" caption="Moodle - Editing the section"> | ||
| Line 146: | Line 146: | ||
</gallery> | </gallery> | ||
| − | By selecting the words | + | By selecting the words highlighted in the above screenshot & clicking the ‘LINK’ symbol, one more ‘pop – window’ will appear where you can paste the website link for quick access while reading a particular paragraph, for the students. |
Above is the screenshot on how to add the “hyperlink” to particular section of “TEXT” by adding the Moodle LMS hyperlink | Above is the screenshot on how to add the “hyperlink” to particular section of “TEXT” by adding the Moodle LMS hyperlink | ||
===== Adding resource to the section ===== | ===== Adding resource to the section ===== | ||
| − | To add a resources like files, folder, URLs or to create a book, | + | To add a resources like files, folder, URLs or to create a book, choose the section in your course homepage where you'd like it to appear and click on the "Add an activity or resource" available in that section and then select the type of resources you are going to add, from the drop down list. This can be any file you have, which you will upload to Moodle and provide as a resource in this section. |
After you select any resource type from the list, click on 'Add'. <br> | After you select any resource type from the list, click on 'Add'. <br> | ||
| Line 158: | Line 158: | ||
<gallery mode="packed" heights="400px" | <gallery mode="packed" heights="400px" | ||
</gallery> | </gallery> | ||
| − | * Name : Type the name for your resources link, it will create a link which students will | + | * Name : Type the name for your resources link, it will create a link which students will click on to view the file. It will be helpful to give it a name that suggests its purpose / contents. |
| − | * Description : Add a description of your file | + | * Description : Add a description of your file if required. |
* Display description on the course page : If this box is ticked, the description will appear on the course page just below the name of the file. | * Display description on the course page : If this box is ticked, the description will appear on the course page just below the name of the file. | ||
| − | * Select files : click on "Add" and use the file picker to upload your file or drag and drop your file onto the arrow if you are using an appropriate browser. Here you can also create folder and add multiple resource files to a folder. You can use folders to categories files if you plan to provide | + | * Select files : click on "Add" and use the file picker to upload your file or drag and drop your file onto the arrow if you are using an appropriate browser. Here you can also create folder and add multiple resource files to a folder. You can use folders to categories files if you plan to provide many of them for the section. <br> |
<gallery mode="packed" heights="400px" caption="Adding resources into the sections"> | <gallery mode="packed" heights="400px" caption="Adding resources into the sections"> | ||
| Line 169: | Line 169: | ||
</gallery> | </gallery> | ||
| − | Once | + | Once you browse the file then click on upload this file to upload to the page. Finally click on "save and display" to display your resources under the specified section. |
==== Adding Activities ==== | ==== Adding Activities ==== | ||
| − | Moodle supports a range of different activities | + | Moodle supports a range of different activities that allow you to insert to any section. You can add interactive exercises for your students. |
To add a activities like quiz, discussion forum, attendances, forms and surveys turn on your editing by clicking on '''Turn editing on''<nowiki/>'. Choose the section in your course homepage where you'd like it to appear and click on the "Add an activity or resource" then select the type of activities you are going to add into section from the list (for example: Quiz). | To add a activities like quiz, discussion forum, attendances, forms and surveys turn on your editing by clicking on '''Turn editing on''<nowiki/>'. Choose the section in your course homepage where you'd like it to appear and click on the "Add an activity or resource" then select the type of activities you are going to add into section from the list (for example: Quiz). | ||
| Line 182: | Line 182: | ||
After select any activity which you are going to add it to the section (for example: quiz) then click on "add". In the next dialog box will be a settings form for the activity like below. | After select any activity which you are going to add it to the section (for example: quiz) then click on "add". In the next dialog box will be a settings form for the activity like below. | ||
* '''General''' | * '''General''' | ||
| − | ** Name : Type the name for your activity link, it will create a link which students will | + | ** Name : Type the name for your activity link, it will create a link which students will click on to view the file. It will be helpful to give it a name that suggests its purpose / contents. |
| − | ** Description : Add a description of your | + | ** Description : Add a description of your activity if required. |
| − | ** Display description on the course page : If this box is ticked, the description will appear on the course page just below the name of the | + | ** Display description on the course page : If this box is ticked, the description will appear on the course page just below the name of the activity. |
* '''Timing''' | * '''Timing''' | ||
** Open the quiz and Close the quiz : Students can only start their attempt(s) after the open time and they must complete their attempts before the close time. | ** Open the quiz and Close the quiz : Students can only start their attempt(s) after the open time and they must complete their attempts before the close time. | ||
| Line 192: | Line 192: | ||
File:Moodle adding activity quiz - 4.png|Setting up display and submitting time | File:Moodle adding activity quiz - 4.png|Setting up display and submitting time | ||
</gallery> | </gallery> | ||
| − | Once the all the settings | + | Once the all the settings have been filled out as required and saved, the activity will appear at the bottom of the section. |
| − | You can move any activity around in the course with the move buttons while in course edit mode. | + | You can move any activity around in the course with the move buttons while in 'course edit' mode. |
| − | Moodle supports a range of different activities that allow | + | Moodle supports a range of different activities that allow you to insert to any section. You can add interactive questions for the other students in the course. |
You can add questions by clicking on 'Creating Question', then select the type of question you are going to add into section from the list (for example: Multiple Question). | You can add questions by clicking on 'Creating Question', then select the type of question you are going to add into section from the list (for example: Multiple Question). | ||
| Line 211: | Line 211: | ||
===== '''Assignment''' ===== | ===== '''Assignment''' ===== | ||
| − | Assignment helps course creators to give assignments to course participants. | + | Assignment helps course creators to give assignments to course participants. The participants can submit assignments in the form of text by typing in text editor or by they can upload their digitally created content. Creators can download the submissions. |
How to add an ‘Activity or resource’ | How to add an ‘Activity or resource’ | ||
| Line 226: | Line 226: | ||
===== '''Forum''' ===== | ===== '''Forum''' ===== | ||
| − | Forum module helps course creators to allow participants discuss about course content, resources etc and share their collective knowledge. After a participant is | + | Forum module helps course creators to allow participants discuss about course content, resources etc and share their collective knowledge. After a participant is enrolled for a course, he/she can take part in these forums. |
<gallery mode="packed" heights="300px" caption="Configuring Forum"> | <gallery mode="packed" heights="300px" caption="Configuring Forum"> | ||
File:Forum_0.png|Select Forum module from activities list | File:Forum_0.png|Select Forum module from activities list | ||
| Line 261: | Line 261: | ||
</gallery> | </gallery> | ||
| − | In the general section, | + | In the general section, enter all the common details like name of the attendance and description about the attendance (if you have). |
===== Discussion forum activity ===== | ===== Discussion forum activity ===== | ||
| − | The forum activity allows students and teachers to exchange ideas by having discussions on any topic. Any teacher or student registered for the course can | + | The discussion forum activity allows students and teachers to exchange ideas by having discussions on any topic. Any teacher or student registered for the course can initiate a new topic, can post comments or respond to available discussions on any topic. The discussions for a topic are automatically shown as as part of a 'thread' by Moodle. |
| − | There are several forum types to choose from, such as a standard forum where anyone can start a new discussion at any time; a forum where each student can post exactly one discussion; or a question and answer forum where students must first post before being able to view other students' posts. A teacher can allow files to be attached to forum posts. Any images attached | + | There are several forum types to choose from, such as a standard forum where anyone can start a new discussion at any time; a forum where each student can post exactly one discussion; or a question and answer forum where students must first post before being able to view other students' posts. A teacher can allow files to be attached to forum posts. Any images attached in the forum post are displayed. |
Discussion forums have many uses, such as | Discussion forums have many uses, such as | ||
| Line 283: | Line 283: | ||
Under the "general" section type your discussion topic and under the "attachments and word count" you can limit the size of the attachment and word counts and number of attachments etc. | Under the "general" section type your discussion topic and under the "attachments and word count" you can limit the size of the attachment and word counts and number of attachments etc. | ||
| − | After you | + | After you complete the editing, click on "Save and display" to display third discussion thread under your selected section. |
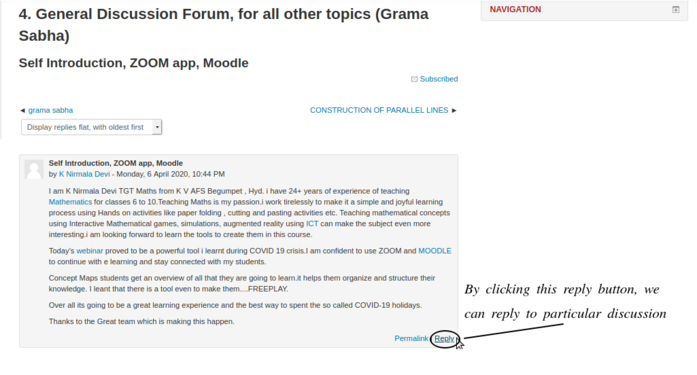
Students can start replying to a topic / discussion by simply clicking on the 'reply' option. | Students can start replying to a topic / discussion by simply clicking on the 'reply' option. | ||
| Line 293: | Line 293: | ||
==== Multi-lingual offering of courses ==== | ==== Multi-lingual offering of courses ==== | ||
| − | The multi-language content filter enables resources to be created in multiple languages. Moodle by default | + | The multi-language content filter enables resources to be created in multiple languages. Moodle by default will be in English and for running any local languages, language packages need to install in your server (This will be done by your web admin). |
[[File:Moodle Multi-lingual.png|none|thumb|600x600px|Use the Moodle in multi-language model]] | [[File:Moodle Multi-lingual.png|none|thumb|600x600px|Use the Moodle in multi-language model]] | ||
| Line 302: | Line 302: | ||
[[File:Moodle mult-lingual content .png|left|thumb|500x500px|Adding content in multiple language]] | [[File:Moodle mult-lingual content .png|left|thumb|500x500px|Adding content in multiple language]] | ||
| − | Once the section open with edit option, for adding Kannada text in to the section just add '''{mlang kn}''' ('kn' means Kannada, replace this with your language) before your text began and at the end of your text just add '''{mlang}'''. follow the same steps for any other language which is already installed in your | + | Once the section open with edit option, for adding Kannada text in to the section just add '''{mlang kn}''' ('kn' means Kannada, replace this with your language) before your text began and at the end of your text just add '''{mlang}'''. follow the same steps for any other language which is already installed in your Moodle server. |
{{Clear}} | {{Clear}} | ||
| Line 316: | Line 316: | ||
=== Student view in Moodle === | === Student view in Moodle === | ||
| − | This page will help you to navigate around your course as student. Once faculty | + | This page will help you to navigate around your course as student. Once the faculty enrols you to a course, you can browse all the course content from the Moodle site. |
==== Student/User information ==== | ==== Student/User information ==== | ||
| Line 329: | Line 329: | ||
In the main page, you can see the two columns: Navigation, Course contents with course sections and news, and upcoming events. You need to click on each tab to see more information.[[File:2. Course lists.png|thumb|See the list of course you are registered|none]] Once you click on the course, The course will open and from the left side course navigation option, directly you can go to any section in the course. | In the main page, you can see the two columns: Navigation, Course contents with course sections and news, and upcoming events. You need to click on each tab to see more information.[[File:2. Course lists.png|thumb|See the list of course you are registered|none]] Once you click on the course, The course will open and from the left side course navigation option, directly you can go to any section in the course. | ||
| − | [https://youtu.be/TPRHv0-_Ebg Click here] to see the tutorial on how access course content from | + | [https://youtu.be/TPRHv0-_Ebg Click here] to see the tutorial on how access course content from Moodle mobile app. |
==== Participating in activities ==== | ==== Participating in activities ==== | ||
| − | Under every section of the | + | Under every section of the course, faculty will give some activities to be completed by students. Activities may be quizzes, assignments, checklists and also discussion topics. Click on the activity to participate in it. |
===== Participating in assignments activity ===== | ===== Participating in assignments activity ===== | ||
| Line 341: | Line 341: | ||
</gallery> | </gallery> | ||
| − | ===== | + | ===== Participating in discussion forum ===== |
Under the first general section you have to click on the "General discussion forum for faculty and students" link to see all the discussion topics. To reply to any topic, click on the topic and type your reply by clicking on the reply link under others replies. Under every reply text input box, also it will allow you to upload your files if needed. | Under the first general section you have to click on the "General discussion forum for faculty and students" link to see all the discussion topics. To reply to any topic, click on the topic and type your reply by clicking on the reply link under others replies. Under every reply text input box, also it will allow you to upload your files if needed. | ||
<gallery mode="packed" heights="250px" caption="Participate in the discussion topics"> | <gallery mode="packed" heights="250px" caption="Participate in the discussion topics"> | ||
| Line 349: | Line 349: | ||
</gallery> | </gallery> | ||
| − | + | In addition to responding to the existing topic, you can create new discussion topic by clicking on "Add a new discussion topic". <br> | |
Also, [https://youtu.be/rRaNAdpPJFY click here] to see the video tutorial on how to participate in discussion forum in mobile app. | Also, [https://youtu.be/rRaNAdpPJFY click here] to see the video tutorial on how to participate in discussion forum in mobile app. | ||
| Line 359: | Line 359: | ||
File:Assignment submission 2.png | File submission section | File:Assignment submission 2.png | File submission section | ||
</gallery> | </gallery> | ||
| − | In this course you can upload | + | In this course you can upload up to sizes 500KB file as assignment, If you want to upload files which is more than 500KB, you can [[Learn Google Drive|'''use google drive''']] to upload your file and give the link here under online text input section. Once you finish your inputs click on "Save changes" to submit your assignment. |
| − | Note : - If you want submit any of the video you have created, use [[Learn Youtube|''' | + | Note : - If you want submit any of the video you have created, use [[Learn Youtube|'''YouTube''']] to upload it and give the video link under online text input section. |
| − | [https://youtu.be/MBfFEuWCX20 '''Click here'''] to see video about assignment submission on | + | [https://youtu.be/MBfFEuWCX20 '''Click here'''] to see video about assignment submission on Moodle mobile app. |
| − | ==== | + | ==== Accessing the resources ==== |
| − | The students can access the resources which | + | The students can access the resources which are posted by the teacher & given permission for downloading to the students. |
<gallery mode="packed" heights="300px" caption="Moodle – Accessing the resource"> | <gallery mode="packed" heights="300px" caption="Moodle – Accessing the resource"> | ||
| Line 377: | Line 377: | ||
===Install Moodle app on your phone=== | ===Install Moodle app on your phone=== | ||
Moodle is a free application and it is available for smart phone, download Moodle from [https://play.google.com/store/apps/details?id=com.moodle.moodlemobile&hl=en_IN google play store].<br> | Moodle is a free application and it is available for smart phone, download Moodle from [https://play.google.com/store/apps/details?id=com.moodle.moodlemobile&hl=en_IN google play store].<br> | ||
| − | * After downloading the "Application" just | + | * After downloading the "Application" just you need to follow the steps & install the Moodle App in your smartphone.<br> |
* When the installation is complete login to the "App" through the "Moodle ID" & "Password" provided. | * When the installation is complete login to the "App" through the "Moodle ID" & "Password" provided. | ||
Revision as of 12:28, 29 June 2020
Introduction
Basic information
| ICT Competency | Moodle is a learning management system (LMS) designed to provide educators, administrators and learners with a robust, secure and integrated system to create personalised and collaborative learning environments. |
| Educational application and relevance | Moodle provides and on-line platform for collaborative learning. It empowers teachers to set-up courses, provide learning resources and activities for the course and assess learners. Teachers and learners can share ideas and experiences using the on-line discussion forums in Moodle. |
| Version | Currently using 3.4 |
| Other similar applications | TalentLMS |
| The application on mobiles and tablets | It is a web based application, and can be accessed through a browser on any device supporting browsing.
There is also an app which can be installed on mobiles. The Moodle app is available in Google Play Store. |
| Development and community help | Moodle |
Working with Moodle
Moodle is a free and open Learning Management System (LMS). You can configure any number of courses on Moodle. You can categorise courses as required.
- Moodle - Dashboard options
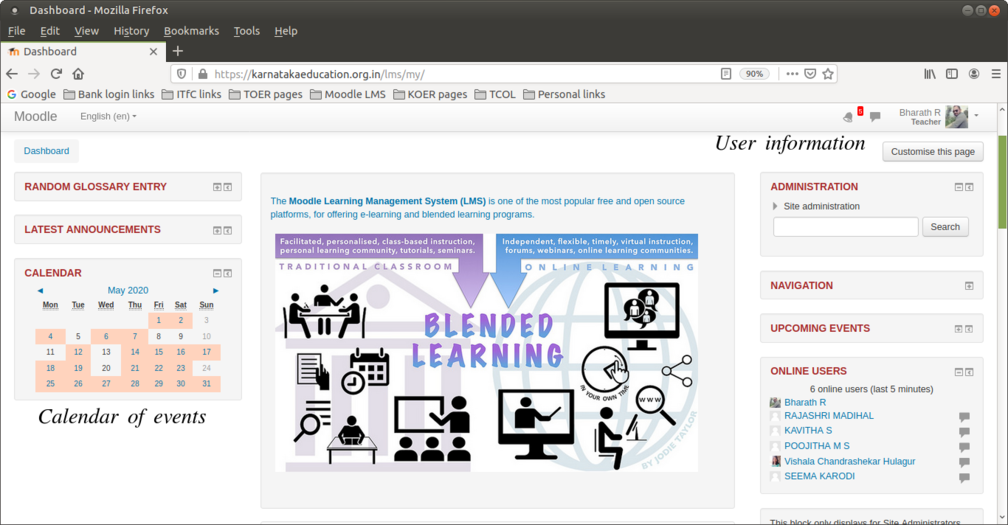
Options available in Moodle

As we can see in the above screenshot, Moodle displays
- Calendar of events
- Latest announcements
- How many online users have accessed Moodle platform
- If we expand the navigation, we can have a look at the courses we're enrolled to.
- Trending random glossary entry
A course is a space on a Moodle site where teachers can add content (learning materials) and activities (pedagogy) for their students. A teacher may be a faculty for more than one course, a course may include more than one teacher and more than one group of learners.
Both teachers and students have to be 'registered' for a course (as 'teacher' or as 'student'), this role configuration is done by the Moodle administrator.
How to reset your Moodle ID password
When you forget your Moodle ID or Password, it can be reset by following the below steps as shown in screenshots.
- Resetting your forgotten Moodle ID or Password
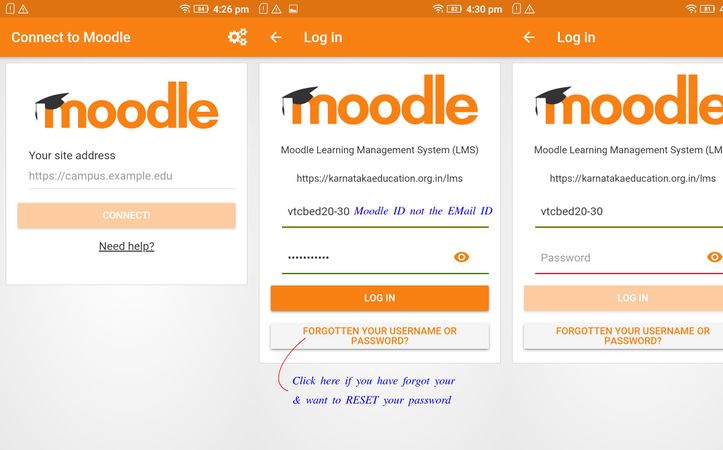
Resetting from Moodle App in smartphone
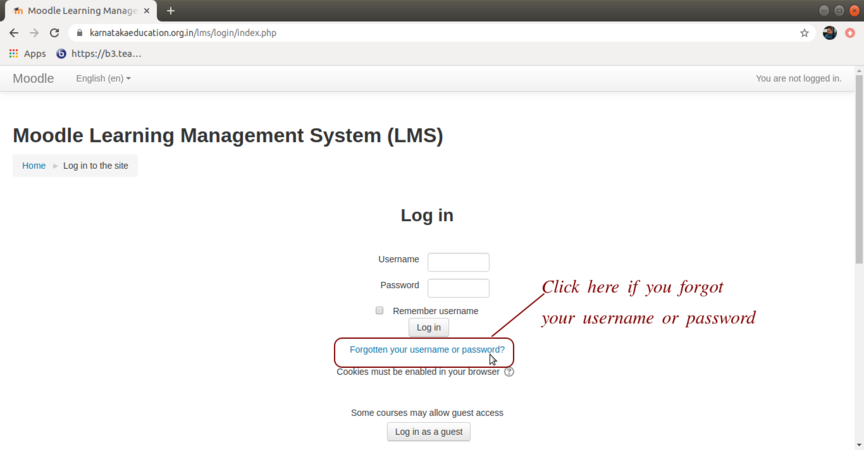
Click here if you have to reset your forgotten ID or password
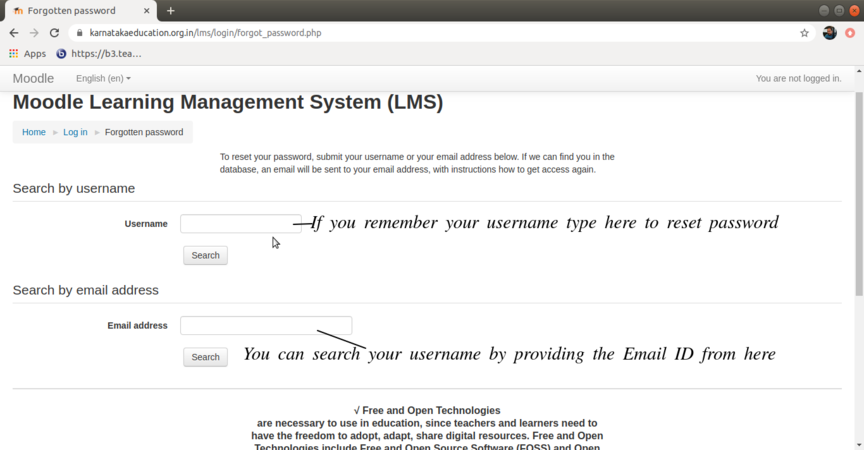
Provide username or mail ID to reset


Logging into Moodle course page
You can login to Moodle, through a phone Moodle app or through any web browser.
Logging in from Web browser
Click on your Moodle course link and click on the login to view or to edit the course. Click on https://karnatakaeducation.org.in/lms/ to view a Moodle courses managed by Centre for Education and Technology, IT for Change.
- Moodle - Login to the course
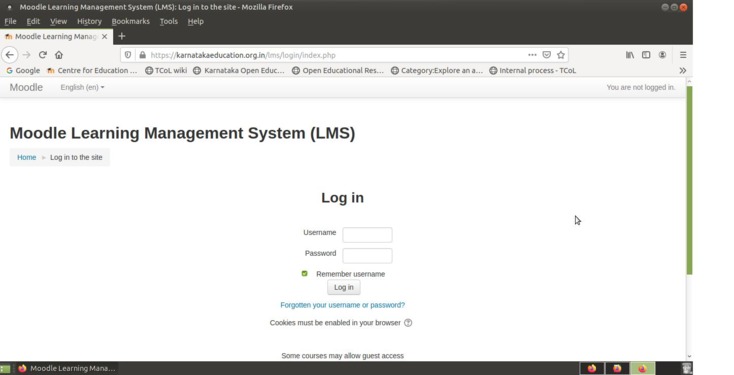
Moodle login screen
Course home page


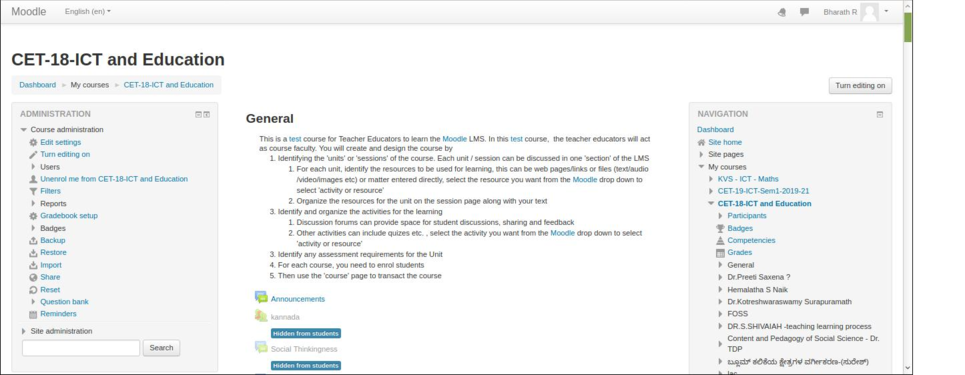
Once you login, you can see the list of enrolled courses and you will see your login name on the top right corner of the screen.
Logging in from Moodle app
- Moodle - Login to the course
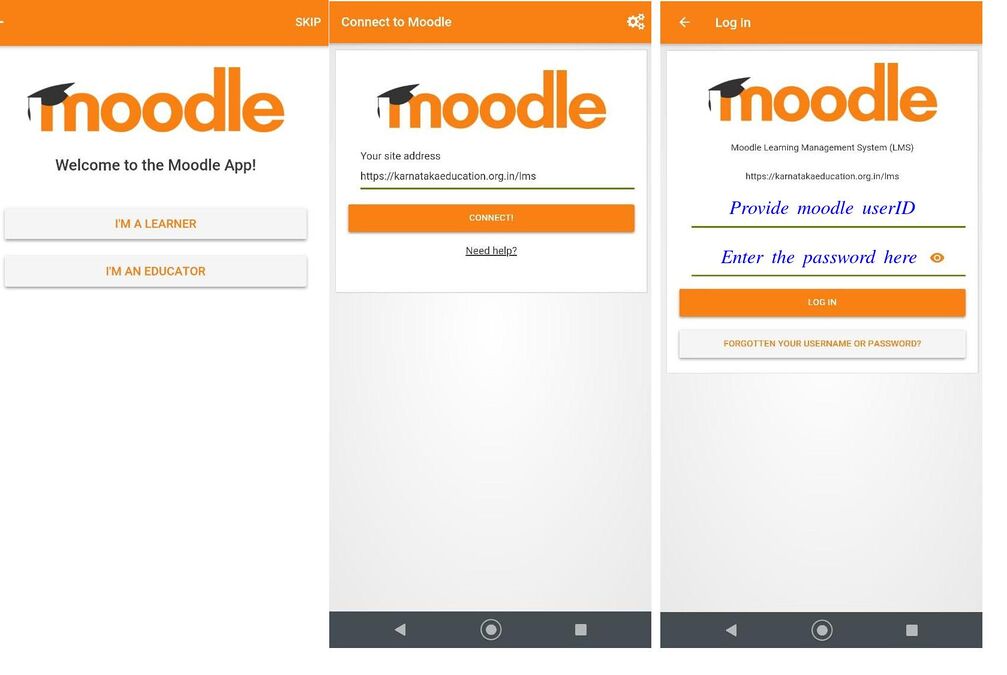
Moodle App login screen

- Accessing the Moodle App

Steps to access the course & download

After logging in to Moodle App, we can find the home screen as shown in screenshot 1, to access the courses we're enrolled to click on the NAVIGATION button. The list if the courses enrolled will be displayed as shown in Screenshot 2, if we want to download courses to our storage. We can even download the courses from Moodle to phone storage by clicking the Settings/Options on top of the Smartphone screen.

Steps to access the course in Browser

Above screenshot shows on steps to access to BigBlueButton through Moodle App.
Moodle Home page
Pic 1 : Moodle LMS login page
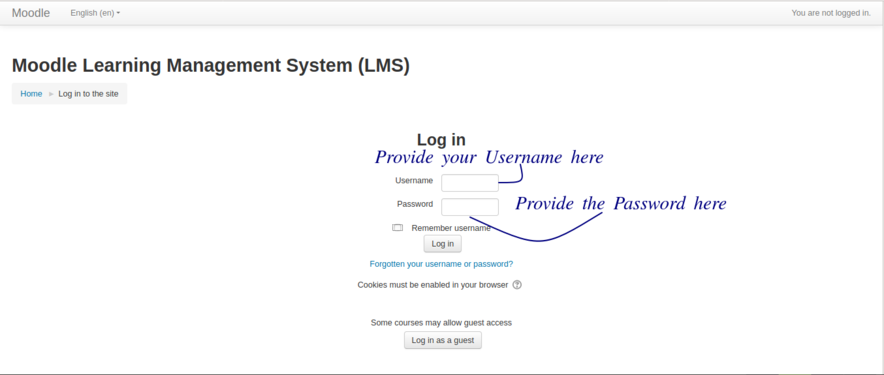
Pic 2 : Username & Password
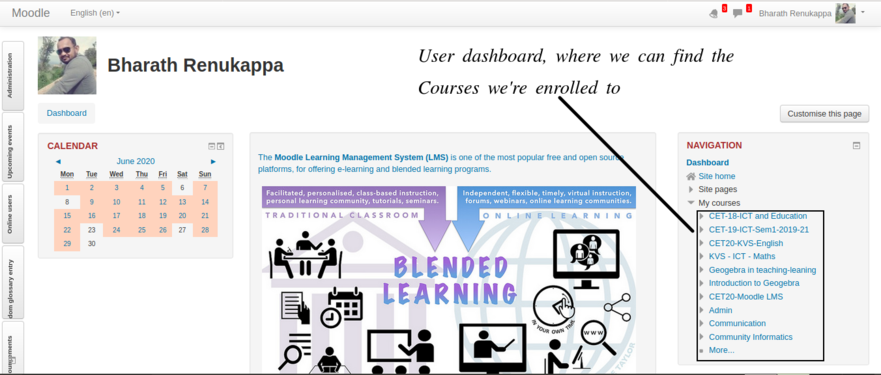
Pic 3 : User dashboard
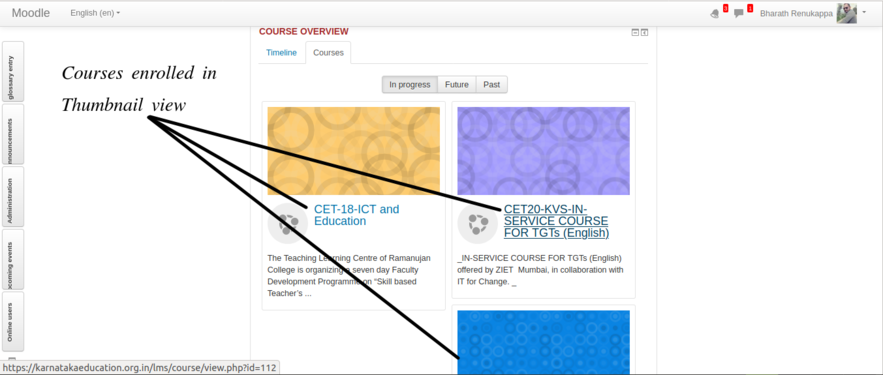
Pic 4 : Courses enrolled to in thumbnail view


- Pic 1 :Homepage of https://karnatakaeducation.org.in/lms
- Pic 2 :Here we have to provide the Username/Moodle ID & Password
- Pic 3 :After the successful log IN to the account, on the left side of the screen we can find a 'DASHBOARD'
- Pic 4 :We can see the Courses we're enrolled in 'THUMBNAIL' view also.
Faculty view in Moodle
Editing sections
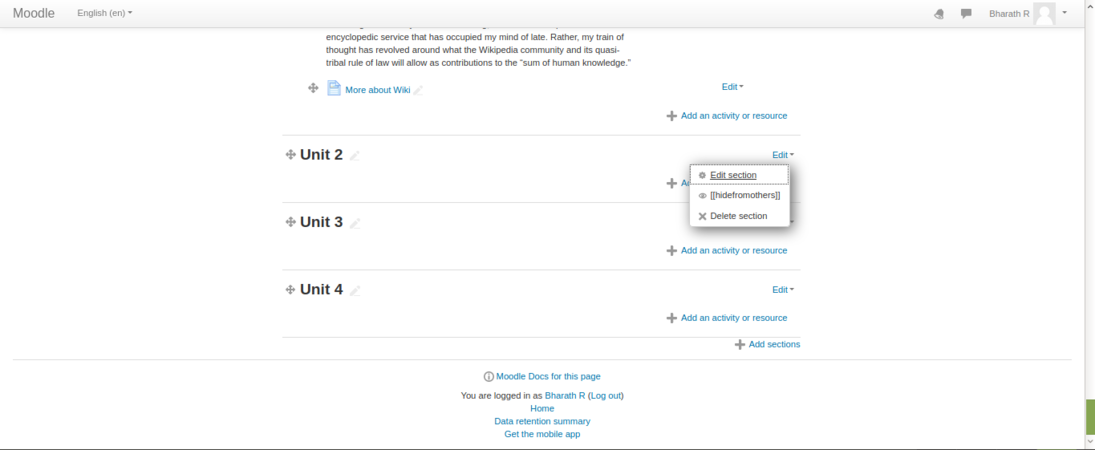
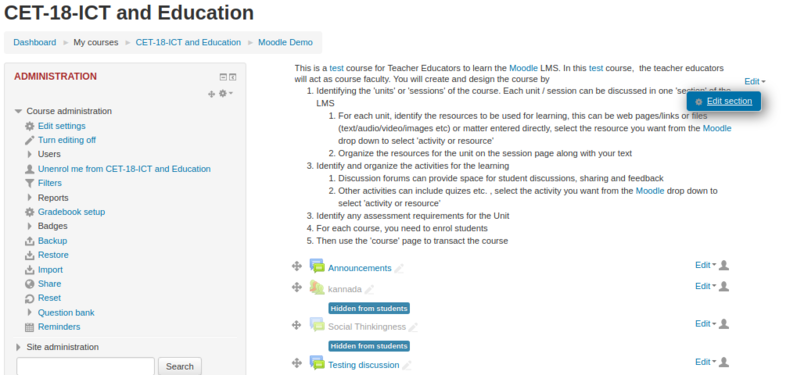
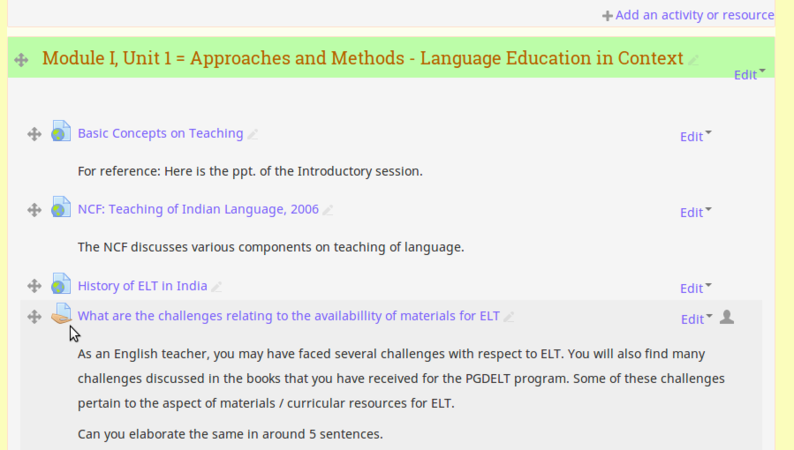
Once you have a new blank course or once you enrolled as teacher for any course, you can start work on it by clicking the Turn editing on button on the top right side of your screen. Only faculty will have rights to edit the course contents, including adding resources and activities. This is not available for students.
When the 'editing' option is turned 'on', each item on your course homepage and each section/block will display 'edit' option, which will enable you to perform different functions such as edit/move/copy/delete/hide.
Note: In your theme the icons may be different. However the functionality is the same for different themes of Moodle.
Once you click on edit - edit topics, it will take you to edit page (see the below screen shots).
- Moodle - editing course content sections
Click 'edit sections' option to start editing section

Uncheck 'Use default section name' for custom title name


You can embed your files, images or videos by dragging and dropping the file to the summary section. You can also adjust the size of the file.
Un-check "Use default section name" to give your custom heading for your section.
Start adding section summary under the summary box (you can copy paste from an existing text document also). Use the top 'basic formatting' toolbar to format your text, you can bold or italicise your text and perform basic text editing functions.
Under the restrict section, you can restrict the access to the page as in the screen shot below.
- Moodle - editing course content sections
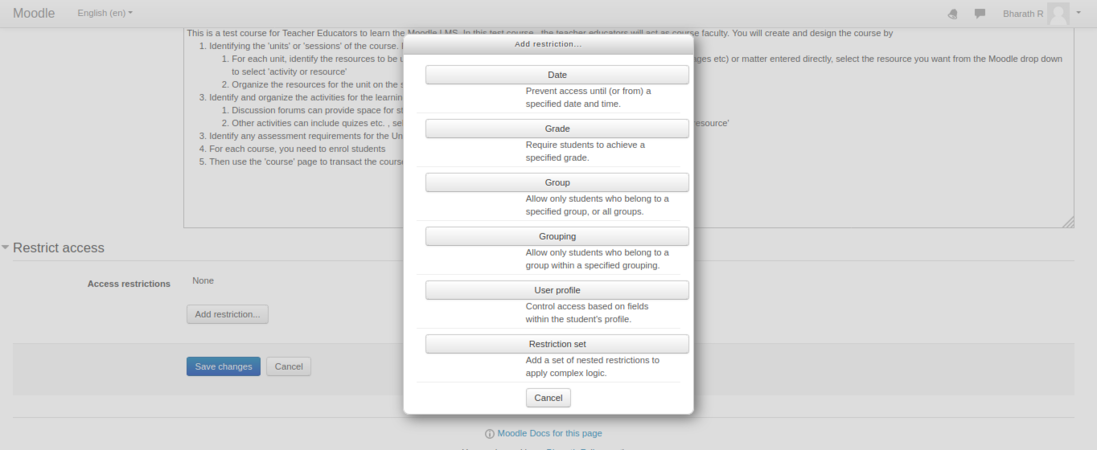
Set restrictions to access the section
To add or remove sections


Once you have completed your editing and added the text, images, videos in the section, you should click on "save changes" button to save your content under that section.
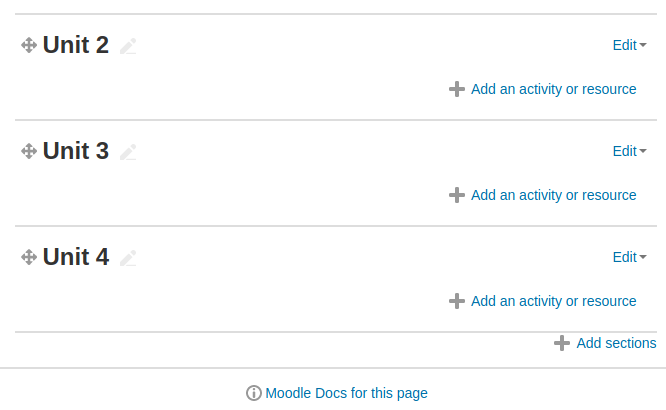
Scroll to the bottom of the course main page and, below the last section, look for the small + and - icons (at right). Click the plus (+)/minus(-) to add and remove sections.
Adding Resources
A resource is an item that a teacher can use to support learning, such as a file or web link. There are two ways you can add resources to the course page
Embedding the resource directly in the section
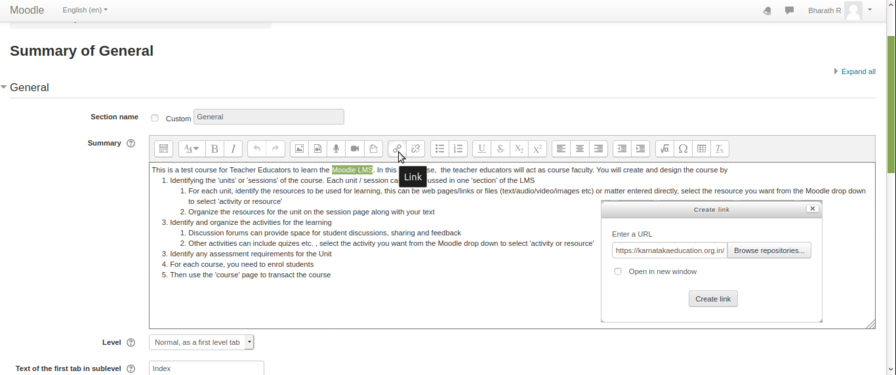
Web links can be provided directly in the section itself. You can give the link directly or 'embed' the link to existing text (which will show as a hyper link). You can also embed images and videos directly on the section page, by providing the URL where the image or video file is stored (using the Insert -> Media option).
- Moodle - Editing the section
Embedding the resource directly to the section
Stages on how to link external link


By selecting the words highlighted in the above screenshot & clicking the ‘LINK’ symbol, one more ‘pop – window’ will appear where you can paste the website link for quick access while reading a particular paragraph, for the students. Above is the screenshot on how to add the “hyperlink” to particular section of “TEXT” by adding the Moodle LMS hyperlink
Adding resource to the section
To add a resources like files, folder, URLs or to create a book, choose the section in your course homepage where you'd like it to appear and click on the "Add an activity or resource" available in that section and then select the type of resources you are going to add, from the drop down list. This can be any file you have, which you will upload to Moodle and provide as a resource in this section.
After you select any resource type from the list, click on 'Add'.
In the next dialogue box you have enter the required information. See the screen shot below for details.
- Adding resources into the sections
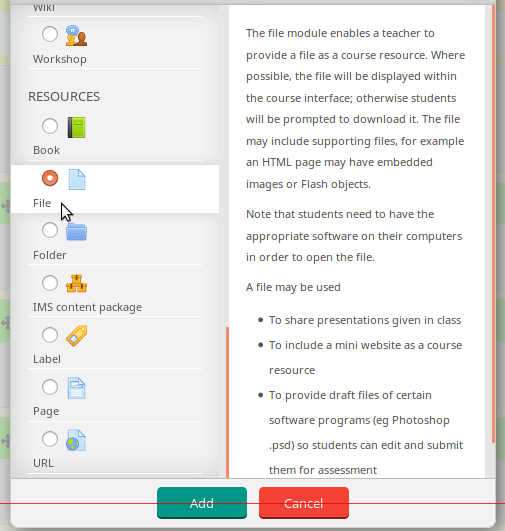
Selecting a type of resources from the list

- Name : Type the name for your resources link, it will create a link which students will click on to view the file. It will be helpful to give it a name that suggests its purpose / contents.
- Description : Add a description of your file if required.
- Display description on the course page : If this box is ticked, the description will appear on the course page just below the name of the file.
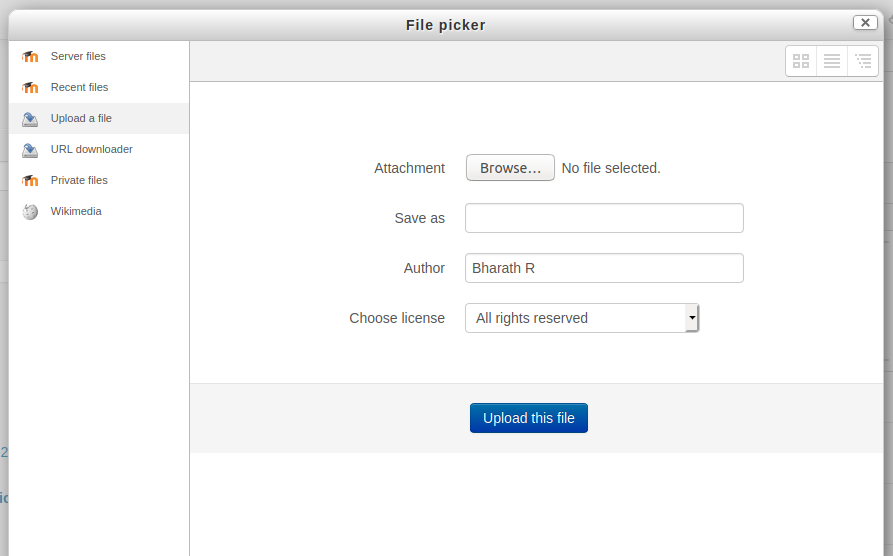
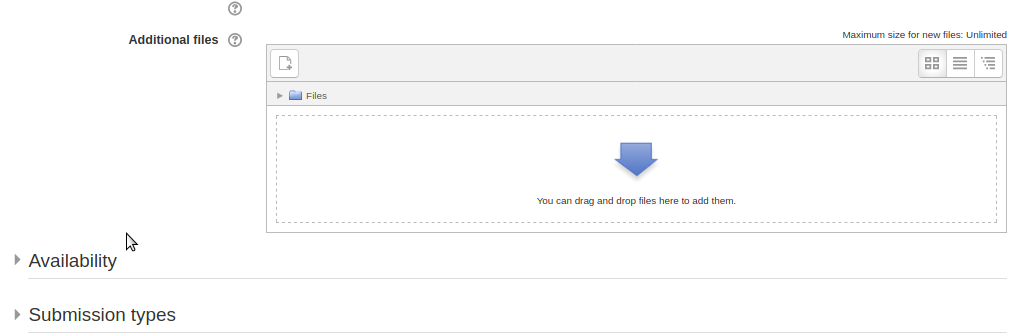
- Select files : click on "Add" and use the file picker to upload your file or drag and drop your file onto the arrow if you are using an appropriate browser. Here you can also create folder and add multiple resource files to a folder. You can use folders to categories files if you plan to provide many of them for the section.
- Adding resources into the sections
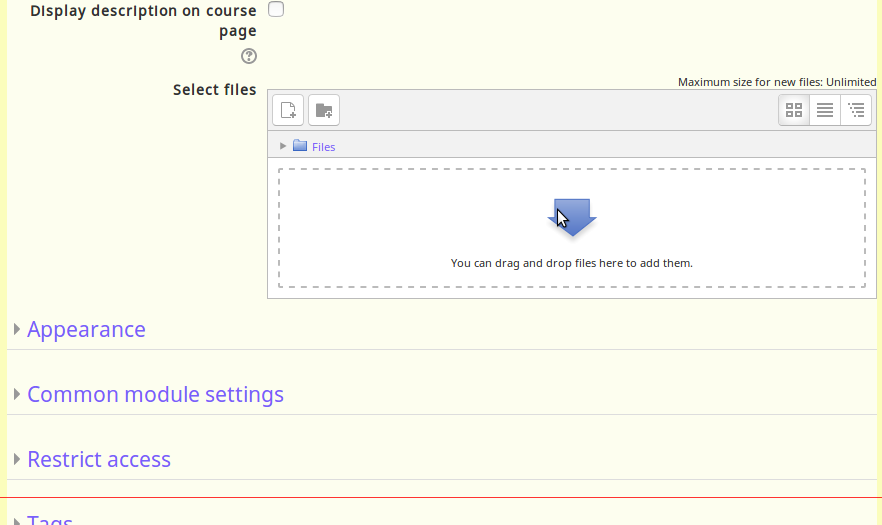
Upload files under the select file section
Browse your local file location


Once you browse the file then click on upload this file to upload to the page. Finally click on "save and display" to display your resources under the specified section.
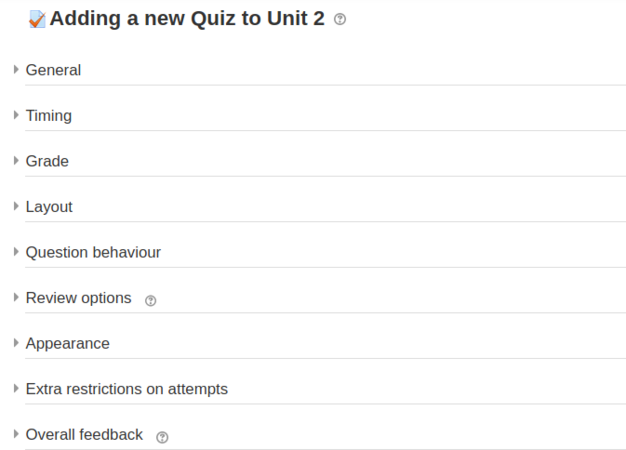
Adding Activities
Moodle supports a range of different activities that allow you to insert to any section. You can add interactive exercises for your students.
To add a activities like quiz, discussion forum, attendances, forms and surveys turn on your editing by clicking on 'Turn editing on'. Choose the section in your course homepage where you'd like it to appear and click on the "Add an activity or resource" then select the type of activities you are going to add into section from the list (for example: Quiz).
Quiz
- Adding activities
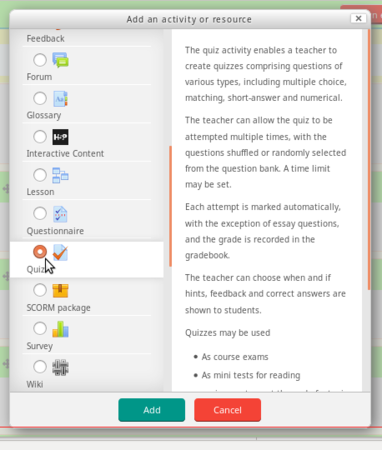
Select type of activity
Configure your activity


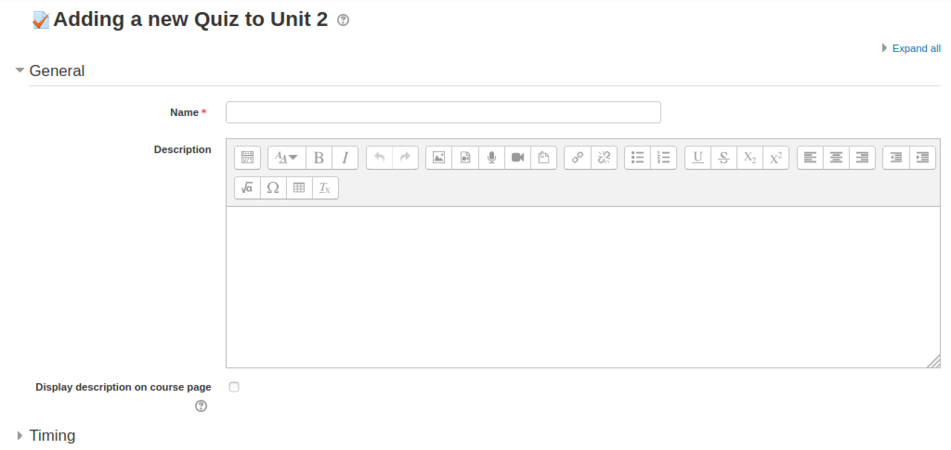
After select any activity which you are going to add it to the section (for example: quiz) then click on "add". In the next dialog box will be a settings form for the activity like below.
- General
- Name : Type the name for your activity link, it will create a link which students will click on to view the file. It will be helpful to give it a name that suggests its purpose / contents.
- Description : Add a description of your activity if required.
- Display description on the course page : If this box is ticked, the description will appear on the course page just below the name of the activity.
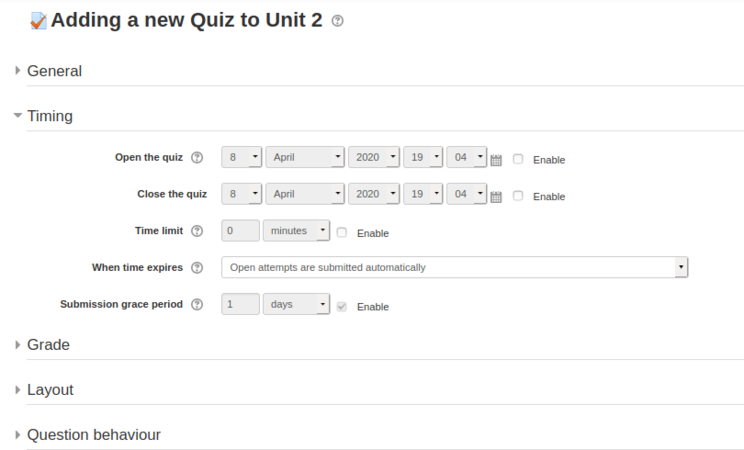
- Timing
- Open the quiz and Close the quiz : Students can only start their attempt(s) after the open time and they must complete their attempts before the close time.
- Time limit : If enabled, the time limit is stated on the initial quiz page and a countdown timer is displayed in the quiz navigation block.
- Configuring activities
Add basic information about the activities
Setting up display and submitting time


Once the all the settings have been filled out as required and saved, the activity will appear at the bottom of the section.
You can move any activity around in the course with the move buttons while in 'course edit' mode.
Moodle supports a range of different activities that allow you to insert to any section. You can add interactive questions for the other students in the course.
You can add questions by clicking on 'Creating Question', then select the type of question you are going to add into section from the list (for example: Multiple Question).
- Moodle - Creating Question
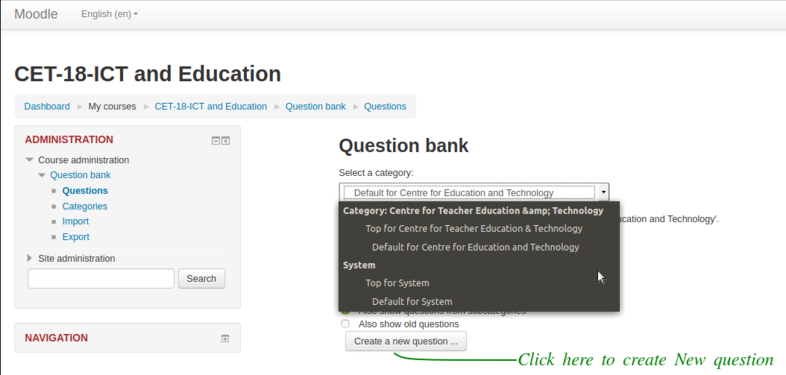
How to create a new Question
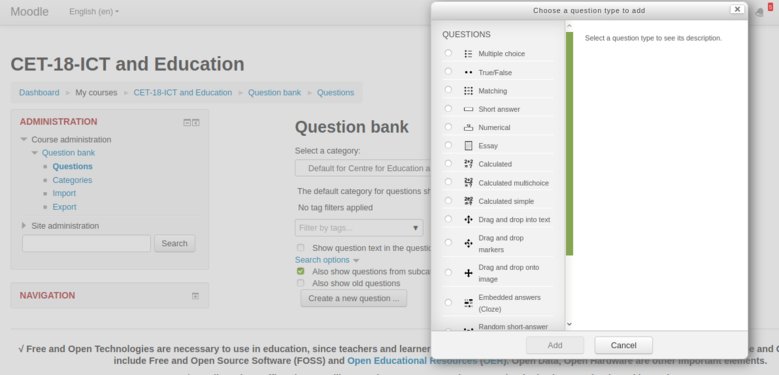
For the example we are framing ‘Multiple Choice Questions’ type.
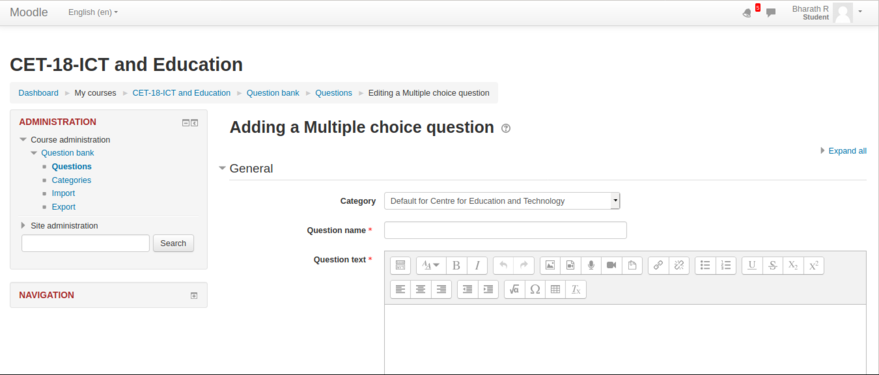
You can add the choices for the
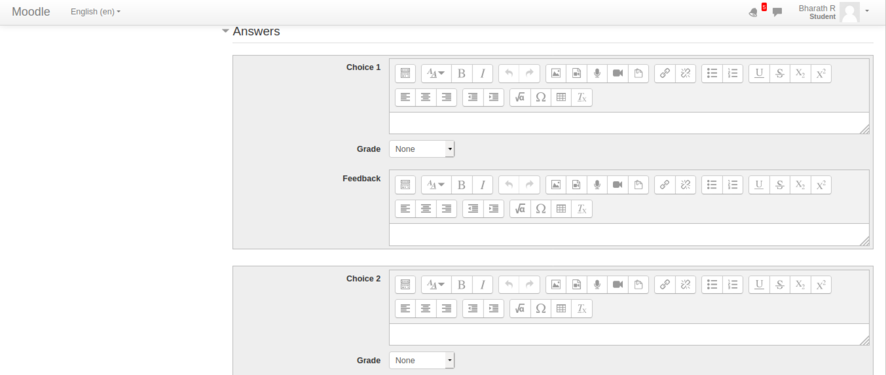
Questions framed in the above screenshot.


Assignment
Assignment helps course creators to give assignments to course participants. The participants can submit assignments in the form of text by typing in text editor or by they can upload their digitally created content. Creators can download the submissions.
How to add an ‘Activity or resource’ By enabling the ‘Turn editing ON’ we can add ‘activity or resource’ in the units
- Moodle - How to add an activity or resource
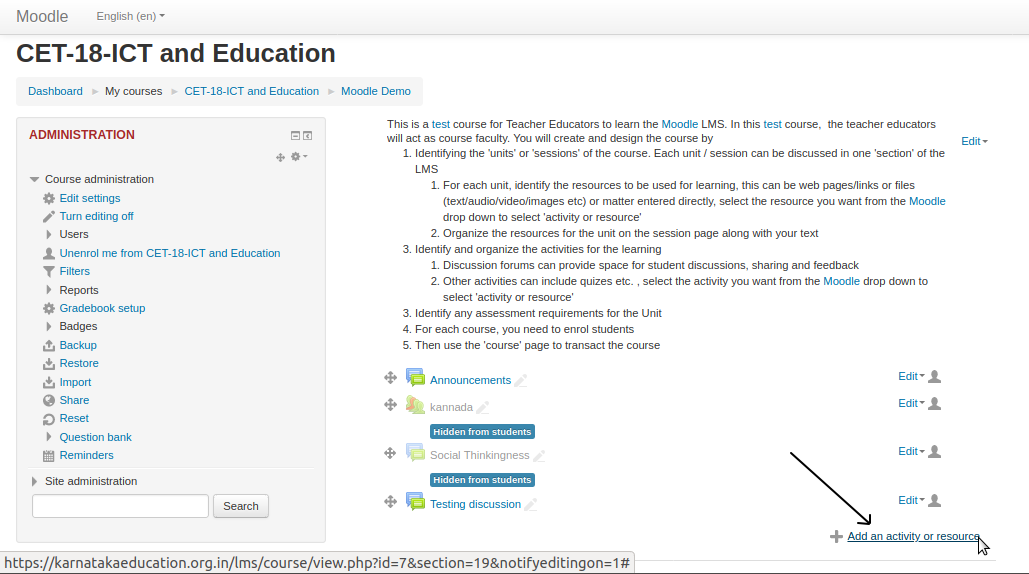
By enabling the ‘Turn editing ON’ we can add ‘activity or resource’ in the units

- Configuring Assignment

Select assignment module from activities list
Participants can upload their files here


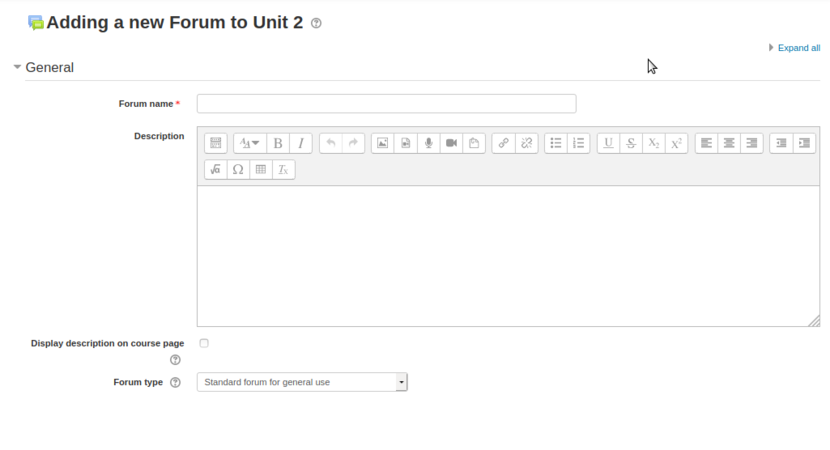
Forum
Forum module helps course creators to allow participants discuss about course content, resources etc and share their collective knowledge. After a participant is enrolled for a course, he/she can take part in these forums.
- Configuring Forum
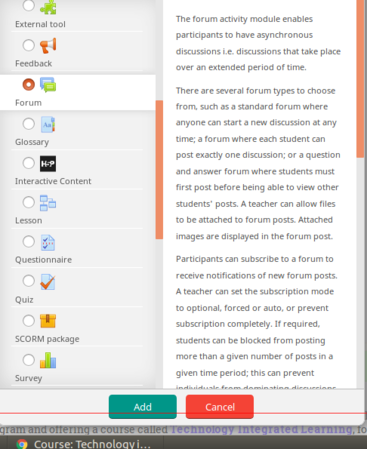
Select Forum module from activities list
Edit these menu options to suit course needs


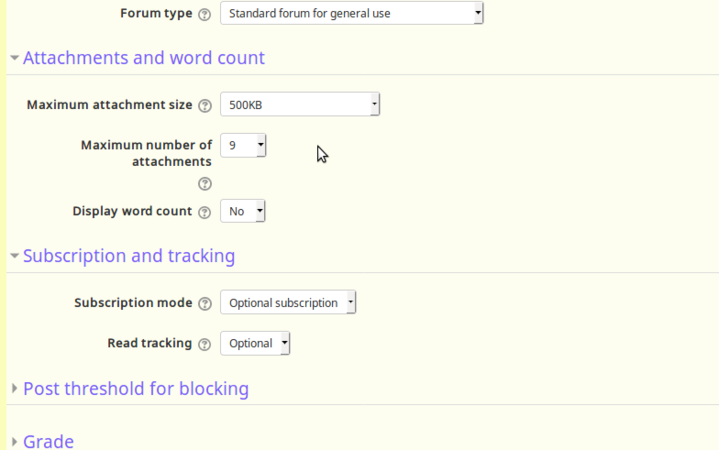
Also there is a control menu which enables users to participate in the forums with word count and attachment size. This will help maintain the course with optimum sized files.

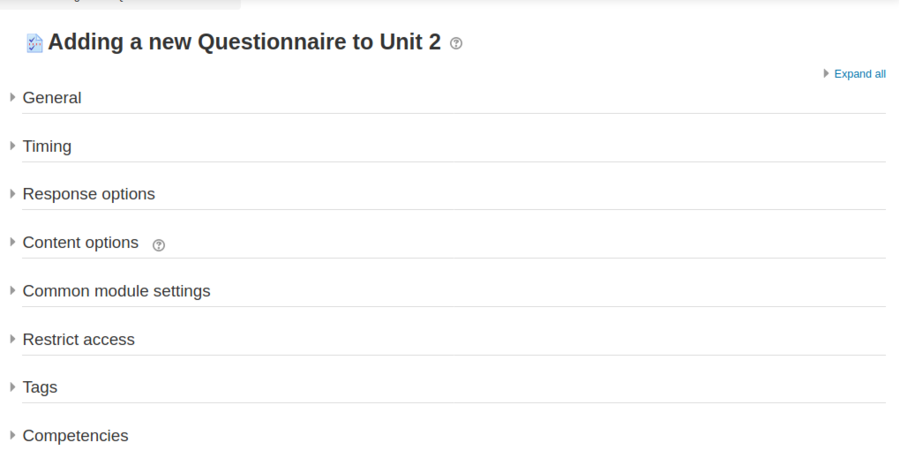
Questionnaire
Questionnaire module will help course creators to give quizzes, data collection etc.
To add a questionnaire, click on Add an activity/resource and select Questionnaire
- Configuring Questionnaire
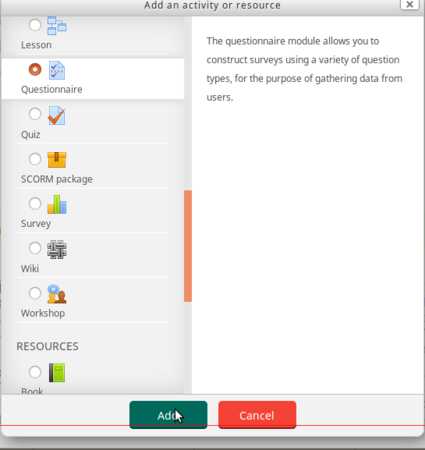
Select Questionnaire module from activities list
Edit these menu options to suit course needs


You can control response actions and also activity completion which gives more control to the creator/moderators.
- Configuring Questionnaire
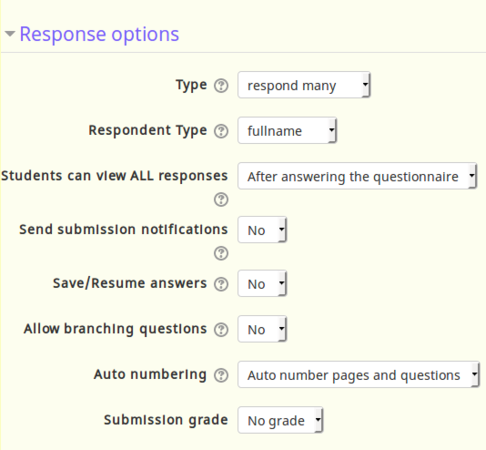
Helps to design responses better
Deadlines also can be set from these menu


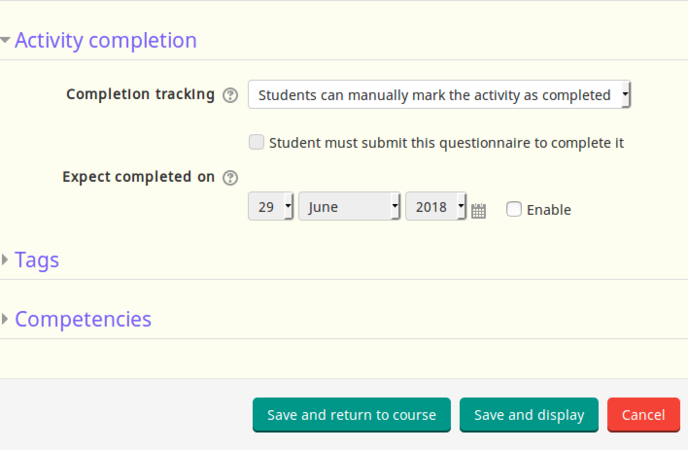
After you finish configuring your questionnaire, click on save and display to show the questionnaire or click on save and return to the course.
Tracking attendance
The Attendance module is designed for teachers to be able take attendance during class, and for students to be able to view their own attendance record.
A teacher can mark the attendance status of a student as "Present", "Absent", "Late", or "Excused". These status descriptions are configurable, and more can be added. The teacher adds Attendance as an activity of a course, and then sets up the sessions whose attendance is to be tracked. To create course attendance go to any section and click an "Add an activity or resource".
- Adding Attendance for the course
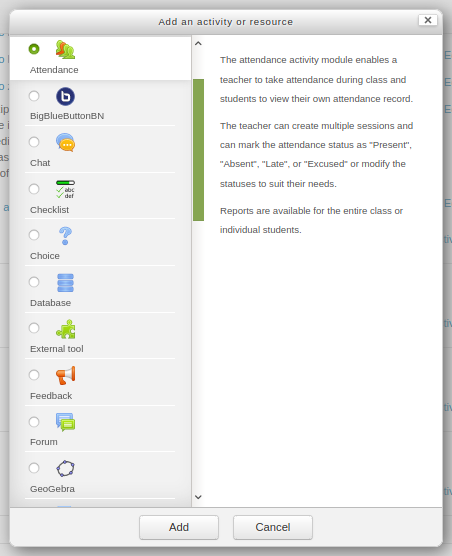
Select attendance option from the list
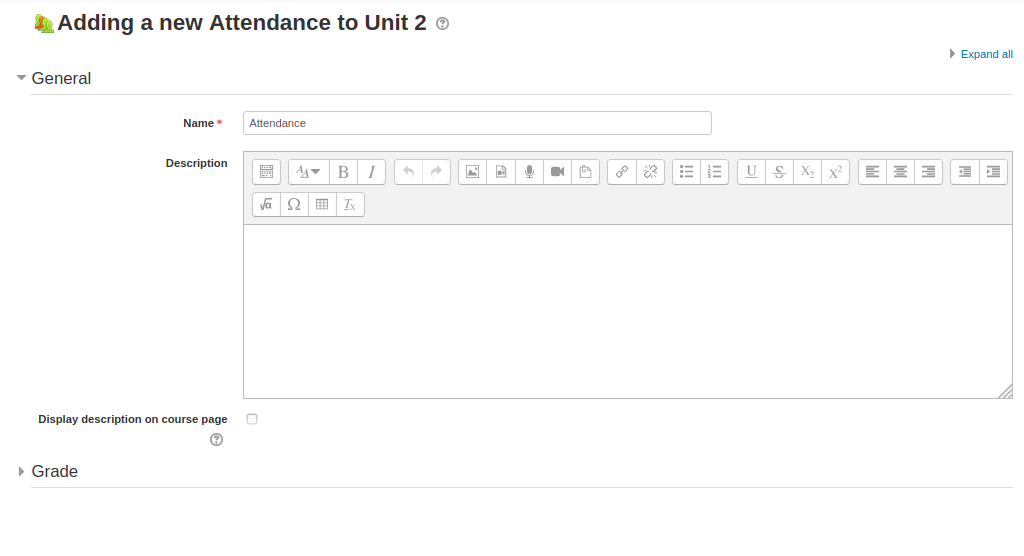
Configuring group


In the general section, enter all the common details like name of the attendance and description about the attendance (if you have).
Discussion forum activity
The discussion forum activity allows students and teachers to exchange ideas by having discussions on any topic. Any teacher or student registered for the course can initiate a new topic, can post comments or respond to available discussions on any topic. The discussions for a topic are automatically shown as as part of a 'thread' by Moodle.
There are several forum types to choose from, such as a standard forum where anyone can start a new discussion at any time; a forum where each student can post exactly one discussion; or a question and answer forum where students must first post before being able to view other students' posts. A teacher can allow files to be attached to forum posts. Any images attached in the forum post are displayed.
Discussion forums have many uses, such as
- A social space for students to get to know each other
- For course announcements (using a news forum with forced subscription, where only faculty can post)
- For discussing course content or reading materials
- For continuing on-line an issue raised previously in a face-to-face session
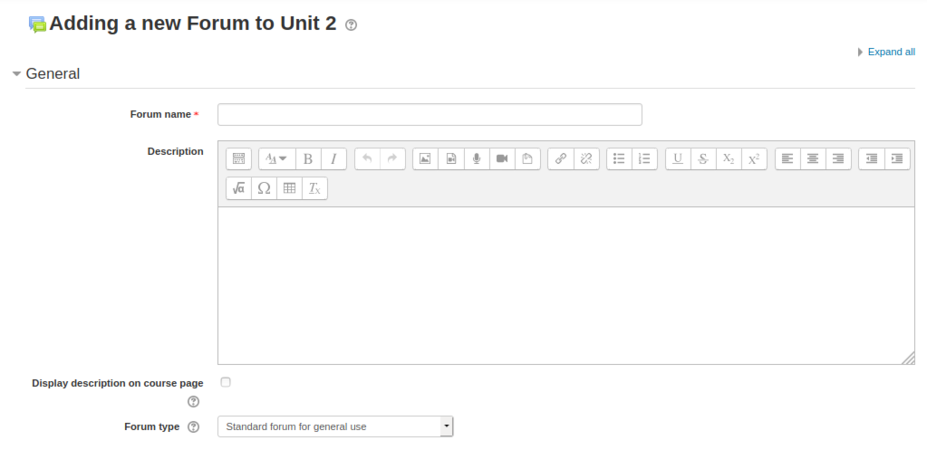
To add discussion topic click on the add "an activity or resource" option and select forum option from the activities list.
Enter the discussion topic and summary
Restricting attachment size and text length


Under the "general" section type your discussion topic and under the "attachments and word count" you can limit the size of the attachment and word counts and number of attachments etc.
After you complete the editing, click on "Save and display" to display third discussion thread under your selected section.
Students can start replying to a topic / discussion by simply clicking on the 'reply' option.
Advanced Activities
1.Lesson
2.Workshop
Multi-lingual offering of courses
The multi-language content filter enables resources to be created in multiple languages. Moodle by default will be in English and for running any local languages, language packages need to install in your server (This will be done by your web admin).

Login to your course and on the top right side of the screen you can select the language which you want see your course.
Adding content in the course page
For adding other language content into any section, after you enable the editing option and select click on edit -> edit topic.

Once the section open with edit option, for adding Kannada text in to the section just add {mlang kn} ('kn' means Kannada, replace this with your language) before your text began and at the end of your text just add {mlang}. follow the same steps for any other language which is already installed in your Moodle server.
How to add a new course
If a faculty wants to add/create a ‘New course’ to the Moodle page below are the steps.
1. Teacher’s Dashboard ►Site administration ►Courses ►Manage courses & categories►Create a new course.
- Moodle - How to add a new course
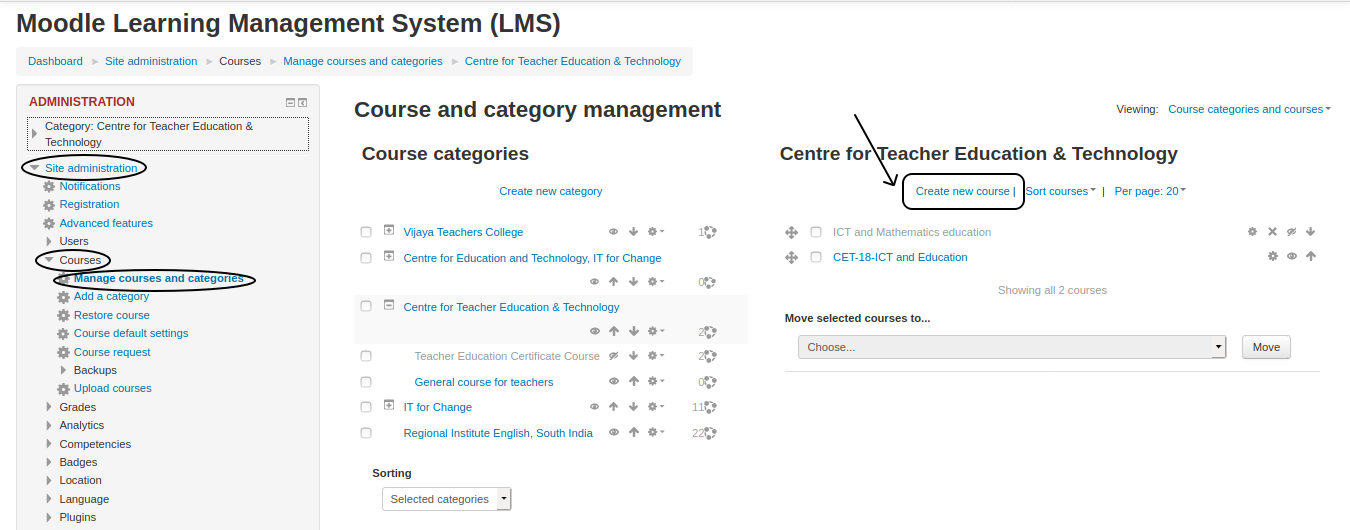
Steps on how to add a new course

Student view in Moodle
This page will help you to navigate around your course as student. Once the faculty enrols you to a course, you can browse all the course content from the Moodle site.
Student/User information
- Moodle - Student login page

Home page of student account

Most courses will allow the student to see profile of the login user from the top right side. This block will allow the student to see information about themselves in the course.
In the main page, you can see the two columns: Navigation, Course contents with course sections and news, and upcoming events. You need to click on each tab to see more information.

Once you click on the course, The course will open and from the left side course navigation option, directly you can go to any section in the course.
Click here to see the tutorial on how access course content from Moodle mobile app.
Participating in activities
Under every section of the course, faculty will give some activities to be completed by students. Activities may be quizzes, assignments, checklists and also discussion topics. Click on the activity to participate in it.
Participating in assignments activity
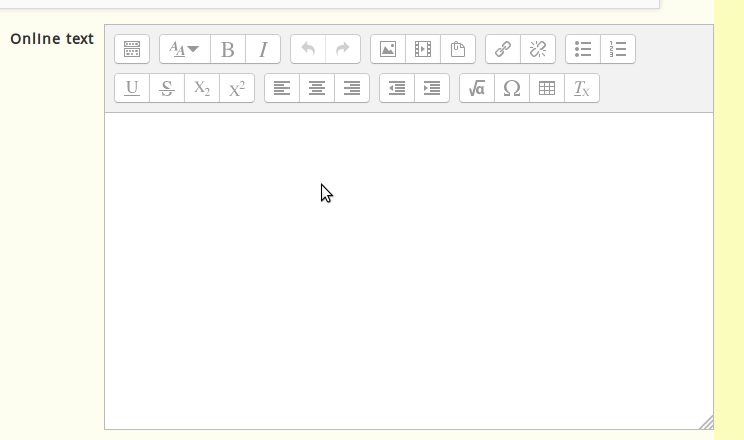
If the activity is assignments, you have click on the title of the activity to read the full assignment and click on "add submission" it will open "online text section" and "file submission" sections, under online text section directly you can give text input of your assignment. In file submission section you can upload any files like images, text files, audio’s etc.
- Moodle – Uploading the assignment

This is how you can upload assignment through Moodle App

Participating in discussion forum
Under the first general section you have to click on the "General discussion forum for faculty and students" link to see all the discussion topics. To reply to any topic, click on the topic and type your reply by clicking on the reply link under others replies. Under every reply text input box, also it will allow you to upload your files if needed.
- Participate in the discussion topics
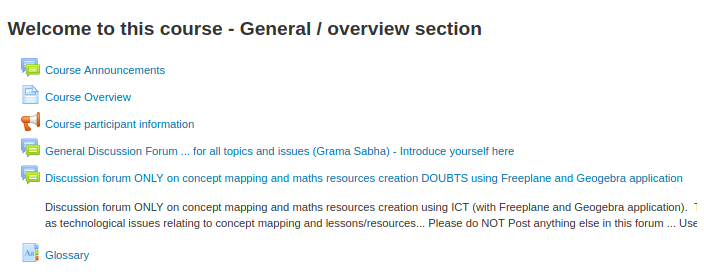


In addition to responding to the existing topic, you can create new discussion topic by clicking on "Add a new discussion topic".
Also, click here to see the video tutorial on how to participate in discussion forum in mobile app.
- Participating in assignments activity
Participate in assignment activity
Online text input section
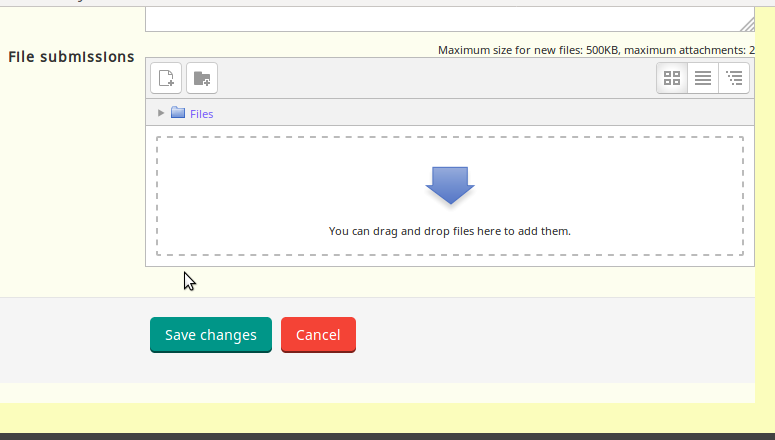
File submission section


In this course you can upload up to sizes 500KB file as assignment, If you want to upload files which is more than 500KB, you can use google drive to upload your file and give the link here under online text input section. Once you finish your inputs click on "Save changes" to submit your assignment.
Note : - If you want submit any of the video you have created, use YouTube to upload it and give the video link under online text input section.
Click here to see video about assignment submission on Moodle mobile app.
Accessing the resources
The students can access the resources which are posted by the teacher & given permission for downloading to the students.
- Moodle – Accessing the resource
In the above screenshot we are trying to download a file which is uploaded by the teacher for the student.
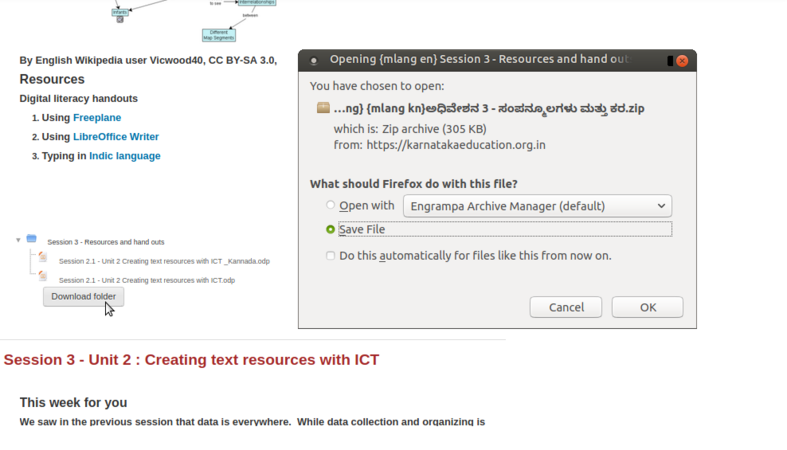
Here in the above screenshot, we can download a whole folder which is uploaded & given access to download for the students.


Install Moodle app on your phone
Moodle is a free application and it is available for smart phone, download Moodle from google play store.
- After downloading the "Application" just you need to follow the steps & install the Moodle App in your smartphone.
- When the installation is complete login to the "App" through the "Moodle ID" & "Password" provided.
Advanced features
- Tracking activities of students
- Tracking assessments and grading assessments
- Quizzes for ongoing assessment
- Event tracking using calendar