Difference between revisions of "Learn Kdenlive"
| (62 intermediate revisions by 3 users not shown) | |||
| Line 8: | Line 8: | ||
|- | |- | ||
|Educational application and relevance | |Educational application and relevance | ||
| − | |Working with video, audio, text and image resources. This can be used in digital story telling | + | |Working with video, audio, text and image resources. This can be used in digital story telling videos |
|- | |- | ||
|Version | |Version | ||
| − | | | + | |21.12 (Stable Version) - as of May 2024 |
|- | |- | ||
|Other similar applications | |Other similar applications | ||
| Line 17: | Line 17: | ||
|- | |- | ||
|The application on mobiles and tablets | |The application on mobiles and tablets | ||
| − | | | + | |[https://play.google.com/store/apps/details?id=com.cyberlink.powerdirector.DRA140225_01&hl=en_IN&gl=US Cyberlink Powerdirector], [https://play.google.com/store/apps/details?id=com.splice.video.editor&hl=en_IN&gl=US Splice] |
|- | |- | ||
|Development and community help | |Development and community help | ||
| Line 23: | Line 23: | ||
|} | |} | ||
==== Overview of features ==== | ==== Overview of features ==== | ||
| − | Kdenlive is an open source video | + | Kdenlive is an open-source video editing software aimed for Linux Operating System, but it also available for Windows and Mac systems. Because of the simple interface and wide range of video editing features, this tools largely using by teachers and teacher-educators to create/edit video resources for their classrooms. |
| − | |||
| − | |||
| − | |||
| − | |||
| − | |||
| − | |||
| − | |||
| − | ==== | + | Here are some key features and benefits of Kdenlive for teachers: |
| − | # The application is part of the Ubuntu custom distribution. | + | |
| − | # In case you do not find it on your computer, you can install by choosing | + | '''User-Friendly Interface:''' Kdenlive offers a user-friendly interface that is easy to navigate, making it suitable for teachers who may not have extensive experience with video editing software. |
| − | # If you would like to install through the terminal follow these steps below: | + | |
| − | ## Open terminal | + | '''Multi-track Editing:''' Teachers can work with multiple video and audio tracks simultaneously, allowing for more complex and professional-looking video projects. |
| − | ## Once | + | |
| − | ## '''sudo apt | + | '''Effects and Transitions:''' Kdenlive provides a range of effects and transitions that teachers can use to enhance their videos, such as fades, wipes, color correction, and more. |
| − | ## | + | |
| + | '''Timeline Editing:''' The timeline editing feature allows teachers to precisely edit and arrange clips, audio, and effects on a timeline, giving them full control over the video editing process. | ||
| + | |||
| + | A wide range of effects and transitions. Audio effects including normalization, phase and pitch shifting, limiting, volume adjustment, reverb and equalization filters as well as others. Video effects include options for masking, blue-screen, distortions, rotations, color tools, blurring, obscuring and others. | ||
| + | |||
| + | '''Export Options:''' Kdenlive supports a variety of export formats, including popular formats like MP4, AVI, and MKV, making it easy for teachers to share their videos with students or upload them to online platforms. | ||
| + | |||
| + | Overall, Kdenlive is a versatile and powerful video editing tool that can help teachers create engaging and informative video content for their teaching-learning process. | ||
| + | |||
| + | === Installation === | ||
| + | ==== For Ubuntu OS ==== | ||
| + | |||
| + | # The application is part of the Ubuntu custom distribution. | ||
| + | # In case you do not find it on your computer, you can install by choosing “Kdenlive” in Ubuntu Software Center | ||
| + | # If you would like to install through the terminal follow these steps below: | ||
| + | ## Open terminal (Menu -> System tools -> Mate terminal) or use use keyboard short keys Ctrl+Alt+t | ||
| + | ## Once the terminal window opens, in front of the dollar($) symbol just type below command. | ||
| + | ## '''sudo apt install kdenlive''' | ||
| + | ## You will be prompted to enter your Ubuntu user password. Type your password (note that it won't be displayed on the screen as you type) and press Enter again to start the installation process. | ||
| + | |||
| + | ==== For Windows OS ==== | ||
| + | |||
| + | # Download the Kdenlive exe file from the official website link: https://kdenlive.org/en/download/. | ||
| + | #* Click on the link to visit the download page. | ||
| + | #* Look for the download link for the Windows version of Kdenlive (usually labeled as "Download for Windows" or similar). | ||
| + | #* Click on the download link to start downloading the .exe file. | ||
| + | # Once the .exe file is downloaded to your Windows computer, locate the file in your Downloads folder or the folder where your browser saves downloads. | ||
| + | # Double-click the .exe file to start the Kdenlive installation process. This action will open the Kdenlive installation dialog box on your screen. | ||
| + | # Follow the on-screen instructions provided by the installation wizard to install the Kdenlive software (''This typically involves selecting installation options (such as language preferences) and agreeing to the software's terms and conditions).'' | ||
| + | # Wait for the installation process to complete. This may take a few minutes depending on your computer's performance. | ||
| + | # Once the installation is finished, you will see a confirmation message indicating that Kdenlive has been successfully installed on your computer. | ||
| + | |||
| + | ==== For Mac OS ==== | ||
| + | {{Note|Important Note: Currently, Kdenlive for Mac only supports Intel processors, not M1 or M2 chips.}} | ||
| + | * Download the Kdenlive .dmg file from the official website link: https://kdenlive.org/en/download/. | ||
| + | * Look for the download link for Mac OS X (often labeled as "Download for macOS" or similar). | ||
| + | * Click on the download link to start downloading the .dmg file. | ||
| + | |||
| + | * Once the .dmg file is downloaded, locate it in your Downloads folder or the folder where your browser saves downloads. | ||
| + | * Open the .dmg File: | ||
| + | ** Double-click the .dmg file to mount the Kdenlive disk image. | ||
| + | ** A new window will appear showing the contents of the disk image. | ||
| + | * Install Kdenlive: | ||
| + | ** Drag the Kdenlive application icon from the disk image window to your Applications folder. | ||
| + | ** This action will copy Kdenlive to your Applications folder, making it available for use. | ||
===Working with the application=== | ===Working with the application=== | ||
| − | When you start to working with any multimedia files (videos, images, animation) | + | When you start to working with any multimedia files (videos, images, animation) the first step is creating a new folder for our new project. This will help to find your all project related files. Create a folder anywhere under your home folder or Desktop. To open Kdenlive |
| − | |||
| − | <gallery mode="packed" heights="250px" caption="Opening kdenlive from menu option"> | + | To open Kdenlive, in Ubuntu - go-to"Applications → Sound and video → Kdenlive" and for the Windows “Start→ search for Kdenlive”. |
| + | |||
| + | This is what your user interface will look like when the Kdenlive application launches on your computer.<gallery mode="packed" heights="250px" caption="Opening kdenlive from menu option"> | ||
File:0. Open kdenlive.png|Opening kdenlive from menu option | File:0. Open kdenlive.png|Opening kdenlive from menu option | ||
| − | File: | + | File:Kdenlive interface.jpg| Kdenlive User Interface UI |
</gallery> | </gallery> | ||
| − | + | <gallery mode="packed" heights="250px"> | |
| + | File:Kdenlive2 image.png| Kdenlive Interface | ||
| + | </gallery> | ||
| − | + | ===== [1] Project Bin, Library: (Elaborate) (use links which is used in current handout) ===== | |
| + | The project bin is your media library. It stores all your video clips, audio files, and images for your project. You can import media from your computer and organize them with folders. The bin acts as a bridge, letting you drag and drop clips to the timeline for editing in the next step. | ||
| + | |||
| + | ===== [2] Clip Monitor: ===== | ||
| + | This is where the clip selected in the project bin is displayed. When you want to preview a clip before getting into the timeline, you can directly preview it from here. | ||
| + | |||
| + | ===== [3] Project Monitor: ===== | ||
| + | This is where the content of the timeline is being displayed with all the edits, effects and compositions applied in the tracks. It displays where your cursor is on the timeline. | ||
| + | |||
| + | ===== [4] Timeline: ===== | ||
| + | The most important section of the Kdenlive tool and most of the action/edit is taking place in the timeline. Here you put your sources in the order in which they will appear in the final video, make your edits (cuts and trimmings), apply effects, add compositions and transitions, and add audio and soundtracks. | ||
| + | In the Editing section you will learn more about this using tracks and organizing your files | ||
| + | |||
| + | ===== [5] Timeline Toolbar: ===== | ||
| + | This is where you find all the editing related tools and features to edit your video project. | ||
| + | |||
| + | ===== [6] Audio Mixer: ===== | ||
| + | This section holds the audio mixing panel where you control the volume and pan of the various audio tracks and the master. | ||
| + | |||
| + | ===== [7] Menu Bar/Toolbar: ===== | ||
| + | At the top of the Kdnelive window screen you have access to the Kdnelive menu bar. The Workspace Layouts and the Main Toolbar. | ||
| + | |||
| + | |||
| + | ===== Create new project ===== | ||
| + | After launching Kdenlive, the first thing to do is create a new project. What is a project, then? A project keeps all the work on your video or slideshow. You can save the project and continue your work later, or restore your work if you need to edit something after you've finished it You are able to pick up where you left off once you save it as a project. | ||
| + | |||
| + | <gallery mode="packed" heights="350px"> | ||
| + | File:3rdimage of choosing a new codec.png|Image of choosing a new codec<br> | ||
| + | </gallery> | ||
| + | |||
| + | Selecting a project setting, prompts a dialog box to show up on your screen when you select File > New > Project. There are several folders, and each folder contains multiple project options if you expand. | ||
| + | The most important question at this point is: what settings should be selected? You can select 4K, HD 720P, Full HD 1080P, and many other resolutions based on your needs To put it another way, selecting 4K will cause your video to be rendered in its highest resolution, which calls for a more advanced hardware setup like only on specific smart 4K TV, High HD display computers and etc; selecting HD 720, on the other hand, will cause it to be rendered in its lowest resolution, making it suitable for usage with a less technical setup like basic smartphones, old computer, tabs. We can use FHD 1080p for learning and exploring; it is an intermediate resolution that is commonly used on YouTube, social media, television, and some movies. There are several project settings under FHD 1080p, Let's select HD 1080p 25 frames profile. | ||
| + | |||
| + | ===== Importing your files to project Now that the project is ready, let’s start adding some clips into your project. ===== | ||
| + | |||
| + | <gallery mode="packed" heights="350px"> | ||
| + | File:4th imageimportingfiles.png | ||
| + | </gallery> | ||
| + | |||
| + | Click on the “Add Clip” icon, form file menu, directly it opens the file dialogue of your local folders, start browsing your local video clips, audio clips, images to start your edit. | ||
| + | |||
| + | ==== Save the project ==== | ||
| + | As soon as you finish importing your files and before starting any further editing, it is safe to save the project in your system's local folder, so you can resume the work you last saved. It is also recommended to store all the working folders in specific folders and subfolders that you are comfortable with. And make sure all the files are available in the main project root folder. it is also recommended that you save projects frequently. | ||
| + | |||
| + | ==== Key Things To Consider 1.0 ==== | ||
| + | |||
| + | ==== Folder Structure ==== | ||
| + | <gallery mode="packed" heights="250px"> | ||
| + | File:5th imagefolderstructure.png|'''Example image for folder structure'''<br> | ||
| + | </gallery> | ||
| + | |||
| + | A well-defined folder structure is crucial for staying organized during video editing. It saves time, prevents frustration, and ensures a smooth workflow. Here's a breakdown of its benefits and recommended folders: | ||
| + | |||
| + | ==== Benefits of creating Folder: ==== | ||
| + | * '''Easy file navigation:''' Quickly locate specific media files (video, audio, graphics) without sifting through everything. | ||
| + | * '''Improved collaboration:''' Enables clear communication and efficient sharing of project files with others. | ||
| + | * '''Reduced risk of losing files:''' Organized folders prevent accidental deletion or misplacement of essential project elements. | ||
| + | |||
| + | ==== Recommended Folder Structure: ==== | ||
| + | '''Main Project Folder:''' Create a folder with a clear and concise name reflecting the project title , this folder will house all the subfolders related to your video project. | ||
| + | |||
| + | '''Subfolders:''' | ||
| + | * '''Project Files:''' Store your editing software project files (.kdenlive for Kdenlive,) here. | ||
| + | * '''Assets:''' This folder holds all the media you'll use in your edit. | ||
| + | * '''Footage:''' Unedited video clips captured from cameras or downloaded sources. You can further organize footage by scene, date, or camera operator for larger projects. | ||
| + | * '''Audio:''' Background music, sound effects, voice-overs, and any other audio elements. | ||
| + | * '''Graphics:''' Logos, titles, animations, overlays, and other visual elements. | ||
| + | |||
| + | Consider subfolders for different versions (drafts, final exports) for better clarity. | ||
| + | Backup and Save Regularly: Create backups of your project folder on external drives to prevent data loss | ||
| + | |||
| + | ==== About Tracks(to add content) ==== | ||
| + | |||
| + | In video editing, a track is a virtual layer within the timeline where you arrange and edit your video and audio elements. Imagine the timeline as a multi-lane highway, and each track represents a lane for a specific type of media. | ||
| + | |||
| + | * '''Video tracks[V1,V2]:''' These tracks hold your video clips, allowing you to sequence them and create the visual flow of your project. You can have multiple video tracks stacked on top of each other, enabling you to layer video clips and create composite shots. | ||
| + | |||
| + | *'''Audio tracks[A1, A2]:''' Devoted to audio elements like music, sound effects, narration, and dialogue. By using multiple audio tracks, you can create a layered soundscape for your video | ||
| + | |||
| + | <gallery mode="packed" heights="350px"> | ||
| + | File:6th masterimage.jpg| | ||
| + | </gallery> | ||
| + | |||
| + | '''Lock:''' This feature in video editing acts like a safety switch for a specific track in your timeline. When you lock a track, you accidentally won't move, edit, or delete the clips on that track. This is helpful to prevent messing up important elements like music or narration while you focus on editing other parts of your video. | ||
| + | |||
| + | '''Video Layers:''' Each layer can hold video clips, images, text, or effects. You can arrange them on top of each other, letting you create effects, overlays, or composite scenes. By adjusting the order. Generally it goes as V1, V2, you can manually add as much tracks/layers as you want. | ||
| + | Audio Layers: Each layer holds a different audio element, like music, narration, or sound effects. You can stack these layers to create a rich soundscape for your video, adjusting volume and timing for each layer independently, similar to video tracks it goes like A1, A2, etc | ||
| + | |||
| + | '''Audio Layers:''' Each layer holds a different audio element, like music, narration, or sound effects. You can stack these layers to create a rich soundscape for your video, adjusting volume and timing for each layer independently, similar to video tracks it goes like A1, A2, etc | ||
| + | |||
| + | '''Timestamp:''' A timestamp in video editing is like a bookmark. It marks a specific moment in your video timeline. you can click on them to jump right to that spot in the video. It's like fast-forwarding to the exact part they want to see. | ||
| + | |||
| + | '''Mute/Unmute Audio:''' As it says you can mute or unmute the entire track as per required. | ||
| + | |||
| + | '''Enable/Disable Video:''' As it says you can Enable/Disable Video the entire track as per required. | ||
| + | |||
| + | Note :The topmost content in the video layers will be displayed on the project monitor and the exact same thing will be rendered or exported. | ||
==== Adding clips ==== | ==== Adding clips ==== | ||
| − | + | <gallery mode="packed" heights="300"> | |
| + | File:2. Kdenlive browse files .png|450px|left|thumb|Importing files into Kdenlive project | ||
| + | </gallery> | ||
Now that the project is ready, let’s start adding some clips into your project. Click on the “Add Clip” icon, directly it opens the file dialogue, start browsing your local video clips, audio clips, images to start your edit. | Now that the project is ready, let’s start adding some clips into your project. Click on the “Add Clip” icon, directly it opens the file dialogue, start browsing your local video clips, audio clips, images to start your edit. | ||
| Line 62: | Line 200: | ||
==== Arranging files in tracks ==== | ==== Arranging files in tracks ==== | ||
| − | |||
| − | |||
| − | |||
| − | + | After you have saved the project, the next step is adding files into the timeline and arranging it for editing. Timeline is the place where the media clips are edited. There are two different types of tracks, Video and Audio. Video tracks can contain any kind of clip for example Video, Images, graphic files and the text etc. audio tracks contain all kind of audios like music, track audio and sound effects. In both types of tracks, multiple tracks can be used by adding new track and per your requirement.. | |
| + | <gallery mode="packed" heights="350"> | ||
| + | 7th addingfiles.jpg|'''Files arranged on timeline''' | ||
| + | </gallery> | ||
| − | ==== | + | To add clips into Sequence select file from the project bin section and drag and drop it in the track where your files are suited. |
| − | <gallery mode="packed" heights=" | + | |
| − | File: | + | Once a clip is dropped on a sequence, it can be moved (drag and drop it) to another place on the same track or onto another track. |
| − | + | ||
| + | Any time by pressing "space" button(or click on the “Play” button in the project monitor) to see the preview of edited work. | ||
| + | |||
| + | ==== Before we move to next steps, these are some important tools used frequently while editing ==== | ||
| + | <gallery mode="packed" heights="350"> | ||
| + | File:8th imagetimelinearranged.png| | ||
</gallery> | </gallery> | ||
| − | + | ||
| − | + | ''' Selection tool (Default shortcut S) ''' | |
| − | + | <gallery mode="packed" heights="200"> | |
| + | File:9th Selection tool .png| | ||
| + | </gallery> | ||
| + | |||
| + | Lets begin the editing by starting with selection. As mentioned in the above image, select any of the clips that are on the timeline and start moving them by dragging left and right. You can also move the clip in track by dragging up and down. This helps you place the clip wherever you want as per requirements. When you have multiple clips on your timeline, you can also use this tool to join and separate clips | ||
| + | |||
| + | ==== Razor tool (Default Shortcut X) ==== | ||
| + | <gallery mode="packed" heights="200px"> | ||
| + | File:10thrazortool.png| | ||
| + | </gallery> | ||
| + | |||
| + | '''Using razor tool:''' | ||
| + | |||
| + | By using the razor tool, click on the cursor in the timeline at the point to be cut or trimmed, then select the razor tool by clicking on the toolbar or simply by clicking X (Default Shortcut Key). | ||
| + | Click on the start point of the clip to have a first cut, and drag to the second or last point to have a second cut (on the same clip, multiple times can be used). Now select the portion using the selection key. Now that you have trimmed the clip, you can delete the clip by pressing the backspace/delete key or move the clip in the timeline using the selection key. | ||
| + | |||
| + | '''Ripple tool:''' | ||
| + | <gallery mode="packed" heights="200px"> | ||
| + | File:11th rippleimage.png| | ||
| + | </gallery> | ||
| + | |||
| + | This tool is used when you have trimmed some of the portions on video or audio but you want it back or you want to extend it, or, in other words, it is used to shorten or extend the particular clip up to its full length. By default, a static image is added to the time limit of 5 seconds. If you want it shorter, you can cut it with a razor tool. What if you needed it for more than 5 seconds? Simply use the ripple tool to select at the end of the image; now you can drag it as much as you want, and Kdenlive has a special feature, which is that if you are in the selection tool or if you drag the cursor to any ends of the clip, the tool automatically gets switched. | ||
| + | |||
| + | ==== Grouping and ungrouping audio ==== | ||
| + | |||
| + | Grouping and ungrouping refer to two various forms, which are: | ||
| + | |||
| + | '''1.Audio and Video''' | ||
| + | When you have imported any video file, it imports along with its respective audio , which are together called a group. If you separate both, it's called ungroup. | ||
| + | Why is it used? | ||
| + | When you need to remove the original audio from your video and replace it with another audio file or a background music, you can use this tool. | ||
| + | |||
| + | '''2.Sequence group''' | ||
| + | In this case there are multiple audio and video clips in the timeline that are continuous can be grouped manually. | ||
| + | |||
| + | Why is it used? | ||
| + | When you have to move a specific set of continuous files together if you group all, or if you can group all the files in the tracks with a specific duration, you can group them together and move them. This avoids selecting multiple clips every time. | ||
| + | |||
| + | '''How to Group and ungroup''' | ||
| + | On your timeline select the video, right click on the timeline --> click Ungroup. | ||
| + | Similarly, you can group an audio with video by selecting both and then right-clicking on any then click on Group. | ||
| + | |||
| + | ==== Volume Control ==== | ||
| + | |||
| + | Sound effect can be given for a video in Kdenlive in a very easy and efficient method. | ||
| + | |||
| + | To give the sound effect right click on timeline window that appears to the bottom of the screen click on "Insert an effect --> Volume (Key framable)". Immediately you can see a Red colored bubble on Audio timeline. You can flexibly move it to top and bottom to raise and down the volume respectively. | ||
==== Resizing a clip ==== | ==== Resizing a clip ==== | ||
A clip can be resized from its start or end by dragging its left or right edge. | A clip can be resized from its start or end by dragging its left or right edge. | ||
| − | If you want a more precise resize, you can place the timeline cursor wherever you want the resize to end and use the menu | + | If you want a more precise resize, you can place the timeline cursor wherever you want the resize to end and use the menu "Timeline --> Resize Item Start or Timeline --> Resize" Item End. |
==== Removing Space Between Clips ==== | ==== Removing Space Between Clips ==== | ||
| − | Right click in the space between the clips and choose Remove Space. <br> | + | Right click in the space between the clips and choose "Remove Space". <br> |
| − | + | <gallery mode="packed" heights="250"> | |
| − | Be aware however that if you have clips on multiple tracks in the timeline and they are not grouped, then removing space may disturb the alignment of the clips between the different tracks | + | File:8. removing extra space.png|Removing extra spaces between clips <br> |
| + | </gallery> | ||
| + | Be aware however that if you have clips on multiple tracks in the timeline and they are not grouped, then removing space may disturb the alignment of the clips between the different tracks the space is only removed from the timeline where you clicked. | ||
{{Clear}} | {{Clear}} | ||
| − | ==== Adding titles | + | ==== Key Things To Consider 2.0 ==== |
| + | Be aware however that if you have clips on multiple tracks in the timeline and they are not grouped, then removing space may disturb the alignment of the clips between the different tracks the space is only removed from the timeline where you clicked | ||
| + | |||
| + | ==== Adding titles ==== | ||
| + | <gallery mode="packed" heights="300"> | ||
| + | File:12th titleimage.png| | ||
| + | </gallery> | ||
Titles are text elements that can be added to the timeline and appear over the top of other clips. Titles are created in the Project Tree and then dragged to the timeline like other video clips. <br> | Titles are text elements that can be added to the timeline and appear over the top of other clips. Titles are created in the Project Tree and then dragged to the timeline like other video clips. <br> | ||
| − | |||
| − | |||
| − | Here just start adding your title and do the formatting using different tools in it and finally click on “OK”. | + | To create a title, Click on Project > Add Title Clip from the toolbar |
| + | |||
| + | <gallery mode="packed" heights="300"> | ||
| + | File:13th title2image.png| | ||
| + | </gallery> | ||
| + | |||
| + | Here just start adding your title and do the formatting using different tools in it and finally click on “OK”. Once click on the OK, your title file will add to you project tree. Drag drop it on your track for adding into your video. | ||
| + | |||
| + | After inserting, check in your project bin for the title file and drag into your timeline | ||
| + | <gallery mode="packed" heights="300"> | ||
| + | File:14th image.png|'''Inserting title to timeline form project bin''' | ||
| + | </gallery> | ||
| + | |||
| + | after dragging into your timeline it should look something like this. | ||
| + | |||
| + | If you want titles to overlay other footage, you put title clips on ''video track 1'' and have the other footage on ''video track 2''. You also need to retain the affine transition that is automatically added to the title clips if you want the footage visible underneath. | ||
| + | |||
| + | <gallery mode="packed" heights="300"> | ||
| + | File:15th image.png|'''Inserting title over the video''' | ||
| + | </gallery> | ||
| + | |||
| + | '''Adding fade in fade out effect''' | ||
| + | By adding fade-in and fade-out for the clips, it will smoothly change the slides from one to next. | ||
| − | + | '''Adding fade in/out for clip''' | |
| + | The most basic type of fade-in and fade-out are the fade from black and fade to black effects. The easiest way to add these to your media files is to move the mouse pointer close to the corner of a clip on the timeline, then click and drag until your fade reaches the desired length. | ||
| − | ==== Adding | + | ==== Adding transition effect ==== |
| − | + | A transition effect in video editing smoothly bridges the gap between two separate clips. It creates a visual connection, adding flow and style to your video by: | |
| − | |||
| − | |||
| + | '''*Animating the change:''' using fades,wipes,dissolves, or other visual effects to avoid an abrupt jump between clips. | ||
| − | + | '''*Enhancing the narrative:''' Emphasizing the passage of time, introducing new scenses, or creating a specific mood | |
| − | |||
| + | ==== How to add transition effect ==== | ||
| + | |||
| + | <gallery mode="packed" heights="300"> | ||
| + | File:17th image.jpg|'''Inserting transition effect''' | ||
| + | </gallery> | ||
| + | |||
| + | To add a transition effect, first 2 clips need to be placed next to each other without any void space. Double-click between the clips, and a basic wipe transition effect will be added. For another transition, click on the transition effect, which is in between the clips. A dilouge window opens next to the display window or project monitor. (Note: Place can be varied according to the customized workspace.In that dilouge box, there will be an option called wipe method. In that option, you can find different types of transition effects as per your requirements. | ||
| − | + | '''Save project files''' | |
Kdenlive needs a project file to save the information that makes up a video project. Information such as the name and location of your project, video and audio files, timeline information, which clips have been trimmed, arranged, etc. This project file you can use it later if you need to do any change in your file. | Kdenlive needs a project file to save the information that makes up a video project. Information such as the name and location of your project, video and audio files, timeline information, which clips have been trimmed, arranged, etc. This project file you can use it later if you need to do any change in your file. | ||
| − | |||
| − | |||
| − | |||
| − | |||
| − | |||
| − | |||
| − | <gallery mode="packed" heights=" | + | Click on "File > Save Project", enter your file name and select location for save in that location. |
| − | File: | + | |
| − | File: | + | <gallery mode="packed" heights="300"> |
| + | File:16th image.png|'''Saving the project''' | ||
| + | </gallery> | ||
| + | |||
| + | '''difference between save and render project''' | ||
| + | |||
| + | '''Export/Render as Video''' | ||
| + | |||
| + | Once done with your all editing work, next is to export your video. This will convert your "Kdenlive" project into a single video file, which should play on any platform. to render Click on the "Project > Render" icon on the top toolbar. As soon as you click on render it shows multiple presets . | ||
| + | In the beginning we have explained about Codecs and presets, based on that you have export/render the project. | ||
| + | Here are the key things to keep in mind before exporting | ||
| + | |||
| + | 1. When a variable bit rate profile is selected, the File Size section displays a drop-down for choosing the Video quality you want. | ||
| + | 2. Select "mp4" format from the format list. | ||
| + | 3. File size will differ from your parameter selection | ||
| + | 4. In the last section, clicking on “full project” will render your entire project as video and by clicking on “Selected zone” will render the portion you are selected. | ||
| + | |||
| + | '''Notes:''' while exporting/rendering project we can render the entire project or a particular part. | ||
| + | |||
| + | ==== Exporting in particular part ==== | ||
| + | <gallery mode="packed" heights="300"> | ||
| + | File:18th image.png|'''Selecting particular portion''' | ||
| + | </gallery> | ||
| + | |||
| + | In the above image, just right above the timeline, you can see a blue slider. By dragging the edge of the bar, you can choose how much sequence or portion you need to export. After selecting the portion, click on Project > Render. In the lower middle of the dialogue box, there will be options called 'Entire project' and'selected zone'. You have to select'selected zone' to export a specific portion of the project | ||
| + | |||
| + | ==== Entire Project ==== | ||
| + | |||
| + | If you want to render/export the entire project select entire project option before rending (Note: this will render the entire project including the blanks if any blanks are present) | ||
| + | |||
| + | '''Which Preset is best to use and why?''' | ||
| + | |||
| + | In the menu render option, you will find multiple render options. The MP4-H254/AAC preset is best because it exports in a standard preset, which is most commonly used in web videos like YouTube and social media platforms. and supports all devices, like smartphones, computers, and televisions. | ||
| + | |||
| + | <gallery mode="packed" heights="400"> | ||
| + | File:19th image.png|'''Image of choosing preset to render''' | ||
| + | </gallery> | ||
| + | |||
| + | ==== Output Path ==== | ||
| + | |||
| + | <gallery mode="packed" heights="400"> | ||
| + | File:20th image.png|'''Example image of choosing path''' | ||
</gallery> | </gallery> | ||
| − | |||
| − | |||
| − | |||
| − | |||
| − | |||
| − | |||
| − | + | In the render dialog box, you will find an option called File. In the same line, you will see an icon for a similar folder. If you click on that, you can browse your computer's local directory and choose where your file needs to be saved | |
| − | |||
| − | ''' | + | '''Advanced features''' |
| − | + | '''Multi-track video editing -''' Kdenlive allows you to use and arrange several audio and video tracks, each one can be locked or muted to your convenience. | |
| − | '''Many effects and transitions -''' Dozens of effects are available, ranging from color correction to audio adjustments, as well as all the standard transform options. | + | '''Configurable interface and shortcuts -''' You can arrange and save your custom interface layouts to fit your workflow.Keyboard shortcuts can also be configured to match your preferences. |
| + | |||
| + | '''Many effects and transitions -''' Dozens of effects are available, ranging from color correction to audio adjustments, as well as all the standard transform options. | ||
'''Automatic backup -''' Your project file is automatically backed up every few minutes, and older versions of the project file are also kept in case you need to roll back to a previous version. | '''Automatic backup -''' Your project file is automatically backed up every few minutes, and older versions of the project file are also kept in case you need to roll back to a previous version. | ||
| + | |||
| + | ====Video cutter tool ==== | ||
| + | Kdenlive is a powerful app for video editing and movie creation, but if you are looking for something simple and light-weight that can quickly trim of those long videos, then try VidCutter tool. It is a free and open source video trimmer for Linux, Windows, and Mac. From VidCutter, you can easily do most common video editing like trim, split, and join videos. <br>VidCutter supports popular video formats including MP4 (which is default video format of smartphones), AVI (used by some cameras), MOV, WMV, MPEG, and FLV. <br>To install this tool in your ubuntu, <br>'''Method 1 :''' From the PPA<br>Open a terminal (Ctrl+Alt+T) and copy paste these following commands one by one: | ||
| + | sudo add-apt-repository ppa:ozmartian/apps <br> | ||
| + | sudo apt-get update <br> | ||
| + | sudo apt-get install qml-module-qtmultimedia vidcutter <br> | ||
| + | |||
| + | '''Method 2 :''' App image file<br>Download App Image file from [https://github.com/ozmartian/vidcutter/releases from this link]. and follow the instruction mentioned in the same link to run it in your system. But it is a bit complicated for the new users. <br>From the above link you can download this application for windows computers. | ||
===Ideas for resource creation=== | ===Ideas for resource creation=== | ||
| + | If you want to create a video by yourself using images or any existing OER video you can trim those and put some other background voices. | ||
===References=== | ===References=== | ||
# https://kdenlive.org | # https://kdenlive.org | ||
# https://userbase.kde.org/Kdenlive/Manual | # https://userbase.kde.org/Kdenlive/Manual | ||
| + | # https://docs.kdenlive.org/en/user_interface/ui_elements.html | ||
[[Category:Explore an application]] | [[Category:Explore an application]] | ||
Latest revision as of 11:56, 13 May 2024

Introduction
Basic information
| ICT Competency | Kdenlive Video editor is generic resource creation tool |
| Educational application and relevance | Working with video, audio, text and image resources. This can be used in digital story telling videos |
| Version | 21.12 (Stable Version) - as of May 2024 |
| Other similar applications | Openshot video editor, Pitivi and advance Lightwork |
| The application on mobiles and tablets | Cyberlink Powerdirector, Splice |
| Development and community help | Official Website |
Overview of features
Kdenlive is an open-source video editing software aimed for Linux Operating System, but it also available for Windows and Mac systems. Because of the simple interface and wide range of video editing features, this tools largely using by teachers and teacher-educators to create/edit video resources for their classrooms.
Here are some key features and benefits of Kdenlive for teachers:
User-Friendly Interface: Kdenlive offers a user-friendly interface that is easy to navigate, making it suitable for teachers who may not have extensive experience with video editing software.
Multi-track Editing: Teachers can work with multiple video and audio tracks simultaneously, allowing for more complex and professional-looking video projects.
Effects and Transitions: Kdenlive provides a range of effects and transitions that teachers can use to enhance their videos, such as fades, wipes, color correction, and more.
Timeline Editing: The timeline editing feature allows teachers to precisely edit and arrange clips, audio, and effects on a timeline, giving them full control over the video editing process.
A wide range of effects and transitions. Audio effects including normalization, phase and pitch shifting, limiting, volume adjustment, reverb and equalization filters as well as others. Video effects include options for masking, blue-screen, distortions, rotations, color tools, blurring, obscuring and others.
Export Options: Kdenlive supports a variety of export formats, including popular formats like MP4, AVI, and MKV, making it easy for teachers to share their videos with students or upload them to online platforms.
Overall, Kdenlive is a versatile and powerful video editing tool that can help teachers create engaging and informative video content for their teaching-learning process.
Installation
For Ubuntu OS
- The application is part of the Ubuntu custom distribution.
- In case you do not find it on your computer, you can install by choosing “Kdenlive” in Ubuntu Software Center
- If you would like to install through the terminal follow these steps below:
- Open terminal (Menu -> System tools -> Mate terminal) or use use keyboard short keys Ctrl+Alt+t
- Once the terminal window opens, in front of the dollar($) symbol just type below command.
- sudo apt install kdenlive
- You will be prompted to enter your Ubuntu user password. Type your password (note that it won't be displayed on the screen as you type) and press Enter again to start the installation process.
For Windows OS
- Download the Kdenlive exe file from the official website link: https://kdenlive.org/en/download/.
- Click on the link to visit the download page.
- Look for the download link for the Windows version of Kdenlive (usually labeled as "Download for Windows" or similar).
- Click on the download link to start downloading the .exe file.
- Once the .exe file is downloaded to your Windows computer, locate the file in your Downloads folder or the folder where your browser saves downloads.
- Double-click the .exe file to start the Kdenlive installation process. This action will open the Kdenlive installation dialog box on your screen.
- Follow the on-screen instructions provided by the installation wizard to install the Kdenlive software (This typically involves selecting installation options (such as language preferences) and agreeing to the software's terms and conditions).
- Wait for the installation process to complete. This may take a few minutes depending on your computer's performance.
- Once the installation is finished, you will see a confirmation message indicating that Kdenlive has been successfully installed on your computer.
For Mac OS
- Download the Kdenlive .dmg file from the official website link: https://kdenlive.org/en/download/.
- Look for the download link for Mac OS X (often labeled as "Download for macOS" or similar).
- Click on the download link to start downloading the .dmg file.
- Once the .dmg file is downloaded, locate it in your Downloads folder or the folder where your browser saves downloads.
- Open the .dmg File:
- Double-click the .dmg file to mount the Kdenlive disk image.
- A new window will appear showing the contents of the disk image.
- Install Kdenlive:
- Drag the Kdenlive application icon from the disk image window to your Applications folder.
- This action will copy Kdenlive to your Applications folder, making it available for use.
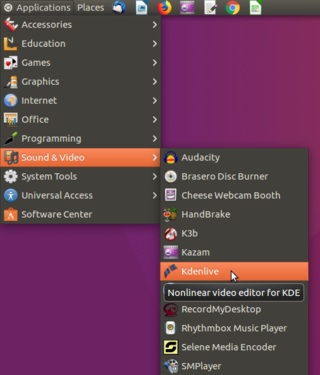
Working with the application
When you start to working with any multimedia files (videos, images, animation) the first step is creating a new folder for our new project. This will help to find your all project related files. Create a folder anywhere under your home folder or Desktop. To open Kdenlive
To open Kdenlive, in Ubuntu - go-to"Applications → Sound and video → Kdenlive" and for the Windows “Start→ search for Kdenlive”.
This is what your user interface will look like when the Kdenlive application launches on your computer.
- Opening kdenlive from menu option
Opening kdenlive from menu option

Kdenlive User Interface UI


Kdenlive Interface

[1] Project Bin, Library: (Elaborate) (use links which is used in current handout)
The project bin is your media library. It stores all your video clips, audio files, and images for your project. You can import media from your computer and organize them with folders. The bin acts as a bridge, letting you drag and drop clips to the timeline for editing in the next step.
[2] Clip Monitor:
This is where the clip selected in the project bin is displayed. When you want to preview a clip before getting into the timeline, you can directly preview it from here.
[3] Project Monitor:
This is where the content of the timeline is being displayed with all the edits, effects and compositions applied in the tracks. It displays where your cursor is on the timeline.
[4] Timeline:
The most important section of the Kdenlive tool and most of the action/edit is taking place in the timeline. Here you put your sources in the order in which they will appear in the final video, make your edits (cuts and trimmings), apply effects, add compositions and transitions, and add audio and soundtracks. In the Editing section you will learn more about this using tracks and organizing your files
[5] Timeline Toolbar:
This is where you find all the editing related tools and features to edit your video project.
[6] Audio Mixer:
This section holds the audio mixing panel where you control the volume and pan of the various audio tracks and the master.
[7] Menu Bar/Toolbar:
At the top of the Kdnelive window screen you have access to the Kdnelive menu bar. The Workspace Layouts and the Main Toolbar.
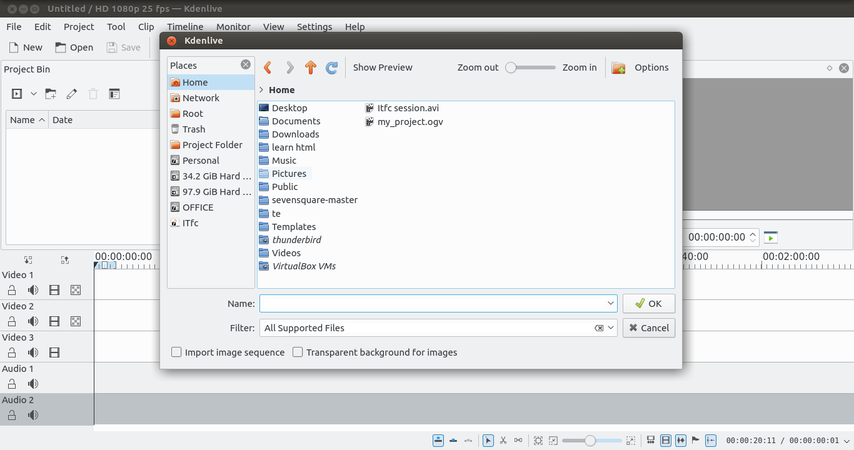
Create new project
After launching Kdenlive, the first thing to do is create a new project. What is a project, then? A project keeps all the work on your video or slideshow. You can save the project and continue your work later, or restore your work if you need to edit something after you've finished it You are able to pick up where you left off once you save it as a project.

Image of choosing a new codec

Selecting a project setting, prompts a dialog box to show up on your screen when you select File > New > Project. There are several folders, and each folder contains multiple project options if you expand. The most important question at this point is: what settings should be selected? You can select 4K, HD 720P, Full HD 1080P, and many other resolutions based on your needs To put it another way, selecting 4K will cause your video to be rendered in its highest resolution, which calls for a more advanced hardware setup like only on specific smart 4K TV, High HD display computers and etc; selecting HD 720, on the other hand, will cause it to be rendered in its lowest resolution, making it suitable for usage with a less technical setup like basic smartphones, old computer, tabs. We can use FHD 1080p for learning and exploring; it is an intermediate resolution that is commonly used on YouTube, social media, television, and some movies. There are several project settings under FHD 1080p, Let's select HD 1080p 25 frames profile.
Importing your files to project Now that the project is ready, let’s start adding some clips into your project.

Click on the “Add Clip” icon, form file menu, directly it opens the file dialogue of your local folders, start browsing your local video clips, audio clips, images to start your edit.
Save the project
As soon as you finish importing your files and before starting any further editing, it is safe to save the project in your system's local folder, so you can resume the work you last saved. It is also recommended to store all the working folders in specific folders and subfolders that you are comfortable with. And make sure all the files are available in the main project root folder. it is also recommended that you save projects frequently.
Key Things To Consider 1.0
Folder Structure

Example image for folder structure

A well-defined folder structure is crucial for staying organized during video editing. It saves time, prevents frustration, and ensures a smooth workflow. Here's a breakdown of its benefits and recommended folders:
Benefits of creating Folder:
- Easy file navigation: Quickly locate specific media files (video, audio, graphics) without sifting through everything.
- Improved collaboration: Enables clear communication and efficient sharing of project files with others.
- Reduced risk of losing files: Organized folders prevent accidental deletion or misplacement of essential project elements.
Recommended Folder Structure:
Main Project Folder: Create a folder with a clear and concise name reflecting the project title , this folder will house all the subfolders related to your video project.
Subfolders:
- Project Files: Store your editing software project files (.kdenlive for Kdenlive,) here.
- Assets: This folder holds all the media you'll use in your edit.
- Footage: Unedited video clips captured from cameras or downloaded sources. You can further organize footage by scene, date, or camera operator for larger projects.
- Audio: Background music, sound effects, voice-overs, and any other audio elements.
- Graphics: Logos, titles, animations, overlays, and other visual elements.
Consider subfolders for different versions (drafts, final exports) for better clarity. Backup and Save Regularly: Create backups of your project folder on external drives to prevent data loss
About Tracks(to add content)
In video editing, a track is a virtual layer within the timeline where you arrange and edit your video and audio elements. Imagine the timeline as a multi-lane highway, and each track represents a lane for a specific type of media.
- Video tracks[V1,V2]: These tracks hold your video clips, allowing you to sequence them and create the visual flow of your project. You can have multiple video tracks stacked on top of each other, enabling you to layer video clips and create composite shots.
- Audio tracks[A1, A2]: Devoted to audio elements like music, sound effects, narration, and dialogue. By using multiple audio tracks, you can create a layered soundscape for your video

Lock: This feature in video editing acts like a safety switch for a specific track in your timeline. When you lock a track, you accidentally won't move, edit, or delete the clips on that track. This is helpful to prevent messing up important elements like music or narration while you focus on editing other parts of your video.
Video Layers: Each layer can hold video clips, images, text, or effects. You can arrange them on top of each other, letting you create effects, overlays, or composite scenes. By adjusting the order. Generally it goes as V1, V2, you can manually add as much tracks/layers as you want. Audio Layers: Each layer holds a different audio element, like music, narration, or sound effects. You can stack these layers to create a rich soundscape for your video, adjusting volume and timing for each layer independently, similar to video tracks it goes like A1, A2, etc
Audio Layers: Each layer holds a different audio element, like music, narration, or sound effects. You can stack these layers to create a rich soundscape for your video, adjusting volume and timing for each layer independently, similar to video tracks it goes like A1, A2, etc
Timestamp: A timestamp in video editing is like a bookmark. It marks a specific moment in your video timeline. you can click on them to jump right to that spot in the video. It's like fast-forwarding to the exact part they want to see.
Mute/Unmute Audio: As it says you can mute or unmute the entire track as per required.
Enable/Disable Video: As it says you can Enable/Disable Video the entire track as per required.
Note :The topmost content in the video layers will be displayed on the project monitor and the exact same thing will be rendered or exported.
Adding clips
Importing files into Kdenlive project

Now that the project is ready, let’s start adding some clips into your project. Click on the “Add Clip” icon, directly it opens the file dialogue, start browsing your local video clips, audio clips, images to start your edit.
Arranging files in tracks
After you have saved the project, the next step is adding files into the timeline and arranging it for editing. Timeline is the place where the media clips are edited. There are two different types of tracks, Video and Audio. Video tracks can contain any kind of clip for example Video, Images, graphic files and the text etc. audio tracks contain all kind of audios like music, track audio and sound effects. In both types of tracks, multiple tracks can be used by adding new track and per your requirement..

Files arranged on timeline

To add clips into Sequence select file from the project bin section and drag and drop it in the track where your files are suited.
Once a clip is dropped on a sequence, it can be moved (drag and drop it) to another place on the same track or onto another track.
Any time by pressing "space" button(or click on the “Play” button in the project monitor) to see the preview of edited work.
Before we move to next steps, these are some important tools used frequently while editing

Selection tool (Default shortcut S)

Lets begin the editing by starting with selection. As mentioned in the above image, select any of the clips that are on the timeline and start moving them by dragging left and right. You can also move the clip in track by dragging up and down. This helps you place the clip wherever you want as per requirements. When you have multiple clips on your timeline, you can also use this tool to join and separate clips
Razor tool (Default Shortcut X)

Using razor tool:
By using the razor tool, click on the cursor in the timeline at the point to be cut or trimmed, then select the razor tool by clicking on the toolbar or simply by clicking X (Default Shortcut Key). Click on the start point of the clip to have a first cut, and drag to the second or last point to have a second cut (on the same clip, multiple times can be used). Now select the portion using the selection key. Now that you have trimmed the clip, you can delete the clip by pressing the backspace/delete key or move the clip in the timeline using the selection key.
Ripple tool:

This tool is used when you have trimmed some of the portions on video or audio but you want it back or you want to extend it, or, in other words, it is used to shorten or extend the particular clip up to its full length. By default, a static image is added to the time limit of 5 seconds. If you want it shorter, you can cut it with a razor tool. What if you needed it for more than 5 seconds? Simply use the ripple tool to select at the end of the image; now you can drag it as much as you want, and Kdenlive has a special feature, which is that if you are in the selection tool or if you drag the cursor to any ends of the clip, the tool automatically gets switched.
Grouping and ungrouping audio
Grouping and ungrouping refer to two various forms, which are:
1.Audio and Video When you have imported any video file, it imports along with its respective audio , which are together called a group. If you separate both, it's called ungroup. Why is it used? When you need to remove the original audio from your video and replace it with another audio file or a background music, you can use this tool.
2.Sequence group In this case there are multiple audio and video clips in the timeline that are continuous can be grouped manually.
Why is it used? When you have to move a specific set of continuous files together if you group all, or if you can group all the files in the tracks with a specific duration, you can group them together and move them. This avoids selecting multiple clips every time.
How to Group and ungroup On your timeline select the video, right click on the timeline --> click Ungroup. Similarly, you can group an audio with video by selecting both and then right-clicking on any then click on Group.
Volume Control
Sound effect can be given for a video in Kdenlive in a very easy and efficient method.
To give the sound effect right click on timeline window that appears to the bottom of the screen click on "Insert an effect --> Volume (Key framable)". Immediately you can see a Red colored bubble on Audio timeline. You can flexibly move it to top and bottom to raise and down the volume respectively.
Resizing a clip
A clip can be resized from its start or end by dragging its left or right edge.
If you want a more precise resize, you can place the timeline cursor wherever you want the resize to end and use the menu "Timeline --> Resize Item Start or Timeline --> Resize" Item End.
Removing Space Between Clips
Right click in the space between the clips and choose "Remove Space".

Removing extra spaces between clips

Be aware however that if you have clips on multiple tracks in the timeline and they are not grouped, then removing space may disturb the alignment of the clips between the different tracks the space is only removed from the timeline where you clicked.
Key Things To Consider 2.0
Be aware however that if you have clips on multiple tracks in the timeline and they are not grouped, then removing space may disturb the alignment of the clips between the different tracks the space is only removed from the timeline where you clicked
Adding titles

Titles are text elements that can be added to the timeline and appear over the top of other clips. Titles are created in the Project Tree and then dragged to the timeline like other video clips.
To create a title, Click on Project > Add Title Clip from the toolbar

Here just start adding your title and do the formatting using different tools in it and finally click on “OK”. Once click on the OK, your title file will add to you project tree. Drag drop it on your track for adding into your video.
After inserting, check in your project bin for the title file and drag into your timeline

Inserting title to timeline form project bin

after dragging into your timeline it should look something like this.
If you want titles to overlay other footage, you put title clips on video track 1 and have the other footage on video track 2. You also need to retain the affine transition that is automatically added to the title clips if you want the footage visible underneath.

Inserting title over the video

Adding fade in fade out effect By adding fade-in and fade-out for the clips, it will smoothly change the slides from one to next.
Adding fade in/out for clip The most basic type of fade-in and fade-out are the fade from black and fade to black effects. The easiest way to add these to your media files is to move the mouse pointer close to the corner of a clip on the timeline, then click and drag until your fade reaches the desired length.
Adding transition effect
A transition effect in video editing smoothly bridges the gap between two separate clips. It creates a visual connection, adding flow and style to your video by:
*Animating the change: using fades,wipes,dissolves, or other visual effects to avoid an abrupt jump between clips.
*Enhancing the narrative: Emphasizing the passage of time, introducing new scenses, or creating a specific mood
How to add transition effect

Inserting transition effect

To add a transition effect, first 2 clips need to be placed next to each other without any void space. Double-click between the clips, and a basic wipe transition effect will be added. For another transition, click on the transition effect, which is in between the clips. A dilouge window opens next to the display window or project monitor. (Note: Place can be varied according to the customized workspace.In that dilouge box, there will be an option called wipe method. In that option, you can find different types of transition effects as per your requirements.
Save project files Kdenlive needs a project file to save the information that makes up a video project. Information such as the name and location of your project, video and audio files, timeline information, which clips have been trimmed, arranged, etc. This project file you can use it later if you need to do any change in your file.
Click on "File > Save Project", enter your file name and select location for save in that location.

Saving the project

difference between save and render project
Export/Render as Video
Once done with your all editing work, next is to export your video. This will convert your "Kdenlive" project into a single video file, which should play on any platform. to render Click on the "Project > Render" icon on the top toolbar. As soon as you click on render it shows multiple presets . In the beginning we have explained about Codecs and presets, based on that you have export/render the project. Here are the key things to keep in mind before exporting
1. When a variable bit rate profile is selected, the File Size section displays a drop-down for choosing the Video quality you want. 2. Select "mp4" format from the format list. 3. File size will differ from your parameter selection 4. In the last section, clicking on “full project” will render your entire project as video and by clicking on “Selected zone” will render the portion you are selected.
Notes: while exporting/rendering project we can render the entire project or a particular part.
Exporting in particular part

Selecting particular portion

In the above image, just right above the timeline, you can see a blue slider. By dragging the edge of the bar, you can choose how much sequence or portion you need to export. After selecting the portion, click on Project > Render. In the lower middle of the dialogue box, there will be options called 'Entire project' and'selected zone'. You have to select'selected zone' to export a specific portion of the project
Entire Project
If you want to render/export the entire project select entire project option before rending (Note: this will render the entire project including the blanks if any blanks are present)
Which Preset is best to use and why?
In the menu render option, you will find multiple render options. The MP4-H254/AAC preset is best because it exports in a standard preset, which is most commonly used in web videos like YouTube and social media platforms. and supports all devices, like smartphones, computers, and televisions.

Image of choosing preset to render

Output Path
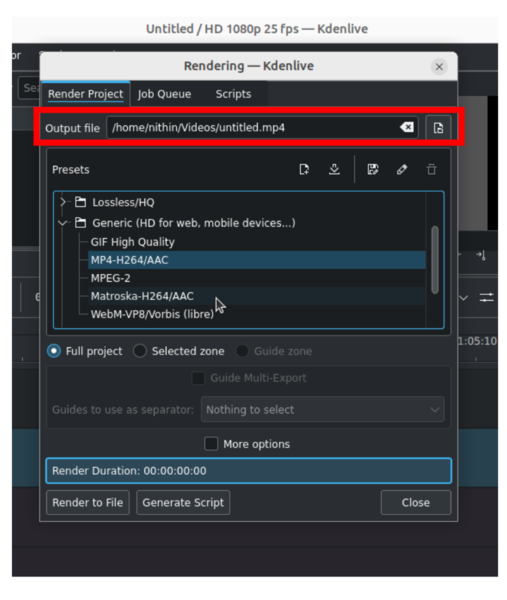
Example image of choosing path

In the render dialog box, you will find an option called File. In the same line, you will see an icon for a similar folder. If you click on that, you can browse your computer's local directory and choose where your file needs to be saved
Advanced features
Multi-track video editing - Kdenlive allows you to use and arrange several audio and video tracks, each one can be locked or muted to your convenience.
Configurable interface and shortcuts - You can arrange and save your custom interface layouts to fit your workflow.Keyboard shortcuts can also be configured to match your preferences.
Many effects and transitions - Dozens of effects are available, ranging from color correction to audio adjustments, as well as all the standard transform options.
Automatic backup - Your project file is automatically backed up every few minutes, and older versions of the project file are also kept in case you need to roll back to a previous version.
Video cutter tool
Kdenlive is a powerful app for video editing and movie creation, but if you are looking for something simple and light-weight that can quickly trim of those long videos, then try VidCutter tool. It is a free and open source video trimmer for Linux, Windows, and Mac. From VidCutter, you can easily do most common video editing like trim, split, and join videos.
VidCutter supports popular video formats including MP4 (which is default video format of smartphones), AVI (used by some cameras), MOV, WMV, MPEG, and FLV.
To install this tool in your ubuntu,
Method 1 : From the PPA
Open a terminal (Ctrl+Alt+T) and copy paste these following commands one by one:
sudo add-apt-repository ppa:ozmartian/apps

sudo apt-get update

sudo apt-get install qml-module-qtmultimedia vidcutter
Method 2 : App image file
Download App Image file from from this link. and follow the instruction mentioned in the same link to run it in your system. But it is a bit complicated for the new users.
From the above link you can download this application for windows computers.
Ideas for resource creation
If you want to create a video by yourself using images or any existing OER video you can trim those and put some other background voices.