Learn Kdenlive

Introduction
Basic information
| ICT Competency | Kdenlive Video editor is generic resource creation tool |
| Educational application and relevance | Working with video, audio, text and image resources. This can be used in digital story telling vities |
| Version | version 16.08.0. |
| Other similar applications | Openshot video editor, Pitivi and advance Lightwork |
| The application on mobiles and tablets | there is many similar application are available in android mobile phones. |
| Development and community help | Official Website |
Overview of features
Kdenlive is an open source video editor. The project was started around 2003. Kdenlive is an acronym for KDE Non-Linear Video Editor. It is a free software (GPL licensed) primarily aimed at the Linux platform. Kdenlive is built on Qt and the KDE Frameworks libraries.
- Kdenlive has multi-track editing with a timeline and supports an unlimited number of video and audio tracks.
- Tools to create, move, crop and delete video clips, audio clips, text clips and image clips. Configurable keyboard shortcuts and interface layouts.
- A wide range of effects and transitions. Audio effects include normalization, phase and pitch shifting, limiting, volume adjustment, reverb and equalization filters as well as others. Video effects include options for masking, blue-screen, distortions, rotations, colour tools, blurring, obscuring and others.
- Ability to add custom effects and transitions.
- Rendering is done using a separate non-blocking process so it can be stopped, paused and restarted.
- Kdenlive also provides a script called the Kdenlive Builder Wizard (KBW) that compiles the latest developer version of the software and its main dependencies from source, to allow users to try to test new features and report problems on the bug tracker.
Installation
- The application is part of the Ubuntu custom distribution.
- In case you do not find it on your computer, you can install by choosing “kdenlive” in Ubuntu Software Centre
- If you would like to install through the terminal follow these steps below:
- Open terminal by clicking (Ctrl+Alt+T),
- Once Window page is open, in front of dollar($) symbol just type below command.
- sudo apt-get install kdenlive
- Then, just type your ubuntu password(it will not display on your screen), press Enter.
Working with the application
When you start to working with any multimedia files (videos, images, animation) The first step is creating a new (empty) folder for our new project. This will help to find your all project files. Create a folder anywhere under your hoe folder. Open Kdenlive from applications → sound and video → Kdenlive.
- Opening kdenlive from menu option
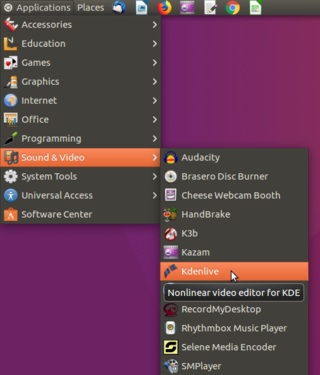
Opening kdenlive from menu option
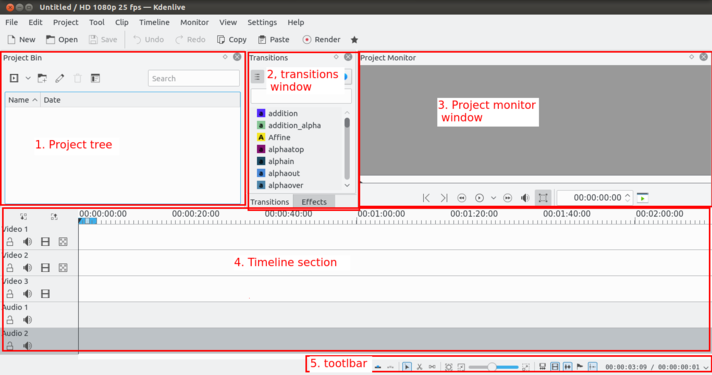
Kdenlive main window


Create new project to start your video editing. Creating/Saving a project file to your computer is similar to saving a file in any other Office program.
If we have created a project that we want to share or to save to be revised at a later time, there are two things that we need to do. The first is to save our project for revise your work later and the second is to export the project to a video file for previewing or sharing. These are two similar but separate processes.
Adding clips

Now that the project is ready, let’s start adding some clips into your project. Click on the “Add Clip” icon, directly it opens the file dialogue, start browsing your local video clips, audio clips, images to start your edit.
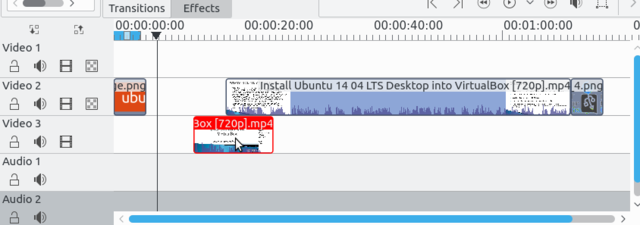
Arranging files in tracks
After you have imported files, the next step is to adding files into the timeline and arranging it for editing. Timeline is the place where the media clips will be edited. There are two different types of tracks, Video and Audio. Video tracks can contain any kind of clip, audio tracks as well – but when dropping a video file to the audio track, only the audio will be used.

To add clips into tracks, select file from the project files section and drag and drop it in the tracks where your files are suited. Any time by pressing “space” button(or click on the “Play” button in the project monitor) to see the preview of edited work.
Once a clip is dropped on a track, it can be moved (drag and drop it) to another place on the same track or onto another track.
Cutting, moving and deleting clips
- Cutting, moving and deleting clips

Using razor tool to cut the clippings
moving clips to different tracks


- To cut a clip into two parts, select Razor from edit toolbar. The mouse cursor will change to a dotted line & razor icon. Click on a clip at the point you want to cut / slice it. And also if you want to remove one part of this clip, just right click on the clip and remove clip.
- After you cut a clip, now it will be two part. Click on cursor icon(Select Mode), click on a clip which you want to move. Then,drag the clip to a new position on the timeline, and drop it. OR
- To cut a clip, the easiest way is to place the timeline cursor where you want to cut the clip, then select the clip (left click in it) and use the menu Timeline -> Current Clip -> Cut Clip (default shortcut: Shift + R).
Resizing a clip
A clip can be resized from its start or end by dragging its left or right edge.
If you want a more precise resize, you can place the timeline cursor wherever you want the resize to end and use the menu Timeline→ Resize Item Start or Timeline→ Resize Item End.
Removing Space Between Clips
Right click in the space between the clips and choose Remove Space.

Be aware however that if you have clips on multiple tracks in the timeline and they are not grouped, then removing space may disturb the alignment of the clips between the different tracks — the space is only removed from the timeline where you clicked.
Adding titles/subtitles
Titles are text elements that can be added to the timeline and appear over the top of other clips. Titles are created in the Project Tree and then dragged to the timeline like other video clips.

To create a title, choose “Add Title Clip” from the Project toolbar. Below is the title create window.
Here just start adding your title and do the formatting using different tools in it and finally click on “OK”. Oncle click on the OK, your title file will add to you project tree. Drag drop it on your track for adding into your video.
If you want titles to overlay other footage, you put title clips on video track 1 and have the other footage on video track 2. You also need to retain the affine transition that is automatically added to the title clips if you want the footage visible underneath.
Adding fade in fade out effect
By adding fade-in and fade-out for the clips, it will smoothly changing the slides from one to next.
 The most basic type of fade-in and fade-out are the fade from black and fade to black effects. The easiest way to add these to your media files, is to move the mouse pointer close to the corner of a clip on the timeline, then click and drag until your fade reaches the desired length.
Adding transition into clips
To add a transition, adjust clips in the timeline so that the end of one overlaps the beginning of another. Then right-click in the timeline at the overlap point, select Add Transition , then choose one of the transitions from the transition list.
Save project files
Kdenlive needs a project file to save the information that makes up a video project. Information such as the name and location of your project, video and audio files, timeline information, which clips have been trimmed, arranged, etc. This project file you can use it later if you need to do any change in your file.
Click on File-> Save Project, enter your file name and select location for save in that location.

Export/Render as Video
Once done with your all editing work, next is to export your video. This will convert your OpenShot project into a single video file, which should work on any platform. Click on the render icon on the top toolbar, video icon at the top menu tool bar (or use the File > Export Video... menu). Under rendering section there are many things which you need to configure to export your project as video.
- Exporting as video
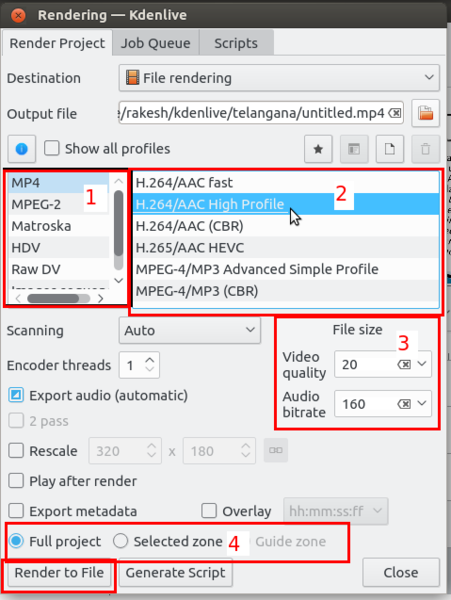
your video profile detail
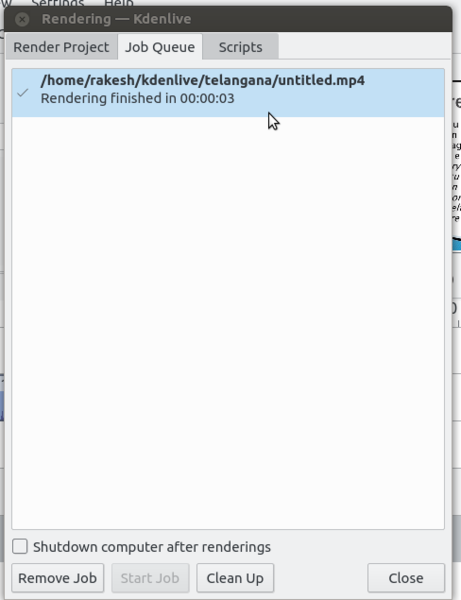
Rendering process completed


Video profile : preset rendering profiles to choose from. The rendering profiles are grouped into categories
- When a variable bitrate profile is selected, the File Size section displays a drop down for choosing the Video quality you want.
- Select mp4 format from the format list.
- File size will be differ from your parameter selection
- In the last section, clicking on "full project" will render your entire project as video and by clicking on "Selected zone" will render the portion you are selected.
- Finally click on "render to file " option to start the process.
Advanced features
Multi-track video editing - Kdenlive allows you to use and arrange several audio and video tracks, each one can be locked or muted to your convenience.
Configurable interface and shortcuts -You can arrange and save your custom interface layouts to fit your workflow.
Keyboard shortcuts can also be configured to match your preferences.
Many effects and transitions - Dozens of effects are available, ranging from color correction to audio adjustments, as well as all the standard transform options.
Automatic backup - Your project file is automatically backed up every few minutes, and older versions of the project file are also kept in case you need to roll back to a previous version.