Difference between revisions of "Learn Screenshot"
| (13 intermediate revisions by 4 users not shown) | |||
| Line 1: | Line 1: | ||
| − | + | ''[http://karnatakaeducation.org.in/KOER/index.php/%E0%B2%B8%E0%B3%8D%E0%B2%95%E0%B3%8D%E0%B2%B0%E0%B3%80%E0%B2%A8%E0%B3%8D_%E0%B2%B6%E0%B2%BE%E0%B2%9F%E0%B3%8D_%E0%B2%95%E0%B2%B2%E0%B2%BF%E0%B2%AF%E0%B2%BF%E0%B2%B0%E0%B2%BF ಕನ್ನಡದಲ್ಲಿ ನೋಡಿ]'' | |
| − | { | + | {{Template:Book-sidebar}} |
| − | |||
| − | |||
| − | |||
===Introduction=== | ===Introduction=== | ||
| − | + | A screenshot captures a static image of your computer screen, whether it's a desktop or mobile display. You may have used screenshots before, but did you know there are different types of screenshots you can take on both desktop and mobile? In this page, we will explore these types in detail.Nowadays, | |
| + | |||
| + | The screenshot feature comes built-in on both mobile devices and desktops. However, as mentioned above, we can customize how we take screenshots, especially on a computer. For that, we use a free and open-source screenshot tool called Flameshot. In this page, we will break down its features and explain how to use it on your desktop. | ||
| + | |||
====Basic information==== | ====Basic information==== | ||
{| class="wikitable" | {| class="wikitable" | ||
|- | |- | ||
|ICT Competency | |ICT Competency | ||
| − | | | + | |Flameshot is a free and open-source software application used for capturing screenshots and creating graphics, making it a valuable tool for resource creation. It is available for Windows, macOS, and Linux. |
| + | |||
| + | You can download Flameshot from the official website 👉 [https://flameshot.org/ 🔗 Flameshot Download Page] | ||
|- | |- | ||
|Educational application and relevance | |Educational application and relevance | ||
| − | | | + | |Screenshots are useful when demonstrating concepts that are difficult to explain in words. They can help showcase software usage, illustrate user issues, or present visual output effectively for learning and troubleshooting. |
| − | |||
|- | |- | ||
|Version | |Version | ||
| − | | | + | |v11.0.0 version. |
|- | |- | ||
|Configuration | |Configuration | ||
|No specific configuration requirements. | |No specific configuration requirements. | ||
|- | |- | ||
| − | |Other similar applications | + | |Other similar applications for desktop |
| | | | ||
| − | *[https://monosnap.com/welcome | + | *[https://monosnap.com/welcome Shutter] , [https://sourceforge.net/projects/kazam/ Kazam], [http://jetscreenshot.com/ Jet Screenshot] |
|- | |- | ||
|The application on mobiles and tablets | |The application on mobiles and tablets | ||
|'''Screenshot''' manages to capture the screen of simple to Android '''mobile''' phone. | |'''Screenshot''' manages to capture the screen of simple to Android '''mobile''' phone. | ||
There are many apps available in Android play store. few are listed here:- | There are many apps available in Android play store. few are listed here:- | ||
| − | # Screenshot | + | [https://play.google.com/store/apps/details?id=com.github.cvzi.screenshottile&pcampaignid=web_share # Screenshot Tile [No root<nowiki>]</nowiki>] |
| − | |||
| − | |||
| − | |||
In any Android mobile, if you press and hold the '''Power key''', it will give you a Screenshot option. | In any Android mobile, if you press and hold the '''Power key''', it will give you a Screenshot option. | ||
| Line 38: | Line 36: | ||
|Development and community help | |Development and community help | ||
| | | | ||
| − | *[https:// | + | *[https://flameshot.org/docs/ Official Website] |
|} | |} | ||
| + | |||
====Overview of Features==== | ====Overview of Features==== | ||
| − | + | Flameshot lets you capture anything on your screen, whether it’s a static image or a frame from a video (videos will be captured as still images). The screenshot will match your screen's resolution. You can edit the captured images and use them to create various resources. Flameshot is available on Ubuntu, Windows, and macOS, offering different options for taking and customizing screenshots on each platform. | |
| + | |||
====Installation==== | ====Installation==== | ||
| − | # | + | |
| − | #In case you do not find it on | + | '''For Ubuntu (Linux)''' |
| − | + | ||
| − | + | # Open the Ubuntu Software Center => Search for Flameshot => Click Install | |
| − | # | + | # In case if you do not find it on Ubuntu Software Center, you can install by using the terminal Press Ctrl + Alt + T to open the terminal. |
| − | + | # Open terminal by clicking Applications->System Tools->Terminal or through Keyboard shortcut <code>Ctrl+Alt+T</code> | |
| + | # Once terminal window, open type below command and press enter to start the installation by providing your ubuntu password: | ||
| + | # <code>sudo apt install flameshot</code> | ||
| + | |||
| + | '''For Windows''' | ||
| + | |||
| + | # Visit the [https://flameshot.org/ Flameshot website page] => Download the latest .exe file under Releases. | ||
| + | # Run the installer and follow the on-screen instructions. | ||
| + | |||
| + | '''For macOS''' | ||
| + | # Using Homebrew => If you have Homebrew installed, => open the terminal and type => brew install flameshot | ||
| + | # Manual Download => Go to the [https://flameshot.org/ offical Flameshot page] => Download the macOS version => Follow the installation steps in the downloaded file. | ||
===Working with the application=== | ===Working with the application=== | ||
Latest revision as of 17:04, 27 February 2025

Introduction
A screenshot captures a static image of your computer screen, whether it's a desktop or mobile display. You may have used screenshots before, but did you know there are different types of screenshots you can take on both desktop and mobile? In this page, we will explore these types in detail.Nowadays,
The screenshot feature comes built-in on both mobile devices and desktops. However, as mentioned above, we can customize how we take screenshots, especially on a computer. For that, we use a free and open-source screenshot tool called Flameshot. In this page, we will break down its features and explain how to use it on your desktop.
Basic information
| ICT Competency | Flameshot is a free and open-source software application used for capturing screenshots and creating graphics, making it a valuable tool for resource creation. It is available for Windows, macOS, and Linux.
You can download Flameshot from the official website 👉 🔗 Flameshot Download Page |
| Educational application and relevance | Screenshots are useful when demonstrating concepts that are difficult to explain in words. They can help showcase software usage, illustrate user issues, or present visual output effectively for learning and troubleshooting. |
| Version | v11.0.0 version. |
| Configuration | No specific configuration requirements. |
| Other similar applications for desktop | |
| The application on mobiles and tablets | Screenshot manages to capture the screen of simple to Android mobile phone.
There are many apps available in Android play store. few are listed here:- # Screenshot Tile [No root] In any Android mobile, if you press and hold the Power key, it will give you a Screenshot option. |
| Development and community help |
Overview of Features
Flameshot lets you capture anything on your screen, whether it’s a static image or a frame from a video (videos will be captured as still images). The screenshot will match your screen's resolution. You can edit the captured images and use them to create various resources. Flameshot is available on Ubuntu, Windows, and macOS, offering different options for taking and customizing screenshots on each platform.
Installation
For Ubuntu (Linux)
- Open the Ubuntu Software Center => Search for Flameshot => Click Install
- In case if you do not find it on Ubuntu Software Center, you can install by using the terminal Press Ctrl + Alt + T to open the terminal.
- Open terminal by clicking Applications->System Tools->Terminal or through Keyboard shortcut
Ctrl+Alt+T - Once terminal window, open type below command and press enter to start the installation by providing your ubuntu password:
sudo apt install flameshot
For Windows
- Visit the Flameshot website page => Download the latest .exe file under Releases.
- Run the installer and follow the on-screen instructions.
For macOS
- Using Homebrew => If you have Homebrew installed, => open the terminal and type => brew install flameshot
- Manual Download => Go to the offical Flameshot page => Download the macOS version => Follow the installation steps in the downloaded file.
Working with the application
Use Print Screen
This is the most common method to take Screenshot. Pressing the “Print Screen” button will take the Screenshot of the “Entire Visible Screen”.
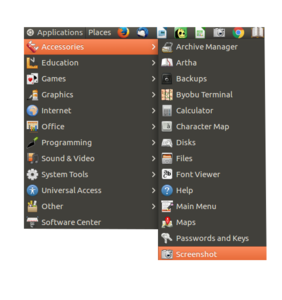
You can also generate open the screenshot application from Applications--->Accessories--->Screenshot.
- Using Screenshot to capture images from your screen
Opening Screenshot
Options to select area
Select area to grab


- To open "Screenshot" go to Application-Accessories-Screenshot. see above image.
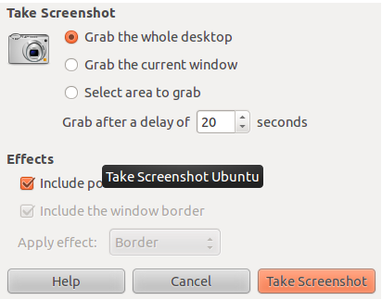
- Once you click on the Screenshot option. it open the above window. Here there will be three options to take pictures.
- Grab the whole desktop -To take a Screenshot with entire screen, select “Grab the whole desktop” and click “Take Screenshot”.
- Grab the Current Window-To take the Screenshot of the current active window alone, select “Grab the Current Window” and click “Take Screenshot”.
- Both the above two options allow you to grab the screen after a time delay of a defined number of seconds. This is useful when we need to take screen shots of the different tool bar functionalities and demonstrate the changes from different commands in an application. This is also useful when you want to take screenshots of dynamic displays - like an animation or video or simulation.
- Select Area to Grab- To take a particular rectangle area alone, select “Select Area to Grab” and click “Take Screenshot”. You will need to mark out a rectangle on the screen, which will be covered by the Screenshot. Begin at the one end and move to the diagonally opposite end, to complete the rectangle, keeping the left mouse click pressed. When you reach the diagonally opposite end, release the mouse to complete the rectangle, which will be the 'area' of the Screenshot.Supposing you are playing a video on one part of the screen and you want only the video to be captured, you can use this feature, to take a photo of the video (which will be the image which is displayed in the video at the time of the taking of the screen shot.
Saving the files and formats

Once you click on Take Screenshot, the picture of the screen will be taken and you will be shown a Save-->Dialog box. Screenshots will be saved in the Pictures folder by default. The application will also name the file as Screenshot....date..time.png. You can edit the file name as required and save. Screenshot images will be saved in .png format.
Advanced features
- Timed captures to allow you prepare the work space (desktop) before capturing the image.
- Options to include or exclude the mouse cursor. The mouse cursor can be used to point out a particular point in your image.
Ideas for resource creation
You can take a picture of your screen (a screenshot). This is useful if you want to show someone how to do something on the computer, for example. Screenshot are just normal picture files, so you can email them and share them on the web.