Difference between revisions of "Learn VLC Player"
| (53 intermediate revisions by the same user not shown) | |||
| Line 1: | Line 1: | ||
''[http://karnatakaeducation.org.in/KOER/index.php/%E0%B2%B5%E0%B2%BF.%E0%B2%8E%E0%B2%B2%E0%B3%8D%E2%80%8C.%E0%B2%B8%E0%B2%BF_%E0%B2%AA%E0%B3%8D%E0%B2%B2%E0%B3%87%E0%B2%AF%E0%B2%B0%E0%B3%8D_%E0%B2%95%E0%B2%B2%E0%B2%BF%E0%B2%AF%E0%B2%BF%E0%B2%B0%E0%B2%BF ಕನ್ನಡದಲ್ಲಿ ನೋಡಿ]''{{Template:Book-sidebar}} | ''[http://karnatakaeducation.org.in/KOER/index.php/%E0%B2%B5%E0%B2%BF.%E0%B2%8E%E0%B2%B2%E0%B3%8D%E2%80%8C.%E0%B2%B8%E0%B2%BF_%E0%B2%AA%E0%B3%8D%E0%B2%B2%E0%B3%87%E0%B2%AF%E0%B2%B0%E0%B3%8D_%E0%B2%95%E0%B2%B2%E0%B2%BF%E0%B2%AF%E0%B2%BF%E0%B2%B0%E0%B2%BF ಕನ್ನಡದಲ್ಲಿ ನೋಡಿ]''{{Template:Book-sidebar}} | ||
| − | = | + | ===Introduction=== |
| − | == | ||
| − | |||
| − | |||
| − | == | + | ==== Basic Information ==== |
| − | == | ||
| − | |||
| − | |||
| − | |||
| − | |||
| − | |||
| − | |||
| − | |||
| − | |||
| − | |||
| − | |||
| − | |||
| − | |||
| − | |||
| − | |||
| − | |||
| − | |||
| − | |||
| − | |||
| − | |||
| − | |||
| − | |||
| − | |||
| − | |||
| − | |||
| − | |||
| − | |||
{| class="wikitable" | {| class="wikitable" | ||
|- | |- | ||
| − | | | + | |ICT Competency |
| − | | | + | |VLC Media Player is a general purpose application to play audio and videos. |
|- | |- | ||
| − | | | + | |Educational application and relevance |
| − | + | |VLC media player is used to play video and audio files. (It supports to play all Audio and Video format files such as mp4, mpeg, divx, flv, mp3, mkv etc). | |
| − | |||
|- | |- | ||
| − | | | + | |Version |
| − | + | |VLC Media Player 3.4.0 | |
|- | |- | ||
| − | | | + | |Configuration |
| − | | | + | |After installation, no need to do any configure. Just open VLC media player. |
| − | |||
|- | |- | ||
| − | | | + | |Other similar applications |
| − | + | |[https://www.smplayer.info/en/downloads SMPlayer], [https://potplayer.daum.net/ Pot Player] | |
|- | |- | ||
| − | | | + | |The application on mobiles and tablets |
| − | | | + | |[https://play.google.com/store/apps/details?id=org.videolan.vlc&hl=en_IN&gl=US VLC for Android] |
| − | |||
|- | |- | ||
| − | | | + | |Development and community help |
| − | + | |[https://www.videolan.org/vlc/ VLC Media Player] | |
| − | | | + | |} |
| − | + | ||
| + | ====Overview of Features==== | ||
| + | VLC media Player is a free and Open Source Software Media Player. It is very simple, fast and powerful media player to use. It Plays everything in the sense, Files, Discs, Webcams, Devices and Streams. It also plays most codecs with no codec packs needed such as MPEG-2, DivX, H.264, MKV, WebM, WMV, MP3. It runs on Windows, Linux, Mac OS X, Unix. Its excellent support for various Audio and Video codecs makes it most popular. | ||
| + | |||
| + | ====Installation==== | ||
| + | |||
| + | ===== For Windows OS ===== | ||
| + | # To install VLC Media Player on Windows you can download the installation file [https://www.videolan.org/vlc/download-windows.html click here] | ||
| + | # Go to the location of downloaded desktop file. | ||
| + | # Select the installer language --> Click OK. | ||
| + | # A welcome screen appears. "Click Next --> Read the license agreement --> Click Next --> Select the components needed and click Next --> Choose the location where you need your installation folder should be --> Click Install". | ||
| + | # Once it finished the installation, click Finish. | ||
| + | |||
| + | ===== For Ubuntu OS ===== | ||
| + | # The application is part of the Ubuntu custom distribution. | ||
| + | # In case you do not find it on your computer, you can install by typing <code>VLC</code> on the top search bar in the Software Center. | ||
| + | # If you would like to install through the terminal follow these steps below: | ||
| + | ## Open terminal by clicking "Applications->System Tools->Terminal" or through Keyboard shortcut <code>Ctrl+Alt+T</code> | ||
| + | ## In the terminal window, type below command and press enter to start the installation by providing your machine password. | ||
| + | ## <code>sudo apt-get install vlc</code> | ||
| + | |||
| + | ===== For MAC OS ===== | ||
| + | # To download the installation file [https://www.videolan.org/vlc/download-macosx.html click here] | ||
| + | # Double-click on the icon of the package: an icon will appear on your Desktop, right beside your drives. | ||
| + | # Open it and drag the VLC application from the resulting window to the place where you want to install it | ||
| + | |||
| + | ===Working with the application=== | ||
| + | |||
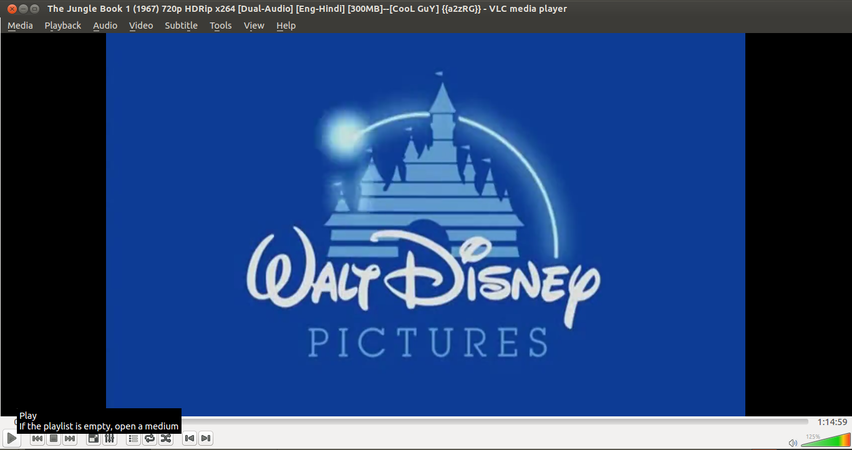
| + | =====Opening and using the application===== | ||
| + | * To launch the VLC media player, Go to "Application --> Sound and Videos --> Click on VLC Media Player". | ||
| + | * To open the media file like audio and video files go to "Media menu --> Click on Open file". | ||
| + | * Then Select one or more files to open dialog box will open. Select any "Audio and Video file--> Click Open". | ||
| + | * The file starts playing the Audio or Video file which you have selected. | ||
| + | <gallery mode="packed" heights="200"> | ||
| + | File:VLC 2 VLC Open Like this.png|VLC Media Player interface | ||
| + | File:To open files in VLC.png|Opening files | ||
| + | File:To select one or more files to open VLC.png|Selecting more than one files to play | ||
| + | </gallery> | ||
| + | |||
| + | ===== Play and Pause in VLC ===== | ||
| + | * You can pause the video in between by clicking on the pause button and resume it using play button respectively. | ||
| + | <gallery mode="packed" heights="300"> | ||
| + | File:Pause and Play in VLC.png|Pause and Play operation | ||
| + | </gallery> | ||
| + | * You can increase the volume upto 200% in VLC which is a best part of this application. You can increase or decrease the volume by click onto certain position in the right bottom side of the VLC interface. You can use Up Arrow or Down arrow to do the same in Keyboard. | ||
| + | {{Note}}Although VLC allows you to play audio upto 200%, it is recommended to keep the volume in between 60 to 100 since the audio engineers use the same level to develop the content. | ||
| + | |||
| + | ===== Jumping to a specific time in video ===== | ||
| + | * VLC allows you to jump to a specific time in a video if you know the playtime of some particular event or occurring. | ||
| + | * This features saves your time of moving the slider to crosscheck the playtime of video. | ||
| + | * To do this, Click on "Playback --> Jump to specific time". In the window that appears, give the duration of video onto which you want to jump. Click OK. | ||
| + | |||
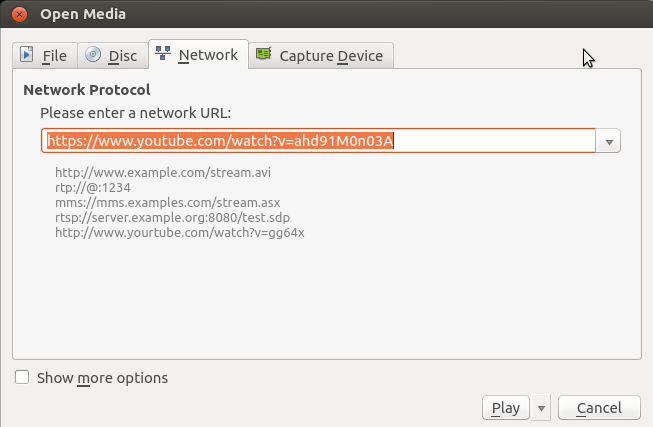
| + | ===== Downloading videos from Youtube ===== | ||
VLC lets you play and download YouTube videos right from its desktop interface. Here's how: | VLC lets you play and download YouTube videos right from its desktop interface. Here's how: | ||
| − | *Find a video on | + | |
| − | *In VLC, | + | <gallery mode="packed" heights="300"> |
| + | File:Download youtube videos in VLC.png|Downloading Youtube videos in VLC | ||
| + | </gallery> | ||
| + | |||
| + | *Find a video on YouTube like the above mentioned one and copy the URL from the address bar. | ||
| + | *In VLC, go to "Media --> Open Network Stream". | ||
*Paste the YouTube link in the box and click Play. | *Paste the YouTube link in the box and click Play. | ||
| − | *Under Tools, click Codec Information. | + | *Under Tools, click "Codec Information". |
| − | *In the box that | + | *In the box that gives Location, right-click the block of text and click Select All. Copy this text to your clipboard. |
| − | *Go back to your browser and paste the link in the address bar. This will open the source file directly on YouTube's | + | *Go back to your browser and paste the link in the address bar. This will open the source file directly on YouTube's server. |
*Right-click the video as it plays and select Save Video As. | *Right-click the video as it plays and select Save Video As. | ||
| − | + | ||
| + | =====Convert Video Files===== | ||
Here's how to convert between one file and another: | Here's how to convert between one file and another: | ||
| − | *Under Media, click "Convert/Save. | + | |
| + | <gallery mode="packed" heights="300"> | ||
| + | File:Video Convert in VLC.png|Video conversion in VLC | ||
| + | </gallery> | ||
| + | |||
| + | *Under Media, click "Convert/Save". | ||
*Add the file you want to convert in the File Selection section. | *Add the file you want to convert in the File Selection section. | ||
*Click "Convert/Save." | *Click "Convert/Save." | ||
| Line 77: | Line 107: | ||
*Click Start. | *Click Start. | ||
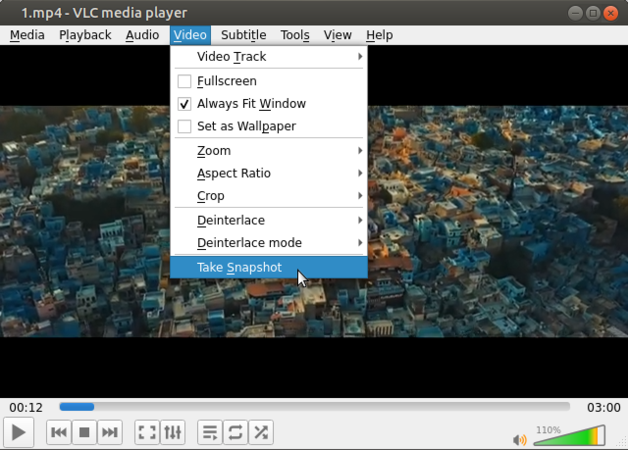
| + | ===== Taking Screenshot in a video ===== | ||
| + | * You can take screenshot from any part of the video at anytime in VLC. Advantage of this is that it will capture only the video screen so that you are not required to crop it again. | ||
| + | <gallery mode="packed" heights="300"> | ||
| + | File:Take Snapshot in VLC.png|Taking snapshot in VLC | ||
| + | </gallery> | ||
| + | * To do this, open the video. | ||
| + | * Pause the video at the moment where you need a snapshot. | ||
| + | * Click on "Video--> Take snapshot". | ||
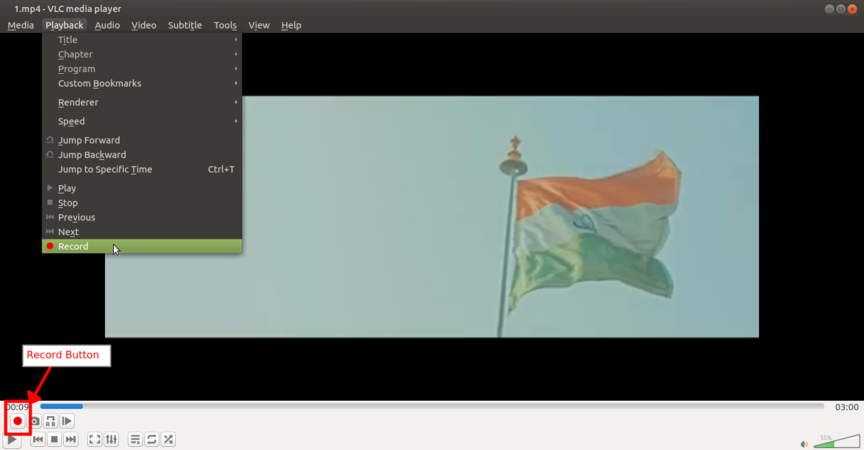
| + | ===== Recording the video ===== | ||
| + | <gallery mode="packed" heights="300"> | ||
| + | File:Video recording in VLC.png|Video recording | ||
| + | </gallery> | ||
| + | * VLC allows you to record the video that is playing. | ||
| + | * To do this, Click on "Playback --> Record" or alternatively there is a red colored button in the interface above the Play/Pause button. Click on that. | ||
| + | * Once you give the command to record the screen, recording process starts and the Record button looks somewhat pressed. | ||
| + | * When you are done with recording, you can again go to "Playback --> Record" to stop recording. Alternatively you can click on Red button again. | ||
| + | * The recorded videos will be available in your home/videos directory. | ||
| − | + | ===Ideas for resource creation=== | |
| − | + | VLC Media Player is used to play the already existed material. You can use snapshot or record feature to create some resource by your own. Make sure you use the Open Educational Resources video. | |
| − | == | ||
| − | |||
| − | |||
| − | |||
| − | |||
| − | |||
| − | |||
| − | |||
| − | = | + | === References === |
| − | + | [https://wiki.videolan.org/ Wiki] | |
| − | |||
| − | |||
| − | |||
| − | |||
| − | |||
| − | |||
| − | |||
| − | |||
| − | |||
| − | |||
| − | |||
| − | |||
| − | |||
| − | |||
| − | |||
| − | = | ||
| − | [https:// | ||
[[Category:Explore an application]] | [[Category:Explore an application]] | ||
Latest revision as of 06:10, 16 June 2022

Introduction
Basic Information
| ICT Competency | VLC Media Player is a general purpose application to play audio and videos. |
| Educational application and relevance | VLC media player is used to play video and audio files. (It supports to play all Audio and Video format files such as mp4, mpeg, divx, flv, mp3, mkv etc). |
| Version | VLC Media Player 3.4.0 |
| Configuration | After installation, no need to do any configure. Just open VLC media player. |
| Other similar applications | SMPlayer, Pot Player |
| The application on mobiles and tablets | VLC for Android |
| Development and community help | VLC Media Player |
Overview of Features
VLC media Player is a free and Open Source Software Media Player. It is very simple, fast and powerful media player to use. It Plays everything in the sense, Files, Discs, Webcams, Devices and Streams. It also plays most codecs with no codec packs needed such as MPEG-2, DivX, H.264, MKV, WebM, WMV, MP3. It runs on Windows, Linux, Mac OS X, Unix. Its excellent support for various Audio and Video codecs makes it most popular.
Installation
For Windows OS
- To install VLC Media Player on Windows you can download the installation file click here
- Go to the location of downloaded desktop file.
- Select the installer language --> Click OK.
- A welcome screen appears. "Click Next --> Read the license agreement --> Click Next --> Select the components needed and click Next --> Choose the location where you need your installation folder should be --> Click Install".
- Once it finished the installation, click Finish.
For Ubuntu OS
- The application is part of the Ubuntu custom distribution.
- In case you do not find it on your computer, you can install by typing
VLCon the top search bar in the Software Center. - If you would like to install through the terminal follow these steps below:
- Open terminal by clicking "Applications->System Tools->Terminal" or through Keyboard shortcut
Ctrl+Alt+T - In the terminal window, type below command and press enter to start the installation by providing your machine password.
sudo apt-get install vlc
- Open terminal by clicking "Applications->System Tools->Terminal" or through Keyboard shortcut
For MAC OS
- To download the installation file click here
- Double-click on the icon of the package: an icon will appear on your Desktop, right beside your drives.
- Open it and drag the VLC application from the resulting window to the place where you want to install it
Working with the application
Opening and using the application
- To launch the VLC media player, Go to "Application --> Sound and Videos --> Click on VLC Media Player".
- To open the media file like audio and video files go to "Media menu --> Click on Open file".
- Then Select one or more files to open dialog box will open. Select any "Audio and Video file--> Click Open".
- The file starts playing the Audio or Video file which you have selected.
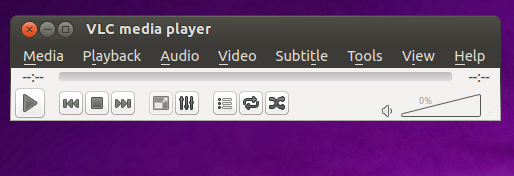
VLC Media Player interface
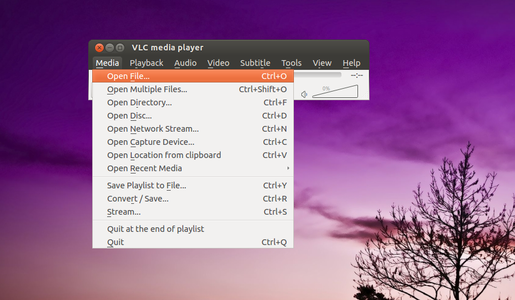
Opening files
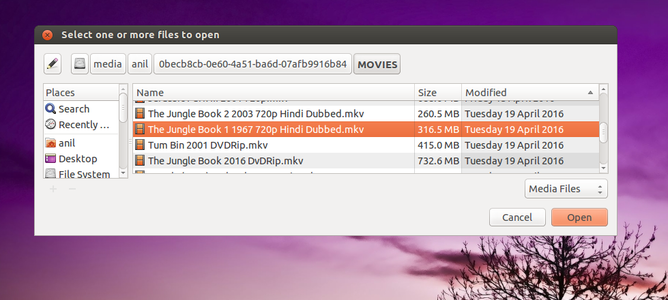
Selecting more than one files to play


Play and Pause in VLC
- You can pause the video in between by clicking on the pause button and resume it using play button respectively.
Pause and Play operation

- You can increase the volume upto 200% in VLC which is a best part of this application. You can increase or decrease the volume by click onto certain position in the right bottom side of the VLC interface. You can use Up Arrow or Down arrow to do the same in Keyboard.
![]() Note:Although VLC allows you to play audio upto 200%, it is recommended to keep the volume in between 60 to 100 since the audio engineers use the same level to develop the content.
Note:Although VLC allows you to play audio upto 200%, it is recommended to keep the volume in between 60 to 100 since the audio engineers use the same level to develop the content.
Jumping to a specific time in video
- VLC allows you to jump to a specific time in a video if you know the playtime of some particular event or occurring.
- This features saves your time of moving the slider to crosscheck the playtime of video.
- To do this, Click on "Playback --> Jump to specific time". In the window that appears, give the duration of video onto which you want to jump. Click OK.
Downloading videos from Youtube
VLC lets you play and download YouTube videos right from its desktop interface. Here's how:
Downloading Youtube videos in VLC

- Find a video on YouTube like the above mentioned one and copy the URL from the address bar.
- In VLC, go to "Media --> Open Network Stream".
- Paste the YouTube link in the box and click Play.
- Under Tools, click "Codec Information".
- In the box that gives Location, right-click the block of text and click Select All. Copy this text to your clipboard.
- Go back to your browser and paste the link in the address bar. This will open the source file directly on YouTube's server.
- Right-click the video as it plays and select Save Video As.
Convert Video Files
Here's how to convert between one file and another:

Video conversion in VLC

- Under Media, click "Convert/Save".
- Add the file you want to convert in the File Selection section.
- Click "Convert/Save."
- In the Settings section, choose the type of file you want to convert the file into under Profile.
- Give the file a name and location under Destination.
- Click Start.
Taking Screenshot in a video
- You can take screenshot from any part of the video at anytime in VLC. Advantage of this is that it will capture only the video screen so that you are not required to crop it again.
Taking snapshot in VLC

- To do this, open the video.
- Pause the video at the moment where you need a snapshot.
- Click on "Video--> Take snapshot".
Recording the video
Video recording

- VLC allows you to record the video that is playing.
- To do this, Click on "Playback --> Record" or alternatively there is a red colored button in the interface above the Play/Pause button. Click on that.
- Once you give the command to record the screen, recording process starts and the Record button looks somewhat pressed.
- When you are done with recording, you can again go to "Playback --> Record" to stop recording. Alternatively you can click on Red button again.
- The recorded videos will be available in your home/videos directory.
Ideas for resource creation
VLC Media Player is used to play the already existed material. You can use snapshot or record feature to create some resource by your own. Make sure you use the Open Educational Resources video.