Difference between revisions of "Learn Ubuntu"
| (160 intermediate revisions by 9 users not shown) | |||
| Line 1: | Line 1: | ||
| + | [http://karnatakaeducation.org.in/KOER/index.php/%E0%B2%89%E0%B2%AC%E0%B3%81%E0%B2%82%E0%B2%9F%E0%B3%81_%E0%B2%95%E0%B2%B2%E0%B2%BF%E0%B2%AF%E0%B2%BF%E0%B2%B0%E0%B2%BF ಕನ್ನಡದಲ್ಲಿ ನೋಡಿ] [https://teacher-network.in/OER/hi/index.php/%E0%A4%89%E0%A4%AC%E0%A4%82%E0%A4%9F%E0%A5%82_%E0%A4%B8%E0%A5%80%E0%A4%96%E0%A4%BF%E0%A4%8F हिंदी] | ||
{{Template:Book-sidebar}} | {{Template:Book-sidebar}} | ||
| − | = | + | ===Introduction=== |
| − | == | + | Operating system is also called system software as it works with the hardware. Every computer must have an operating system to run other computer programs. Even your mobile phone will have an operating system. Operating systems start automatically when you turn on the computer, this process is termed as booting. All the other computer programs like programs to paint, type, listen to music, learn mathematics etc., are called application software or 'Apps' which work with the system software. |
| − | Operating | ||
| − | + | Ubuntu is a ‘[[wikipedia:Free_and_open-source_software|Free and Open Source Software]]’ (called FOSS in short) operating system. You may be familiar with Microsoft Windows operating system or used an application called Adobe Reader. Windows or Adobe Photoshop are ‘[[wikt:proprietary|proprietary]]’ , meaning they cannot be copied or shared or modified by us; FOSS applications are licensed under the ‘General Public License’ which allows all of us to share the software freely, we can also modify the software as per our needs. Hence it is important to use FOSS in our schools. Teachers must learn and teach FOSS and avoid use of proprietary software, since it is not possible for all to access and use proprietary software, and not possible for anyone (other than the vendor) to study or improve the software. | |
| − | Ubuntu is a | ||
| − | Hence it is important to use FOSS in our schools. Teachers must learn and teach FOSS and avoid use of proprietary software, since it is not possible for all to access and use proprietary software | ||
| − | == | + | Since all the software like [[wikipedia:Productivity_software#Office_suite|Office suite]], [[wikipedia:Web_browser|web browser]], educational software can be bundled with Ubuntu GNU/Linux operating system, all these applications can be installed on the computer at one time. On proprietary software Windows, each software has to be separately installed, which can make it cumbersome and time consuming. Operating systems use a program called the [[wikipedia:Graphical_user_interface|Graphical User Interface]] (GUI) to access other computer with a [[wikipedia:Pointing_device|mouse]]. The popular operating systems are [[wikipedia:Microsoft_Windows|Microsoft Windows]], [[wikipedia:Linux|GNU/Linux]] and [[wikipedia:MacOS|Mac OS]]. In this section, you will learn about the functions of an operating system, using an example of [[Learn Ubuntu|Ubuntu]] GNU/Linux operating system. With this learning, you can also operate a computer with Windows of Mac operating systems. Remember that we are focusing on learning the processes of any software application, so that we can, with that learning, use similar other applications. |
| − | The first Ubuntu release | + | ====Basic information==== |
| + | {| class="wikitable" | ||
| + | |- | ||
| + | |ICT Competency | ||
| + | |Ubuntu GNU/Linux is an operating system for the computer. The operating system is the foundation, which supports the interface between the user and other software applications. Hence learning Ubuntu constitutes basic digital literacy. | ||
| + | |- | ||
| + | |Educational application and relevance | ||
| + | |There are a large number of freely shareable educational tools on Ubuntu pertaining to mathematics, science, social sciences, languages etc which can be used in all schools. There are a large number of additional freely shareable tools on GNU/Linux, such as [[wikipedia:Intelligent_Input_Bus|IBUS]] which support word processing in more than 50 languages, including all languages used in Telangana such as Telugu, Urdu, Kannada, Tamil, Marathi, Hindi etc. The [[wikipedia:Orca_(disambiguation)|ORCA]] screen reader can be used by the visually handicapped for reading content on the computer screen. [[wikipedia:Scribus|Scribus]] can be used for for desktop publishing. | ||
| + | |- | ||
| + | |Version | ||
| + | | | ||
| + | Once in six months, [[wikipedia:Canonical_(company)|Canonical]] releases a new version of the Ubuntu. The first Ubuntu release was in April 2004. The recently released version of Ubuntu is 18.04 (as April 2018), but Ubuntu 18.04 is the latest [https://wiki.ubuntu.com/LTS LTS] ('''L'''ong '''T'''erm '''S'''upport) version, which you will use. | ||
| + | |- | ||
| + | |Configuration | ||
| + | |To install and use Ubuntu on your computer, it should have following configuration: | ||
| + | Processor: 2 GHz dual core processor or better<br>Memory: 1GB of RAM (2GB recommended)<br> | ||
| + | Disk: 30GB of disk space depending on options<br> | ||
| + | Graphics: If you plan to use the netbook interface, you will require a graphics card that supports 3D acceleration on Ubuntu. <br> | ||
| + | Either a DVD drive or a USB port for the installer media. | ||
| + | |||
| + | If your computer does not match the above hardware specifications, or is old, install [[wikipedia:Lubuntu|Lubuntu]] OS. Lubuntu is an Ubuntu based distribution meant for low hardware configuration computers. Lubuntu is a fast and lightweight operating system. It has low hardware requirements. Download Lubuntu ISO 32 bit from [http://cdimage.ubuntu.com/lubuntu/releases/16.10/release/lubuntu-16.10-desktop-i386.iso here] and 64 bit [http://cdimage.ubuntu.com/lubuntu/releases/16.10/release/lubuntu-16.10-desktop-amd64.iso here]. | ||
| + | |- | ||
| + | |Other similar applications | ||
| + | |[[wikipedia:Linux_Mint|Mint]], [[wikipedia:Debian|Debian]], [[wikipedia:OpenSUSE|OpenSUSE]], and [[wikipedia:Fedora|Fedora]] are popular Linux distributions. | ||
| + | |- | ||
| + | |The application on mobiles and tablets | ||
| + | | | ||
| + | Ubuntu is available on select [https://ubuntu.com/mobile/devices Mobile phones] and [https://ubuntu.com/mobile tablets] | ||
| + | |||
| + | |- | ||
| + | |Development and community help | ||
| + | | | ||
| + | There are many community forums are helping Ubuntu users. | ||
| + | * [https://help.ubuntu.com/community/CommunityHelpWiki Community Wiki help] | ||
| + | * [https://community.ubuntu.com/help-information/ Ubuntu help] | ||
| + | |||
| + | |} | ||
| + | |||
| + | ==== Overview of Features ==== | ||
| + | Ubuntu performs all the basic functions expected of an operating system. | ||
| + | # It allows the user to login and logout and keeps the user data secure within that login | ||
| + | # Users can browse the folders and files using a file browser | ||
| + | # Users can use different applications on their computer for creating and accessing files. This includes accessing, creating, editing text, image, audio, video, animation files. | ||
| + | # Users can connect to other devices - printers and scanners, mobile phones, pen drives, external hard disks and other storage devices, external DVD writers etc. | ||
| + | # Users can connect to the internet. | ||
| + | Ubuntu is shipped with many applications relevant to education including GCompris, KDE Edutainment Suite, Ubuntu Menu editor, LibreOffice, Gnome Nanny etc. Ubuntu is available to [https://www.ubuntu.com/download/desktop freely download]. Edubuntu's default GUI is Unity while GNOME is also available. | ||
| + | |||
| + | ===Working with the application=== | ||
| + | ====Starting and shutting down your computer==== | ||
| + | <gallery mode="packed" heights="300" caption="Starting and shutting down your computer"> | ||
| + | File:Login.jpg|Ubuntu Login screen | ||
| + | File:Ubuntu home screen.png|Ubuntu home screen | ||
| + | File:Shutdown the computer.png|Shutdown the computer | ||
| + | </gallery> | ||
| + | |||
| + | The above images show you the basic Ubuntu interface. | ||
| + | #'''Logging in''': When you switch on your computer, you will see a login screen. Login with the user id (name) and password created by the system administrator. '''Ubuntu''' allows you to have a user interface in your own language, by specifying your language as the user language, during your user id creation. Once you have logged in, the home screen will appear. | ||
| + | #'''Home screen:''' The second image shows you the Ubuntu home screen. The applications menu at the top left has a list of all the programs (apps) on your computer. The '''Places''' menu, next to it, lets you access the 'places' on your computer including the hard disk, CD/DVD or pen drives. Digital cameras and MP3 players are also listed here when plugged-in. The '''Applications''' menu has sub menus for Education, Office, Internet, Games etc. Each sub-menu has many applications. You can try to learn them yourselves by clicking and selecting options. | ||
| + | #'''Shutting down the computer:''' What will you do after you have finished your work? You have to turn off the computer. You must turn it off by clicking on the last button on the right hand top corner and select shut down. Never turn off the power button without shutting the computer properly. | ||
| + | ====Changing Ubuntu interface (Mate Tweak)==== | ||
| + | |||
| + | * After login into your Ubuntu and if it is not showing Applications and places menu option, Just open "Settings->System setting". Another dialog box will open in that click on "MATE Tweak" option | ||
| + | * After login into your Ubuntu and if it is not showing Applications and places menu option, Just open "Settings->System setting". Another dialog box will open in that click on "MATE Tweak" option | ||
| + | * After login into your Ubuntu and if it is not showing Applications and places menu option, Just open "Settings->System setting". Another dialog box will open in that click on "MATE Tweak" option | ||
| + | <gallery mode="packed" heights="300"> | ||
| + | File:System settings.png|Opening the system settings | ||
| + | File:Opening the Mate Tweak.png|Opening the Mate Tweak | ||
| + | </gallery> | ||
| + | <gallery mode="packed" heights="300"> | ||
| + | File:Tradi.png|Selecting the panel | ||
| + | File:Close.png|Closing the Mate Tweak | ||
| + | </gallery> | ||
| + | <br>Once you have chosen the option from drop down it will ask you to click on "OK" or "Cancel", Click on "OK" to apply the format | ||
| + | ====Home page overview==== | ||
| + | |||
| + | # In home page we can see the below mentioned options, | ||
| + | |||
| + | * '''Application menu:-''' You can see the list of software's from this option. | ||
| + | * '''Places:-''' You can see the folder locations from this option. | ||
| + | * '''System settings:-''' You can see the setting options from this. | ||
| + | * '''Shortcuts:-''' You can see the shortcuts created for shortcuts to the top panel. | ||
| + | * '''Top panel:-''' It's a panel which includes Application menu, Places, System settings, Shortcuts, Top panel, Ibus language preferences option, Time & Settings. | ||
| + | * '''Ibus language preferences option:-''' It's used to change the typing language. | ||
| + | * '''Time & Settings:-''' Time will reflect the present date and time. Setting will open the settings options. | ||
| + | * '''Short cut for Desktop:-''' Used to go to the desktop directly. | ||
| + | * '''Minimized tabs:-''' It will show the list of minimized tabs in your system. | ||
| + | * '''Down panel:-''' It includes Minimized tabs, Short cut for Desktop, Workspace and Trash | ||
| + | * '''Trash:-''' Trash will work just like recycle bean(The deleted files will be moved to trash). | ||
| + | * '''Workspace:-''' It is just like a room where if we change workspace the entire tabs will be kept in previous room and a new room will open with blank home page. | ||
| + | <gallery mode="packed" heights="290" caption="Home page overview"> | ||
| + | File:Home screen.png|Home screen | ||
| + | File:Workspace.jpg|Once changed the workspace | ||
| + | </gallery> | ||
| + | '''<br />''' | ||
| + | |||
| + | ====Creating and managing folders and files==== | ||
| + | <gallery mode="packed" heights="300" caption="Creating and managing folders and files"> | ||
| + | File:Managing files folders.png|Managing files & folders | ||
| + | </gallery> | ||
| + | *Creating and managing files and folders - When you write an essay or paint something on a paper, you would like to keep it for future, right? You would probably put it in a hard bound folder. Maybe, if you have more than one essay or painting, you would have one folder to hold your essays and one folder to hold your paintings. | ||
| + | *#To create new folder right click on your mouse and click on "New Folder". Rename the folder and save your files in it. You can also create many sub folders within that. | ||
| + | *#Always give meaningful names for folders, so that you can easily search for them later. | ||
| + | *#You can move folders, and files across folders. | ||
| + | *#You can create a file by opening a application, and creating a new file to prepare your content. You can create text documents with LibreOffice Writer, Images with Tux Paint etc. | ||
| + | <gallery mode="packed" heights="300" caption="Creating folders with meaningful name"> | ||
| + | File:Create folder.png|Creating new folder | ||
| + | File:Created.png|Once the new folder created | ||
| + | File:Renamne.png|Giving a meaningful name | ||
| + | </gallery> | ||
| + | |||
| + | * To delete a file or folder right click on the particular file or folder and click on the "Move to Trash" option. | ||
| + | <gallery mode="packed" heights="300" caption="Deleting the folder or files"> | ||
| + | File:Deleting the folder.png|Deleting the folder | ||
| + | </gallery> | ||
| + | *From '''HOME''' folder you can search any files and folders which you have saved in your computer, click on search option on the toolbar and type the keywords of the file or folder, it will show the all files contains our searching keywords in your computer. If you have an idea about the location of the file you are searching, you can launch the search from within that folder itself, instead of the Home folder, this will show you a lesser number of files | ||
| + | <gallery mode="packed" heights="300" caption="Creating and managing folders and files"> | ||
| + | File:Filesearch.png|File search | ||
| + | </gallery> | ||
| + | *To access the hidden files of your system open the Home folder and click on "View->Show Hidden Files" or open using the shortcut "Ctrl+H" and if you want to hide a file or folder then click on rename and add".(dot)" before the file or folder. | ||
| + | <gallery mode="packed" heights="300" caption="Opening Hidden files"> | ||
| + | File:Hidden.png|Opening the Hidden Files option | ||
| + | File:After clicking hidden files.png|After opening the hidden files | ||
| + | </gallery> | ||
| + | |||
| + | * To access the recent files click on the "Places" option from the top panel and we can see the recently viewed documents fro "Recent Documents" option. | ||
| + | <gallery mode="packed" heights="300" caption="Accessing recently opened files"> | ||
| + | File:Recent files.png|Recently opened files | ||
| + | </gallery> | ||
| + | |||
| + | * To create a shortcut of software to the "Top panel" or to the "Desktop" follow the below steps, | ||
| + | ** Open the software by clicking on the "Application menu" | ||
| + | ** Right click on the particular software | ||
| + | ** If shortcut need to be created on "Top panel" click on "Add this launcher to panel", If needs to be created on "Desktop" click on "Add this launcher to Desktop". | ||
| + | <gallery mode="packed" heights="300" caption="Creating shortcut to Top panel and Desktop"> | ||
| + | File:Creating shortcut to top panel and desktop.png|thumb|Creating shortcut to top panel and desktop | ||
| + | </gallery> | ||
| + | '''Opening files by "open with" option''' | ||
| + | <gallery mode="packed" heights="350" caption="Opening files with application"> | ||
| + | File:Opening files with application.png|Opening files with application | ||
| + | </gallery> | ||
| + | #A file can usually be opened with any given application in Ubuntu which supports that particular file. For example, an image file can be opened with image viewer, gimp, etc. So if you want to open with a application of your choice, right click on file select "Open with" to see the available options. | ||
| + | #File can be opened with multiple application in Ubuntu which support that particular file. For example, an image file can be opened with image viewer and also can be with Gimp, Mypaint, Kolorpaint, Shotwell viewer etc. So if you want to open the file with a application of your choice, right click on file select "Open with" to see the available multiple options. | ||
| + | |||
| + | ====Import files and folders from external device==== | ||
| + | <gallery mode="packed" heights="300" caption="Import files and folders from external device"> | ||
| + | File:Access external device.png|Access external device | ||
| + | File:Copy from external device.png|Copy from external device | ||
| + | </gallery> | ||
| + | #You can import files from other devices. You can insert devices such as CDs, DVDs or memory cards into your computer. | ||
| + | ##Connect the devices such as pen drives, memory card holders, external DVD drives using a cable, to your computer. | ||
| + | ##Click on "Places" from your desktop top panel. You can see your device name. | ||
| + | ##Click on your device name to view the files from that device. | ||
| + | #To import files from devices, right click on that file and click on "Copy", then paste it into your computer folder.You can copy audio and video files, that you have recorded on your mobile phone, to your computer. You can edit these files. In the same way, you can copy these and other files from your computer to your mobile phone. | ||
| − | + | You should periodically take back up of important files on your computer and store it on a pen drive or an external hard disk. So that if the hard disk of your computer has a problem or crashes, you would not lose your data entirely. | |
| − | = | + | {{Ambox |
| − | + | | text = Study how there are different kinds of connecting cables, for different devices / ports on your computer. Use the appropriate cable in each case. You can connect printers, scanners, projectors to suitable ports on your computer. | |
| − | + | | type = notice | |
| − | + | }} | |
| − | |||
| − | = | ||
| − | |||
| − | |||
| − | |||
| − | |||
| − | = | + | ====Connecting to the WiFi or Wired Network==== |
| − | == | ||
| − | + | * To connect to the WiFi or Wired Network click on the "WiFi" symbol from the top panel and make sure "Enable Network" and "Enable WiFi" are check marked. | |
| − | | | + | <gallery mode="packed" heights="300" caption="Ensuring Enable Network and Enable WiFi are check marked"> |
| − | + | File:Clicking on wifi option.png|Clicking on WiFi symbol from the top panel and Ensuring "Enable Network" and "Enable WiFi" are check marked | |
| − | + | </gallery> | |
| − | + | * If you are connecting through Wired network connect the LAN cable to the computer and you will get a option as "Wired connection 1" below the "Ethernet Network" option. once you click on "Wired connection 1" your system will be connected to the wired network. | |
| + | <gallery mode="packed" heights="300" caption="Connecting to Wired Network"> | ||
| + | File:Connecting to wired network.png|Connection to the Wired Network | ||
| + | File:1connection.png|Once connected to the Wired Network | ||
| + | </gallery> | ||
| + | * If you are connecting through WiFi click on your WiFi name shown in the list you may asked to enter your WiFi password if the WiFi is protected, Once you enter the password click on "Connect" your system will be connected to the "WiFi" Network selected by you. | ||
| + | {{Note}}Ensure that your computer must have a WiFi drive if you wish to connect through WiFi. | ||
| + | <gallery mode="packed" heights="300" caption="Connecting to WiFi"> | ||
| + | File:Selecting and clicking on wifi network name.png|Selecting and clicking on WiFi network name | ||
| + | </gallery> | ||
| + | <gallery mode="packed" heights="250"> | ||
| + | File:Asking to enter the password.png|Asking to enter the password | ||
| + | File:Once connected to the netwrok.png|Once connected to the WiFi network | ||
| + | </gallery> | ||
| − | |||
| − | |||
| − | |||
| − | |||
| − | |||
| − | |||
| − | |||
| − | |||
| − | |||
| − | |||
| − | == | + | ====Changing user interface language in Ubuntu ==== |
| − | + | English will be default interface in Ubuntu but you can also use Ubuntu in you local languages like Telugu, Kannada or Tamil. | |
| + | <gallery mode="packed" heights="300" caption="Changing user interface language in Ubuntu"> | ||
| + | File:Select language support from system settings.png|Select language support from system settings | ||
| + | File:Changing the language from English to Kannada.png|Changing the language from English to Kannada | ||
| + | File:Arrange language list.png|Arrange language list | ||
| + | </gallery> | ||
| − | == | + | # To get started, go to <u>Applications -> System tools -> System settings -> Language support</u>. |
| − | + | # It may ask you to update or add components to your current default language when you first open the dialog. If you do not have internet connect then click "Remind Me Later" and If you have good internet connection, select install to update your language lists. | |
| + | # Now we are ready to change our Ubuntu interface language. Find your new language in the list, and then click and drag it to the top of the list and click Apply '''System-Wide'''. | ||
| + | # Once you have set you language as first and click on "system-wide", you will need to '''log out''' of your account and '''log in''' to see your new interface language. | ||
| + | # Ubuntu may ask if you want to update your user folders names to your new language, Select Rename folder option. | ||
| + | <gallery mode="packed" heights="300" caption="Changing user interface language in Ubuntu"> | ||
| + | File:Renaming folders.png|Renaming folders | ||
| + | File:Kannada Ubuntu interface.png|Kannada Ubuntu interface | ||
| + | </gallery> | ||
| − | == | + | ====Adding software applications to your computer system==== |
| − | + | <gallery mode="packed" heights="350"> | |
| + | File:Adding softwares to computer system using Appgrid.png|Adding software's to computer system using App Grid | ||
| + | </gallery> | ||
| + | You can add many more FOSS applications to your computer. Select the "System->Administration->App Grid" - You can download applications from the Internet. Teachers can explore new FOSS educational tools and utilities. | ||
| − | + | Go to Applications > System Tools -> App Grid. You will need to type the required application name in the search bar. It will show all applications with the words you have entered and you will get an option for "Install". Click on "install" if you want to install the application. If your search does not get the application(s) you want, try with fewer letters / words to search. | |
| − | |||
| − | |||
| − | |||
| − | |||
| − | + | It may ask your Ubuntu log in password for authentication, just type your Ubuntu password press enter. | |
| − | |||
| − | |||
| − | + | If you have doubts or difficulties in using the Ubuntu operating system or any of the applications, you can search for solutions on the Internet using a search engine or refer to '[http://karnatakaeducation.org.in/KOER/en/index.php/Frequently_Asked_Questions Frequently asked questions]'. | |
| − | |||
| − | |||
| − | |||
| − | |||
| − | + | ====Adding your languages to type in Ubuntu==== | |
| + | In Ubuntu by default you can type English in any application and by default it will use only Unicode fonts unless you manually changing it to non-Unicode. | ||
| + | <gallery mode="packed" heights=350> | ||
| + | File:Selecting ibus for typing language.png|Selecting Ibus for typing language | ||
| + | </gallery> | ||
| + | Also you can type any your local languages in Ubuntu by adding those languages in Ibus. For typing in any local language, Ubuntu will use application called Ibus. You can follow the below step to set up Ibus and to add languages in the typing list. <br> | ||
| + | # Go to Applications -> System tools -> System Settings -> Language Support ->Look at the Keyboard input method system Select '''IBus''' and close the window. | ||
| + | # Log-out your computer and log-in to applying this changes. | ||
| + | Now you have to add your languages in "Text Entry" to type it. You can type multiple language in any application by adding it in this list.<br> | ||
| − | + | <gallery mode="packed" heights=300 caption="Adding language to text entry"> | |
| − | + | File:Selecting preferences.png|left|thumb|Selecting preferences | |
| − | + | File:Adding language to text entry.png|thumb|Adding language to text entry | |
| − | + | </gallery> | |
| − | |||
| − | |||
| − | |||
| − | |||
| − | |||
| − | |||
| − | |||
| − | |||
| − | |||
| − | |||
| − | |||
| − | |||
| − | |||
| − | |||
| − | |||
| − | + | # Right click on '''"En"''' from the top panel and select "Preferences". | |
| − | + | # Once the Preferences window opens, click on "Input method->Add" option, as shown in image. | |
| + | # The language list window will open, search your languages by typing it in search box and click on the language. It will show the all the typing methods for the language. Choose a keyboard layout you are comfortable with and click "Add". | ||
| + | # Yes, you are finished all the set up, after this your language list looks like below. | ||
| + | <gallery mode="packed" heights=300 caption="Adding language to text entry"> | ||
| + | File:Searching Kannada language in search box.png|Searching Kannada language in search box | ||
| + | File:Selecting keyboard layout.png|Selecting keyboard layout | ||
| + | File:After adding language.png|after adding language | ||
| + | </gallery> | ||
| + | <br>Now its time to type your added language in most of the applications. Click on the language panel "En" (right top corner of the screen) and select language in which you want to type. When you select language, icon will change to that language. The very important is you can add multiple languages in this list. | ||
| + | ====Advanced features==== | ||
| + | Ubuntu contains a wide range of software that includes LibreOffice, Firefox, Thunderbird and several games and Educational tools. Many additional software packages are accessible from the built in Ubuntu Software Center known as "App Grid". More complex commands can be given to the computer using the 'Terminal' interface, this is really for those who have technical expertise. | ||
| + | '''{{Note}}To Know the installation process of Ubuntu please go through the below link''' | ||
| − | =References= | + | [https://teacher-network.in/OER/index.php/Teachers%27_toolkit_for_creating_and_re-purposing_OER_using_FOSS/Installing_Ubuntu_-_creating_the_FOSS_platform#Installation_Process Click here to Know the Installation process.] |
| − | [https://www.google.co.in/webhp?sourceid=chrome-instant&ion=1&espv=2&ie=UTF-8#q=ubuntu%20wikipedia | + | ===References=== |
| + | #[https://wiki.ubuntu.com/Releases Ubuntu releases] | ||
| + | #[https://wiki.ubuntu.com/LTS Ubuntu LTS] | ||
| + | #[https://www.google.co.in/webhp?sourceid=chrome-instant&ion=1&espv=2&ie=UTF-8#q=ubuntu%20wikipedia Wikipedia] | ||
| + | #[http://karnatakaeducation.org.in/KOER/en/index.php/Kalpavriksha Install Ubuntu (kalpavriksha)] | ||
[[Category:Explore an application]] | [[Category:Explore an application]] | ||
Latest revision as of 10:33, 26 September 2022

Introduction
Operating system is also called system software as it works with the hardware. Every computer must have an operating system to run other computer programs. Even your mobile phone will have an operating system. Operating systems start automatically when you turn on the computer, this process is termed as booting. All the other computer programs like programs to paint, type, listen to music, learn mathematics etc., are called application software or 'Apps' which work with the system software.
Ubuntu is a ‘Free and Open Source Software’ (called FOSS in short) operating system. You may be familiar with Microsoft Windows operating system or used an application called Adobe Reader. Windows or Adobe Photoshop are ‘proprietary’ , meaning they cannot be copied or shared or modified by us; FOSS applications are licensed under the ‘General Public License’ which allows all of us to share the software freely, we can also modify the software as per our needs. Hence it is important to use FOSS in our schools. Teachers must learn and teach FOSS and avoid use of proprietary software, since it is not possible for all to access and use proprietary software, and not possible for anyone (other than the vendor) to study or improve the software.
Since all the software like Office suite, web browser, educational software can be bundled with Ubuntu GNU/Linux operating system, all these applications can be installed on the computer at one time. On proprietary software Windows, each software has to be separately installed, which can make it cumbersome and time consuming. Operating systems use a program called the Graphical User Interface (GUI) to access other computer with a mouse. The popular operating systems are Microsoft Windows, GNU/Linux and Mac OS. In this section, you will learn about the functions of an operating system, using an example of Ubuntu GNU/Linux operating system. With this learning, you can also operate a computer with Windows of Mac operating systems. Remember that we are focusing on learning the processes of any software application, so that we can, with that learning, use similar other applications.
Basic information
| ICT Competency | Ubuntu GNU/Linux is an operating system for the computer. The operating system is the foundation, which supports the interface between the user and other software applications. Hence learning Ubuntu constitutes basic digital literacy. |
| Educational application and relevance | There are a large number of freely shareable educational tools on Ubuntu pertaining to mathematics, science, social sciences, languages etc which can be used in all schools. There are a large number of additional freely shareable tools on GNU/Linux, such as IBUS which support word processing in more than 50 languages, including all languages used in Telangana such as Telugu, Urdu, Kannada, Tamil, Marathi, Hindi etc. The ORCA screen reader can be used by the visually handicapped for reading content on the computer screen. Scribus can be used for for desktop publishing. |
| Version |
Once in six months, Canonical releases a new version of the Ubuntu. The first Ubuntu release was in April 2004. The recently released version of Ubuntu is 18.04 (as April 2018), but Ubuntu 18.04 is the latest LTS (Long Term Support) version, which you will use. |
| Configuration | To install and use Ubuntu on your computer, it should have following configuration:
Processor: 2 GHz dual core processor or better If your computer does not match the above hardware specifications, or is old, install Lubuntu OS. Lubuntu is an Ubuntu based distribution meant for low hardware configuration computers. Lubuntu is a fast and lightweight operating system. It has low hardware requirements. Download Lubuntu ISO 32 bit from here and 64 bit here. |
| Other similar applications | Mint, Debian, OpenSUSE, and Fedora are popular Linux distributions. |
| The application on mobiles and tablets |
Ubuntu is available on select Mobile phones and tablets |
| Development and community help |
There are many community forums are helping Ubuntu users. |
Overview of Features
Ubuntu performs all the basic functions expected of an operating system.
- It allows the user to login and logout and keeps the user data secure within that login
- Users can browse the folders and files using a file browser
- Users can use different applications on their computer for creating and accessing files. This includes accessing, creating, editing text, image, audio, video, animation files.
- Users can connect to other devices - printers and scanners, mobile phones, pen drives, external hard disks and other storage devices, external DVD writers etc.
- Users can connect to the internet.
Ubuntu is shipped with many applications relevant to education including GCompris, KDE Edutainment Suite, Ubuntu Menu editor, LibreOffice, Gnome Nanny etc. Ubuntu is available to freely download. Edubuntu's default GUI is Unity while GNOME is also available.
Working with the application
Starting and shutting down your computer
- Starting and shutting down your computer
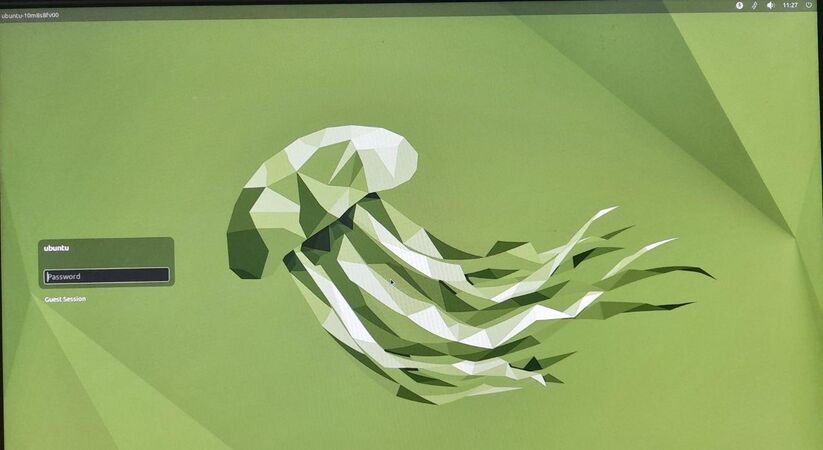
Ubuntu Login screen
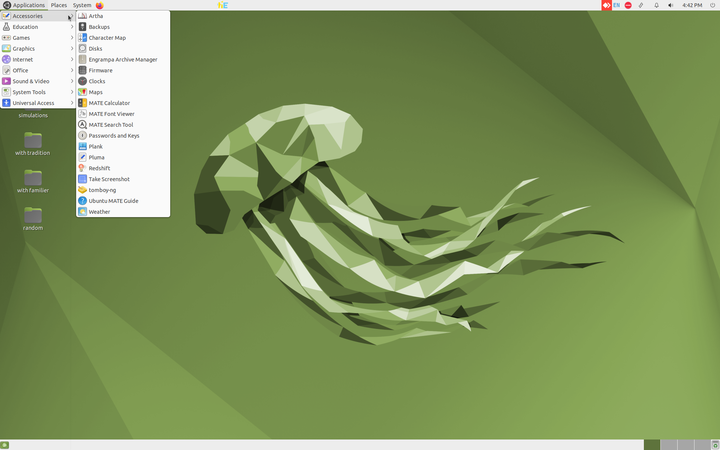
Ubuntu home screen
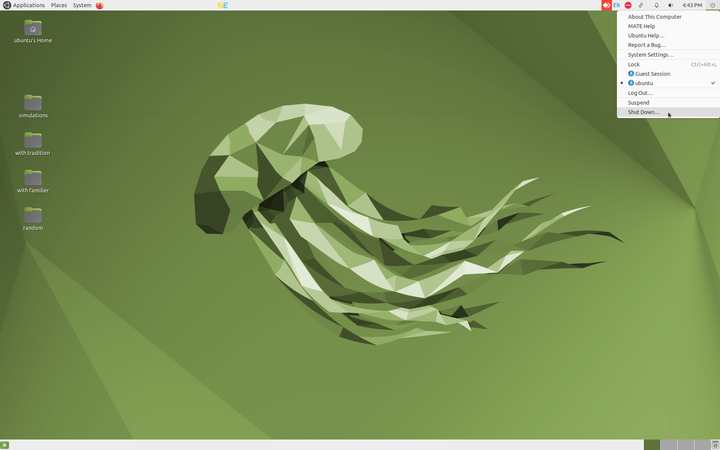
Shutdown the computer


The above images show you the basic Ubuntu interface.
- Logging in: When you switch on your computer, you will see a login screen. Login with the user id (name) and password created by the system administrator. Ubuntu allows you to have a user interface in your own language, by specifying your language as the user language, during your user id creation. Once you have logged in, the home screen will appear.
- Home screen: The second image shows you the Ubuntu home screen. The applications menu at the top left has a list of all the programs (apps) on your computer. The Places menu, next to it, lets you access the 'places' on your computer including the hard disk, CD/DVD or pen drives. Digital cameras and MP3 players are also listed here when plugged-in. The Applications menu has sub menus for Education, Office, Internet, Games etc. Each sub-menu has many applications. You can try to learn them yourselves by clicking and selecting options.
- Shutting down the computer: What will you do after you have finished your work? You have to turn off the computer. You must turn it off by clicking on the last button on the right hand top corner and select shut down. Never turn off the power button without shutting the computer properly.
Changing Ubuntu interface (Mate Tweak)
- After login into your Ubuntu and if it is not showing Applications and places menu option, Just open "Settings->System setting". Another dialog box will open in that click on "MATE Tweak" option
- After login into your Ubuntu and if it is not showing Applications and places menu option, Just open "Settings->System setting". Another dialog box will open in that click on "MATE Tweak" option
- After login into your Ubuntu and if it is not showing Applications and places menu option, Just open "Settings->System setting". Another dialog box will open in that click on "MATE Tweak" option
Opening the system settings
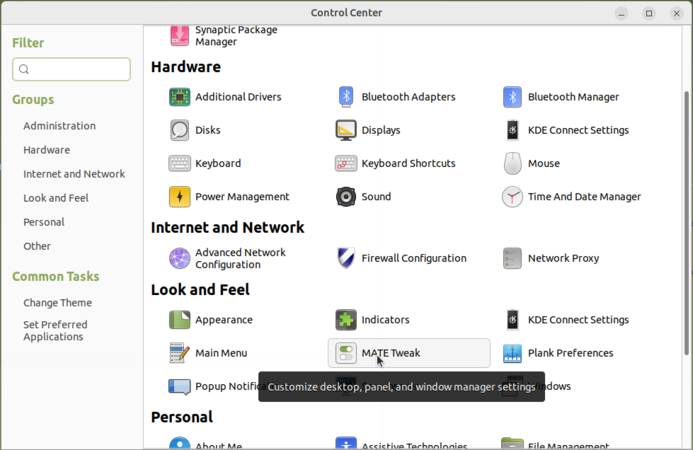
Opening the Mate Tweak


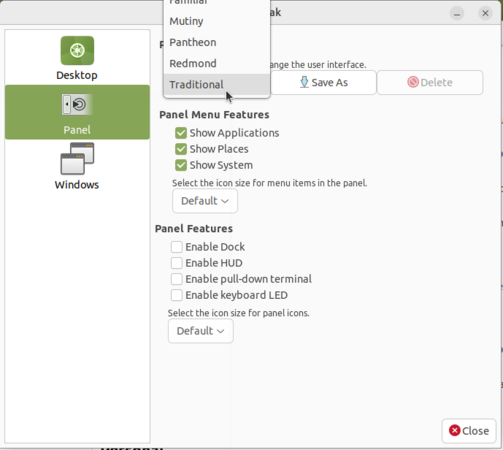
Selecting the panel
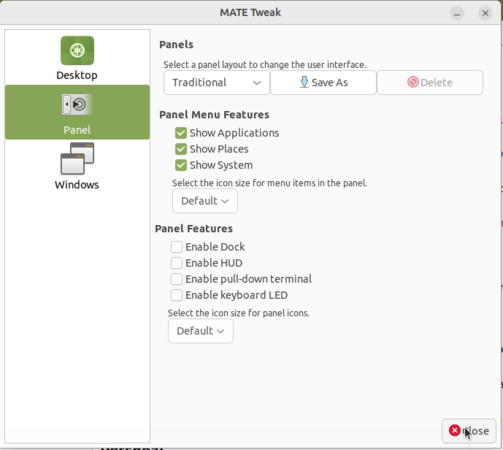
Closing the Mate Tweak


Once you have chosen the option from drop down it will ask you to click on "OK" or "Cancel", Click on "OK" to apply the format
Home page overview
- In home page we can see the below mentioned options,
- Application menu:- You can see the list of software's from this option.
- Places:- You can see the folder locations from this option.
- System settings:- You can see the setting options from this.
- Shortcuts:- You can see the shortcuts created for shortcuts to the top panel.
- Top panel:- It's a panel which includes Application menu, Places, System settings, Shortcuts, Top panel, Ibus language preferences option, Time & Settings.
- Ibus language preferences option:- It's used to change the typing language.
- Time & Settings:- Time will reflect the present date and time. Setting will open the settings options.
- Short cut for Desktop:- Used to go to the desktop directly.
- Minimized tabs:- It will show the list of minimized tabs in your system.
- Down panel:- It includes Minimized tabs, Short cut for Desktop, Workspace and Trash
- Trash:- Trash will work just like recycle bean(The deleted files will be moved to trash).
- Workspace:- It is just like a room where if we change workspace the entire tabs will be kept in previous room and a new room will open with blank home page.
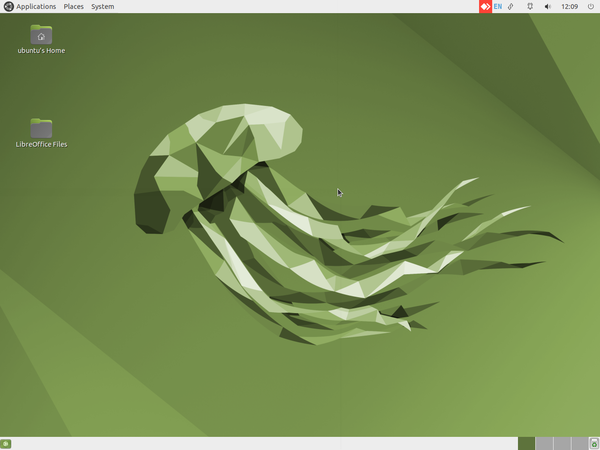
- Home page overview

Home screen
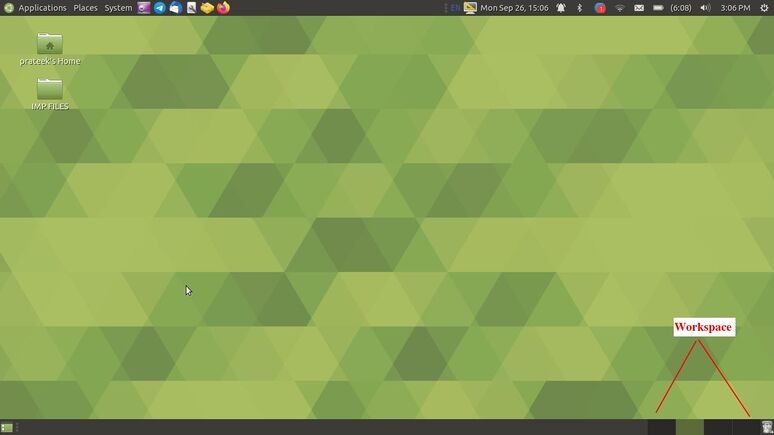
Once changed the workspace


Creating and managing folders and files
- Creating and managing folders and files
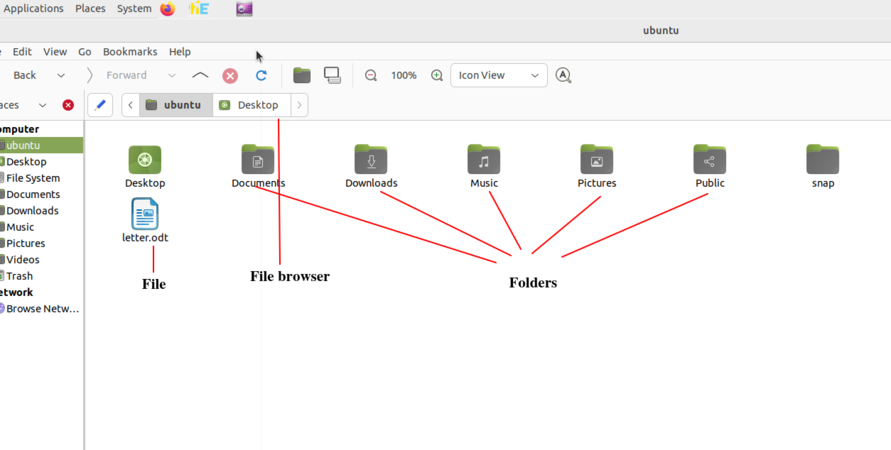
Managing files & folders

- Creating and managing files and folders - When you write an essay or paint something on a paper, you would like to keep it for future, right? You would probably put it in a hard bound folder. Maybe, if you have more than one essay or painting, you would have one folder to hold your essays and one folder to hold your paintings.
- To create new folder right click on your mouse and click on "New Folder". Rename the folder and save your files in it. You can also create many sub folders within that.
- Always give meaningful names for folders, so that you can easily search for them later.
- You can move folders, and files across folders.
- You can create a file by opening a application, and creating a new file to prepare your content. You can create text documents with LibreOffice Writer, Images with Tux Paint etc.
- Creating folders with meaningful name

Creating new folder

Once the new folder created
Giving a meaningful name


- To delete a file or folder right click on the particular file or folder and click on the "Move to Trash" option.
- Deleting the folder or files
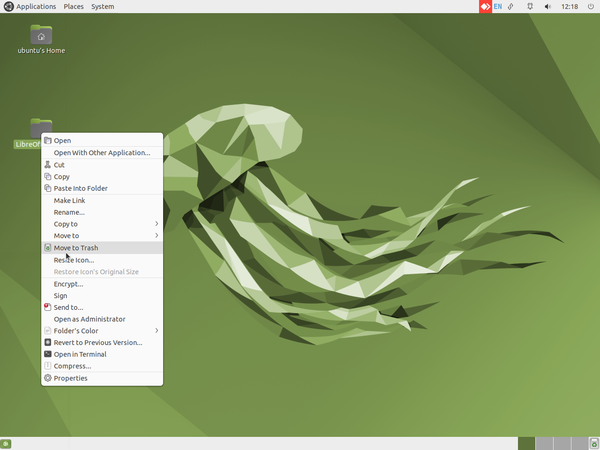
Deleting the folder

- From HOME folder you can search any files and folders which you have saved in your computer, click on search option on the toolbar and type the keywords of the file or folder, it will show the all files contains our searching keywords in your computer. If you have an idea about the location of the file you are searching, you can launch the search from within that folder itself, instead of the Home folder, this will show you a lesser number of files
- Creating and managing folders and files
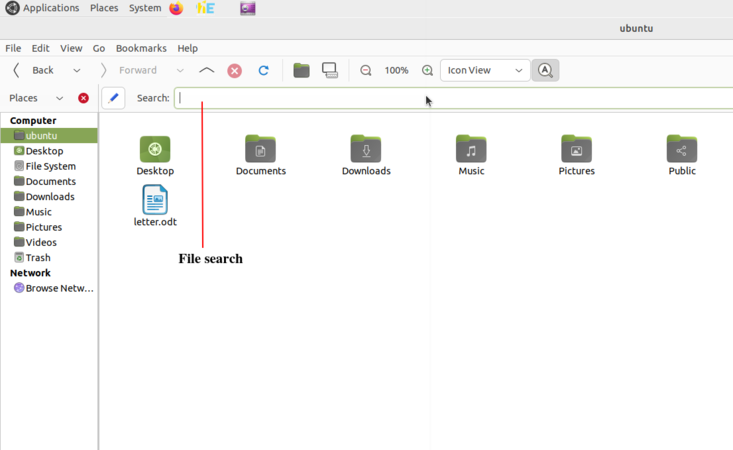
File search

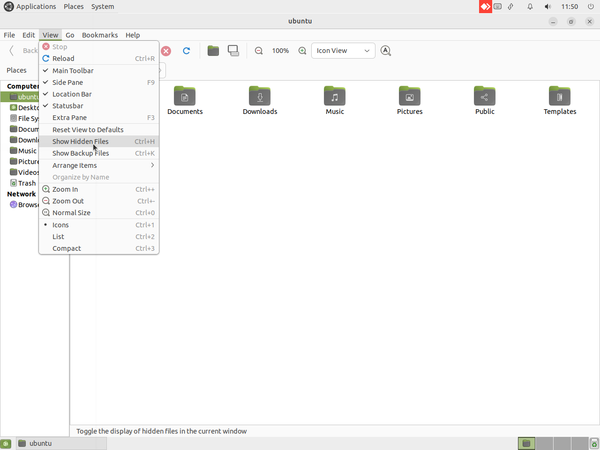
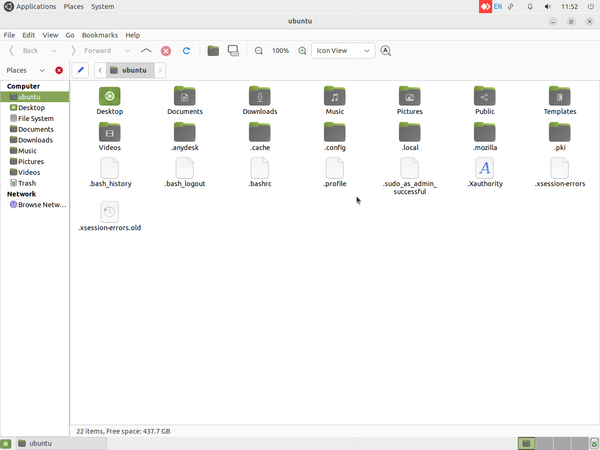
- To access the hidden files of your system open the Home folder and click on "View->Show Hidden Files" or open using the shortcut "Ctrl+H" and if you want to hide a file or folder then click on rename and add".(dot)" before the file or folder.
- Opening Hidden files
Opening the Hidden Files option
After opening the hidden files


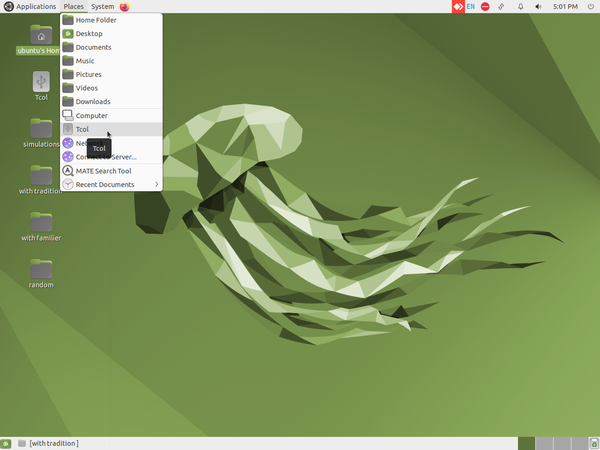
- To access the recent files click on the "Places" option from the top panel and we can see the recently viewed documents fro "Recent Documents" option.
- Accessing recently opened files

Recently opened files

- To create a shortcut of software to the "Top panel" or to the "Desktop" follow the below steps,
- Open the software by clicking on the "Application menu"
- Right click on the particular software
- If shortcut need to be created on "Top panel" click on "Add this launcher to panel", If needs to be created on "Desktop" click on "Add this launcher to Desktop".
- Creating shortcut to Top panel and Desktop

Creating shortcut to top panel and desktop

Opening files by "open with" option
- Opening files with application
Opening files with application

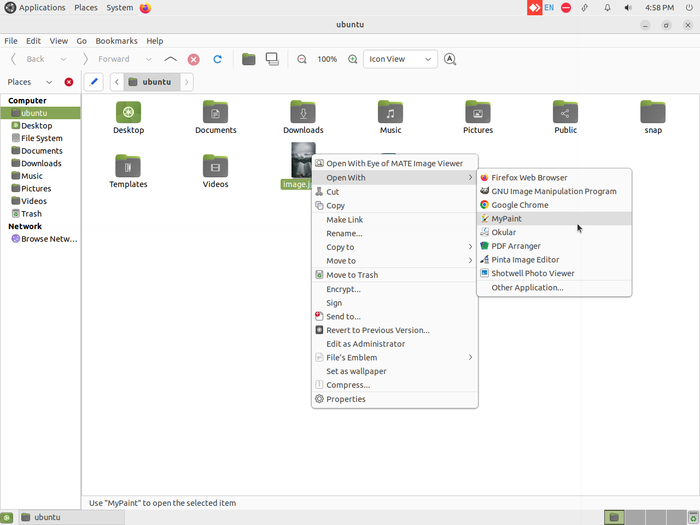
- A file can usually be opened with any given application in Ubuntu which supports that particular file. For example, an image file can be opened with image viewer, gimp, etc. So if you want to open with a application of your choice, right click on file select "Open with" to see the available options.
- File can be opened with multiple application in Ubuntu which support that particular file. For example, an image file can be opened with image viewer and also can be with Gimp, Mypaint, Kolorpaint, Shotwell viewer etc. So if you want to open the file with a application of your choice, right click on file select "Open with" to see the available multiple options.
Import files and folders from external device
- Import files and folders from external device
Access external device

Copy from external device


- You can import files from other devices. You can insert devices such as CDs, DVDs or memory cards into your computer.
- Connect the devices such as pen drives, memory card holders, external DVD drives using a cable, to your computer.
- Click on "Places" from your desktop top panel. You can see your device name.
- Click on your device name to view the files from that device.
- To import files from devices, right click on that file and click on "Copy", then paste it into your computer folder.You can copy audio and video files, that you have recorded on your mobile phone, to your computer. You can edit these files. In the same way, you can copy these and other files from your computer to your mobile phone.
You should periodically take back up of important files on your computer and store it on a pen drive or an external hard disk. So that if the hard disk of your computer has a problem or crashes, you would not lose your data entirely.
| Study how there are different kinds of connecting cables, for different devices / ports on your computer. Use the appropriate cable in each case. You can connect printers, scanners, projectors to suitable ports on your computer. |
Connecting to the WiFi or Wired Network
- To connect to the WiFi or Wired Network click on the "WiFi" symbol from the top panel and make sure "Enable Network" and "Enable WiFi" are check marked.
- Ensuring Enable Network and Enable WiFi are check marked

Clicking on WiFi symbol from the top panel and Ensuring "Enable Network" and "Enable WiFi" are check marked

- If you are connecting through Wired network connect the LAN cable to the computer and you will get a option as "Wired connection 1" below the "Ethernet Network" option. once you click on "Wired connection 1" your system will be connected to the wired network.
- Connecting to Wired Network
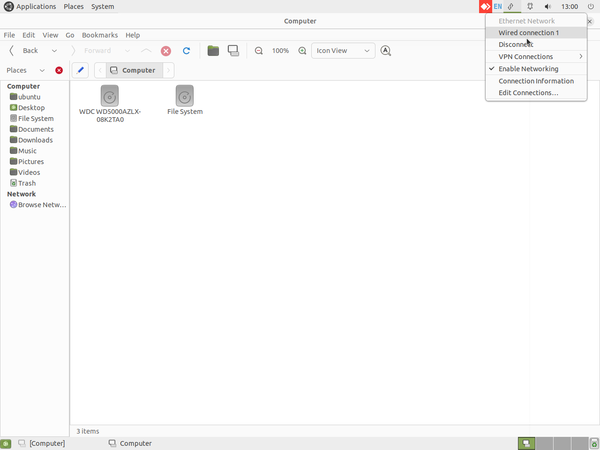
Connection to the Wired Network

Once connected to the Wired Network


- If you are connecting through WiFi click on your WiFi name shown in the list you may asked to enter your WiFi password if the WiFi is protected, Once you enter the password click on "Connect" your system will be connected to the "WiFi" Network selected by you.
![]() Note:Ensure that your computer must have a WiFi drive if you wish to connect through WiFi.
Note:Ensure that your computer must have a WiFi drive if you wish to connect through WiFi.
- Connecting to WiFi
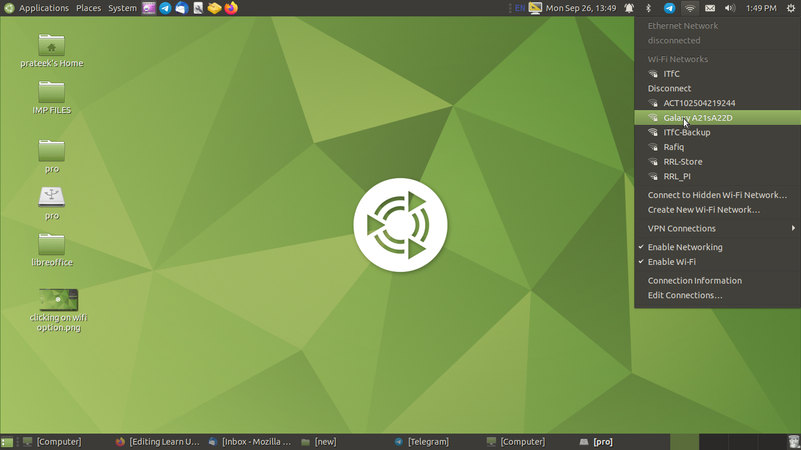
Selecting and clicking on WiFi network name

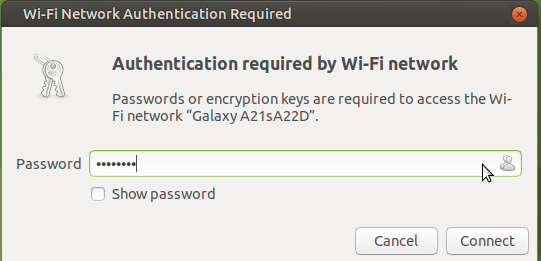
Asking to enter the password
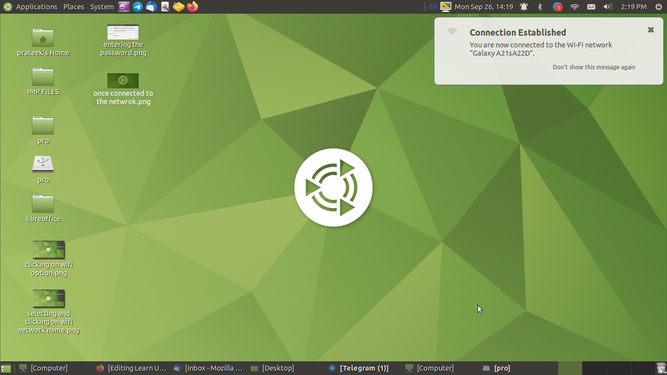
Once connected to the WiFi network


Changing user interface language in Ubuntu
English will be default interface in Ubuntu but you can also use Ubuntu in you local languages like Telugu, Kannada or Tamil.
- Changing user interface language in Ubuntu

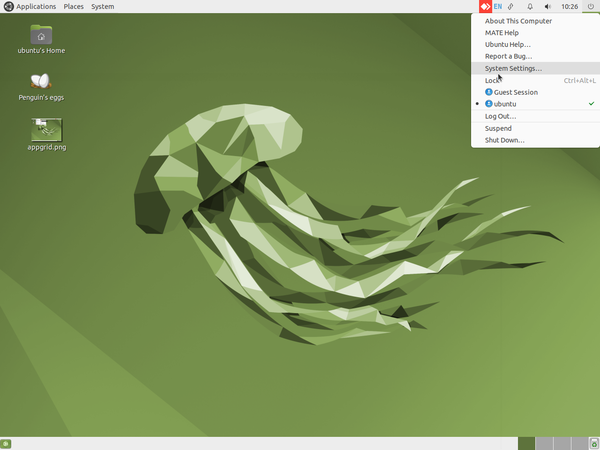
Select language support from system settings
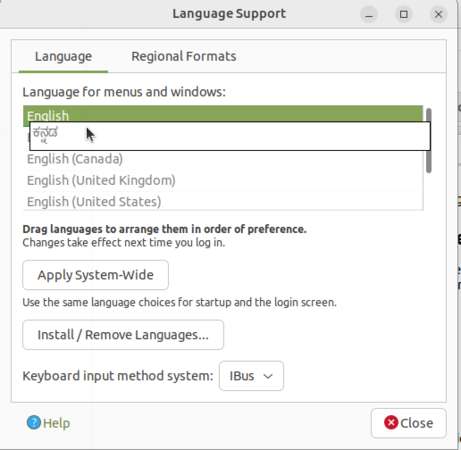
Changing the language from English to Kannada
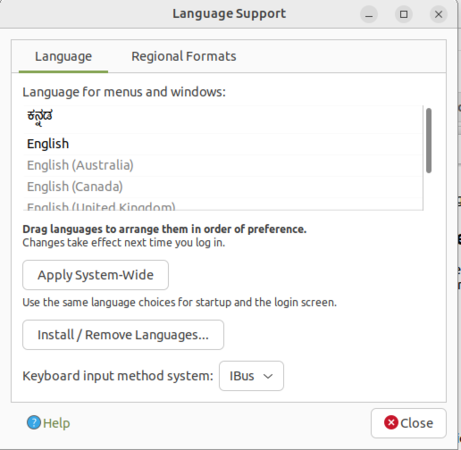
Arrange language list


- To get started, go to Applications -> System tools -> System settings -> Language support.
- It may ask you to update or add components to your current default language when you first open the dialog. If you do not have internet connect then click "Remind Me Later" and If you have good internet connection, select install to update your language lists.
- Now we are ready to change our Ubuntu interface language. Find your new language in the list, and then click and drag it to the top of the list and click Apply System-Wide.
- Once you have set you language as first and click on "system-wide", you will need to log out of your account and log in to see your new interface language.
- Ubuntu may ask if you want to update your user folders names to your new language, Select Rename folder option.
- Changing user interface language in Ubuntu
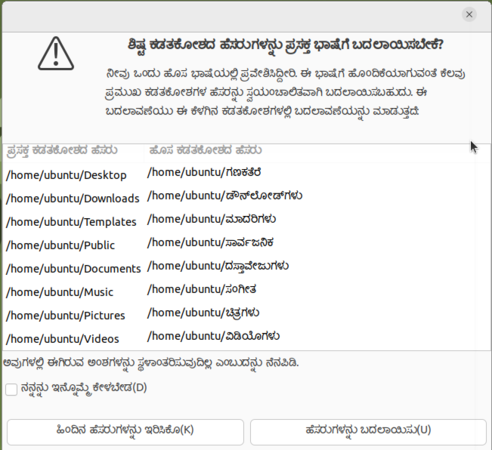
Renaming folders
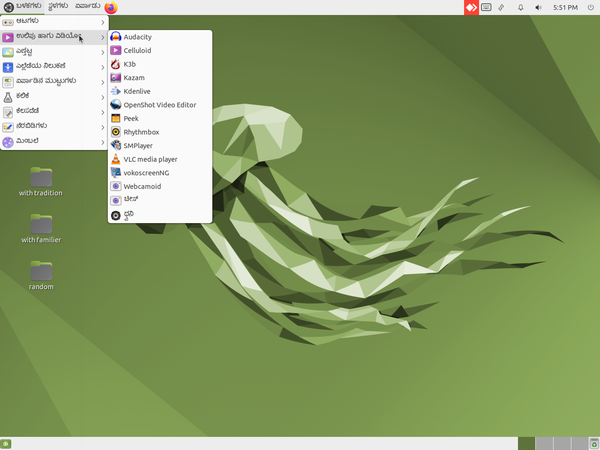
Kannada Ubuntu interface


Adding software applications to your computer system
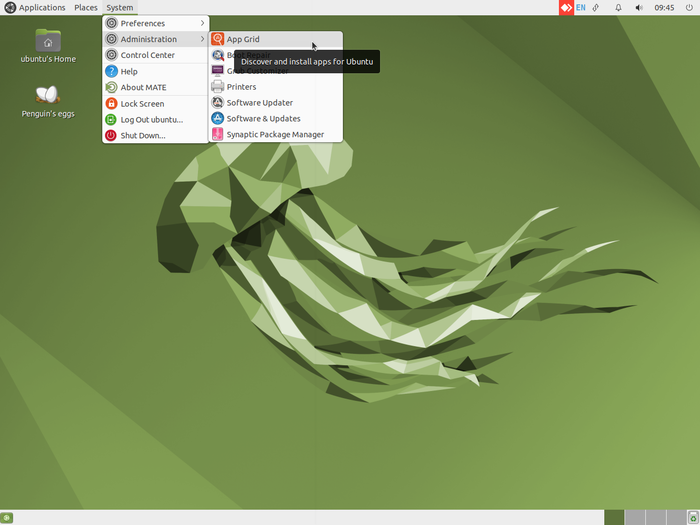
Adding software's to computer system using App Grid

You can add many more FOSS applications to your computer. Select the "System->Administration->App Grid" - You can download applications from the Internet. Teachers can explore new FOSS educational tools and utilities.
Go to Applications > System Tools -> App Grid. You will need to type the required application name in the search bar. It will show all applications with the words you have entered and you will get an option for "Install". Click on "install" if you want to install the application. If your search does not get the application(s) you want, try with fewer letters / words to search.
It may ask your Ubuntu log in password for authentication, just type your Ubuntu password press enter.
If you have doubts or difficulties in using the Ubuntu operating system or any of the applications, you can search for solutions on the Internet using a search engine or refer to 'Frequently asked questions'.
Adding your languages to type in Ubuntu
In Ubuntu by default you can type English in any application and by default it will use only Unicode fonts unless you manually changing it to non-Unicode.
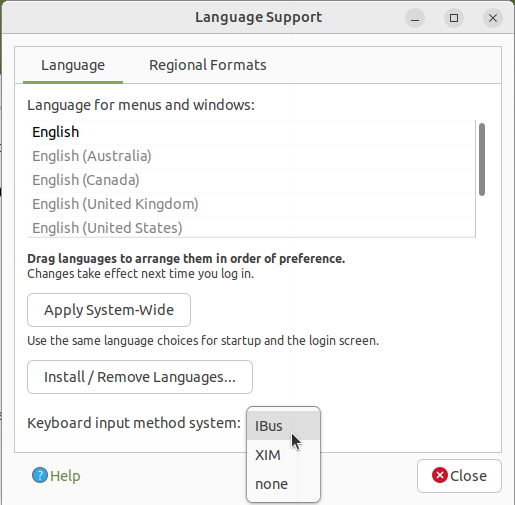
Selecting Ibus for typing language

Also you can type any your local languages in Ubuntu by adding those languages in Ibus. For typing in any local language, Ubuntu will use application called Ibus. You can follow the below step to set up Ibus and to add languages in the typing list.
- Go to Applications -> System tools -> System Settings -> Language Support ->Look at the Keyboard input method system Select IBus and close the window.
- Log-out your computer and log-in to applying this changes.
Now you have to add your languages in "Text Entry" to type it. You can type multiple language in any application by adding it in this list.
- Adding language to text entry

Selecting preferences

Adding language to text entry


- Right click on "En" from the top panel and select "Preferences".
- Once the Preferences window opens, click on "Input method->Add" option, as shown in image.
- The language list window will open, search your languages by typing it in search box and click on the language. It will show the all the typing methods for the language. Choose a keyboard layout you are comfortable with and click "Add".
- Yes, you are finished all the set up, after this your language list looks like below.
- Adding language to text entry
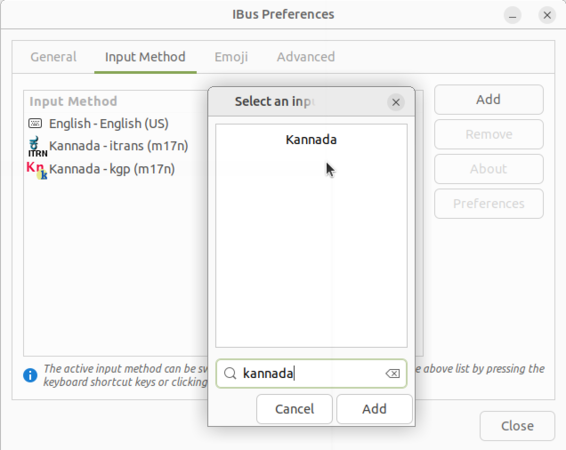
Searching Kannada language in search box
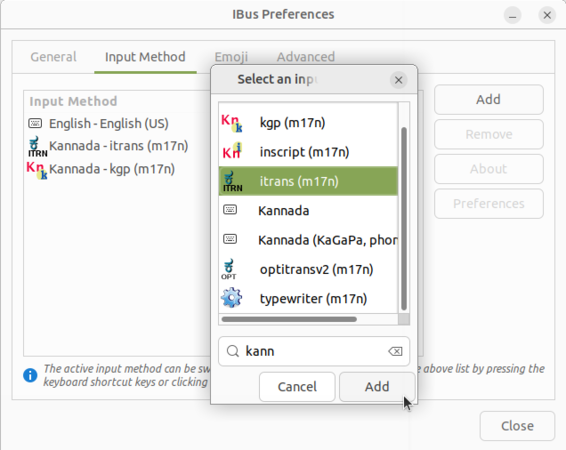
Selecting keyboard layout
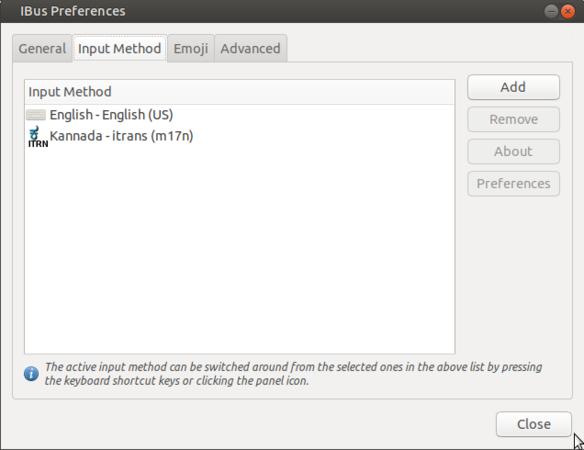
after adding language


Now its time to type your added language in most of the applications. Click on the language panel "En" (right top corner of the screen) and select language in which you want to type. When you select language, icon will change to that language. The very important is you can add multiple languages in this list.
Advanced features
Ubuntu contains a wide range of software that includes LibreOffice, Firefox, Thunderbird and several games and Educational tools. Many additional software packages are accessible from the built in Ubuntu Software Center known as "App Grid". More complex commands can be given to the computer using the 'Terminal' interface, this is really for those who have technical expertise.
![]() Note:To Know the installation process of Ubuntu please go through the below link
Note:To Know the installation process of Ubuntu please go through the below link
Click here to Know the Installation process.