Difference between revisions of "Learn Tux Paint"
| (46 intermediate revisions by 8 users not shown) | |||
| Line 1: | Line 1: | ||
| − | + | ''[http://karnatakaeducation.org.in/KOER/index.php/%E0%B2%9F%E0%B2%95%E0%B3%8D%E0%B2%B8%E0%B3%8D%E2%80%8C_%E0%B2%AA%E0%B3%88%E0%B2%82%E0%B2%9F%E0%B3%8D%E2%80%8C_%E0%B2%95%E0%B2%B2%E0%B2%BF%E0%B2%AF%E0%B2%BF%E0%B2%B0%E0%B2%BF ಕನ್ನಡದಲ್ಲಿ ನೋಡಿ]'' | |
| − | = | + | <div class="noprint" style="float:right; border:1px solid blue;width:300px;background-color:#F5F5F5;padding:2px;"> |
| − | = | + | {| cellspacing="0" |
| − | + | | [[File:Book.jpg|none|80px|Book image]] | |
| − | + | | style="padding-left:2px;" | Go to <br /> [[ICT_student_textbook/Communication with graphics|ICT student textbook]] | |
| − | == | + | [[ICT teacher handbook]] |
| − | + | |}</div> | |
| − | + | ===Introduction=== | |
| − | == | + | ====Basic information==== |
| − | |||
| − | |||
| − | |||
| − | |||
{| class="wikitable" | {| class="wikitable" | ||
| − | + | |- | |
| + | |ICT Competency | ||
| + | |Tux Paint is a free and open source application for supporting basic digital literacy by getting familiar with the mouse as a method of input. | ||
| + | This tool can also be used for graphic resource creation and editing. | ||
| + | |- | ||
| + | |Educational application and relevance | ||
| + | |Tux Paint is useful for creating pictures, simple animations and adding text to images to create picture stories. | ||
| + | |- | ||
| + | |Version | ||
| + | |Version - 0.9.28 | ||
| + | |- | ||
| + | |Configuration | ||
| + | |No specific configuration requirements | ||
| + | |- | ||
| + | |Other similar applications | ||
| + | |[https://en.wikipedia.org/wiki/GIMP GIMP], [https://en.wikipedia.org/wiki/MyPaint MyPaint], [https://en.wikipedia.org/wiki/KolourPaint Kolourpaint] | ||
| + | |- | ||
| + | |The application on mobiles and tablets | ||
| + | |There are graphics editors on the mobile / tablet platform like 'Photo Editor' | ||
| + | |- | ||
| + | |Development and community help | ||
| + | |[https://www.youtube.com/watch?v=O6hKk-0dzKA&index=1&list=PL4895DA72B06A794C Tux paint tutorials] | ||
| + | [http://www.tuxpaint.org/ Official Website] | ||
|} | |} | ||
| − | == | + | ====Overview of features==== |
| − | It | + | Tux Paint is a graphics editor. It can be used for digital art introduction as well as to make simple animation in the form of slide show. It has a simple interface with a drawing area, drawing tools, color palettes, shapes and stamps. The paint brushes can be used to draw free hand or with previously defined shapes. It has been designed to encourage young learners with cartoon mascots and with cartoon sound effects. You can view detailed features [http://tuxpaint.org/features here]. |
| + | Selector, providing various objects you can select from (e.g., brushes, fonts or sub-tools, depending on the current tool). | ||
| − | == | + | ==== Installation ==== |
| − | |||
| − | |||
| − | |||
| − | |||
| − | |||
| − | + | ===== For Ubuntu OS ===== | |
| + | # The application is part of the Ubuntu custom distribution. | ||
| + | # In case you do not find it on your computer, you can install by choosing “Tux Paint” in Ubuntu Software Center | ||
| + | # If you would like to install through the terminal follow these steps below: | ||
| + | ## Open terminal by clicking (Ctrl+Alt+T), | ||
| + | ## Once Window page is open, in front of dollar($) symbol just type below command. | ||
| + | ## sudo apt-get install tuxpaint | ||
| − | == | + | ===== For Windows OS ===== |
| − | + | Tux Paint for Windows comes as two parts, the main program and the optional add-on 'stamps' collection. | |
| + | #You can visit [http://www.tuxpaint.org/download/windows/ this link] to download the install able files in to your computer. | ||
| + | #Go to those downloaded place and install both files by double clicking on it. | ||
| − | == | + | ===== For MAC OS ===== |
| − | + | Tux Paint for macOS comes as three disk image (<code>.dmg</code>) files. One contains main program (Tux Paint), another contains the configuration program (Tux Paint Config.) for parents and teachers. | |
| − | + | #You can visit [http://www.tuxpaint.org/download/macosx/ this link] to download files to your computer. | |
| − | + | #Once your download these files, copy three of them to your hard drive's <code>Applications</code> folder. The third contains an application that installs the optional 'stamps' collection. | |
| − | |||
| − | |||
| − | =Working with the application= | + | ===Working with the application=== |
| − | == | + | ====Getting familiar with the application==== |
| + | <gallery mode="packed" heights="400"> | ||
| + | File:Tux Paint 1 Main page.png|The Tux Paint interface | ||
| + | </gallery> | ||
| + | {{clear}} | ||
| + | When we open the Tux Paint we will see this image. This window or main screen contains following sections: | ||
| + | #''Left side'': Tool bar contains drawing and editing controls. | ||
| + | #''Middle'': Drawing canvas. The largest part of the screen, in the centre, is the drawing canvas. | ||
| + | #''Right Side'': Selector; depending on the tool selected, the the selector shows different options available for the tool. For example, when the Paint Brush tool is selected, it shows the various brushes available. When the Rubber Stamp tool is selected, it shows the different shapes you can use. | ||
| + | #''Lower'': Colours; a palette of available colours are shown near the bottom of the screen. | ||
| + | #''Bottom'': Help Area at the very bottom of the screen, Tux, where the Linux Penguin, provides tips and other information while you draw. | ||
| + | {{clear}} | ||
| − | + | ====Creating images with brushes and shapes==== | |
| − | + | <gallery mode="packed" heights="300px"> | |
| − | + | File:Tux Paint 2 Brush tool.png|Freehand drawing using the brush | |
| − | + | File:Tux_Paint.png|Working with stamps (black and white) | |
| − | + | </gallery> | |
| − | |||
| − | |||
| − | |||
| − | |||
| − | |||
| − | |||
| − | |||
| − | |||
| − | |||
| − | |||
| − | |||
| − | | | ||
| − | |||
| − | + | <gallery mode="packed" heights="300px"> | |
| − | + | File:Tux Paint 3 Work done stamp on Tux Paint page.png|Working with stamps | |
| − | + | </gallery> | |
| − | |||
| − | |||
| − | + | The above images show the different ways of creating images with Tux Paint. | |
| − | The | + | # The first image shows you how to draw freehand. You can use the "Brush" tool, select the kind of "Brush" from the selector, and draw freehand. By choosing from the "Color palette", you can also make a color sketch. For more fun, you can also listen to sounds as you draw. The bigger the brush, the lower the pitch. You can, of course, mute the sound. |
| + | # The second and third images show shapes unfilled and filled in different colors. In addition to freehand, Tux Paint allows you to select predefined shapes and stamps to use in your creation. This makes the tool quite versatile. You can select the shapes tool and select the kind of shape from the right hand side selector panel. For example, select "rectangle" shape, draw a rectangle with drag (press left click and keep pressed) and drop (release left click), if you didn't keep press mouse and release, it will keep moving. Press and release is required to complete the drawing. | ||
| − | == | + | ====Adding text to images ==== |
| − | + | <gallery mode="packed" heights="400"> | |
| − | + | File:Tux paint - adding text.png|Adding text | |
| − | + | </gallery> | |
| − | |||
| − | + | There is also a "text" tool, which allows you to type in text in the canvas. By combining images and text, you can create simple cartoon strip. For adding text, Select "Text" tool from left tool bar, click on the screen where you need to add text and start typing. from the right side font window you can change the text font. Also change the text color from the bottom color tool bar. | |
| − | + | {{clear}} | |
| − | |||
| − | |||
| − | |||
| − | == | + | ====Creating animations==== |
| − | + | <gallery mode="packed" heights="250px"> | |
| − | + | File:Tuxpaint_animation.png|Creating a sequence of images | |
| − | + | File:Tuxpaintanimation1.png|Numbering the images | |
| − | + | </gallery> | |
| − | |||
| − | |||
| − | = | + | <gallery mode="packed" heights="200px"> |
| − | + | File:Animation_Play.png|Animating the images using a slideshow | |
| + | </gallery> | ||
| − | + | #It is possible to make simple animations with the pictures you created. In the first step, shown in the first image, you can use Tux Paint to create a series of images you want to build the animation with. For example, draw the life stages of a plant and you can start with a seed being blown from a mature plant. You can add as many images as you want to tell your story. Each time you can make slight changes to each drawing to create the idea of animation. | |
| + | #The next step is to number the images and play them using slideshow, shown in the second image above. Numbering is done by simply clicking on slides. The bars that you see next to the play button allow you to select the speed at which the slideshow will run and hence determine how your animation will look. | ||
| − | + | ====Saving the files and formats==== | |
| − | + | # Once you have created/ edited your images, you can click on the "Save" button on the left panel. If it is a new creation, Tux Paint will simply save. If you are editing an existing image Tux Paint will give you an option of replacing the older file or saving a new file. | |
| + | # The files will be saved as ".png". | ||
| + | To View the saved files the files saved by Tux Paint are available in your ''home'' folder, under the sub folder ''.tuxpaint'' saved. The "." preceding the tuxpaint makes this folder 'hidden'. To unhide (show) and open this folder you can do 'CTRL+H' when you have opened your home folder. You can then see all hidden folders. You can copy these files to any other folder you want. | ||
| − | |||
| − | + | # To access Tux Paint saved images in windows look in "<code>C:\Users\''Username''\AppData\Roaming\TuxPaint\saved</code>" | |
| − | + | # To access Tux Paint saved images in UBUNTU look in "<code>/home/''username''/.tuxpaint/saved/</code>" | |
| + | # To access Tux Paint saved images in Mac OS X look in "<code>/Users/''Username''/Library/Applicaton Support/TuxPaint/saved/</code>" | ||
| − | = | + | ====Advanced features==== |
| − | + | You can copy image files (only in png format) to the Tux Paint folder for saved files under the sub folder ''/.tuxpaint'' saved in your home folder. You can open these using Tux Paint and edit it within Tux Paint. | |
| − | =Ideas for resource creation= | + | ===Ideas for resource creation=== |
| − | #It is easy to use Tux Paint to create simple drawings. These drawings can be a combination of what you can draw, combined with the | + | #It is easy to use Tux Paint to create simple drawings. These drawings can be a combination of what you can draw, combined with the stamps or images already available in the application. Thus image/graphics resources can be created with Tux Paint. These images can be inserted in documents to create picture essays. |
| − | #It is also possible to create simple animations in Tux Paint. You can create a series of drawings, with small modifications as required. You can sequence these drawings to show one after another. You can then | + | #It is also possible to create simple animations in Tux Paint. You can create a series of drawings, with small modifications as required. You can sequence these drawings to show one after another. You can then "Play" the slides for to create an animation. |
| − | =References= | + | ===References=== |
[https://en.wikipedia.org/wiki/Tux_Paint Wikipedia] | [https://en.wikipedia.org/wiki/Tux_Paint Wikipedia] | ||
[[Category:Explore an application]] | [[Category:Explore an application]] | ||
Latest revision as of 04:53, 23 June 2022

Introduction
Basic information
| ICT Competency | Tux Paint is a free and open source application for supporting basic digital literacy by getting familiar with the mouse as a method of input.
This tool can also be used for graphic resource creation and editing. |
| Educational application and relevance | Tux Paint is useful for creating pictures, simple animations and adding text to images to create picture stories. |
| Version | Version - 0.9.28 |
| Configuration | No specific configuration requirements |
| Other similar applications | GIMP, MyPaint, Kolourpaint |
| The application on mobiles and tablets | There are graphics editors on the mobile / tablet platform like 'Photo Editor' |
| Development and community help | Tux paint tutorials |
Overview of features
Tux Paint is a graphics editor. It can be used for digital art introduction as well as to make simple animation in the form of slide show. It has a simple interface with a drawing area, drawing tools, color palettes, shapes and stamps. The paint brushes can be used to draw free hand or with previously defined shapes. It has been designed to encourage young learners with cartoon mascots and with cartoon sound effects. You can view detailed features here. Selector, providing various objects you can select from (e.g., brushes, fonts or sub-tools, depending on the current tool).
Installation
For Ubuntu OS
- The application is part of the Ubuntu custom distribution.
- In case you do not find it on your computer, you can install by choosing “Tux Paint” in Ubuntu Software Center
- If you would like to install through the terminal follow these steps below:
- Open terminal by clicking (Ctrl+Alt+T),
- Once Window page is open, in front of dollar($) symbol just type below command.
- sudo apt-get install tuxpaint
For Windows OS
Tux Paint for Windows comes as two parts, the main program and the optional add-on 'stamps' collection.
- You can visit this link to download the install able files in to your computer.
- Go to those downloaded place and install both files by double clicking on it.
For MAC OS
Tux Paint for macOS comes as three disk image (.dmg) files. One contains main program (Tux Paint), another contains the configuration program (Tux Paint Config.) for parents and teachers.
- You can visit this link to download files to your computer.
- Once your download these files, copy three of them to your hard drive's
Applicationsfolder. The third contains an application that installs the optional 'stamps' collection.
Working with the application
Getting familiar with the application
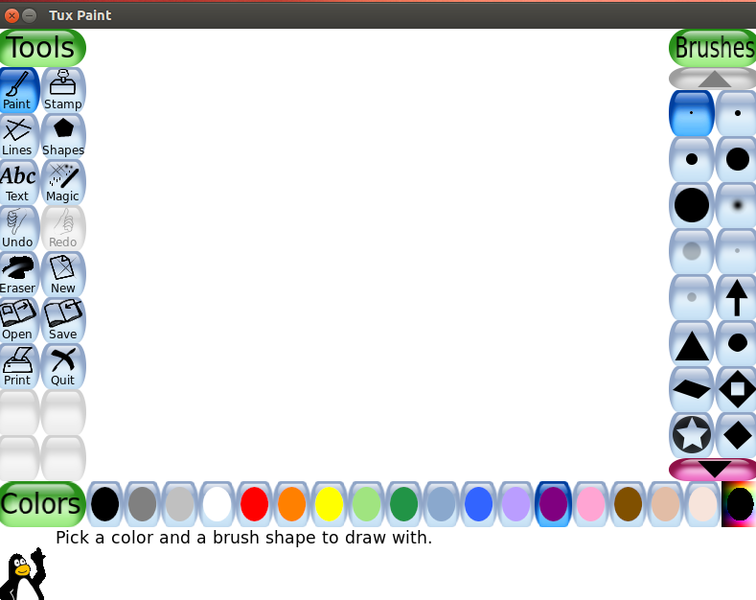
The Tux Paint interface

When we open the Tux Paint we will see this image. This window or main screen contains following sections:
- Left side: Tool bar contains drawing and editing controls.
- Middle: Drawing canvas. The largest part of the screen, in the centre, is the drawing canvas.
- Right Side: Selector; depending on the tool selected, the the selector shows different options available for the tool. For example, when the Paint Brush tool is selected, it shows the various brushes available. When the Rubber Stamp tool is selected, it shows the different shapes you can use.
- Lower: Colours; a palette of available colours are shown near the bottom of the screen.
- Bottom: Help Area at the very bottom of the screen, Tux, where the Linux Penguin, provides tips and other information while you draw.
Creating images with brushes and shapes
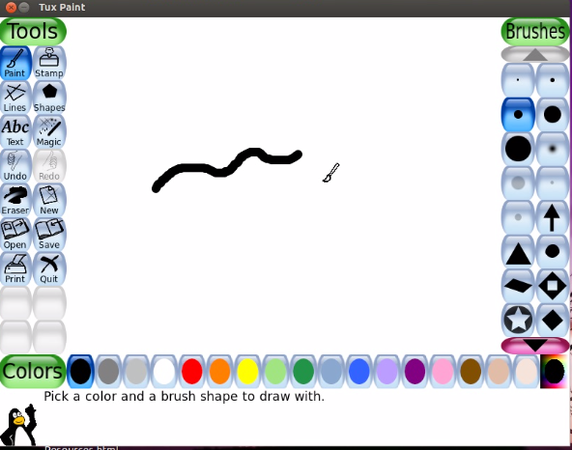
Freehand drawing using the brush

Working with stamps (black and white)


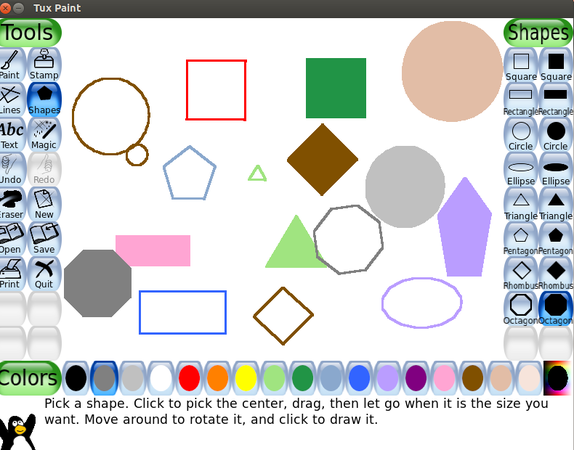
Working with stamps

The above images show the different ways of creating images with Tux Paint.
- The first image shows you how to draw freehand. You can use the "Brush" tool, select the kind of "Brush" from the selector, and draw freehand. By choosing from the "Color palette", you can also make a color sketch. For more fun, you can also listen to sounds as you draw. The bigger the brush, the lower the pitch. You can, of course, mute the sound.
- The second and third images show shapes unfilled and filled in different colors. In addition to freehand, Tux Paint allows you to select predefined shapes and stamps to use in your creation. This makes the tool quite versatile. You can select the shapes tool and select the kind of shape from the right hand side selector panel. For example, select "rectangle" shape, draw a rectangle with drag (press left click and keep pressed) and drop (release left click), if you didn't keep press mouse and release, it will keep moving. Press and release is required to complete the drawing.
Adding text to images
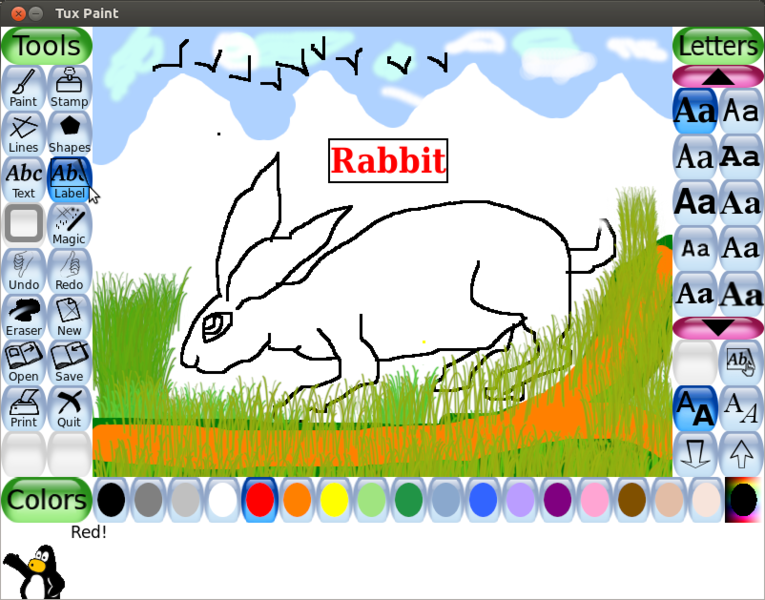
Adding text

There is also a "text" tool, which allows you to type in text in the canvas. By combining images and text, you can create simple cartoon strip. For adding text, Select "Text" tool from left tool bar, click on the screen where you need to add text and start typing. from the right side font window you can change the text font. Also change the text color from the bottom color tool bar.
Creating animations
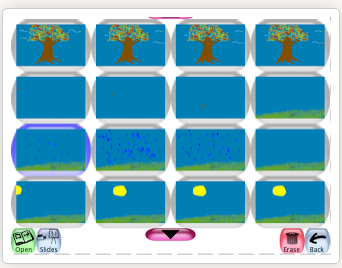
Creating a sequence of images
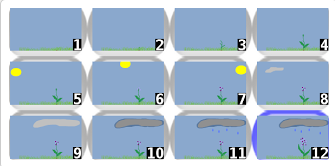
Numbering the images


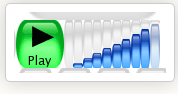
Animating the images using a slideshow

- It is possible to make simple animations with the pictures you created. In the first step, shown in the first image, you can use Tux Paint to create a series of images you want to build the animation with. For example, draw the life stages of a plant and you can start with a seed being blown from a mature plant. You can add as many images as you want to tell your story. Each time you can make slight changes to each drawing to create the idea of animation.
- The next step is to number the images and play them using slideshow, shown in the second image above. Numbering is done by simply clicking on slides. The bars that you see next to the play button allow you to select the speed at which the slideshow will run and hence determine how your animation will look.
Saving the files and formats
- Once you have created/ edited your images, you can click on the "Save" button on the left panel. If it is a new creation, Tux Paint will simply save. If you are editing an existing image Tux Paint will give you an option of replacing the older file or saving a new file.
- The files will be saved as ".png".
To View the saved files the files saved by Tux Paint are available in your home folder, under the sub folder .tuxpaint saved. The "." preceding the tuxpaint makes this folder 'hidden'. To unhide (show) and open this folder you can do 'CTRL+H' when you have opened your home folder. You can then see all hidden folders. You can copy these files to any other folder you want.
- To access Tux Paint saved images in windows look in "
C:\Users\Username\AppData\Roaming\TuxPaint\saved" - To access Tux Paint saved images in UBUNTU look in "
/home/username/.tuxpaint/saved/" - To access Tux Paint saved images in Mac OS X look in "
/Users/Username/Library/Applicaton Support/TuxPaint/saved/"
Advanced features
You can copy image files (only in png format) to the Tux Paint folder for saved files under the sub folder /.tuxpaint saved in your home folder. You can open these using Tux Paint and edit it within Tux Paint.
Ideas for resource creation
- It is easy to use Tux Paint to create simple drawings. These drawings can be a combination of what you can draw, combined with the stamps or images already available in the application. Thus image/graphics resources can be created with Tux Paint. These images can be inserted in documents to create picture essays.
- It is also possible to create simple animations in Tux Paint. You can create a series of drawings, with small modifications as required. You can sequence these drawings to show one after another. You can then "Play" the slides for to create an animation.