Difference between revisions of "Learn Record My Desktop"
| (5 intermediate revisions by 4 users not shown) | |||
| Line 1: | Line 1: | ||
| + | ''[http://karnatakaeducation.org.in/KOER/index.php/%E0%B2%B0%E0%B3%86%E0%B2%95%E0%B2%BE%E0%B2%B0%E0%B3%8D%E0%B2%A1%E0%B3%8D%E2%80%8C_%E0%B2%AE%E0%B3%88_%E0%B2%A1%E0%B3%86%E0%B2%B8%E0%B3%8D%E0%B2%95%E0%B3%8D%E2%80%8C%E0%B2%9F%E0%B2%BE%E0%B2%AA%E0%B3%8D_%E0%B2%95%E0%B2%B2%E0%B2%BF%E0%B2%AF%E0%B2%BF%E0%B2%B0%E0%B2%BF ಕನ್ನಡದಲ್ಲಿ ನೋಡಿ]'' | ||
{{Template:Book-sidebar}} | {{Template:Book-sidebar}} | ||
| − | =Introduction= | + | ===Introduction=== |
| − | + | ====Basic information==== | |
| + | {| class="wikitable" | ||
| + | |- | ||
| + | |ICT Competency | ||
| + | |RecordMydesktop is an free and open source application for supporting to record your computer screen along with your input voice. <br> | ||
| + | <br> | ||
| + | This tool can also be used for video resource creation. | ||
| + | |- | ||
| + | |Educational application and relevance | ||
| + | |Creating video resources, combining audio, text, image and video. This can be used in digital story telling activities | ||
| + | |- | ||
| + | |Version | ||
| + | |recordMyDesktop v0.3.8.1 | ||
| + | |- | ||
| + | |Other similar applications | ||
| + | |[https://launchpad.net/kazam Kazam], [http://www.maartenbaert.be/simplescreenrecorder/ Simple screen recorder] | ||
| + | |- | ||
| + | |The application on mobiles and tablets | ||
| + | |There are many similar application are available in android mobile phones. Example,. [https://play.google.com/store/apps/details?id=com.hecorat.screenrecorder.free&hl=en AZ screen recorder] | ||
| + | |- | ||
| + | |Development and community help | ||
| + | |[http://recordmydesktop.sourceforge.net/rug/toc.php RecordMydesktop Help] | ||
| − | + | |} | |
| − | |||
| − | |||
| − | |||
| − | |||
| − | |||
| − | |||
| − | |||
| − | |||
| − | |||
| − | |||
| − | |||
| − | |||
| − | |||
| − | |||
| − | |||
| − | |||
| − | |||
| − | |||
| − | |||
| − | |||
| − | |||
| − | |||
| − | |||
| − | + | ====Overview of features==== | |
| − | + | The RecordMyDesktop software records the computer output display as the video and audio. This can be used to record the functioning of a software or any educational application. In addition to the audio played on the computer as part of the running of the application, additional audio spoken and provided as an input to the computer can also be recorded as a part of the video. | |
| + | Only you have to make sure that, when you are recording, you are not displaying any copy righted materials on the screen. | ||
| − | == | + | ====Installation==== |
| + | #The application is part of the Ubuntu custom distribution. | ||
| + | #In case you do not find it on your computer, you can install by choosing “gtk-recordmydesktop” in Ubuntu Software Centre | ||
| + | #If you would like to install through the terminal follow these steps below: | ||
| + | ##Open terminal by clicking (Ctrl+Alt+T), | ||
| + | ##Once Window page is open, in front of dollar($) symbol just type below command. | ||
| + | ##'''sudo apt-get install gtk-recordmydesktop''' | ||
| + | ## just type your password(it will not display on your screen), press '''Enter'''. | ||
| − | =Working with | + | === Working with application === |
| − | == | ||
| − | |||
| − | |||
| − | |||
| − | |||
| − | |||
| − | |||
| − | + | ==== Getting familiar with application ==== | |
| + | [[File:RecordMyDesktop 1 Main Window.png|450px|left|frame|The RecordMyDesktop interface]] | ||
| + | When we open the RecordMyDesktop we will see this main window. This main window contains the following sections. | ||
| + | # Select window : From this option we can define area to record. | ||
| + | # Record : This will start you recording session. | ||
| + | # Video and Audio quality : These two options will use to configure quality of your video and audio. | ||
| + | # Save as : From this option you can give file name and the path for your future recording videos. | ||
| + | # Quit : This will close the recordmydesktop application. | ||
| + | # Advanced : Under this advanced option, we can set up record my desktop more effectively like number of frames, audio jacks set up, and the CPU performance. | ||
| − | + | ==== Getting start with simple screen casting with full window ==== | |
| − | + | <gallery mode="packed" heights="200px"> | |
| − | + | File:RecordMyDesktop 6 Red Button.png|Selecting record option from top bar menu | |
| − | + | File:Exporting recording as video.png|Exporting video | |
| + | </gallery> | ||
| − | + | 1. The simplest way to start a recording is to simply left click on the tray icon on the top menu (as see this image), or click the record button on the main window. <br> | |
| − | + | When you click on Record button, desktop recording will start. The recording can be paused and resumed at any time, by right clicking on the RecordMyDesktop icon in the top panel and selecting Pause (and later Resume when you want to continue recording). Clicking on ‘Stop’ will stop the recording and initiate the export of the video output. <br> | |
| − | + | <br> | |
| − | + | 2. Once we click on the "Stop" button, we need to wait till the export is completed, to get the output file. If we close the process before, we will lose the output file. The output file will be saved in your "Home" folder by default, with .OGV format. The file will usually have a name like ‘out.ogv’, however you can use the ‘save as’ button on the RecordMyDesktop screen to give a file name. | |
| − | == | + | ==== Defining area to Record ==== |
| − | |||
| − | == | + | <gallery mode="packed" heights="250px"> |
| − | + | File:RecordMyDesktop 2 defining area.png|Click on select area on screen | |
| − | + | File:Record my desktop - selected area.png| Area is defined to record | |
| − | + | </gallery> | |
| − | + | # It is possible to select the screen window you want to record. Click on Select window, you will be asked to grab the area to select. You can select only that part of the screen that you want to record. This is useful if you are opening photos or playing a video on only part of your screen and want to record that part only. | |
| + | # After you have finished a selecting area, the area you have selected will be shown in the the preview window. Depending on your settings, an optional frame (see the highlighted box in the second image) might also appear on your real display, around the recording area. Now its ready to start recording, click on the "Record" option from the top panel "recordmydesktop" icon(small red circle). | ||
| + | # If you are adding a narration, make sure you have connected headphones for audio input and set the input volume settings (from sound settings) in your computer to 100%. Make sure the input is not muted before you start the recording. Otherwise, the audio will not get captured. | ||
| + | # Once you want finish the video, click on "Stop" button from the top recordmydesktop menu. It will start exporting your session as video. | ||
| − | = | + | ==== Saving and exporting ==== |
| − | + | File export and saving process are same in this application. After you start the recording, by clicking on "Stop" to stop the recording it will start to export your session in video formate. This video will be in the .ogv format. These video will be save in your "Home folder" | |
| − | + | ==== Advanced features ==== | |
| − | + | If you select "advanced" option from main menu, you will find following options. | |
| − | + | # Frames per second : Setting it to a higher value will produce smoother recordings, but it will require more processing power. It will also increase the size of the video. <br> | |
| − | + | # Sound : The sound tab lets you configure the quality of the sound capture, or the recorded ports, when using JACK. | |
| − | |||
| − | |||
| − | |||
| − | |||
| − | |||
| − | |||
| − | |||
| − | = | + | === Ideas for resource creation === |
| − | + | # This is very useful for creating simple video resources by adding narration to a process being done using an application. For example, you can run a simulation on your screen or an image slide show and add your narration to it as the application runs. | |
| − | + | # You can also use an existing video and dub it in another language | |
| + | # Please make sure that in both (1) and (2) the original visual resource/ video is licensed for reuse with modification. | ||
| − | =References= | + | === References === |
| − | [ | + | # [https://en.wikipedia.org/wiki/RecordMyDesktop Wikipedia] |
| − | [ | + | # [http://recordmydesktop.sourceforge.net/about.php RecodMyDesktop] |
[[Category:Explore an application]] | [[Category:Explore an application]] | ||
Latest revision as of 14:18, 11 August 2018

Introduction
Basic information
| ICT Competency | RecordMydesktop is an free and open source application for supporting to record your computer screen along with your input voice.
|
| Educational application and relevance | Creating video resources, combining audio, text, image and video. This can be used in digital story telling activities |
| Version | recordMyDesktop v0.3.8.1 |
| Other similar applications | Kazam, Simple screen recorder |
| The application on mobiles and tablets | There are many similar application are available in android mobile phones. Example,. AZ screen recorder |
| Development and community help | RecordMydesktop Help |
Overview of features
The RecordMyDesktop software records the computer output display as the video and audio. This can be used to record the functioning of a software or any educational application. In addition to the audio played on the computer as part of the running of the application, additional audio spoken and provided as an input to the computer can also be recorded as a part of the video. Only you have to make sure that, when you are recording, you are not displaying any copy righted materials on the screen.
Installation
- The application is part of the Ubuntu custom distribution.
- In case you do not find it on your computer, you can install by choosing “gtk-recordmydesktop” in Ubuntu Software Centre
- If you would like to install through the terminal follow these steps below:
- Open terminal by clicking (Ctrl+Alt+T),
- Once Window page is open, in front of dollar($) symbol just type below command.
- sudo apt-get install gtk-recordmydesktop
- just type your password(it will not display on your screen), press Enter.
Working with application
Getting familiar with application

When we open the RecordMyDesktop we will see this main window. This main window contains the following sections.
- Select window : From this option we can define area to record.
- Record : This will start you recording session.
- Video and Audio quality : These two options will use to configure quality of your video and audio.
- Save as : From this option you can give file name and the path for your future recording videos.
- Quit : This will close the recordmydesktop application.
- Advanced : Under this advanced option, we can set up record my desktop more effectively like number of frames, audio jacks set up, and the CPU performance.
Getting start with simple screen casting with full window
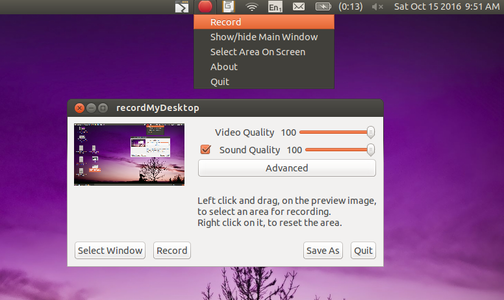
Selecting record option from top bar menu
Exporting video


1. The simplest way to start a recording is to simply left click on the tray icon on the top menu (as see this image), or click the record button on the main window.
When you click on Record button, desktop recording will start. The recording can be paused and resumed at any time, by right clicking on the RecordMyDesktop icon in the top panel and selecting Pause (and later Resume when you want to continue recording). Clicking on ‘Stop’ will stop the recording and initiate the export of the video output.
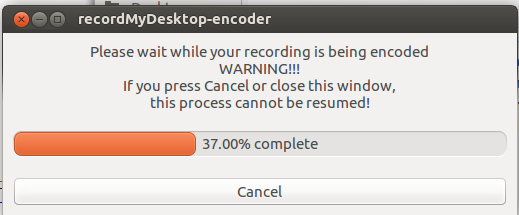
2. Once we click on the "Stop" button, we need to wait till the export is completed, to get the output file. If we close the process before, we will lose the output file. The output file will be saved in your "Home" folder by default, with .OGV format. The file will usually have a name like ‘out.ogv’, however you can use the ‘save as’ button on the RecordMyDesktop screen to give a file name.
Defining area to Record
Click on select area on screen
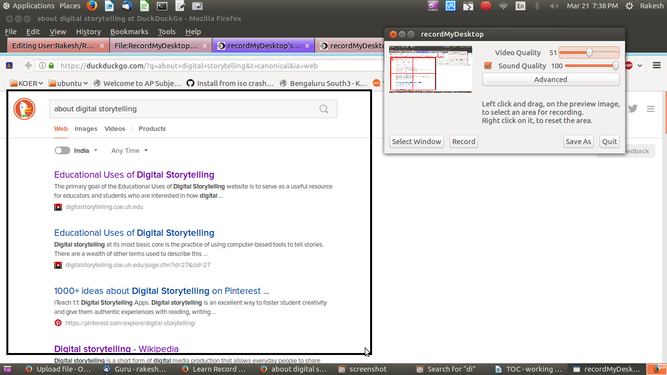
Area is defined to record


- It is possible to select the screen window you want to record. Click on Select window, you will be asked to grab the area to select. You can select only that part of the screen that you want to record. This is useful if you are opening photos or playing a video on only part of your screen and want to record that part only.
- After you have finished a selecting area, the area you have selected will be shown in the the preview window. Depending on your settings, an optional frame (see the highlighted box in the second image) might also appear on your real display, around the recording area. Now its ready to start recording, click on the "Record" option from the top panel "recordmydesktop" icon(small red circle).
- If you are adding a narration, make sure you have connected headphones for audio input and set the input volume settings (from sound settings) in your computer to 100%. Make sure the input is not muted before you start the recording. Otherwise, the audio will not get captured.
- Once you want finish the video, click on "Stop" button from the top recordmydesktop menu. It will start exporting your session as video.
Saving and exporting
File export and saving process are same in this application. After you start the recording, by clicking on "Stop" to stop the recording it will start to export your session in video formate. This video will be in the .ogv format. These video will be save in your "Home folder"
Advanced features
If you select "advanced" option from main menu, you will find following options.
- Frames per second : Setting it to a higher value will produce smoother recordings, but it will require more processing power. It will also increase the size of the video.
- Sound : The sound tab lets you configure the quality of the sound capture, or the recorded ports, when using JACK.
Ideas for resource creation
- This is very useful for creating simple video resources by adding narration to a process being done using an application. For example, you can run a simulation on your screen or an image slide show and add your narration to it as the application runs.
- You can also use an existing video and dub it in another language
- Please make sure that in both (1) and (2) the original visual resource/ video is licensed for reuse with modification.