Difference between revisions of "Learn LibreOffice Writer"
| (39 intermediate revisions by 2 users not shown) | |||
| Line 4: | Line 4: | ||
{{Template:Book-sidebar}} | {{Template:Book-sidebar}} | ||
</noinclude> | </noinclude> | ||
| + | |||
===Introduction=== | ===Introduction=== | ||
LibreOffice Writer is the free and open-source text editor application of the LibreOffice software package. Writer is a text editor similar to Microsoft Word. | LibreOffice Writer is the free and open-source text editor application of the LibreOffice software package. Writer is a text editor similar to Microsoft Word. | ||
| Line 26: | Line 27: | ||
|- | |- | ||
|Development and community help | |Development and community help | ||
| − | |The Document Foundation | + | |[https://documentation.libreoffice.org/assets/Uploads/Documentation/en/WG7.2/WG72-WriterGuide.pdf The Document Foundation] |
[https://www.libreoffice.org/get-help/community-support/ Community help] | [https://www.libreoffice.org/get-help/community-support/ Community help] | ||
|} | |} | ||
| Line 34: | Line 35: | ||
==== Installation ==== | ==== Installation ==== | ||
| − | + | Please click on the below link to learn about LibreOffice Installation & Configuration | |
| − | |||
| − | |||
| − | |||
| − | |||
| − | |||
| − | |||
| − | |||
| − | |||
| − | |||
| − | |||
| − | |||
| − | |||
| − | |||
| − | |||
| − | |||
| − | |||
| − | |||
| − | |||
| − | |||
| − | |||
| − | |||
| − | |||
| − | |||
| − | |||
| − | |||
| − | |||
| − | |||
| − | |||
| − | |||
| − | |||
| − | |||
| − | |||
| − | |||
| − | |||
| − | + | [https://teacher-network.in/OER/index.php/LibreOffice_Installation_and_Configuration Click here] | |
| − | |||
| − | |||
| − | |||
| − | |||
| − | |||
| − | |||
| − | |||
| − | |||
| − | |||
| − | |||
| − | |||
| − | |||
| − | |||
| − | |||
| − | |||
| − | |||
===Working with the application=== | ===Working with the application=== | ||
| Line 97: | Line 48: | ||
When LibreOffice is open but no document is open, the Start Center is shown. Click the Create: Writer Document button to create a new text document. | When LibreOffice is open but no document is open, the Start Center is shown. Click the Create: Writer Document button to create a new text document. | ||
* From the operating system menu | * From the operating system menu | ||
| − | You can open the LibreOffice Start Center or the Writer component from the operating system menu in the same way that you start other programs. When LibreOffice was installed on your computer, in most cases a menu entry for each component was added to the system menu.<gallery mode="packed" heights=" | + | You can open the LibreOffice Start Center or the Writer component from the operating system menu in the same way that you start other programs. When LibreOffice was installed on your computer, in most cases a menu entry for each component was added to the system menu. |
| + | <gallery mode="packed" heights="300px"> | ||
File:LibreOfficeStartCenter.png|LibreOffice start center | File:LibreOfficeStartCenter.png|LibreOffice start center | ||
</gallery> | </gallery> | ||
| Line 104: | Line 56: | ||
You can open an existing document in any of the following options. | You can open an existing document in any of the following options. | ||
| − | Option1: Choose '''File > Open''' on the Menu bar. | + | Option1: Choose '''"File --> Open"''' on the Menu bar. |
| − | Option2: Press '''Ctrl+O''' on the keyboard. | + | Option2: Press '''"Ctrl+O'''" on the keyboard. |
| − | Option3: Click on the '''Open icon''' on the Standard toolbar | + | Option3: Click on the "'''Open icon'''" on the Standard toolbar |
==== LibreOffice Writer interface ==== | ==== LibreOffice Writer interface ==== | ||
The LibreOffice menu bar has multiple options for file operations including saving, editing, viewing the document, inserting images, links, tables, etc in the document and formatting and defining styles in the document. The commonly used parts of the window are discussed below. | The LibreOffice menu bar has multiple options for file operations including saving, editing, viewing the document, inserting images, links, tables, etc in the document and formatting and defining styles in the document. The commonly used parts of the window are discussed below. | ||
| Line 122: | Line 74: | ||
'''2. Menu bar''' | '''2. Menu bar''' | ||
| − | The Menu bar is located just below the Title bar in Windows and Linux and at the top of the screen in macOS. When you select one of the menus, a | + | The Menu bar is located just below the Title bar in Windows and Linux and at the top of the screen in macOS. When you select one of the menus, a sub menu drops down to show further options,including: |
# Commands that directly cause an action, such as Close or Save, in the File menu. | # Commands that directly cause an action, such as Close or Save, in the File menu. | ||
# Commands that open further sub menus. | # Commands that open further sub menus. | ||
| Line 131: | Line 83: | ||
'''4. Formatting toolbar''' | '''4. Formatting toolbar''' | ||
| − | The second toolbar at the top is the Formatting toolbar. It is context-sensitive; that is, it shows the tools relevant to the current position of the cursor or the selected object. For example, when the cursor is in text, the Formatting toolbar provides tools for formatting text. When the cursor is on a graphic (image), the tools are for formatting images. Other toolbars are available at | + | The second toolbar at the top is the Formatting toolbar. It is context-sensitive; that is, it shows the tools relevant to the current position of the cursor or the selected object. For example, when the cursor is in text, the Formatting toolbar provides tools for formatting text. When the cursor is on a graphic (image), the tools are for formatting images. Other toolbars are available at "View --> Toolbars". |
'''5. Rulers''' | '''5. Rulers''' | ||
| Line 137: | Line 89: | ||
The horizontal ruler across the top of the workspace is visible by default but the vertical ruler on the left is hidden by default. | The horizontal ruler across the top of the workspace is visible by default but the vertical ruler on the left is hidden by default. | ||
| − | To enable the vertical ruler, choose View > Rulers > Vertical Ruler from the Menu bar, or choose Tools > Options > LibreOffice Writer > View. To quickly show or hide both rulers, use the key combination Ctrl+Shift+R. | + | To enable the vertical ruler, choose "View --> Rulers --> Vertical Ruler" from the Menu bar, or choose "Tools --> Options --> LibreOffice Writer --> View". To quickly show or hide both rulers, use the key combination "Ctrl+Shift+R". |
==== Editing document==== | ==== Editing document==== | ||
| Line 146: | Line 98: | ||
==== Changing default fonts ==== | ==== Changing default fonts ==== | ||
| − | + | <gallery mode="packed" heights="300"> | |
| + | File:Changing the Font settings in Writer.png|Changing the Font settings in Writer | ||
| + | </gallery> | ||
* LibreOffice Writer has some of the fonts set by default which can be customized any point of time. | * LibreOffice Writer has some of the fonts set by default which can be customized any point of time. | ||
| − | * To do this, Go to Tools-->Options. | + | * To do this, Go to "Tools-->Options". |
| − | * In the left panel Double click on LibreOffice Writer--> Click on Basic Fonts (Western). | + | * In the left panel "Double click on LibreOffice Writer--> Click on Basic Fonts (Western)". |
* Right side panel shows you the things that are fonts setup for your software by default. It is further classified as Default, Heading, List, Caption and Index. Based on your requirement you can click the drop down on their respective options and change the Font. Also note that you can customize the font size. | * Right side panel shows you the things that are fonts setup for your software by default. It is further classified as Default, Heading, List, Caption and Index. Based on your requirement you can click the drop down on their respective options and change the Font. Also note that you can customize the font size. | ||
| − | * Once you are done, Click Apply-->OK. | + | * Once you are done, "Click Apply-->OK". |
| − | + | ==== Cut, copy, and paste text ==== | |
* Using cut, copy and paste options are similar to any other applications. You can copy or move text, image or any other objects within a document, or between documents. These features can be used by dragging or by using keyboard shortcuts. | * Using cut, copy and paste options are similar to any other applications. You can copy or move text, image or any other objects within a document, or between documents. These features can be used by dragging or by using keyboard shortcuts. | ||
| − | + | {{Note}} You can also copy text from other sources such as Web pages and paste it into a text document. | |
| − | * To move (drag and drop) selected text using the mouse, drag it to the new location and release it; the cursor changes shape while dragging. To copy selected text, hold down the | + | * To move (drag and drop) selected text using the mouse, drag it to the new location and release it; the cursor changes shape while dragging. To copy selected text, hold down the Ctrl key while dragging. The text retains the formatting it had before dragging. |
| − | * To move (cut and paste) selected text, use | + | * To move (cut and paste) selected text, use "Ctrl+X" to cut the text, insert the cursor at the paste-in point and use "Ctrl+V" to paste. Alternatively, use the buttons on the Standard toolbar. |
| − | * When you paste text, the result depends on the source of the text and how you paste it. If you click the Paste button, then the pasted text keeps its original formatting (such as bold or italics). Text pasted from Web sites and other sources may be placed automatically into frames or tables as part of the format when you paste. If you do not like the results, click the Undo button or press | + | * When you paste text, the result depends on the source of the text and how you paste it. If you click the Paste button, then the pasted text keeps its original formatting (such as bold or italics). Text pasted from Web sites and other sources may be placed automatically into frames or tables as part of the format when you paste. If you do not like the results, click the Undo button or press "Ctrl+Z". |
To make the pasted text show the paragraph style at the insertion point: | To make the pasted text show the paragraph style at the insertion point: | ||
| − | # Choose | + | # Choose "Edit --> Paste Special", or |
# Click the arrow on the combination Paste button, or | # Click the arrow on the combination Paste button, or | ||
| − | # Click the Paste button without releasing the left mouse button. | + | # Click the "Paste" button without releasing the left mouse button. |
| − | <gallery mode="packed" heights=" | + | <gallery mode="packed" heights="300px"> |
File:Copy text.png| Copy text | File:Copy text.png| Copy text | ||
File:Copy image.png|Copy image | File:Copy image.png|Copy image | ||
| Line 171: | Line 125: | ||
==== Using text formatting ==== | ==== Using text formatting ==== | ||
| − | The format option is for changing the text styles like text font, text size and text color options. For many of these options, we can use shortcut icons from formatting toolbar as shown below.<gallery mode="packed" heights="400px"> | + | The format option is for changing the text styles like text font, text size and text color options. For many of these options, we can use shortcut icons from formatting toolbar as shown below. |
| + | <gallery mode="packed" heights="400px"> | ||
File:Format features.png|Formatting properties | File:Format features.png|Formatting properties | ||
</gallery> | </gallery> | ||
| Line 180: | Line 135: | ||
# Make selected text ''Italic'' | # Make selected text ''Italic'' | ||
# Make selected text <u>Underline</u> | # Make selected text <u>Underline</u> | ||
| − | # Make selected text | + | # Make selected text strikethrough(Eg: <s>strikethrough</s>) |
# Make selected text as superscript | # Make selected text as superscript | ||
# Make selected text as subscript | # Make selected text as subscript | ||
| Line 187: | Line 142: | ||
# Change the background color | # Change the background color | ||
| − | '''Using Bulleting and Numbering''' | + | ==== '''Using Bulleting and Numbering''' ==== |
| − | |||
The Bullets and Numbering feature on the formatting toolbar can be used to create nested lists and access the Bullets and Numbering dialog. | The Bullets and Numbering feature on the formatting toolbar can be used to create nested lists and access the Bullets and Numbering dialog. | ||
| − | # To add the bullets and numbers to text information, choose | + | # To add the bullets and numbers to text information, choose "Format --> Bullets and Numbering". You can also select the different symbols of bullets and numbers here. You can also find the Bullets and Numbers in the formatting toolbar |
# An important feature of Writer is to enable you present your information through simple and short points ('bullet points'). | # An important feature of Writer is to enable you present your information through simple and short points ('bullet points'). | ||
| − | # For the selected text input that has been entered, go to Format | + | # For the selected text input that has been entered, go to "Format --> Select Bullets and Numbering" and choose the numbering type that is needed. You can create sub-numbered lists. |
| − | <gallery mode="packed" heights=" | + | <gallery mode="packed" heights="300px"> |
File:Bulleting numbering.png| Bulleting and Numbering | File:Bulleting numbering.png| Bulleting and Numbering | ||
File:Bulleting.png|Bulleting Dialogue | File:Bulleting.png|Bulleting Dialogue | ||
| Line 204: | Line 158: | ||
On the Formatting toolbar, the icons and formats include( As labeled in below paragraph properties image) | On the Formatting toolbar, the icons and formats include( As labeled in below paragraph properties image) | ||
| − | # Apply | + | # Apply "Paragraph Style" from formatting toolbar . |
# Align Left, Center Horizontally, Align Right, or Justified. | # Align Left, Center Horizontally, Align Right, or Justified. | ||
# Line Spacing (choose from 1, 1.15, 1.5, 2, or custom spacing. Line spacing refers to the distance from one baseline (the imaginary line at the bottom of a letter like “n” or “m”) to the next baseline. It is determined by the size of the font. | # Line Spacing (choose from 1, 1.15, 1.5, 2, or custom spacing. Line spacing refers to the distance from one baseline (the imaginary line at the bottom of a letter like “n” or “m”) to the next baseline. It is determined by the size of the font. | ||
| − | # Increase Paragraph Spacing, Decrease Paragraph Spacing. ( Paragraph spacing refers to the vertical spacing between one paragraph and the paragraphs above and below it. | + | # Increase Paragraph Spacing, Decrease Paragraph Spacing. (Paragraph spacing refers to the vertical spacing between one paragraph and the paragraphs above and below it"). |
# Increase Indent, Decrease Indent. | # Increase Indent, Decrease Indent. | ||
<gallery mode="packed" heights="400px"> | <gallery mode="packed" heights="400px"> | ||
| Line 215: | Line 169: | ||
==== Inserting & Formatting Images ==== | ==== Inserting & Formatting Images ==== | ||
#The insert menu option is for inserting images, hyperlinks, charts, page numbers, page breaks, formulas and etc... | #The insert menu option is for inserting images, hyperlinks, charts, page numbers, page breaks, formulas and etc... | ||
| − | #To insert an image, Go to Insert | + | #To insert an image, Go to "Insert --> Image" This will open a folder from which images are to be inserted (Images need to be browsed from your computer local folders). |
| − | #The inserted image (triangle) will looks like below | + | #The inserted image (triangle) will looks like below "Inserted Image View" image. |
| − | <gallery mode="packed" heights=" | + | <gallery mode="packed" heights="300px"> |
File:Insert images.png|Insert Menu | File:Insert images.png|Insert Menu | ||
File:LO_Writer_9_Insert_image.png|Inserting Image | File:LO_Writer_9_Insert_image.png|Inserting Image | ||
File:LO_Writer_10_Inserted_Image.png|Inserted Image View | File:LO_Writer_10_Inserted_Image.png|Inserted Image View | ||
| − | </gallery>After you insert any image if you want to resize (height*width), | + | </gallery> |
| + | After you insert any image if you want to resize (height*width), "Click on the image and select any of the dots on the corner of the image and drag to increase or decrease the size of the image". | ||
===== Editing image ===== | ===== Editing image ===== | ||
| − | + | 1. Using the Crop tool: To use the Crop tool "Click on the Crop icon" as shown in Image1 or right-click on the image and select Crop from the context menu. Cropping handles appear at the corners and mid-points of the sides of the image. Drag a handle to cut off part of the image. Click outside the image to turn off cropping mode. | |
| − | handles appear at the corners and mid-points of the sides of the image. Drag a handle to cut off part of the image. Click outside the image to turn off cropping mode. | ||
| − | + | 2. Compressing images ("Inserting Image" image) | |
* If you insert a large image in your document and resize it to fit into the layout of the page, the complete original image is stored in the document file to preserve its content, resulting in a large document file to store or send by mail. | * If you insert a large image in your document and resize it to fit into the layout of the page, the complete original image is stored in the document file to preserve its content, resulting in a large document file to store or send by mail. | ||
* If you can accept some loss of quality of the image rendering, you can compress or resize the image object to reduce its data volume while preserving its display in the page layout. You probably don’t want to compress something that will be professionally printed. | * If you can accept some loss of quality of the image rendering, you can compress or resize the image object to reduce its data volume while preserving its display in the page layout. You probably don’t want to compress something that will be professionally printed. | ||
| − | * Right-click to select the image and open the context menu. Then choose Compress to open the Compress Image dialog . Click OK to apply the compression settings. If the resulting image is not acceptable, press Ctrl+Z to undo and choose another compression setting. | + | * "Right-click to select the image and open the context menu". Then choose "Compress" to open the Compress Image dialog. Click "OK" to apply the compression settings. If the resulting image is not acceptable, press "Ctrl+Z" to undo and choose another compression setting. |
| − | + | 3. Transparency: set the transparency options for the image using this button as shown in Image1. | |
| − | + | 4. Rotating images: Rotate images if required using button showed in Image1:Image Formatting features | |
| + | <gallery mode="packed" heights="300"> | ||
File:Image editng.png|Image1: Image Formatting features | File:Image editng.png|Image1: Image Formatting features | ||
File:Compress Image.png|Image 2: Image compressing window | File:Compress Image.png|Image 2: Image compressing window | ||
| Line 240: | Line 195: | ||
==== Inserting & Formatting Table ==== | ==== Inserting & Formatting Table ==== | ||
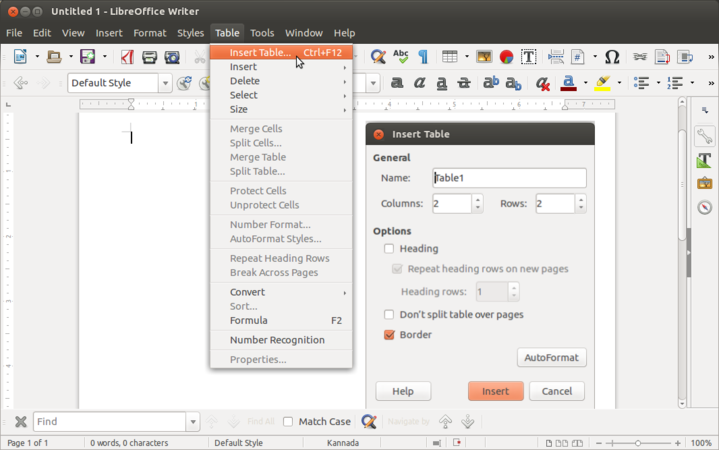
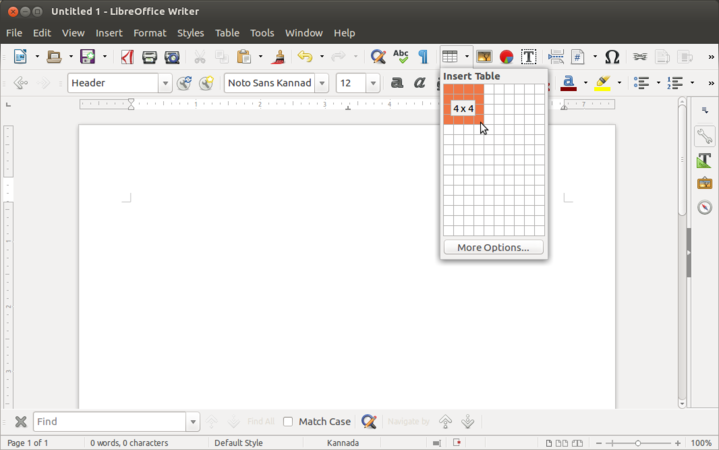
| − | * To insert Table, go to Table from Menu bar and select "Insert Table", in given window choose required number of rows and columns. Alternatively you can also insert table from standard toolbar, Click on table grid from toolbar and move the cursor over the grid until you highlight the number of columns and rows you want. Click and the table appears in the document. | + | * To insert Table, go to "Table" from Menu bar and select "Insert Table", in given window choose required number of rows and columns. Alternatively you can also insert table from standard toolbar, Click on "table grid" from toolbar and move the cursor over the grid until you highlight the number of columns and rows you want. Click and the table appears in the document. |
| − | * You can format your table by selecting the options in 'Table'. Move your cursor inside the table and | + | * You can format your table by selecting the options in 'Table'. Move your cursor inside the table and "Select --> Table". You can then adjust the row and column widths ("Table --> Size"), add or remove borders ("Table --> Properties --> Borders"), split or merge cells ("Table --> Merge Cells", "Table --> Split Cells") etc. |
| − | * You can also copy data from a spreadsheet. You can simply copy that data (in rows and columns) from the spreadsheet and paste into the document, it will create a copy of the spreadsheet in your document. If you do not want it as a spreadsheet, but only as a table, you need to select | + | * You can also copy data from a spreadsheet. You can simply copy that data (in rows and columns) from the spreadsheet and paste into the document, it will create a copy of the spreadsheet in your document. If you do not want it as a spreadsheet, but only as a table, you need to select "Paste Special -> Formatted text option". |
| − | <gallery mode="packed" heights=" | + | <gallery mode="packed" heights="300px" caption="Inserting Table"> |
File:Inert table in LOW.png|Insert Table | File:Inert table in LOW.png|Insert Table | ||
File:Format Table in LOW.png|Select rows and columns | File:Format Table in LOW.png|Select rows and columns | ||
| + | </gallery> | ||
| + | |||
| + | <gallery mode="packed" heights="400px"> | ||
File:Table Formatting.png|Table Formatting | File:Table Formatting.png|Table Formatting | ||
</gallery> | </gallery> | ||
| + | |||
# Align text to the top, middle and to the bottom | # Align text to the top, middle and to the bottom | ||
# Apply Borders to cells and tables | # Apply Borders to cells and tables | ||
| Line 253: | Line 212: | ||
==== Finding and replacing text ==== | ==== Finding and replacing text ==== | ||
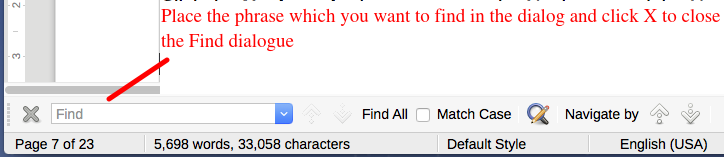
| − | Writer has two ways to find text within a document: The Find toolbar for fast searching and the Find & Replace dialog. If the Find toolbar is not visible, you can display it by choosing | + | Writer has two ways to find text within a document: The Find toolbar for fast searching and the Find & Replace dialog. If the Find toolbar is not visible, you can display it by choosing "View --> Toolbars --> Find" from the Menu bar or by pressing "Ctrl+F". |
'''Using the Find toolbar''' | '''Using the Find toolbar''' | ||
| − | * To use the Find toolbar, click in the text input box and type your search text, then press Enter to find the next occurrence of that term from the current cursor position. Click the Find Next or Find Previous buttons as needed. | + | * To use the "Find" toolbar, click in the text input box and type your search text, then press "Enter" to find the next occurrence of that term from the current cursor position. Click the "Find Next" or "Find Previous" buttons as needed. |
| − | * Click the Find All button to select all instances of the search term within the document. | + | * Click the "Find All" button to select all instances of the search term within the document. |
<gallery mode="packed" heights="300"> | <gallery mode="packed" heights="300"> | ||
File:Using the Find toolbar.png|Using the Find toolbar | File:Using the Find toolbar.png|Using the Find toolbar | ||
| Line 264: | Line 223: | ||
'''Using the Find & Replace dialog''' | '''Using the Find & Replace dialog''' | ||
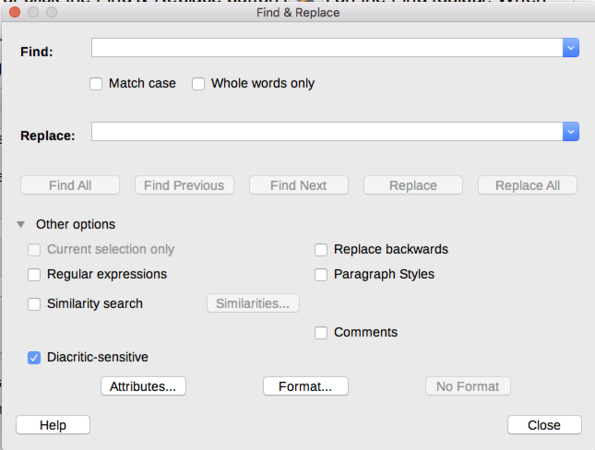
| − | To display the Find & Replace dialog, use the keyboard shortcut | + | To display the Find & Replace dialog, use the keyboard shortcut "Ctrl+H", or choose "Edit --> Find & Replace" from the Menu bar. Use the Find & Replace dialog: |
| − | Use the Find & Replace dialog: | ||
* Type the text you want to find in the Find box. | * Type the text you want to find in the Find box. | ||
* To replace the text with different text, type the new text in the Replace box. | * To replace the text with different text, type the new text in the Replace box. | ||
* You can select various options, such as matching the case or matching whole words only. The other options include searching only in selected text, searching from the current cursor position backwards toward the beginning of the document, searching for similar words, and searching in comments. | * You can select various options, such as matching the case or matching whole words only. The other options include searching only in selected text, searching from the current cursor position backwards toward the beginning of the document, searching for similar words, and searching in comments. | ||
| − | * When you have set up your search, click Find Next. As the document view moves to each found instance, replace the text by clicking Replace. | + | * When you have set up your search, click "Find Next". As the document view moves to each found instance, replace the text by clicking "Replace". |
| − | <gallery mode="packed" heights=" | + | <gallery mode="packed" heights="300px"> |
File:Expanded Find & Replace dialog.png|Expanded Find & Replace dialog | File:Expanded Find & Replace dialog.png|Expanded Find & Replace dialog | ||
</gallery> | </gallery> | ||
| Line 277: | Line 235: | ||
==== Creating an automatic Table of Contents==== | ==== Creating an automatic Table of Contents==== | ||
| − | #Often it is useful to create text documents which are organize into headings and sub headings to denote different sections. This can be done in two ways | + | #Often it is useful to create text documents which are organize into headings and sub headings to denote different sections. This can be done in two ways, |
| − | ##You can select the text you want to define as a heading and choose from the predefined headings style, by selecting from the first drop down box as shown in the first image. | + | ##You can select the text you want to define as a heading and choose from the predefined headings style, by selecting from the first drop down box as shown in the first image. |
##You can also define this from the Style menu by clicking on Style and selecting the given heading. | ##You can also define this from the Style menu by clicking on Style and selecting the given heading. | ||
##You can define the appearance of each heading under the Styles and formatting option by changing the default font colour, size, etc. | ##You can define the appearance of each heading under the Styles and formatting option by changing the default font colour, size, etc. | ||
| − | #Once the headings are defined, you can insert the Table of Contents. Click in your document where you want to create the table of contents. Choose Insert - Table of Contents and Index | + | #Once the headings are defined, you can insert the Table of Contents. Click in your document where you want to create the table of contents. Choose "Insert --> Table of Contents and Index --> Index Entry", just click on “OK”. For updating table of content, right click on the table of content and Update Index or Table of Contents. Note that if you add any headings in the document, it will not automatically update the Table of Contents, hence you will need to come to the Table of Contents and do the update manually. |
| − | <gallery mode="packed" heights=" | + | <gallery mode="packed" heights="300px" caption="Inserting Table of Content"> |
File:Adding paragrapgh style.png|Paragraph style for Table of Content | File:Adding paragrapgh style.png|Paragraph style for Table of Content | ||
File:Adding TOC into the document.png|Insert Table of Content | File:Adding TOC into the document.png|Insert Table of Content | ||
| Line 289: | Line 247: | ||
==== Adding page header and footer ==== | ==== Adding page header and footer ==== | ||
| − | # You can add a header and / or footer to your document. You could provide the name of the document (or any other static information) in the footer. You can also insert page number in the header or the footer, which will be dynamically generated by Writer. It is useful to have page number and name of your document on every page, this is specially useful if the reader wants to read a print copy. LibreOffice Writer allows you to easily insert this information at the bottom or top of each page. This can be done using Insert--->Footer. | + | # You can add a header and/or footer to your document. You could provide the name of the document (or any other static information) in the footer. You can also insert page number in the header or the footer, which will be dynamically generated by Writer. It is useful to have page number and name of your document on every page, this is specially useful if the reader wants to read a print copy. LibreOffice Writer allows you to easily insert this information at the bottom or top of each page. This can be done using "Insert--->Footer". |
| − | # Once a footer has been inserted, you can go to the bottom of the page and insert multiple fields of information using Insert | + | # Once a footer has been inserted, you can go to the bottom of the page and insert multiple fields of information using "Insert --> Fields". You can type any text in this footer, it will come on all pages. Other than page number, other dynamic information you can provide is the date/time stamp of the document. A similar method can also be adopted for inserting a header as well. |
| − | <gallery mode="packed" heights=" | + | <gallery mode="packed" heights="250px"> |
File:LOWriter - Header and footers.png| Adding header and footers for the page | File:LOWriter - Header and footers.png| Adding header and footers for the page | ||
File:LOWriter adding fields.png| Inserting page fields | File:LOWriter adding fields.png| Inserting page fields | ||
| Line 297: | Line 255: | ||
==== Spelling check ==== | ==== Spelling check ==== | ||
| − | #Spelling - By enabling | + | #Spelling - By enabling "Automatic spell checking" under Tools, you can check spelling within your document. You will see a red underline below a word spelt wrongly. (If you see a green line below a word, it suggests a grammatical error). You can move your cursor to the word and right click to get suggestions for correcting the spelling. In case you are clear your word is correct, you can also "Add your word to the dictionary" so that the next time you use it, it will not be treated as a wrong spelling. |
| − | #You can also do a manual spelling and grammar checking of the document. Select the text and click on | + | #You can also do a manual spelling and grammar checking of the document. Select the text and click on "spelling and grammar" under "Tools" option. it will start looking spelling and grammar for the document. It is a good habit to always run a spelling check on your document before sharing. |
#To check the spelling and the grammar of a text, the appropriate dictionaries must be installed. You can have dictionaries for your own language (Telugu, Urdu etc) installed, apart from the one in English. | #To check the spelling and the grammar of a text, the appropriate dictionaries must be installed. You can have dictionaries for your own language (Telugu, Urdu etc) installed, apart from the one in English. | ||
| − | <gallery mode="packed" heights=" | + | <gallery mode="packed" heights="250px" caption="Formatting in LibreOffice Writer"> |
File:Auto spell checking LO writer .png|Auto spell checking | File:Auto spell checking LO writer .png|Auto spell checking | ||
File:Checking spelling and grammar by manually .png|Spelling and grammar checking | File:Checking spelling and grammar by manually .png|Spelling and grammar checking | ||
</gallery> | </gallery> | ||
| − | + | ==== Customizing the Toolbar ==== | |
* LibreOffice is a Open source application and therefore it allows the users to customize the interface. | * LibreOffice is a Open source application and therefore it allows the users to customize the interface. | ||
* Menu is most useful section of Writer and its structure must be familiar to the user. | * Menu is most useful section of Writer and its structure must be familiar to the user. | ||
* The structure of menu and its items can be customized easily so that it becomes user friendly. | * The structure of menu and its items can be customized easily so that it becomes user friendly. | ||
| − | * To do this, go to Tools-->Customize. | + | * To do this, go to "Tools-->Customize". |
* Customize window will be having all the "Available Command" list on the left side. "Assigned command" on the right. If you want to remove the already assigned command then click on that particular command on the Assigned command list and move it towards Available command by clicking the left arrow button. | * Customize window will be having all the "Available Command" list on the left side. "Assigned command" on the right. If you want to remove the already assigned command then click on that particular command on the Assigned command list and move it towards Available command by clicking the left arrow button. | ||
* Similarly if you want an additional command to your menu then choose the command from the "Available command" list. Click right arrow button to move it to the "Assigned command" list. | * Similarly if you want an additional command to your menu then choose the command from the "Available command" list. Click right arrow button to move it to the "Assigned command" list. | ||
| − | * You can also change the name of a particular command by clicking that command and click on Modify-->Rename. Give the new name to that menu and click OK | + | * You can also change the name of a particular command by clicking that command and click on "Modify --> Rename". Give the new name to that menu and click OK. |
| − | + | <gallery mode="packed" heights="300"> | |
| − | + | File:Checked and Unchecked Toolbar.png|Customizing Toolbar | |
| − | |||
| − | |||
| − | |||
| − | |||
| − | |||
| − | |||
| − | |||
| − | <gallery mode="packed" heights=" | ||
| − | File: | ||
| − | |||
| − | |||
| − | |||
| − | |||
| − | |||
| − | |||
| − | |||
| − | |||
| − | |||
| − | |||
| − | |||
| − | |||
| − | |||
| − | |||
| − | |||
| − | |||
| − | |||
</gallery> | </gallery> | ||
| − | + | * To customize Toolbar, click on "Toolbar" tab in Customize window. As explained earlier, "Assigned Commands" will be having list of tools. The checked tools are already there in the toolbar and unchecked ones are available to move them to the toolbar. If you want any particular tool to be easily accessible and move to the toolbar then just check mark those and click "Apply-->OK". | |
| − | + | * In the way you can change or assign the Keyboard shortcuts. For this Click on Keyboard tab in the Customize window. You can choose a command and click on "Modify?" to change its shortcut or functionality. | |
| − | + | <gallery mode="packed" heights="250"> | |
| − | + | File:LO Tools Language select.png|Menubar tools | |
| − | + | File:LO language interface language settings, user interface.jpg|Languages interface | |
| − | |||
| − | |||
| − | |||
| − | |||
| − | <gallery mode="packed" heights=" | ||
| − | File: | ||
| − | File: | ||
</gallery> | </gallery> | ||
| − | |||
| − | |||
| − | |||
| − | |||
| − | |||
| − | |||
| − | |||
| − | |||
| − | |||
| − | |||
| − | |||
| − | |||
| − | |||
| − | |||
| − | |||
==== Tracking changes to a document ==== | ==== Tracking changes to a document ==== | ||
| Line 380: | Line 290: | ||
When you send a document to someone else to review or edit, you may want to prepare it first so that the editor or reviewer does not have to remember to turn on the revision marks. | When you send a document to someone else to review or edit, you may want to prepare it first so that the editor or reviewer does not have to remember to turn on the revision marks. | ||
| − | * Open the document. Check whether it contains multiple versions by clicking | + | * Open the document. Check whether it contains multiple versions by clicking "File --> Versions". If multiple versions are listed, save the current version as a separate document with a different name and use this new document as the review copy. |
| − | * With the review copy open, make sure that change recording is turned on. The | + | * With the review copy open, make sure that change recording is turned on. The "Edit --> Track Changes --> Record Changes" menu item has a check mark next to it when recording is turned on. |
| − | * To begin tracking (recording) changes, click | + | * To begin tracking (recording) changes, click "Edit --> Track Changes --> Record Changes". To show or hide the display of changes, click "Edit --> Track Changes --> Show Changes". |
| − | * To stop recording changes, click | + | * To stop recording changes, click "Edit --> Track Changes --> Record Changes" again. |
The results of accepting or rejecting a change are as follows: | The results of accepting or rejecting a change are as follows: | ||
| − | * | + | * Accept: Incorporates the alteration into the document and removes the change indication marking. |
| − | * | + | * Reject: Reverts the document to its original state and removes the change indication marking. |
| + | |||
| + | ==== Changing Page orientation within the document ==== | ||
| + | <gallery mode="packed" heights="250"> | ||
| + | File:Create a New Style.png|Creating a new style | ||
| + | File:Giving a name for a style.png|Giving a name for a style | ||
| + | File:Changing Page Orientation.png|Changing page orientation | ||
| + | File:Inserting a page break1.png|Inserting a page break | ||
| + | </gallery> | ||
| + | |||
| + | * LibreOffice Writer allows you to change the page orientation in between the document as per your needs. | ||
| + | * For example, If you have a document having data of three pages you can make the second page landscape and rest two to remain as portrait orientation. | ||
| + | * To do this, first go to sidebar of Writer. Click on "Styles --> Page styles". | ||
| + | * On the Page style list page, "right click --> New". | ||
| + | * In the new page style window click on "Organizer tab --> Enter a new name to the style --> Choose the 'Default style' as Next style". | ||
| + | * Go to the "Page" tab --> Change the orientation as Landscape". | ||
| + | * Click "Apply --> OK". | ||
| + | * Place the position of the cursor to the place where you need to change the orientation. | ||
| + | * Click on Insert --> More Breaks --> Manual Break". You will get a new window called "Insert Break" | ||
| + | * In this window, choose the type “Page break” and name of the style you have given earlier as the style name. | ||
| + | Sometimes it may happen that your cursor point becomes Landscape but remaining pages also changes their orientation and become Landscape. The solution for this is, | ||
| + | |||
| + | * Place the cursor from which you want your orientation to be Portrait. Click on Insert --> More Breaks --> Manual Break". You will get a new window called "Insert Break". In this window, choose the type “Page break” and name of the style as Default Style. (Usually this Default style will be having the page orientation as portrait. In this way your can make the rest of the pages again as Portrait. | ||
====Saving the file==== | ====Saving the file==== | ||
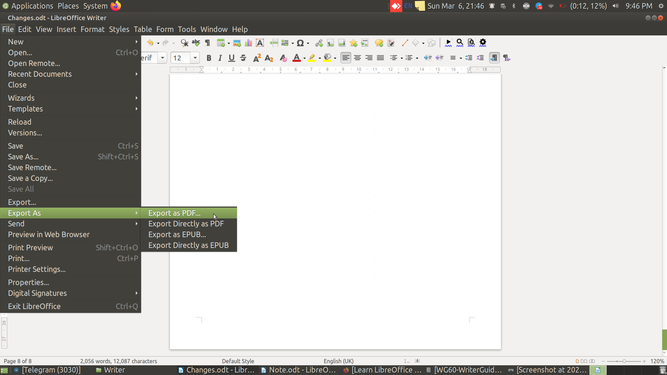
| − | * Like in most applications, a file can be saved using the | + | * Like in most applications, a file can be saved using the "File --> Save" command, or by the shortcut key "Ctrl+S". Always give a meaningful file name, reading which you should get an idea of the file contents. Often adding the month-year information when the file was created can be useful later File will save in .odt format, ODT is the short form of Open Document Text. ODT conforms to Open Document Format (ODF) which is recommended by the Government of India through its website [https://india.gov.in/policy-open-standards-e-governance Policy on open standards]””. |
* Like in most applications, a file can be exported to a PDF format. This is useful when you only need to print the file and do not want any changes to it. You can also export a document to a 'html' (web page) format, which can be opened by a web browser or MS word format which is supported by Windows operating system.<br> | * Like in most applications, a file can be exported to a PDF format. This is useful when you only need to print the file and do not want any changes to it. You can also export a document to a 'html' (web page) format, which can be opened by a web browser or MS word format which is supported by Windows operating system.<br> | ||
| − | <gallery mode="packed" heights=" | + | <gallery mode="packed" heights="250px"> |
File:Save as odt.png| Save as ODT | File:Save as odt.png| Save as ODT | ||
File:Export as PDF.png|Export as PDF | File:Export as PDF.png|Export as PDF | ||
| Line 399: | Line 331: | ||
====Advanced features==== | ====Advanced features==== | ||
| − | # [https://help.libreoffice.org/Common/Track_Changes Track changes] ( | + | # [https://help.libreoffice.org/Common/Track_Changes Track changes] (Recording editing changes by another person in another colour in the document, which can be accepted or rejected by the author) |
| − | # [https://help.libreoffice.org/Writer/Columns Multiple columns] ( | + | # [https://help.libreoffice.org/Writer/Columns Multiple columns] (Useful for making newsletters and magazines) and other page layout functions |
===Ideas for resource creation=== | ===Ideas for resource creation=== | ||
Latest revision as of 11:24, 26 September 2022
हिंदी मे देखिये
ಕನ್ನಡದಲ್ಲಿ ನೋಡಿ

Introduction
LibreOffice Writer is the free and open-source text editor application of the LibreOffice software package. Writer is a text editor similar to Microsoft Word.
Basic information
| ICT Competency | ICT for creating generic resources |
| Educational application and relevance | LibreOffice Writer is a software used for creating (including writing, editing, formatting, and possibly printing) text resources. Apart from entering and editing text, you can insert images and links also. |
| Version | LibreOffice Writer is also available on the Windows (visit download LibreOffice on Windows to install LibreOffice on a Windows system) and Macintosh operating systems.
This tool has no specific configuration requirements but in this application you can use many extra features by installing extensions |
| Other similar applications | Microsoft Word, OpenOffice writer, Google Docs |
| The application on mobiles and tablets | Collabora Office for Android and for iOS |
| Development and community help | The Document Foundation |
Overview of features
LibreOffice Writer lets you design and produce text documents that can include graphics, tables, or charts. In this application you can save the documents in a variety of formats, including the standardized Open Document Format (ODF), Microsoft Word format(.doc), or HTML. Here you can easily export your document to the Portable Document Format(PDF).
Installation
Please click on the below link to learn about LibreOffice Installation & Configuration
Working with the application
Starting a new document
From the Start Center
You can start a new, blank document in Writer in several ways. If a document is already open in LibreOffice, the new document opens in a new window.
- From the Start Center
When LibreOffice is open but no document is open, the Start Center is shown. Click the Create: Writer Document button to create a new text document.
- From the operating system menu
You can open the LibreOffice Start Center or the Writer component from the operating system menu in the same way that you start other programs. When LibreOffice was installed on your computer, in most cases a menu entry for each component was added to the system menu.
LibreOffice start center

Opening an existing document
You can open an existing document in any of the following options.
Option1: Choose "File --> Open" on the Menu bar.
Option2: Press "Ctrl+O" on the keyboard.
Option3: Click on the "Open icon" on the Standard toolbar
LibreOffice Writer interface
The LibreOffice menu bar has multiple options for file operations including saving, editing, viewing the document, inserting images, links, tables, etc in the document and formatting and defining styles in the document. The commonly used parts of the window are discussed below.
- LibreOffice Writer menu

LibreOffice Writer (Parts of the window)

1. Title bar
The Title bar is located at the top of the Writer window. It shows the file name of the current document. When the document is not yet named, the document name will appear as Untitled X, where X is a number. Untitled documents are numbered in the order in which they are created.
2. Menu bar
The Menu bar is located just below the Title bar in Windows and Linux and at the top of the screen in macOS. When you select one of the menus, a sub menu drops down to show further options,including:
- Commands that directly cause an action, such as Close or Save, in the File menu.
- Commands that open further sub menus.
3. Standard toolbar
In a default LibreOffice installation , the top toolbar, just under the Menu bar, is called the Standard toolbar. This gives quick access to different types of elements and tools to the users.
4. Formatting toolbar
The second toolbar at the top is the Formatting toolbar. It is context-sensitive; that is, it shows the tools relevant to the current position of the cursor or the selected object. For example, when the cursor is in text, the Formatting toolbar provides tools for formatting text. When the cursor is on a graphic (image), the tools are for formatting images. Other toolbars are available at "View --> Toolbars".
5. Rulers
The horizontal ruler across the top of the workspace is visible by default but the vertical ruler on the left is hidden by default.
To enable the vertical ruler, choose "View --> Rulers --> Vertical Ruler" from the Menu bar, or choose "Tools --> Options --> LibreOffice Writer --> View". To quickly show or hide both rulers, use the key combination "Ctrl+Shift+R".
Editing document
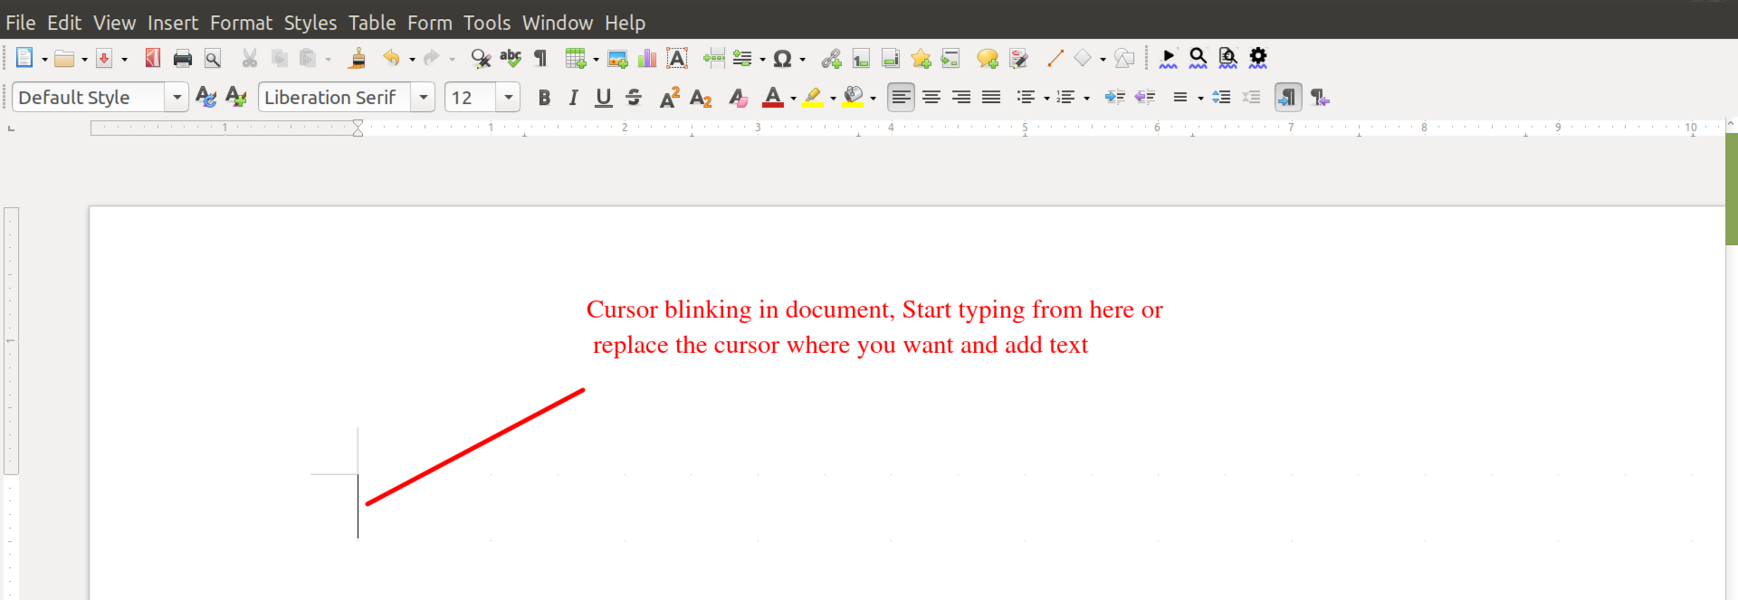
You can start adding the text from where the cursor blinks. You can also reposition cursor as per the requirement in the document.
- Cursor

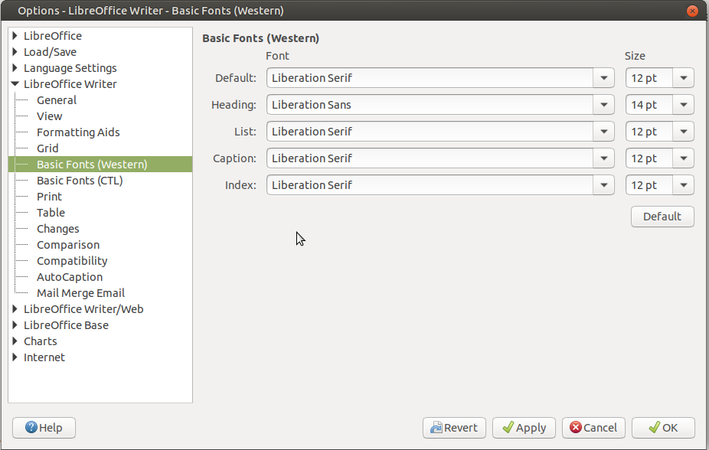
Changing default fonts
Changing the Font settings in Writer

- LibreOffice Writer has some of the fonts set by default which can be customized any point of time.
- To do this, Go to "Tools-->Options".
- In the left panel "Double click on LibreOffice Writer--> Click on Basic Fonts (Western)".
- Right side panel shows you the things that are fonts setup for your software by default. It is further classified as Default, Heading, List, Caption and Index. Based on your requirement you can click the drop down on their respective options and change the Font. Also note that you can customize the font size.
- Once you are done, "Click Apply-->OK".
Cut, copy, and paste text
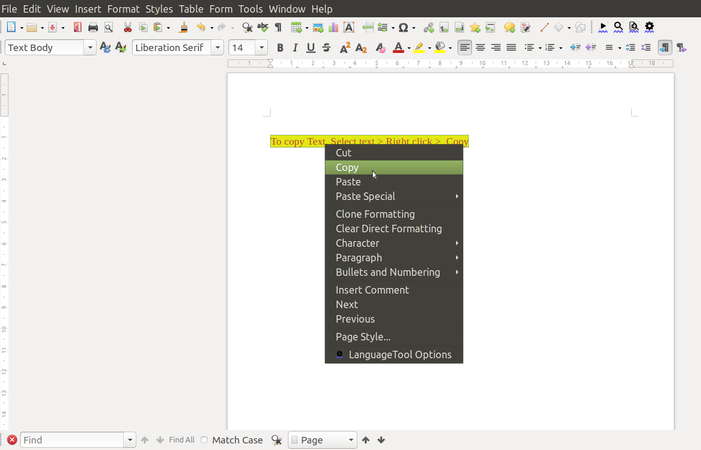
- Using cut, copy and paste options are similar to any other applications. You can copy or move text, image or any other objects within a document, or between documents. These features can be used by dragging or by using keyboard shortcuts.
![]() Note: You can also copy text from other sources such as Web pages and paste it into a text document.
Note: You can also copy text from other sources such as Web pages and paste it into a text document.
- To move (drag and drop) selected text using the mouse, drag it to the new location and release it; the cursor changes shape while dragging. To copy selected text, hold down the Ctrl key while dragging. The text retains the formatting it had before dragging.
- To move (cut and paste) selected text, use "Ctrl+X" to cut the text, insert the cursor at the paste-in point and use "Ctrl+V" to paste. Alternatively, use the buttons on the Standard toolbar.
- When you paste text, the result depends on the source of the text and how you paste it. If you click the Paste button, then the pasted text keeps its original formatting (such as bold or italics). Text pasted from Web sites and other sources may be placed automatically into frames or tables as part of the format when you paste. If you do not like the results, click the Undo button or press "Ctrl+Z".
To make the pasted text show the paragraph style at the insertion point:
- Choose "Edit --> Paste Special", or
- Click the arrow on the combination Paste button, or
- Click the "Paste" button without releasing the left mouse button.
Copy text
Copy image


Using text formatting
The format option is for changing the text styles like text font, text size and text color options. For many of these options, we can use shortcut icons from formatting toolbar as shown below.
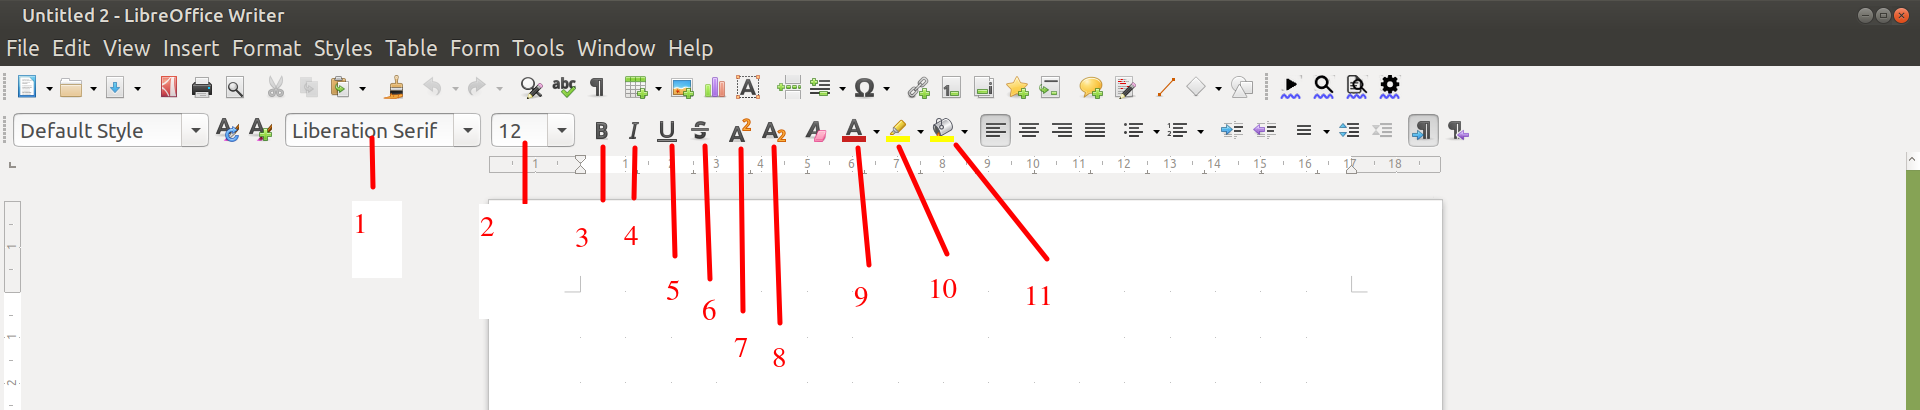
Formatting properties

- Font name: Choose font name from dropdown
- Font size: Choose font size from the dropdown
- Make selected text Bold
- Make selected text Italic
- Make selected text Underline
- Make selected text strikethrough(Eg:
strikethrough) - Make selected text as superscript
- Make selected text as subscript
- Choose Font color from the dropdown
- Make selected text to highlight with color
- Change the background color
Using Bulleting and Numbering
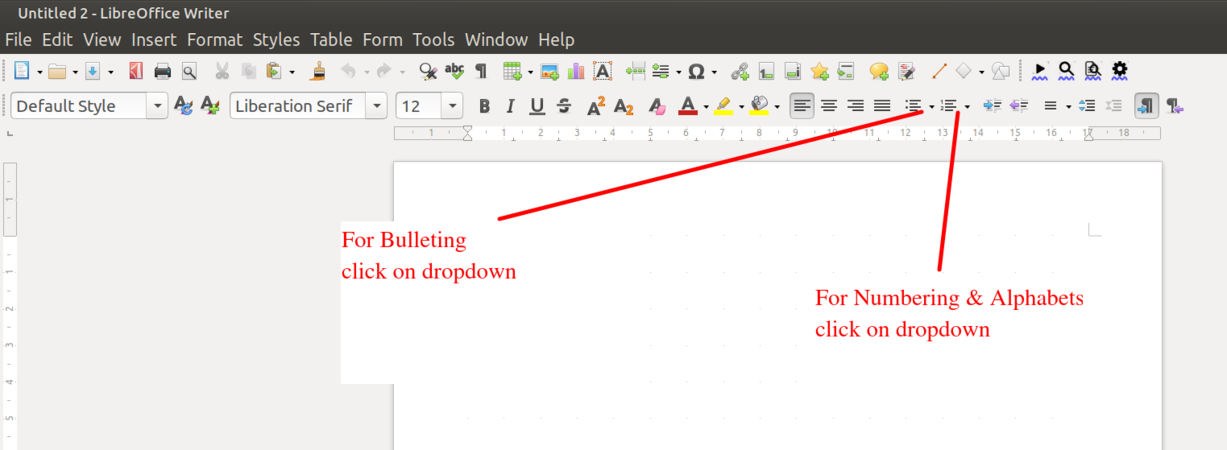
The Bullets and Numbering feature on the formatting toolbar can be used to create nested lists and access the Bullets and Numbering dialog.
- To add the bullets and numbers to text information, choose "Format --> Bullets and Numbering". You can also select the different symbols of bullets and numbers here. You can also find the Bullets and Numbers in the formatting toolbar
- An important feature of Writer is to enable you present your information through simple and short points ('bullet points').
- For the selected text input that has been entered, go to "Format --> Select Bullets and Numbering" and choose the numbering type that is needed. You can create sub-numbered lists.
Bulleting and Numbering
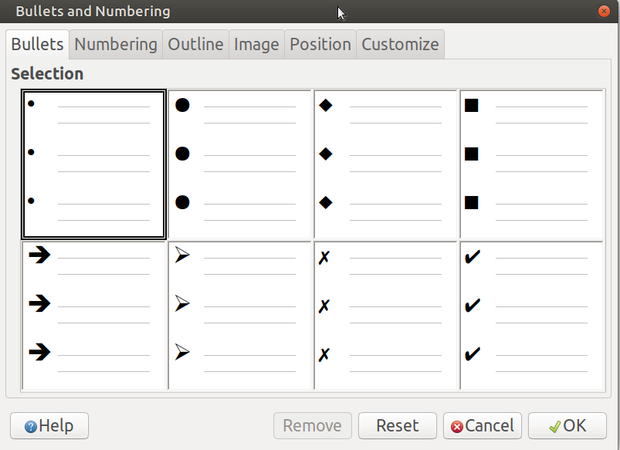
Bulleting Dialogue
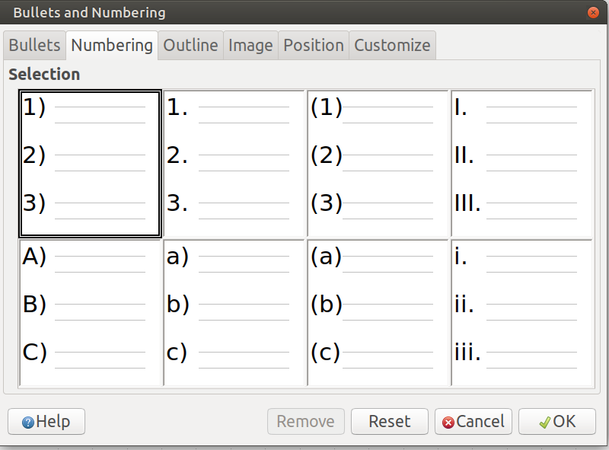
Numbering & Alphabetical Dialogue


Using paragraph formatting
You can apply many formats to paragraphs using the icons on the Formatting toolbar. Other formatting options are provided under the format option from the menu bar.
On the Formatting toolbar, the icons and formats include( As labeled in below paragraph properties image)
- Apply "Paragraph Style" from formatting toolbar .
- Align Left, Center Horizontally, Align Right, or Justified.
- Line Spacing (choose from 1, 1.15, 1.5, 2, or custom spacing. Line spacing refers to the distance from one baseline (the imaginary line at the bottom of a letter like “n” or “m”) to the next baseline. It is determined by the size of the font.
- Increase Paragraph Spacing, Decrease Paragraph Spacing. (Paragraph spacing refers to the vertical spacing between one paragraph and the paragraphs above and below it").
- Increase Indent, Decrease Indent.
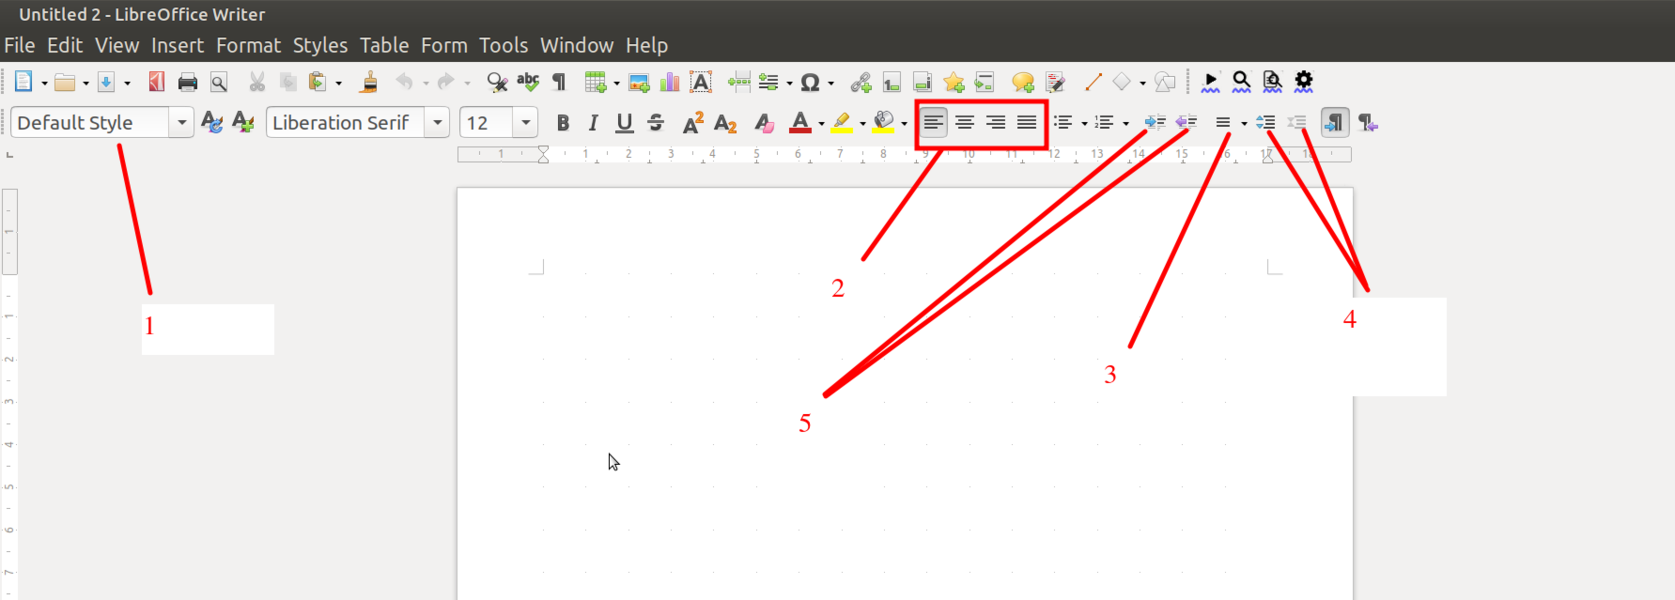
Paragraph properties

Inserting & Formatting Images
- The insert menu option is for inserting images, hyperlinks, charts, page numbers, page breaks, formulas and etc...
- To insert an image, Go to "Insert --> Image" This will open a folder from which images are to be inserted (Images need to be browsed from your computer local folders).
- The inserted image (triangle) will looks like below "Inserted Image View" image.
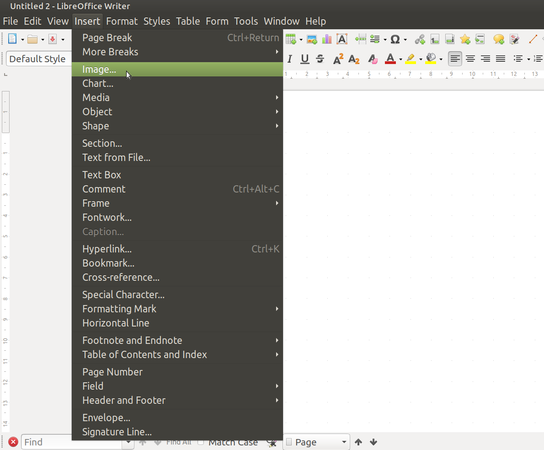
Insert Menu
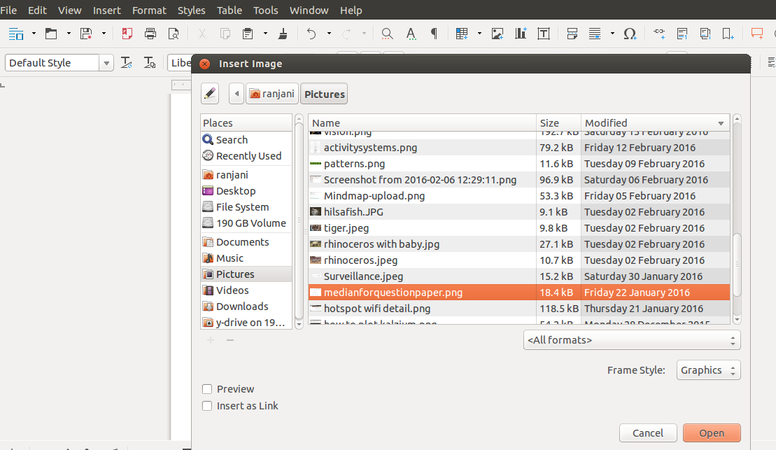
Inserting Image

Inserted Image View


After you insert any image if you want to resize (height*width), "Click on the image and select any of the dots on the corner of the image and drag to increase or decrease the size of the image".
Editing image
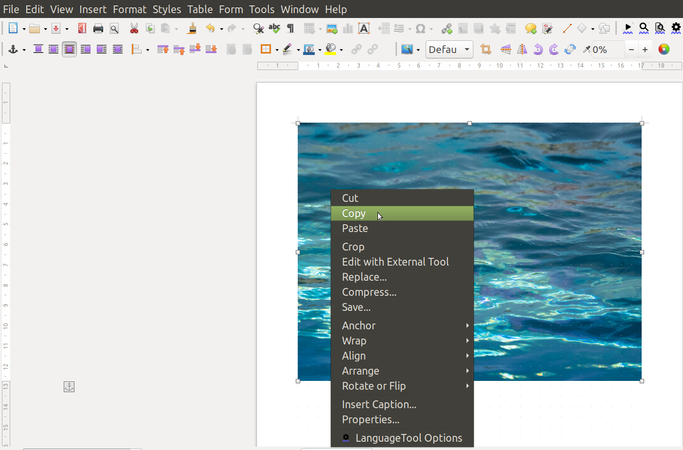
1. Using the Crop tool: To use the Crop tool "Click on the Crop icon" as shown in Image1 or right-click on the image and select Crop from the context menu. Cropping handles appear at the corners and mid-points of the sides of the image. Drag a handle to cut off part of the image. Click outside the image to turn off cropping mode.
2. Compressing images ("Inserting Image" image)
- If you insert a large image in your document and resize it to fit into the layout of the page, the complete original image is stored in the document file to preserve its content, resulting in a large document file to store or send by mail.
- If you can accept some loss of quality of the image rendering, you can compress or resize the image object to reduce its data volume while preserving its display in the page layout. You probably don’t want to compress something that will be professionally printed.
- "Right-click to select the image and open the context menu". Then choose "Compress" to open the Compress Image dialog. Click "OK" to apply the compression settings. If the resulting image is not acceptable, press "Ctrl+Z" to undo and choose another compression setting.
3. Transparency: set the transparency options for the image using this button as shown in Image1.
4. Rotating images: Rotate images if required using button showed in Image1:Image Formatting features
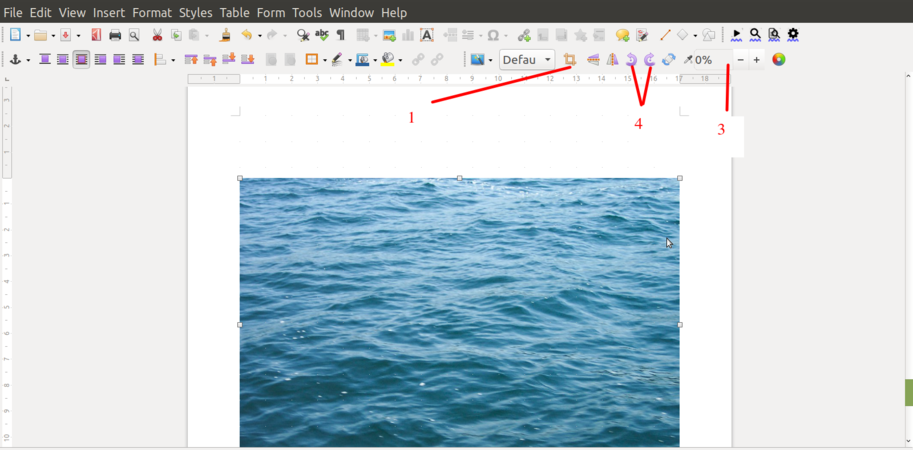
Image1: Image Formatting features
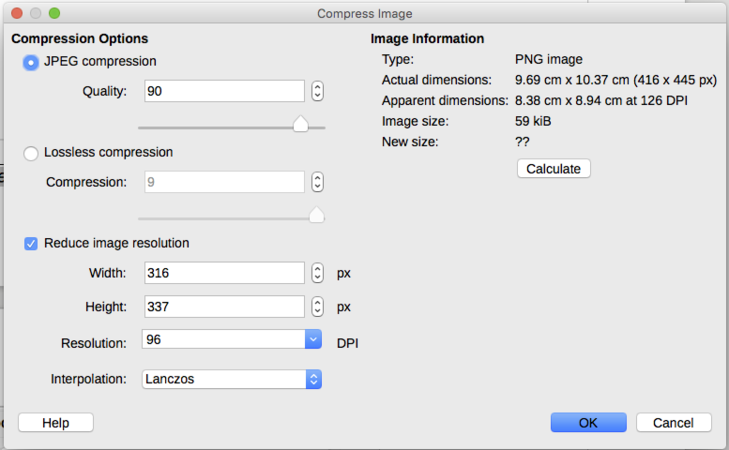
Image 2: Image compressing window


Inserting & Formatting Table
- To insert Table, go to "Table" from Menu bar and select "Insert Table", in given window choose required number of rows and columns. Alternatively you can also insert table from standard toolbar, Click on "table grid" from toolbar and move the cursor over the grid until you highlight the number of columns and rows you want. Click and the table appears in the document.
- You can format your table by selecting the options in 'Table'. Move your cursor inside the table and "Select --> Table". You can then adjust the row and column widths ("Table --> Size"), add or remove borders ("Table --> Properties --> Borders"), split or merge cells ("Table --> Merge Cells", "Table --> Split Cells") etc.
- You can also copy data from a spreadsheet. You can simply copy that data (in rows and columns) from the spreadsheet and paste into the document, it will create a copy of the spreadsheet in your document. If you do not want it as a spreadsheet, but only as a table, you need to select "Paste Special -> Formatted text option".
- Inserting Table
Insert Table
Select rows and columns


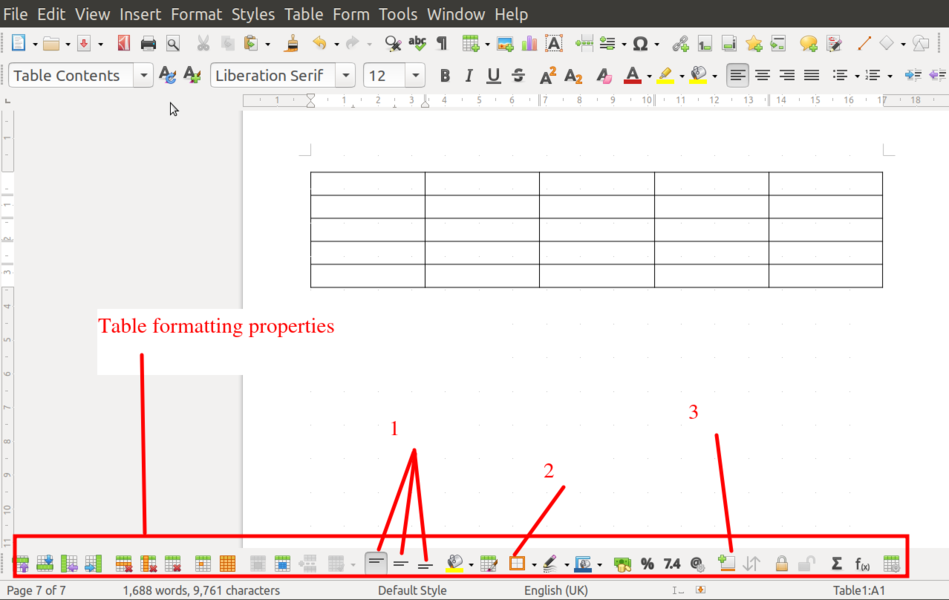
Table Formatting

- Align text to the top, middle and to the bottom
- Apply Borders to cells and tables
- Insert caption for the table
Finding and replacing text
Writer has two ways to find text within a document: The Find toolbar for fast searching and the Find & Replace dialog. If the Find toolbar is not visible, you can display it by choosing "View --> Toolbars --> Find" from the Menu bar or by pressing "Ctrl+F".
Using the Find toolbar
- To use the "Find" toolbar, click in the text input box and type your search text, then press "Enter" to find the next occurrence of that term from the current cursor position. Click the "Find Next" or "Find Previous" buttons as needed.
- Click the "Find All" button to select all instances of the search term within the document.
Using the Find toolbar

Using the Find & Replace dialog
To display the Find & Replace dialog, use the keyboard shortcut "Ctrl+H", or choose "Edit --> Find & Replace" from the Menu bar. Use the Find & Replace dialog:
- Type the text you want to find in the Find box.
- To replace the text with different text, type the new text in the Replace box.
- You can select various options, such as matching the case or matching whole words only. The other options include searching only in selected text, searching from the current cursor position backwards toward the beginning of the document, searching for similar words, and searching in comments.
- When you have set up your search, click "Find Next". As the document view moves to each found instance, replace the text by clicking "Replace".
Expanded Find & Replace dialog

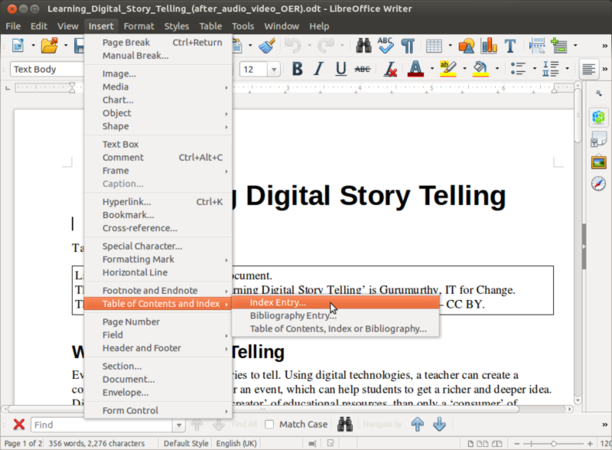
Creating an automatic Table of Contents
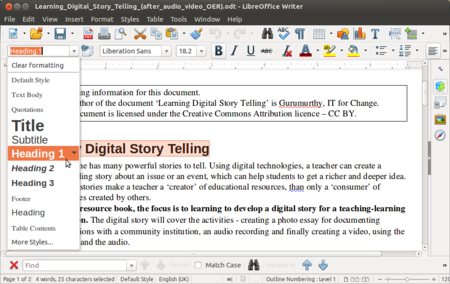
- Often it is useful to create text documents which are organize into headings and sub headings to denote different sections. This can be done in two ways,
- You can select the text you want to define as a heading and choose from the predefined headings style, by selecting from the first drop down box as shown in the first image.
- You can also define this from the Style menu by clicking on Style and selecting the given heading.
- You can define the appearance of each heading under the Styles and formatting option by changing the default font colour, size, etc.
- Once the headings are defined, you can insert the Table of Contents. Click in your document where you want to create the table of contents. Choose "Insert --> Table of Contents and Index --> Index Entry", just click on “OK”. For updating table of content, right click on the table of content and Update Index or Table of Contents. Note that if you add any headings in the document, it will not automatically update the Table of Contents, hence you will need to come to the Table of Contents and do the update manually.
- Inserting Table of Content
Paragraph style for Table of Content
Insert Table of Content


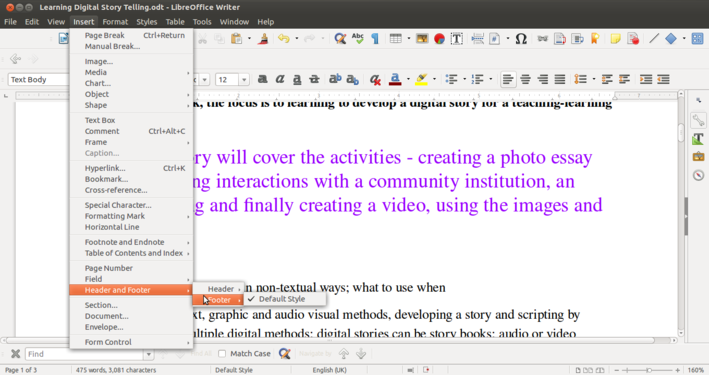
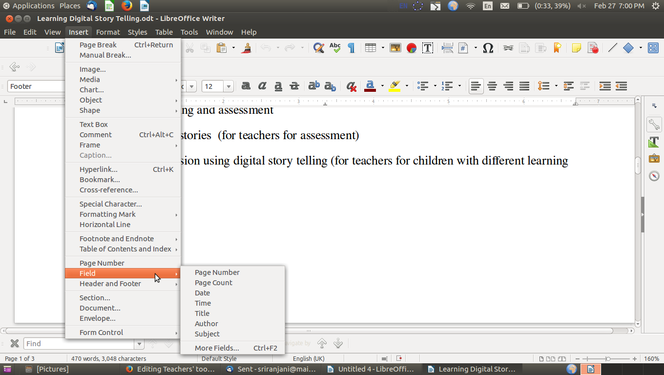
- You can add a header and/or footer to your document. You could provide the name of the document (or any other static information) in the footer. You can also insert page number in the header or the footer, which will be dynamically generated by Writer. It is useful to have page number and name of your document on every page, this is specially useful if the reader wants to read a print copy. LibreOffice Writer allows you to easily insert this information at the bottom or top of each page. This can be done using "Insert--->Footer".
- Once a footer has been inserted, you can go to the bottom of the page and insert multiple fields of information using "Insert --> Fields". You can type any text in this footer, it will come on all pages. Other than page number, other dynamic information you can provide is the date/time stamp of the document. A similar method can also be adopted for inserting a header as well.
Adding header and footers for the page
Inserting page fields


Spelling check
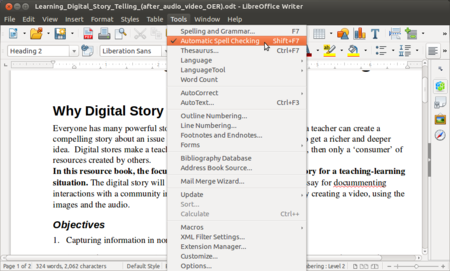
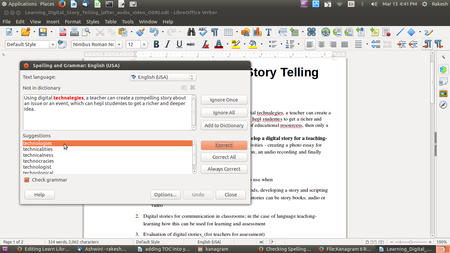
- Spelling - By enabling "Automatic spell checking" under Tools, you can check spelling within your document. You will see a red underline below a word spelt wrongly. (If you see a green line below a word, it suggests a grammatical error). You can move your cursor to the word and right click to get suggestions for correcting the spelling. In case you are clear your word is correct, you can also "Add your word to the dictionary" so that the next time you use it, it will not be treated as a wrong spelling.
- You can also do a manual spelling and grammar checking of the document. Select the text and click on "spelling and grammar" under "Tools" option. it will start looking spelling and grammar for the document. It is a good habit to always run a spelling check on your document before sharing.
- To check the spelling and the grammar of a text, the appropriate dictionaries must be installed. You can have dictionaries for your own language (Telugu, Urdu etc) installed, apart from the one in English.
- Formatting in LibreOffice Writer
Auto spell checking
Spelling and grammar checking


Customizing the Toolbar
- LibreOffice is a Open source application and therefore it allows the users to customize the interface.
- Menu is most useful section of Writer and its structure must be familiar to the user.
- The structure of menu and its items can be customized easily so that it becomes user friendly.
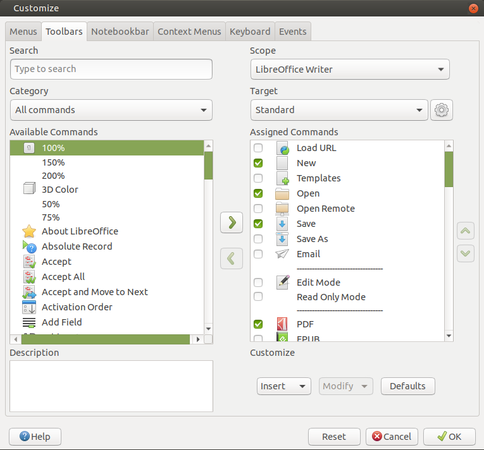
- To do this, go to "Tools-->Customize".
- Customize window will be having all the "Available Command" list on the left side. "Assigned command" on the right. If you want to remove the already assigned command then click on that particular command on the Assigned command list and move it towards Available command by clicking the left arrow button.
- Similarly if you want an additional command to your menu then choose the command from the "Available command" list. Click right arrow button to move it to the "Assigned command" list.
- You can also change the name of a particular command by clicking that command and click on "Modify --> Rename". Give the new name to that menu and click OK.
Customizing Toolbar

- To customize Toolbar, click on "Toolbar" tab in Customize window. As explained earlier, "Assigned Commands" will be having list of tools. The checked tools are already there in the toolbar and unchecked ones are available to move them to the toolbar. If you want any particular tool to be easily accessible and move to the toolbar then just check mark those and click "Apply-->OK".
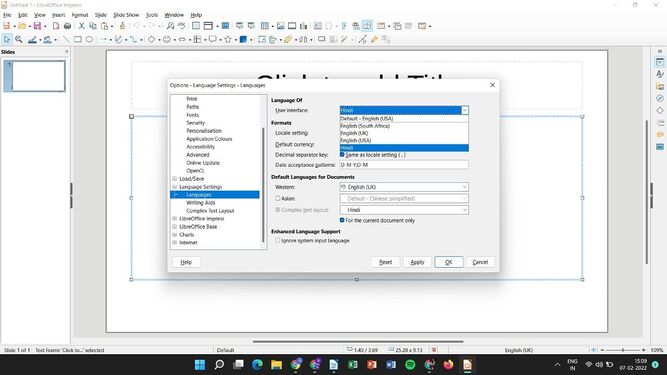
- In the way you can change or assign the Keyboard shortcuts. For this Click on Keyboard tab in the Customize window. You can choose a command and click on "Modify?" to change its shortcut or functionality.
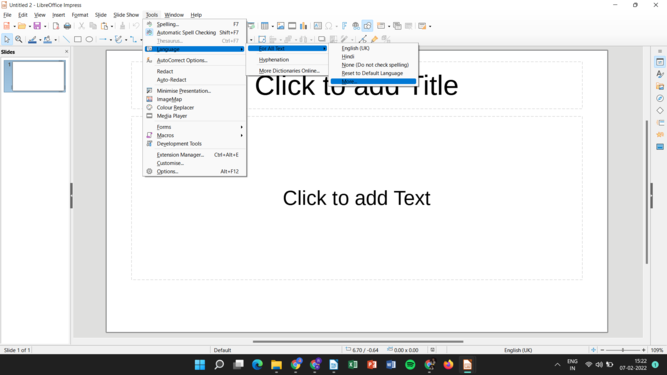
Menubar tools
Languages interface


Tracking changes to a document
You can use several methods to keep track of changes made to a document.
- Make your changes to a copy of the document (stored in a different folder, under a different name, or both), then use Writer to compare the two files and show the changes you made. This technique is particularly useful if you are the only person working on the document, as it avoids the increase in file size and complexity caused by the other methods.
- Save versions that are stored as part of the original file. However, this method can cause problems with large or complex documents, especially if you save a lot of versions. Avoid this method if you can.
- Use Writer’s change marks (often called “revision marks”) to show added or deleted material or changed formatting. Later, you or another person can review and accept or reject each change.
Preparing a document for review
When you send a document to someone else to review or edit, you may want to prepare it first so that the editor or reviewer does not have to remember to turn on the revision marks.
- Open the document. Check whether it contains multiple versions by clicking "File --> Versions". If multiple versions are listed, save the current version as a separate document with a different name and use this new document as the review copy.
- With the review copy open, make sure that change recording is turned on. The "Edit --> Track Changes --> Record Changes" menu item has a check mark next to it when recording is turned on.
- To begin tracking (recording) changes, click "Edit --> Track Changes --> Record Changes". To show or hide the display of changes, click "Edit --> Track Changes --> Show Changes".
- To stop recording changes, click "Edit --> Track Changes --> Record Changes" again.
The results of accepting or rejecting a change are as follows:
- Accept: Incorporates the alteration into the document and removes the change indication marking.
- Reject: Reverts the document to its original state and removes the change indication marking.
Changing Page orientation within the document
Creating a new style
Giving a name for a style

Changing page orientation
Inserting a page break


- LibreOffice Writer allows you to change the page orientation in between the document as per your needs.
- For example, If you have a document having data of three pages you can make the second page landscape and rest two to remain as portrait orientation.
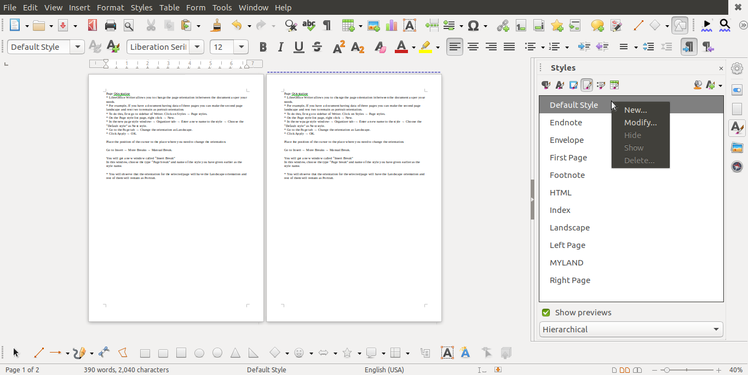
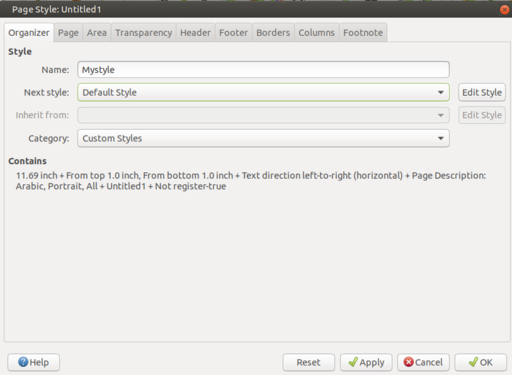
- To do this, first go to sidebar of Writer. Click on "Styles --> Page styles".
- On the Page style list page, "right click --> New".
- In the new page style window click on "Organizer tab --> Enter a new name to the style --> Choose the 'Default style' as Next style".
- Go to the "Page" tab --> Change the orientation as Landscape".
- Click "Apply --> OK".
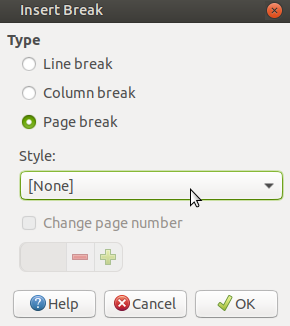
- Place the position of the cursor to the place where you need to change the orientation.
- Click on Insert --> More Breaks --> Manual Break". You will get a new window called "Insert Break"
- In this window, choose the type “Page break” and name of the style you have given earlier as the style name.
Sometimes it may happen that your cursor point becomes Landscape but remaining pages also changes their orientation and become Landscape. The solution for this is,
- Place the cursor from which you want your orientation to be Portrait. Click on Insert --> More Breaks --> Manual Break". You will get a new window called "Insert Break". In this window, choose the type “Page break” and name of the style as Default Style. (Usually this Default style will be having the page orientation as portrait. In this way your can make the rest of the pages again as Portrait.
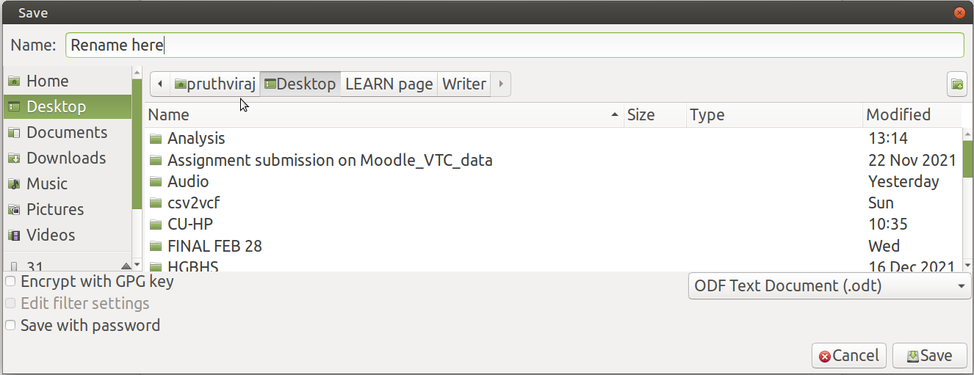
Saving the file
- Like in most applications, a file can be saved using the "File --> Save" command, or by the shortcut key "Ctrl+S". Always give a meaningful file name, reading which you should get an idea of the file contents. Often adding the month-year information when the file was created can be useful later File will save in .odt format, ODT is the short form of Open Document Text. ODT conforms to Open Document Format (ODF) which is recommended by the Government of India through its website Policy on open standards””.
- Like in most applications, a file can be exported to a PDF format. This is useful when you only need to print the file and do not want any changes to it. You can also export a document to a 'html' (web page) format, which can be opened by a web browser or MS word format which is supported by Windows operating system.
Save as ODT
Export as PDF
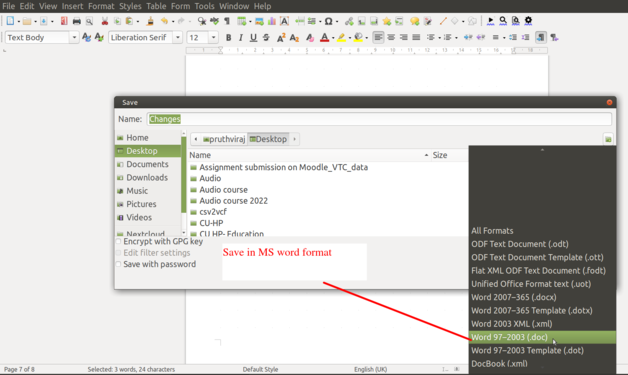
Save in MS word format


Advanced features
- Track changes (Recording editing changes by another person in another colour in the document, which can be accepted or rejected by the author)
- Multiple columns (Useful for making newsletters and magazines) and other page layout functions
Ideas for resource creation
- You can use this application to create and edit text resources. You can insert images, web links, hyper links in the document and connect the text to other resource formats. You can insert and edit tables, create sections (with section headings) and format it in many ways to create a text document.
- Infographics, posters, comic strips are some resources you can create using text editors in addition to making reports.