Difference between revisions of "Learn Image Viewer"
| (22 intermediate revisions by 6 users not shown) | |||
| Line 1: | Line 1: | ||
| − | |||
| − | |||
| − | |||
| − | |||
| − | |||
| − | |||
| − | |||
| − | |||
| − | |||
| − | |||
| − | |||
| − | |||
| − | |||
| − | |||
| − | |||
| − | |||
| − | |||
| − | |||
| − | |||
| − | |||
| − | |||
| − | |||
| − | |||
| − | |||
| − | |||
| − | |||
| − | |||
| − | |||
| + | ''[http://karnatakaeducation.org.in/KOER/index.php/%E0%B2%87%E0%B2%AE%E0%B3%87%E0%B2%9C%E0%B3%8D%E2%80%8C_%E0%B2%B5%E0%B3%8D%E0%B2%AF%E0%B3%82%E0%B2%B5%E0%B2%B0%E0%B3%8D_%E0%B2%95%E0%B2%B2%E0%B2%BF%E0%B2%AF%E0%B2%BF%E0%B2%B0%E0%B2%BF ಕನ್ನಡದಲ್ಲಿ ನೋಡಿ]'' | ||
| + | {{Template:Book-sidebar}} | ||
| + | ===Introduction=== | ||
| + | ====Basic information==== | ||
{| class="wikitable" | {| class="wikitable" | ||
|- | |- | ||
| − | | | + | |ICT Competency |
| − | | | + | |An image viewer is a computer program that can display stored graphical images. |
|- | |- | ||
| − | | | + | |Educational application and relevance |
| − | + | |Images have the potential to convey meaning powerfully and support story telling. Image Viewer allows you to present a slide show of images in a folder, these images can be organized in the order of the story to be told. | |
|- | |- | ||
| − | | | + | |Version |
| − | + | |version 1.26.0 | |
|- | |- | ||
| − | | | + | |Configuration |
| + | |No specific configuration requirements. | ||
|- | |- | ||
| − | | | + | |Other similar applications |
| − | + | |[https://nomacs.org/ Nomacs], [https://wiki.gnome.org/Apps/EyeOfGnome Eye of Gnome] | |
| + | |||
|- | |- | ||
| − | | | + | |The application on mobiles and tablets |
| − | + | |There are some application available in android versions. Perfect Viewer, Photo Gallery (Fish Bowl), Image Viewer and Nexus Photo Viewer. | |
| + | |- | ||
| + | |Development and community help | ||
| + | |[http://manpages.ubuntu.com/manpages/bionic/man1/eom.1.html Manual pages] | ||
| + | |||
| + | |} | ||
| + | ====Overview of Features==== | ||
| + | Image viewer allows you to view images and present as a gallery or a slideshow. You can zoom in or rotate your images as well as change display options. You can change image formats as well as print images. | ||
| + | |||
| + | ====Installation==== | ||
| + | #The application is part of the Ubuntu custom distribution. | ||
| + | #In case you do not find it on your computer, you can install by choosing “Image Viewer” in Ubuntu Software Center. | ||
| + | #If you would like to install through the terminal follow these steps below: | ||
| + | ##Open terminal by clicking (Ctrl+Alt+T), | ||
| + | ##Once Window page is open, in front of dollar($) symbol just type below command'''.''' | ||
| + | ##sudo apt-get install eom-common | ||
| + | ##Then, just type your Ubuntu password(it will not display on your screen), press Enter. | ||
| + | ===Working with the application=== | ||
| + | ====Opening Image Viewer==== | ||
| + | <gallery mode="packed" heights="300px" caption="Opening the image viewer application"> | ||
| + | File:Image Viewer opening.png|Opening from applications | ||
| + | File:Open with Image Viewer.png|Opening through image | ||
| + | </gallery> | ||
| + | #To open Image Viewer go to "Application --> Graphics --> Image Viewer". This will open the Image viewer application, as shown in the first image. | ||
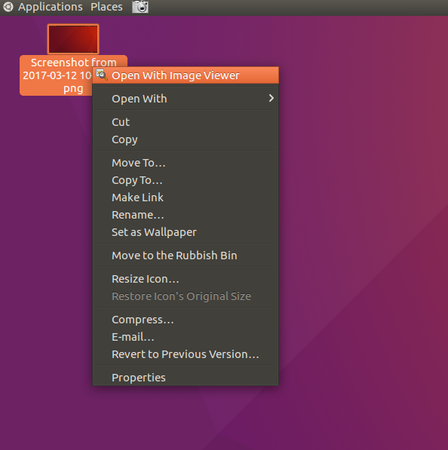
| + | #In the second image, another way of opening the Image Viewer application (or any other application) is shown. The method is to click on an image and right click and choose "Open with Image Viewer". | ||
| + | <gallery mode="packed" heights="250px" caption="Opening an image"> | ||
| + | File:Imageviewer1.png|Application with an image open | ||
| + | File:Imageviewer2.png|The image opening dialog box | ||
| + | </gallery> | ||
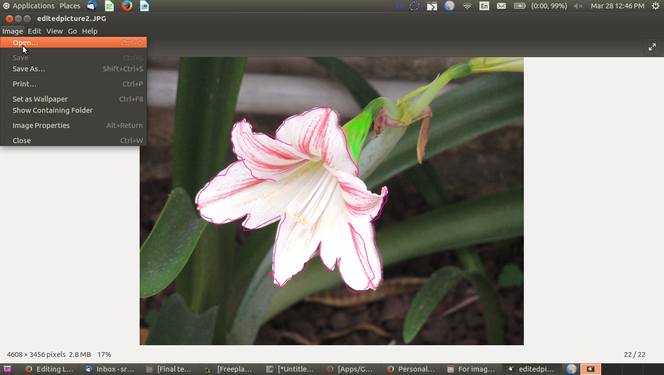
| + | #The first image shows you the Image viewer window with an image open. To open an image, you can click on "Image--->Open". | ||
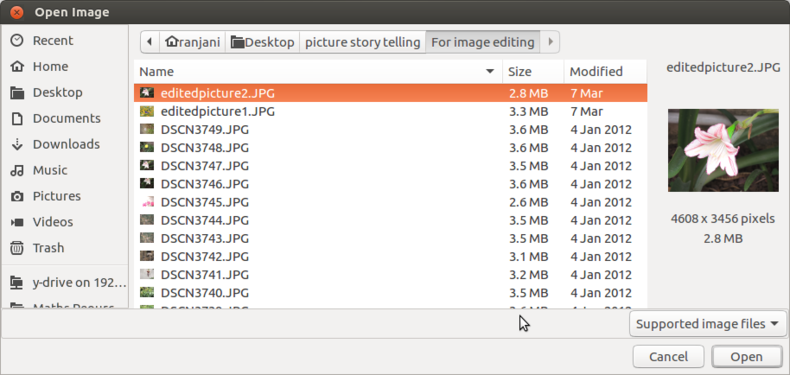
| + | #Once you click on "Image-->Open", you will see a dialog box open as shown in the second image and you can select the image you want to open. | ||
| + | |||
| + | ====Editing images in Image Viewer==== | ||
| + | Once the image is open using Image Viewer application, you can use the edit option to control the display. | ||
| + | <gallery mode="packed" heights="200px" caption="Changing the way the image looks"> | ||
| + | File:Image_Viewer3.png|Flipping horizontally | ||
| + | File:Imageviewer4.png|Rotating clockwise | ||
| + | </gallery> | ||
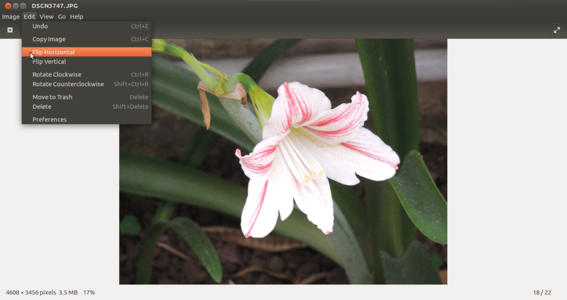
| + | #You can flip the images horizontally or vertically. In the first image you see a horizontally flipped image. | ||
| + | #You can also rotate the images clockwise or counterclockwise. In the second image, the image has been rotated clockwise<br> | ||
| + | These changed display options can also be saved as new images using the "Image--->Save as". If you use "Image--->Save", the existing image will be replaced. | ||
| + | ==== Viewing images in Image Viewer ==== | ||
| + | A very useful functionality of the Image Viewer application is the view option which allows a display or presentation of images. When you have a large collection of images, you can show them as a gallery or a slide show. The images below show you the various viewing options | ||
| + | <gallery mode="packed" heights="250px"> | ||
| + | File:Imageviewer5.png|Viewing an image | ||
| + | File:Imageviewer6.png|Viewing images a gallery | ||
| + | </gallery> | ||
| + | |||
| + | <gallery mode="packed" heights="250px"> | ||
| + | File:Imageviewer7.png|Viewing images as a slide show | ||
| + | </gallery> | ||
| + | *You can go to the folder of images and click on one image to open with Image Viewer. Once you have opened an image, you can use the arrow keys to click and view the other images. The default view shown in this image is the Best fit view. You can also select "View--->Full Screen". The images will be shown in the order in which they are shown in the folder (sorted by the file name). If you would like to see or show the images in a different order, you could do so by renaming the files, and prefixing file name with a serial number. In this case the file with prefix 1 will be shown first file with prefix 2 in its name. | ||
| + | *The second image shows a gallery view of images, with arrows for scrolling forward or backward | ||
| + | The slideshow option is shown in the third image. You can see a tool bar on top of the slide show which allows you to navigate the slide show. Under "Edit-->Preferences-->Slide show", you can set the preferences for the slide show, in terms of time between images and also whether images should be displayed in a loop. | ||
| − | + | '''Zoom in and Zoom out the images''' | |
| + | * Image can be zoom in or zoom out based on the user requirement. To do this you can click on "View--> Zoom in" or "View--> Zoom out". | ||
| − | + | * Alternatively there is a '+' and '-' in the toolbar to zoom in and zoom out the image respectively. | |
| − | |||
| − | == | + | ====To set an image to desktop background==== |
| − | + | <gallery mode="packed" heights="250px"> | |
| + | File:Desktop bg.png|Setting the desktop background | ||
| + | </gallery> | ||
| + | {{clear}} | ||
| + | * You can set an image as desktop background. | ||
| + | * To do this, Open Image Viewer from "Applications --> Graphics--> Image Viewer". | ||
| + | * In the Image Viewer interface, Click on "Image --> Open" to open the image. | ||
| + | * Click "Image --> Set as Desktop Background". | ||
| + | {{clear}} | ||
| − | == | + | ====Checking the image resolution==== |
| − | + | * It is sometimes required to know the size of image to resize it to some standard resolution. In such situation we can go to "View-->Side Pane" to see the image properties for any image. It will give you size and type of the image and other related information. | |
| + | * Once you click on Side Pane the settings will preserve and will show you the properties for all the images that you open until you uncheck the option Side pane again for any image. | ||
| + | {{clear}} | ||
| + | ====Saving the files and formats==== | ||
| + | <gallery mode="packed" heights="250px"> | ||
| + | File:Imageviewer8.png|Save window | ||
| + | </gallery> | ||
| + | {{clear}} | ||
| + | We saw earlier that you could change the display option of the images. Once you have changed this, you can click on "Image-->Save As" and save it as a different file. | ||
| − | + | You can also use the "Save as" option to convert the image to a png, jpeg or bmp format through "File --> Save as" option. | |
| + | {{clear}} | ||
| − | = | + | ===Ideas for resource creation=== |
| − | + | #Images can be flipped and saved and the collection can be shown as a resource for lesson on symmetry, orientation. | |
| − | + | #Creating a photo or image essay in the form of a slide show to tell a story. | |
| − | + | #Using a [https://teacher-network.in/OER/index.php/Learn_VokoscreenNG Vokoscreen-NG] tool you can create an audio visual story with pictures and narration. | |
| − | |||
| − | |||
| − | |||
| − | |||
| − | |||
| − | |||
| − | |||
| − | |||
| − | |||
| − | |||
| − | |||
| − | |||
| − | |||
| − | |||
| − | |||
| − | =References= | + | ===References=== |
| − | [https://en.wikipedia.org/wiki/Image_viewer | + | [https://en.wikipedia.org/wiki/Image_viewer Wikipedia] |
[[Category:Explore an application]] | [[Category:Explore an application]] | ||
Latest revision as of 07:03, 16 June 2022

Introduction
Basic information
| ICT Competency | An image viewer is a computer program that can display stored graphical images. |
| Educational application and relevance | Images have the potential to convey meaning powerfully and support story telling. Image Viewer allows you to present a slide show of images in a folder, these images can be organized in the order of the story to be told. |
| Version | version 1.26.0 |
| Configuration | No specific configuration requirements. |
| Other similar applications | Nomacs, Eye of Gnome |
| The application on mobiles and tablets | There are some application available in android versions. Perfect Viewer, Photo Gallery (Fish Bowl), Image Viewer and Nexus Photo Viewer. |
| Development and community help | Manual pages |
Overview of Features
Image viewer allows you to view images and present as a gallery or a slideshow. You can zoom in or rotate your images as well as change display options. You can change image formats as well as print images.
Installation
- The application is part of the Ubuntu custom distribution.
- In case you do not find it on your computer, you can install by choosing “Image Viewer” in Ubuntu Software Center.
- If you would like to install through the terminal follow these steps below:
- Open terminal by clicking (Ctrl+Alt+T),
- Once Window page is open, in front of dollar($) symbol just type below command.
- sudo apt-get install eom-common
- Then, just type your Ubuntu password(it will not display on your screen), press Enter.
Working with the application
Opening Image Viewer
- Opening the image viewer application

Opening from applications
Opening through image


- To open Image Viewer go to "Application --> Graphics --> Image Viewer". This will open the Image viewer application, as shown in the first image.
- In the second image, another way of opening the Image Viewer application (or any other application) is shown. The method is to click on an image and right click and choose "Open with Image Viewer".
- Opening an image
Application with an image open
The image opening dialog box


- The first image shows you the Image viewer window with an image open. To open an image, you can click on "Image--->Open".
- Once you click on "Image-->Open", you will see a dialog box open as shown in the second image and you can select the image you want to open.
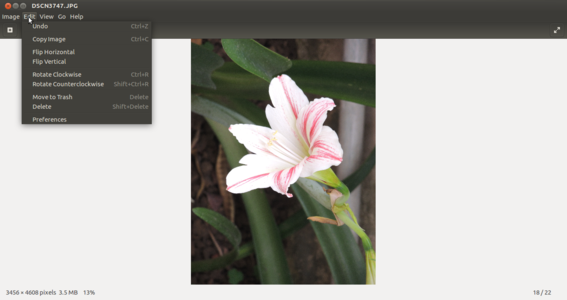
Editing images in Image Viewer
Once the image is open using Image Viewer application, you can use the edit option to control the display.
- Changing the way the image looks
Flipping horizontally
Rotating clockwise


- You can flip the images horizontally or vertically. In the first image you see a horizontally flipped image.
- You can also rotate the images clockwise or counterclockwise. In the second image, the image has been rotated clockwise
These changed display options can also be saved as new images using the "Image--->Save as". If you use "Image--->Save", the existing image will be replaced.
Viewing images in Image Viewer
A very useful functionality of the Image Viewer application is the view option which allows a display or presentation of images. When you have a large collection of images, you can show them as a gallery or a slide show. The images below show you the various viewing options

Viewing an image

Viewing images a gallery


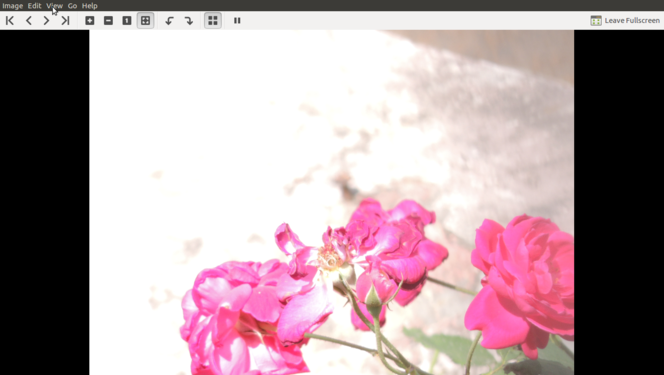
Viewing images as a slide show

- You can go to the folder of images and click on one image to open with Image Viewer. Once you have opened an image, you can use the arrow keys to click and view the other images. The default view shown in this image is the Best fit view. You can also select "View--->Full Screen". The images will be shown in the order in which they are shown in the folder (sorted by the file name). If you would like to see or show the images in a different order, you could do so by renaming the files, and prefixing file name with a serial number. In this case the file with prefix 1 will be shown first file with prefix 2 in its name.
- The second image shows a gallery view of images, with arrows for scrolling forward or backward
The slideshow option is shown in the third image. You can see a tool bar on top of the slide show which allows you to navigate the slide show. Under "Edit-->Preferences-->Slide show", you can set the preferences for the slide show, in terms of time between images and also whether images should be displayed in a loop.
Zoom in and Zoom out the images
- Image can be zoom in or zoom out based on the user requirement. To do this you can click on "View--> Zoom in" or "View--> Zoom out".
- Alternatively there is a '+' and '-' in the toolbar to zoom in and zoom out the image respectively.
To set an image to desktop background
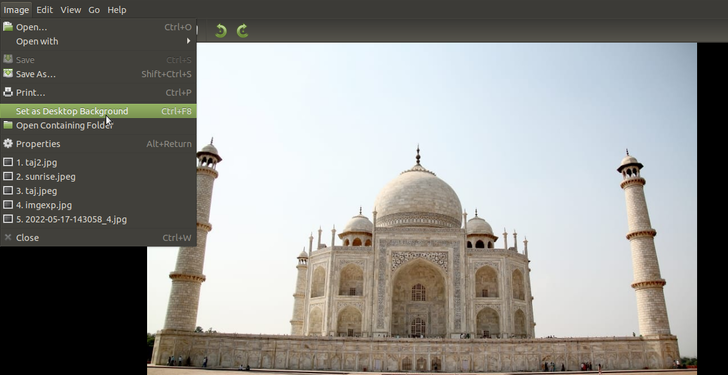
Setting the desktop background

- You can set an image as desktop background.
- To do this, Open Image Viewer from "Applications --> Graphics--> Image Viewer".
- In the Image Viewer interface, Click on "Image --> Open" to open the image.
- Click "Image --> Set as Desktop Background".
Checking the image resolution
- It is sometimes required to know the size of image to resize it to some standard resolution. In such situation we can go to "View-->Side Pane" to see the image properties for any image. It will give you size and type of the image and other related information.
- Once you click on Side Pane the settings will preserve and will show you the properties for all the images that you open until you uncheck the option Side pane again for any image.
Saving the files and formats

Save window

We saw earlier that you could change the display option of the images. Once you have changed this, you can click on "Image-->Save As" and save it as a different file.
You can also use the "Save as" option to convert the image to a png, jpeg or bmp format through "File --> Save as" option.
Ideas for resource creation
- Images can be flipped and saved and the collection can be shown as a resource for lesson on symmetry, orientation.
- Creating a photo or image essay in the form of a slide show to tell a story.
- Using a Vokoscreen-NG tool you can create an audio visual story with pictures and narration.