Difference between revisions of "Learn Freeplane"
| Line 2: | Line 2: | ||
{| cellspacing="0" | {| cellspacing="0" | ||
| [[File:Book.jpg|none|80px|Book image]] | | [[File:Book.jpg|none|80px|Book image]] | ||
| − | | style="padding-left:2px;" | Go back to | + | | style="padding-left:2px;" |Go back to [[ICT student textbook]] [[ICT teacher handbook]] |
|}</div> | |}</div> | ||
| − | =Introduction= | + | ===Introduction=== |
| − | |||
| − | + | ==== Basic information ==== | |
| − | == | ||
| − | |||
| − | |||
| − | == | ||
| − | |||
| − | |||
| − | |||
| − | |||
| − | |||
| − | |||
| − | |||
| − | |||
| − | |||
| − | |||
| − | |||
| − | |||
| − | |||
| − | |||
| − | |||
| − | |||
| − | |||
| − | |||
| − | |||
| − | |||
| − | |||
| − | |||
{| class="wikitable" | {| class="wikitable" | ||
| + | |ICT Competency | ||
| + | |Freeplane is a free and open source software application that helps you create and edit concept maps, as a generic resource creation. For the purposes of this section, we can treat 'concept mapping' as nearly synonymous with 'mind mapping'. | ||
|- | |- | ||
| − | | | + | |Educational application and relevance |
| − | + | |Making concept maps can support thinking, brainstorming, sharing information and documenting meetings and group processes. | |
| + | Educators consider that Concept mapping is a good approach for build skills in students for ideating and organizing ideas; they also find it a great asset for teaching. It is a great tool to students to help them organize their thought processes when writing. Teachers and students can use this application to collaboratively or individually create concept maps on an idea or explore a problem. | ||
|- | |- | ||
| − | | | + | |Version |
| − | + | |Version - 1.3.15 | |
| − | |||
| − | |||
|- | |- | ||
| − | | | + | |Configuration |
| − | + | |This tool has no specific configuration requirements. It is available as a part of Ubuntu custom distribution. | |
|- | |- | ||
| − | | | + | |Other similar applications |
| − | | | + | |[[Learn Freemind|Freemind]] |
|- | |- | ||
| − | | | + | |The application on mobiles and tablets |
| − | | | + | |There is no concept map creation tool in mobiles, but you can view concept maps In Android Mobiles using Freeplane reader or Simple Mind app. |
|- | |- | ||
| − | | | + | |Development and community help |
| − | + | |[https://www.freeplane.org/ Freeplane website] | |
| − | + | |} | |
| − | + | ====Overview of Features==== | |
| − | + | Freeplane allows you to create concept maps, as a textual resource that can be organized graphically, in the form of a map or tree of ideas; it provides a pictorial overview of the concepts, related concepts / sub-concepts for a topic. A concept map helps you to create a textual OER with possibilities for linking to additional resources (on your computer as well as on the web), adding annotations as well as images. Freeplane allows you to organize and order ideas into a hierarchy connected by lines (edges). Nodes can also be linked with free lines (connectors) and labels. The concept map can be exported as an image as well as a text document. | |
| − | + | ||
| − | + | ====Installation==== | |
| − | + | #The application is part of the Ubuntu custom distribution. | |
| − | + | #In case you do not find it on your computer, you can install by typing <code>Freeplane</code> on top search bar in Software Centre. | |
| − | + | #If you would like to install through the terminal follow these steps below: | |
| − | + | ##Open terminal by clicking Applications->System Tools->Terminal or through Keyboard shortcut <code>Ctrl+Alt+T</code> | |
| − | + | ##In the terminal window, type below command and press enter to start the installation by providing your machine password: | |
| − | + | ##<code>sudo apt-get install freeplane</code> | |
| + | |||
| + | === Working with the application === | ||
| + | ====Creating a map ==== | ||
| + | <gallery mode="packed" heights="250px" caption="Creating a concept map"> | ||
| + | File:Freeplane1_Opening_Freeplane.png|Opening Freeplane | ||
| + | File:Freeplane2_rootnode.png|Main window of Freeplane | ||
| + | </gallery> | ||
| + | To learn working with Freeplane, we will start creating a concept map for Digital Story Telling; you will see above that Freeplane has opened a window with a box with text "New mindmap". This node, also called the "root node" will contain the core idea/ theme to be discussed in the concept map. You can click on File option to save this map; when the map is saved it will get saved with the name in the root node. | ||
| + | |||
| + | ==== Inserting nodes ==== | ||
| + | Concept maps can be stored on your folders; they are saved with an extension ".mm". We have created a concept map called Learning Digital Story Telling.mm. After the root node is created, additional ideas are added by adding more nodes, called child nodes. The concept map gets built by adding further child nodes, for topics and sub-topics. You can keep adding child nodes to any node. Use the ‘insert’ key to create a ‘child node’ this is a sub-concept of your current concept. Use the ‘enter’ key to create a ‘sibling’ this is a parallel concept to your current concept. Thus you can create a concept map with knowing just two functions – add child node (insert) and add sibling node (enter). In this manner, a concept map can be used to classify and categorise information. | ||
| + | <gallery mode="packed" heights="250px" caption="Child and sibling nodes"> | ||
| + | File:Conceptmap2.png|Child Node | ||
| + | File:COL - Concept Map on DST.png|Sibling Node | ||
| + | </gallery> | ||
| + | Our map has nodes for the ‘why’, ‘what’ and ‘how’ of DST, with sub-nodes. | ||
| + | #The first image shows the creation of a concept map with the first child node. | ||
| + | #The second image shows the completed concept map with child nodes and sibling nodes. | ||
| + | |||
| + | ==== Linking nodes==== | ||
| + | <gallery mode=packed heights = 250px > | ||
| + | File:Freeplane linking nodes.png|Connect two nodes | ||
| + | </gallery> | ||
| + | #When you discuss concepts, you can notice that sometimes concepts are connected, and you want to link them to study in detail. For doing this you can add a graphical link (an arrow) to connect two nodes. To do this select two nodes, then go to Menu Bar and choose EDIT > CONNECT option. then you can see graphical link which is connected to two nodes. You can click on the arrow and move it around. | ||
| + | {{clear}} | ||
| − | + | ==== Hyperlinking files and weblinks ==== | |
| − | + | <gallery mode="packed" heights="150px" caption="Adding hyperlinks"> | |
| − | You can | + | File:Freeplane4_inserting_hyperlink.png|Node with a hyperlink |
| − | + | File:Freeplane3_inserting_hyperlink.png|Linking to resources on the internet | |
| − | + | File:Freeplanelinkfile.png|Linking to resources on the computer | |
| − | + | </gallery> | |
| + | # In the first image, did you notice the red arrow in the root node of our concept map? This main node has a hyper-link which opens the Wikipedia page on digital story telling. You can embed a hyper-link on a node, such that clicking on the node can connect to related resources. In our Learning Digital Story Telling.mm concept map, we have inserted a hyper-link for the main node ‘Learning Digital Story Telling’. | ||
| + | # To do this Move your cursor to this node and select Edit → Link → Add or Modify hyperlink (type). You can also use the keyboard short cut CTRL-K. Freeplane will open an input bar as shown in the second image. We will type in our web page address <nowiki>https://en.wikipedia.org/wiki/Digital_storytelling</nowiki> into this input bar | ||
| + | # You can also add a hyperlink to a local file on your computer. If you select When you click on Edit-->Link-->Add Hyperlink (choose) allows you to link to a file on a folder on your computer. The third image shows how to choose a file from your folders to link. | ||
| − | == | + | ====Adding notes and note window==== |
| + | <gallery mode="packed" heights="200px" caption="Adding notes and note window"> | ||
| + | File:Freeplane5_inserting_notes.png|Node with a note added | ||
| + | File:Freeplane6_howtoaddnote.png|How to add a note | ||
| + | File:Freeplane7_note_window.png|Typing in the note window | ||
| + | </gallery> | ||
| + | #In our Learning Digital Story Telling.mm concept map, you will also see a yellow label beside the arrow and if you place your mouse over the yellow label, you will see a note description. | ||
| + | #To add a note, you can click on the node, as shown in the second image, go to View--->Notes--->Display note panel | ||
| + | #You can type your note in the note window which opens as shown in the third image. You can change the position and size of this note window. | ||
| − | ==Saving | + | ====Saving and exporting==== |
| − | + | <gallery mode=packed heights = 250px caption="Saving and exporting"> | |
| + | File:Freeplane8_saving.png|Saving the map | ||
| + | File:Freeplane9_exporting.png|Exporting the map | ||
| + | </gallery> | ||
| + | #By default your concept map is saved by Freeplane as a '.mm' format file as shown in the first image. While saving the file, Freeplane will display the file browser, to allow you to select the folder in which you can save your file. By default, the file is saved in your home folder. | ||
| + | #However, the concept map can be saved in many other formats. You can export the map to a text document file (in .odt or .doc formats). You can also export the map as an image (in .png or .jpeg formats) or as a web page (in .html format), as shown in the second image. | ||
| − | == | + | ====Typing Telugu in Freeplane==== |
| − | |||
| − | + | Freeplane will not allow you to type Telugu directly, you will need to change font family in Freeplane by the following: | |
| − | # | + | # Go to Tools -> Preferences -> Appearance -> |
| − | # | + | # In the font family option select Telugu fonts and click on '''Okay'''. |
| − | # | + | # Freeplane may ask you to restart, after which you can type in Telugu. |
| − | + | <br> | |
| + | '''Note:'''If you are using older version of Freeplane, this approach will not work. You need to type Telugu in Libreoffice writer and copy paste it into Freeplane, and change the font to Telugu for each node. | ||
| − | = | + | ====Saving the file==== |
| − | + | Like in most applications, a file can be saved using the FILE – SAVE command, or by the shortcut key CTRL-S. Always give a meaningful file name, reading which you should get an idea of the file contents. Freeplane saves files with a .mm extension. You can also export a concept map to image (png or jpeg) and text (odt and html) formats. | |
| − | |||
| − | |||
| − | |||
| − | |||
| − | |||
| − | |||
| − | |||
| − | |||
| − | |||
| − | |||
| − | |||
| − | = | + | ==== Advanced features ==== |
| − | + | # You can insert images directly in your nodes. You can create visual representation using 'Cloud' etc. You can enter detailed notes for any node. When you export it to a ODT, you can see this as a document, with the 'note' information being the text in the note, and all the nodes will become headings. This way you can even write a document using Freeplane | |
| + | # You can import your entire folder structure as a mind map. | ||
| + | # Our aim here is to get you started with concept map OER creation using Freeplane. For advanced functions, you should refer to the User Manual for the application. The Freeplane tutorial is available within Freeplane itself, which you can access any time by pressing the F1 function key. ''The tutorial itself is a concept map, and you should browse this concept map, not only to get help that you may require, but also as a lesson on how a concept map can communicate so much information in such a simple manner!!'' | ||
| − | =Ideas for resource creation= | + | ===Ideas for resource creation=== |
| + | Freeplane a good tool to start your resource creation work. You should develop a concept map for the topic you want to develop a resource on. The ideas you have about the topic, the sequencing of ideas and sub concepts, the specific points for each idea / sub-concept can be developed on the map. Links between nodes, with web pages, notes explaining concepts can all be inserted in the concept map. The power of the digital concept map is that you can keep revising the nodes, adding and deleting, moving and copying nodes as you want. This makes the process quite dynamic. | ||
| − | + | Once you have completed your concept map you can share it with your colleagues for feedback with which you can refine the concept map still further. | |
| − | |||
| + | ===References=== | ||
| + | [https://en.wikipedia.org/wiki/Freeplane Wikipedia] | ||
[[Category:Explore an application]] | [[Category:Explore an application]] | ||
Revision as of 09:17, 18 April 2017

Introduction
Basic information
| ICT Competency | Freeplane is a free and open source software application that helps you create and edit concept maps, as a generic resource creation. For the purposes of this section, we can treat 'concept mapping' as nearly synonymous with 'mind mapping'. |
| Educational application and relevance | Making concept maps can support thinking, brainstorming, sharing information and documenting meetings and group processes.
Educators consider that Concept mapping is a good approach for build skills in students for ideating and organizing ideas; they also find it a great asset for teaching. It is a great tool to students to help them organize their thought processes when writing. Teachers and students can use this application to collaboratively or individually create concept maps on an idea or explore a problem. |
| Version | Version - 1.3.15 |
| Configuration | This tool has no specific configuration requirements. It is available as a part of Ubuntu custom distribution. |
| Other similar applications | Freemind |
| The application on mobiles and tablets | There is no concept map creation tool in mobiles, but you can view concept maps In Android Mobiles using Freeplane reader or Simple Mind app. |
| Development and community help | Freeplane website |
Overview of Features
Freeplane allows you to create concept maps, as a textual resource that can be organized graphically, in the form of a map or tree of ideas; it provides a pictorial overview of the concepts, related concepts / sub-concepts for a topic. A concept map helps you to create a textual OER with possibilities for linking to additional resources (on your computer as well as on the web), adding annotations as well as images. Freeplane allows you to organize and order ideas into a hierarchy connected by lines (edges). Nodes can also be linked with free lines (connectors) and labels. The concept map can be exported as an image as well as a text document.
Installation
- The application is part of the Ubuntu custom distribution.
- In case you do not find it on your computer, you can install by typing
Freeplaneon top search bar in Software Centre. - If you would like to install through the terminal follow these steps below:
- Open terminal by clicking Applications->System Tools->Terminal or through Keyboard shortcut
Ctrl+Alt+T - In the terminal window, type below command and press enter to start the installation by providing your machine password:
sudo apt-get install freeplane
- Open terminal by clicking Applications->System Tools->Terminal or through Keyboard shortcut
Working with the application
Creating a map
- Creating a concept map

Opening Freeplane

Main window of Freeplane


To learn working with Freeplane, we will start creating a concept map for Digital Story Telling; you will see above that Freeplane has opened a window with a box with text "New mindmap". This node, also called the "root node" will contain the core idea/ theme to be discussed in the concept map. You can click on File option to save this map; when the map is saved it will get saved with the name in the root node.
Inserting nodes
Concept maps can be stored on your folders; they are saved with an extension ".mm". We have created a concept map called Learning Digital Story Telling.mm. After the root node is created, additional ideas are added by adding more nodes, called child nodes. The concept map gets built by adding further child nodes, for topics and sub-topics. You can keep adding child nodes to any node. Use the ‘insert’ key to create a ‘child node’ this is a sub-concept of your current concept. Use the ‘enter’ key to create a ‘sibling’ this is a parallel concept to your current concept. Thus you can create a concept map with knowing just two functions – add child node (insert) and add sibling node (enter). In this manner, a concept map can be used to classify and categorise information.
- Child and sibling nodes
Child Node
Sibling Node


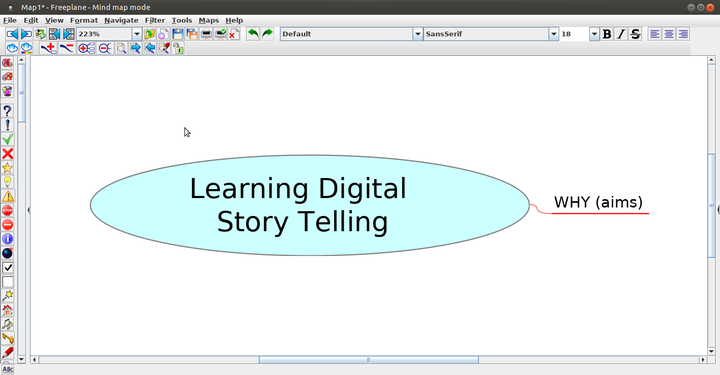
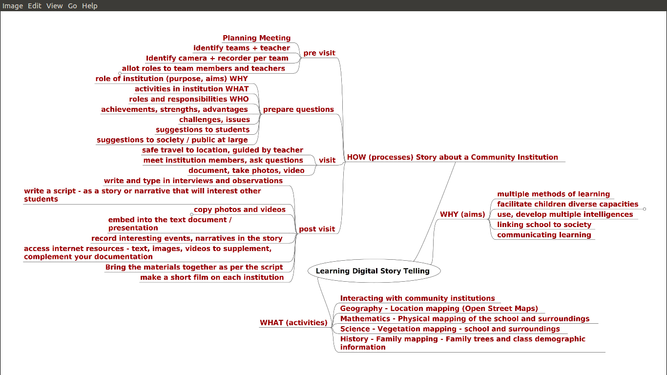
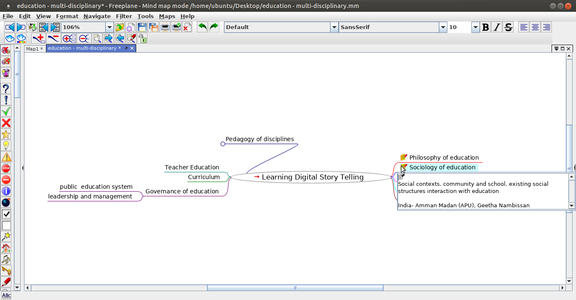
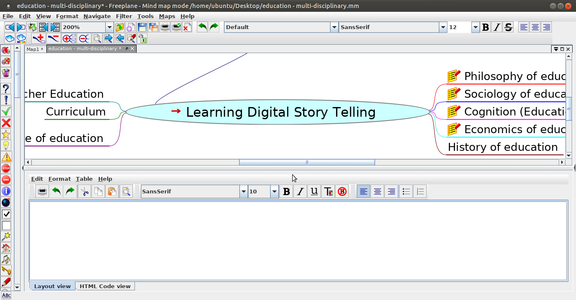
Our map has nodes for the ‘why’, ‘what’ and ‘how’ of DST, with sub-nodes.
- The first image shows the creation of a concept map with the first child node.
- The second image shows the completed concept map with child nodes and sibling nodes.
Linking nodes
Connect two nodes

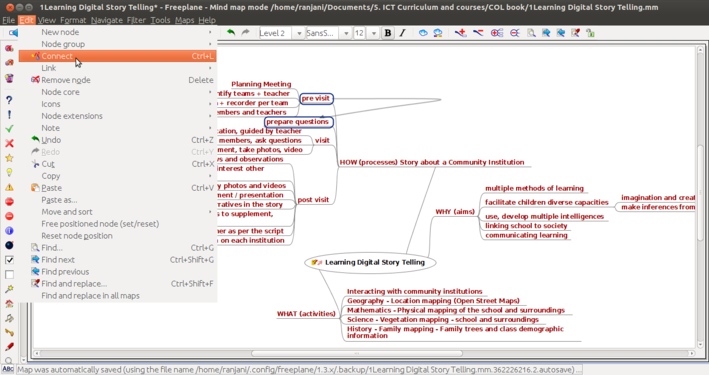
- When you discuss concepts, you can notice that sometimes concepts are connected, and you want to link them to study in detail. For doing this you can add a graphical link (an arrow) to connect two nodes. To do this select two nodes, then go to Menu Bar and choose EDIT > CONNECT option. then you can see graphical link which is connected to two nodes. You can click on the arrow and move it around.
Hyperlinking files and weblinks
- Adding hyperlinks
Node with a hyperlink
Linking to resources on the internet

Linking to resources on the computer


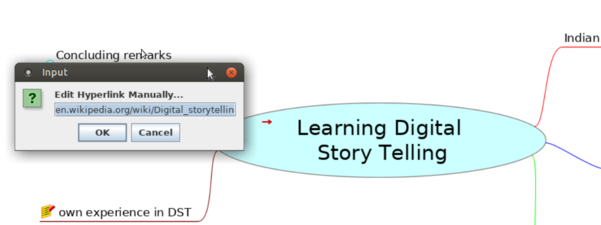
- In the first image, did you notice the red arrow in the root node of our concept map? This main node has a hyper-link which opens the Wikipedia page on digital story telling. You can embed a hyper-link on a node, such that clicking on the node can connect to related resources. In our Learning Digital Story Telling.mm concept map, we have inserted a hyper-link for the main node ‘Learning Digital Story Telling’.
- To do this Move your cursor to this node and select Edit → Link → Add or Modify hyperlink (type). You can also use the keyboard short cut CTRL-K. Freeplane will open an input bar as shown in the second image. We will type in our web page address https://en.wikipedia.org/wiki/Digital_storytelling into this input bar
- You can also add a hyperlink to a local file on your computer. If you select When you click on Edit-->Link-->Add Hyperlink (choose) allows you to link to a file on a folder on your computer. The third image shows how to choose a file from your folders to link.
Adding notes and note window
- Adding notes and note window
Node with a note added

How to add a note
Typing in the note window


- In our Learning Digital Story Telling.mm concept map, you will also see a yellow label beside the arrow and if you place your mouse over the yellow label, you will see a note description.
- To add a note, you can click on the node, as shown in the second image, go to View--->Notes--->Display note panel
- You can type your note in the note window which opens as shown in the third image. You can change the position and size of this note window.
Saving and exporting
- Saving and exporting

Saving the map
Exporting the map


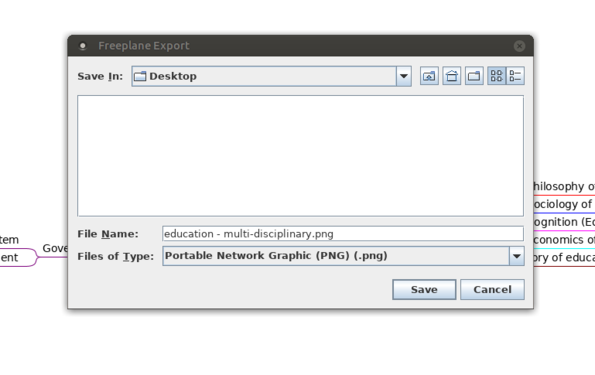
- By default your concept map is saved by Freeplane as a '.mm' format file as shown in the first image. While saving the file, Freeplane will display the file browser, to allow you to select the folder in which you can save your file. By default, the file is saved in your home folder.
- However, the concept map can be saved in many other formats. You can export the map to a text document file (in .odt or .doc formats). You can also export the map as an image (in .png or .jpeg formats) or as a web page (in .html format), as shown in the second image.
Typing Telugu in Freeplane
Freeplane will not allow you to type Telugu directly, you will need to change font family in Freeplane by the following:
- Go to Tools -> Preferences -> Appearance ->
- In the font family option select Telugu fonts and click on Okay.
- Freeplane may ask you to restart, after which you can type in Telugu.
Note:If you are using older version of Freeplane, this approach will not work. You need to type Telugu in Libreoffice writer and copy paste it into Freeplane, and change the font to Telugu for each node.
Saving the file
Like in most applications, a file can be saved using the FILE – SAVE command, or by the shortcut key CTRL-S. Always give a meaningful file name, reading which you should get an idea of the file contents. Freeplane saves files with a .mm extension. You can also export a concept map to image (png or jpeg) and text (odt and html) formats.
Advanced features
- You can insert images directly in your nodes. You can create visual representation using 'Cloud' etc. You can enter detailed notes for any node. When you export it to a ODT, you can see this as a document, with the 'note' information being the text in the note, and all the nodes will become headings. This way you can even write a document using Freeplane
- You can import your entire folder structure as a mind map.
- Our aim here is to get you started with concept map OER creation using Freeplane. For advanced functions, you should refer to the User Manual for the application. The Freeplane tutorial is available within Freeplane itself, which you can access any time by pressing the F1 function key. The tutorial itself is a concept map, and you should browse this concept map, not only to get help that you may require, but also as a lesson on how a concept map can communicate so much information in such a simple manner!!
Ideas for resource creation
Freeplane a good tool to start your resource creation work. You should develop a concept map for the topic you want to develop a resource on. The ideas you have about the topic, the sequencing of ideas and sub concepts, the specific points for each idea / sub-concept can be developed on the map. Links between nodes, with web pages, notes explaining concepts can all be inserted in the concept map. The power of the digital concept map is that you can keep revising the nodes, adding and deleting, moving and copying nodes as you want. This makes the process quite dynamic.
Once you have completed your concept map you can share it with your colleagues for feedback with which you can refine the concept map still further.