Difference between revisions of "Passwords and Keys"
(Initial page) |
|||
| Line 1: | Line 1: | ||
| − | + | {{Template:Book-sidebar}} | |
| + | ===Introduction=== | ||
| + | ====Basic information==== | ||
| + | {| class="wikitable" | ||
| + | |- | ||
| + | |ICT Competency | ||
| + | |The "Passwords and Keys" app, also known as Seahorse, is a password manager and keyring management application. It's used for managing passwords, encryption keys, and certificates certificates on your Linux desktop environment. <br> | ||
| + | |- | ||
| + | |Educational application and relevance | ||
| + | |No direct application. Teachers who register and create online accounts to access educational content can use this application to securely store their login passwords. | ||
| + | |- | ||
| + | |Version | ||
| + | |Passwords and Keys (or) Seahorse 41 | ||
| + | |- | ||
| + | |Other similar applications | ||
| + | |[https://keepassxc.org KeypassXC], [https://www.passwordstore.org/ pass] | ||
| + | |- | ||
| + | |Development and community help | ||
| + | |[https://wiki.gnome.org/Apps/Seahorse Seahorse GNOME app page], [https://help.gnome.org/users/seahorse/stable/ Seahorse GNOME help page] | ||
| + | |||
| + | |} | ||
| + | |||
| + | ====Overview of features==== | ||
| + | ====Installation==== | ||
| + | #The application is not part of the Ubuntu custom distribution. | ||
| + | #You need to install by choosing “kazam” in Ubuntu Software Centre | ||
| + | #If you would like to install through the terminal follow these steps below: | ||
| + | ##Open terminal by clicking (Ctrl+Alt+T), | ||
| + | ##Once Window page is open, in front of dollar($) symbol just type below command. | ||
| + | ##'''sudo apt-get install kazam''' | ||
| + | ## just type your password(it will not display on your screen), press '''Enter'''. | ||
| + | === Working with application === | ||
| + | |||
| + | ==== Use Print Screen ==== | ||
| + | This is the most common method to take Screenshot. Pressing the “Print Screen” button will take the Screenshot of the “Entire Visible Screen”. | ||
| + | ==== Getting familiar with application ==== | ||
| + | When we open the Kazam we will see this main window. This main window contains the following sections. Open application from Applications--->Sound and Video--->Kazam. | ||
| + | [[File:Kazam home page.png|left|frame|Kazam home page]] | ||
| + | # Screencast : This option is to set the screen-casting | ||
| + | # screenshot : This option is to set the screenshot | ||
| + | # Fullscreen : By selecting this option, user can able to screencast/screenshot of complete screen of the computer display. This mode is useful for creating tutorials where you need to show the interaction between the desktop manager and the different windows and applications. | ||
| + | # Window : By selecting this option, user can able to screencast/screenshot of only current window of your computer screen. This mode which records only a particular window and is ideal for recording screencasts of an application. | ||
| + | # Area : By selecting this option, user can able to screencast/screenshot of only selected area of your computer screen. | ||
| + | # Mouse cursor : Select this feature for including cursor point into our screencast/screenshot output file. | ||
| + | # Sound from the speaker : Select this feature for adding speaker output audio with our screencasting. | ||
| + | # Sound from microphone : Select this feature for adding your own audio (by using microphone) with our screencasting. | ||
| + | # Seconds to wait before capturing : This will allow us to delay to start the capture. | ||
| + | # Capture : This option is to start screencast/scheenshot. | ||
| + | |||
| + | ==== Getting start with simple screenshot ==== | ||
| + | When user launch the application, user will notice that in addition to recording screencast, user can also use the application to take screenshots, by switching to it at the top. | ||
| + | |||
| + | <gallery mode="packed" heights="250px"> | ||
| + | File:Kazam home page.png|Selecting screenshot option | ||
| + | File:Delay count down.png|Delay count time for taking screenshot | ||
| + | </gallery> | ||
| + | After user opens kazam from menu, just click on the Screenshot option to take capture your computer screen as image. Here user can take screenshot in three modes like full screen, select window and select area. | ||
| + | Users can choose | ||
| + | *'''Fullscreen''' when they want to take full computer screen as Screenshot, they can choose (include top and buttom panel of your Ubuntu. | ||
| + | * '''Window''' when they want to take current window | ||
| + | *'''Area''' when they want particular area in the screen. | ||
| + | If users choose '''Area''' option''',''' they have to drag cursor along particular area. Also users can choose whether to keep their '''Mouse cursor''' in their Screenshot and can choose to set capturing delay by few seconds before they actually start their Screenshot. | ||
| + | |||
| + | '''NOTE:-''' ''<u>These options are same for both Screenshot and Screencast.</u>'' | ||
| + | |||
| + | ==== Saving screenshot ==== | ||
| + | [[File:Choose lacation to save your screenshot.png|left|thumb|390x390px|Choose location to save your screenshot]] | ||
| + | |||
| + | After selecting above options users can click on '''Capture''' to take Screenshot. | ||
| + | |||
| + | It will prompt users to choose location for save your screenshot. Users can also change the file name before saving. | ||
| + | |||
| + | {{Clear}} | ||
| + | |||
| + | ==== Getting start with Screen casting your computer screen ==== | ||
| + | This works similar to Screenshot except that it helps users to record their computer screens along with audio and save them as videos. | ||
| + | [[File:Screencasting home page.png|left|frame|390x390px|Screencast dialog box]] | ||
| + | |||
| + | Here also users can choose whether to keep their '''Mouse cursor''' in their Screencast recording, also they can choose to record '''Sounds from speakers''' (computer audio output) and '''Sounds from microphone''' (record users input through microphone) in their recording which will help users to use their own voice or music from other sources. | ||
| + | Also users can choose to set capturing delay by few seconds before they actually start their recording. | ||
| + | |||
| + | After selecting above options users can click on '''Capture''' to begin Screencast. | ||
| + | |||
| + | {{clear}} | ||
| + | |||
| + | ==== Saving/exporting screencast ==== | ||
| + | After recording a screen, users can click on '''Finish recording''' which will prompt users to choose '''edit''' it further using any video editing tools or to '''Save for later''' to save this video in computer'''.''' | ||
| + | |||
| + | <gallery mode="packed" heights="250px"> | ||
| + | File:Stop screencasting.png|left|Pause/Finish recording dialog box | ||
| + | File:Save sreencasted video.png|Save screencasted video | ||
| + | </gallery> | ||
| + | |||
| + | Now users can change the project name before saving the project in their desired destination. Now project will be saved as video. This project can again be used later.<br> [[File:Choose lacation to save your screenshot.png|left|thumb|390x390px|Choose location to save your screencast]]{{Clear}} | ||
| + | |||
| + | === Video on how how to use Kazam === | ||
| + | {{#widget:YouTube|id=W-I7yxi_jmM|height=300|width=400}} | ||
| + | |||
| + | === Ideas for resource creation === | ||
| + | # This is very useful for creating simple video/screenshot resources by adding narration to a process being done using an application. For example, you can run a simulation on your screen or an image slide show and add your narration to it as the application runs. | ||
| + | # You can also use an existing video and dub it in another language | ||
| + | # Please make sure that in both (1) and (2) the original visual resource/ video is licensed for reuse with modification. | ||
| + | |||
| + | === References === | ||
| + | |||
| + | |||
| + | [[Category:Explore an application]] | ||
Revision as of 13:53, 27 January 2025

Introduction
Basic information
| ICT Competency | The "Passwords and Keys" app, also known as Seahorse, is a password manager and keyring management application. It's used for managing passwords, encryption keys, and certificates certificates on your Linux desktop environment. |
| Educational application and relevance | No direct application. Teachers who register and create online accounts to access educational content can use this application to securely store their login passwords. |
| Version | Passwords and Keys (or) Seahorse 41 |
| Other similar applications | KeypassXC, pass |
| Development and community help | Seahorse GNOME app page, Seahorse GNOME help page |
Overview of features
Installation
- The application is not part of the Ubuntu custom distribution.
- You need to install by choosing “kazam” in Ubuntu Software Centre
- If you would like to install through the terminal follow these steps below:
- Open terminal by clicking (Ctrl+Alt+T),
- Once Window page is open, in front of dollar($) symbol just type below command.
- sudo apt-get install kazam
- just type your password(it will not display on your screen), press Enter.
Working with application
Use Print Screen
This is the most common method to take Screenshot. Pressing the “Print Screen” button will take the Screenshot of the “Entire Visible Screen”.
Getting familiar with application
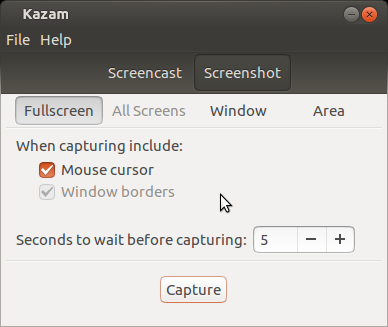
When we open the Kazam we will see this main window. This main window contains the following sections. Open application from Applications--->Sound and Video--->Kazam.

- Screencast : This option is to set the screen-casting
- screenshot : This option is to set the screenshot
- Fullscreen : By selecting this option, user can able to screencast/screenshot of complete screen of the computer display. This mode is useful for creating tutorials where you need to show the interaction between the desktop manager and the different windows and applications.
- Window : By selecting this option, user can able to screencast/screenshot of only current window of your computer screen. This mode which records only a particular window and is ideal for recording screencasts of an application.
- Area : By selecting this option, user can able to screencast/screenshot of only selected area of your computer screen.
- Mouse cursor : Select this feature for including cursor point into our screencast/screenshot output file.
- Sound from the speaker : Select this feature for adding speaker output audio with our screencasting.
- Sound from microphone : Select this feature for adding your own audio (by using microphone) with our screencasting.
- Seconds to wait before capturing : This will allow us to delay to start the capture.
- Capture : This option is to start screencast/scheenshot.
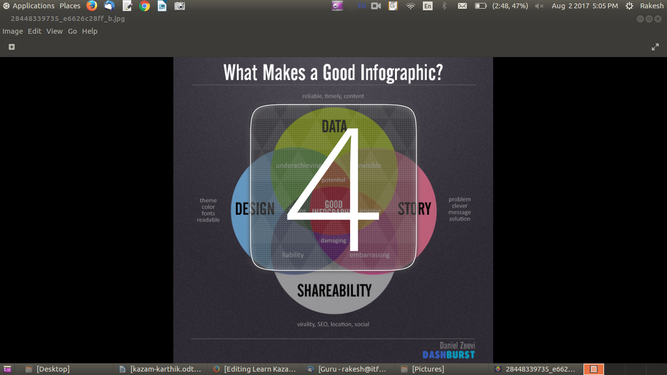
Getting start with simple screenshot
When user launch the application, user will notice that in addition to recording screencast, user can also use the application to take screenshots, by switching to it at the top.
Selecting screenshot option
Delay count time for taking screenshot

After user opens kazam from menu, just click on the Screenshot option to take capture your computer screen as image. Here user can take screenshot in three modes like full screen, select window and select area. Users can choose
- Fullscreen when they want to take full computer screen as Screenshot, they can choose (include top and buttom panel of your Ubuntu.
- Window when they want to take current window
- Area when they want particular area in the screen.
If users choose Area option, they have to drag cursor along particular area. Also users can choose whether to keep their Mouse cursor in their Screenshot and can choose to set capturing delay by few seconds before they actually start their Screenshot.
NOTE:- These options are same for both Screenshot and Screencast.
Saving screenshot

After selecting above options users can click on Capture to take Screenshot.
It will prompt users to choose location for save your screenshot. Users can also change the file name before saving.
Getting start with Screen casting your computer screen
This works similar to Screenshot except that it helps users to record their computer screens along with audio and save them as videos.

Here also users can choose whether to keep their Mouse cursor in their Screencast recording, also they can choose to record Sounds from speakers (computer audio output) and Sounds from microphone (record users input through microphone) in their recording which will help users to use their own voice or music from other sources. Also users can choose to set capturing delay by few seconds before they actually start their recording.
After selecting above options users can click on Capture to begin Screencast.
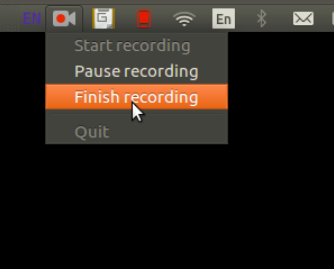
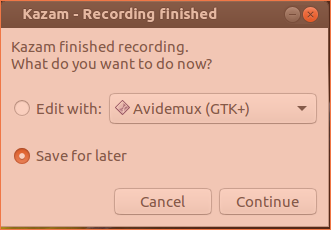
Saving/exporting screencast
After recording a screen, users can click on Finish recording which will prompt users to choose edit it further using any video editing tools or to Save for later to save this video in computer.
Pause/Finish recording dialog box
Save screencasted video


Now users can change the project name before saving the project in their desired destination. Now project will be saved as video. This project can again be used later.
Video on how how to use Kazam
Ideas for resource creation
- This is very useful for creating simple video/screenshot resources by adding narration to a process being done using an application. For example, you can run a simulation on your screen or an image slide show and add your narration to it as the application runs.
- You can also use an existing video and dub it in another language
- Please make sure that in both (1) and (2) the original visual resource/ video is licensed for reuse with modification.