|
|
| (30 intermediate revisions by 2 users not shown) |
| Line 1: |
Line 1: |
| | [https://karnatakaeducation.org.in/KOER/index.php/ಮೂಡಲ್_ಕಲಿಯಿರಿ ಕನ್ನಡದಲ್ಲಿ ನೋಡಿ] | | [https://karnatakaeducation.org.in/KOER/index.php/ಮೂಡಲ್_ಕಲಿಯಿರಿ ಕನ್ನಡದಲ್ಲಿ ನೋಡಿ] |
| | + | |
| | + | {| style="width:100%;font-size:80%;border-collapse:separate;border-spacing:10px;" |
| | + | |{{Color-table|theme=8|title=[[Learn_Moodle_-_Educators|Moodle for Educators]]}} |
| | + | |{{Color-table|theme=9|title=[[Learn_Moodle_-_Students|Moodle for Students]]}} |
| | + | |} |
| | === Introduction === | | === Introduction === |
| | + | Moodle is an open-source Learning Management System (LMS) that facilitates online learning and training for educational institutions, including teacher education programs. Designed to create an interactive and flexible learning environment, Moodle allows educators to build customized courses, deliver content, and engage with students through various digital tools. For teacher educators, teachers and student teachers, Moodle offers a powerful platform for the management of instructional materials, collaboration, and assessment. |
| | | | |
| | ==== Basic information ==== | | ==== Basic information ==== |
| Line 14: |
Line 20: |
| | |- | | |- |
| | |Other similar applications | | |Other similar applications |
| − | |[https://chamilo.org/en/ chamilo] [https://openedx.org/ openedx] | + | |[https://chamilo.org/en/ chamilo] [https://openedx.org/ openedx] [https://www.sakailms.org/ Sakai LMS] |
| | |- | | |- |
| | |The application on mobiles and tablets | | |The application on mobiles and tablets |
| Line 98: |
Line 104: |
| | | | |
| | Both teachers and students have to be 'registered' for a course (as 'teacher' or as 'student'), this role configuration is done by the Moodle administrator. | | Both teachers and students have to be 'registered' for a course (as 'teacher' or as 'student'), this role configuration is done by the Moodle administrator. |
| − |
| |
| − | === Faculty view in Moodle===
| |
| − | Since the moodle is a participant-faculty course transaction platform both of them will have separate rights in terms of technical features. Faculty would have more options to edit the course in variety of ways whereas a participant will have limited rights over any kind of modification.
| |
| − |
| |
| − | ==== Creating a Course in Gnomio ====
| |
| − | Gnomio is a free hosting service that allows users to create their own online learning community using Moodle. It provides educators with a platform to develop online learning environments based on Moodle's open-source system. The key feature of Gnomio is its free access and simple interface, making it easy for individual teachers to explore e-learning with Moodle.
| |
| − |
| |
| − | To create your moodle site on gnomio website, follow these steps:
| |
| − |
| |
| − | * Click on the following link: <nowiki>https://www.gnomio.com</nowiki>. This will take you to the main page of Gnomio. Refer to the 'Create Your Site' option.
| |
| − |
| |
| − | * Enter your preferred URL in the provided box. The URL will automatically be prefixed with "https://" and will end with ".gnomio.com". The URL can be between 2 and 32 characters.
| |
| − |
| |
| − | {{Note}} If you give the name of your course as 'ict'. Then your course will have the address as, <nowiki>https://ict.gnomio.com</nowiki>
| |
| − |
| |
| − | * Enter your email address in the email inbox. This email will be used to send the credentials for your site.
| |
| − |
| |
| − | * Check the box indicating that you have read and agree with the terms and conditions, then click 'Create Site.'
| |
| − |
| |
| − | * After this step, go to your email and look for the Gnomio-related email, as shown in the screenshot. It might take some time to arrive, and there is a possibility it could land in your spam folder, so be sure to check there as well.
| |
| − |
| |
| − | * Once you receive the email, open it to find your credentials. The email will contain the URL of your Gnomio site along with your login credentials. Click on the URL and use the provided credentials to access your Gnomio Moodle site.
| |
| − |
| |
| − | Now your moodle site in ready in gnomio. You can create number of courses on moodle.
| |
| − |
| |
| − | ==== User account creation ====
| |
| − | After creating accounts, and before enrolling students in courses, the teacher may want to ensure that all students have accounts in Moodle. The administrator has the rights to create accounts. Once a teacher becomes an administrator, they will have the rights to create user accounts.
| |
| − |
| |
| − | Generally, an account can be created in two ways:
| |
| − |
| |
| − | * Bulk Account Creation
| |
| − |
| |
| − | # Individual Account Creation
| |
| − |
| |
| − | ===== Bulk Account Creation =====
| |
| − | When you have a set of student accounts to create, follow these steps:
| |
| − |
| |
| − | First, prepare a sheet (CSV format using LibreOffice Calc or any other spreadsheet software) with details regarding the students. The details may include the first name, last name, username, password, email ID, cohort, etc. After filling out all the details, save the sheet in CSV format.
| |
| − |
| |
| − | Next, in Moodle, follow these steps:
| |
| − |
| |
| − | * Click on Site Administration → Users. In the Accounts section, you will find an option called Upload Users. Upon clicking that, a page will show you an example CSV file that you can refer to for preparing your own.
| |
| − |
| |
| − | * In the File option, click on Choose a File to upload the CSV sheet containing student details --> Click Upload Users.
| |
| − |
| |
| − | * The next page will show a preview of the user list. You can cross-check this information. In the settings below, select Add new only, skip existing users to ensure that only the new users from your list will be added. In the New User Password option, choose Password required in the file, since you have already included this information in the uploaded CSV file. Click Upload Users.
| |
| − |
| |
| − | * The next page will display the result of adding the users. If there are any issues with your uploaded CSV file, it will indicate the respective row and the corresponding issue.
| |
| − |
| |
| − | * In this way, you can create bulk user accounts in Moodle.
| |
| − |
| |
| − | ===== Individual Account Creation =====
| |
| − | When you want to create an individual student account, follow these steps:
| |
| − |
| |
| − | Go to Site Administration → In the Accounts section, click on Add a New User.
| |
| − |
| |
| − | The page will display fields that you need to fill out for that student. The username, new password, first name, last name, and email address are mandatory fields. In the authentication method, ensure you select Manual accounts. Also, make sure to follow the password guidelines.
| |
| − |
| |
| − | After filling out the required fields, click Create User.
| |
| − |
| |
| − | This will create an individual user account on the site.
| |
| − |
| |
| − | ==== How to add a new course in moodle ====
| |
| − | If a faculty wants to add/create a ‘New course’ to the Moodle page below are the steps:
| |
| − |
| |
| − | <gallery mode="packed" heights="300px">
| |
| − | File:Moodle Add new course0.png|Adding a new course
| |
| − | File:Moodle add course3.png|General settings in course creation
| |
| − | </gallery>
| |
| − |
| |
| − | <gallery mode="packed" heights="300px">
| |
| − | File:Moodle add course4.png|Configuring course format
| |
| − | </gallery>
| |
| − |
| |
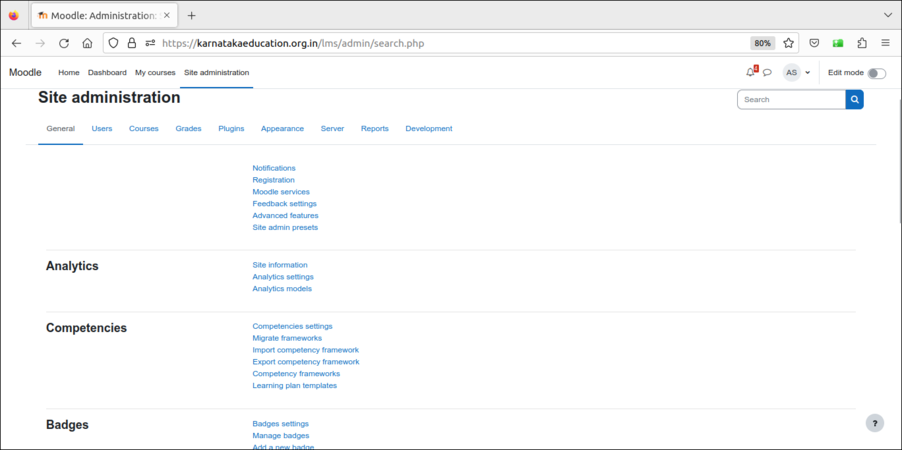
| − | * Click on 'Site administration' in faculty login --> Courses --> Add a new course.
| |
| − | * Course full name, short name, category, start date and end date can be added
| |
| − | The course format shows various formats such as one topic, single activity, social format, topics format, weekly format. Each of these will show the course content in such layouts.
| |
| − |
| |
| − | Files and uploads sections shows you an option to increase or decrease the upload size limitation.
| |
| − |
| |
| − | '''Completion tracking'''
| |
| − |
| |
| − | Enabling the the completion tracking makes the opportunity for student and teacher to have a transparency between them in regard with the activities. It allows teachers to track completion status and generate reports. Additionally, it can be used to create a structured learning path, as access to certain activities can be restricted until previous tasks are completed. This feature improves engagement, simplifies course management, and enhances the overall learning experience.
| |
| − |
| |
| − | To enable the completion tracking, you can choose 'yes' option.
| |
| − |
| |
| − | ==== Enabling the guest access to the course ====
| |
| − | When you want to make a particular Moodle course accessible to anyone, even those who are not enrolled as participants, it is referred to as a public course. These types of courses can be accessed by any guest. Therefore, when you create a course and want it to be publicly accessible to guests, you can enable guest access.
| |
| − |
| |
| − | Note : Guest access to any course will only make the guests to access the materials of the course but do not allow participation in any of the activities.
| |
| − |
| |
| − | To enable guest access to a course, follow these steps :
| |
| − |
| |
| − | * Log in to Moodle with your account
| |
| − |
| |
| − | * Navigate to the course you want to make accessible to guests.
| |
| − |
| |
| − | * In the course navigation, click 'Participants,' and then from the dropdown, select 'Enrollment methods > Guest access.'
| |
| − |
| |
| − | * You will see a list of enrollment methods. Enable 'Guest access' by clicking on the eye icon. An 'open eye' symbol indicates that you have 'enabled' the guest access.
| |
| − |
| |
| − | * If you wish to set a password, click the configure icon and enter a password. This ensures that only people with the password can access the course, even if they do not have a Moodle account.
| |
| − |
| |
| − | When you share this course with others, they will see a login page. They can access the course by selecting the "Access as a guest" option, which will take them directly to the course.
| |
| − |
| |
| − | ==== Editing sections ====
| |
| − | Once you have a new blank course or once you have enrolled as teacher for any course, you can start working on it by turning on the 'edit' button enabled on top right of your screen. Only faculty will have rights to edit the course contents, including adding resources and activities. This option is not available for students. This is the key to edit the entire course. Once you hit this 'edit' option, it takes a second of time to refresh the page and enables all the other editing afterwards.
| |
| − |
| |
| − |
| |
| − | <gallery mode="packed" heights="100px">
| |
| − | File:Moodle Enable button.png|'Enabled' editing button
| |
| − | </gallery>
| |
| − |
| |
| − | <gallery mode="packed" heights="400px">
| |
| − | File:Moodle topics.png|Deleting/hiding/moving the topic
| |
| − | </gallery>
| |
| − |
| |
| − | The course could contain a number of units or topics or sections. By default the course could contain a few. Later, the faculty can add or remove the required and unnecessary sections respectively. If you click on three vertical dots on a topic it shows the following options:
| |
| − |
| |
| − | * '''Edit topic :''' Allows to edit the topic
| |
| − | * '''Highlight :''' Highlighted topic gets attention among the number of topics
| |
| − | * '''Hide topic :''' The topic gets hidden to students
| |
| − | * '''Move :''' Moves the topic to the some other position
| |
| − | * '''Delete topic :''' Deletes the entire topic
| |
| − |
| |
| − | You can embed your files, images or videos by dragging and dropping the file to the summary section. You can also adjust the size of the file.
| |
| − |
| |
| − | A topic or section can have some set of related materials. To edit the topic, click on three dots on right side of the topic --> Click "Edit topic".
| |
| − |
| |
| − | You will get another screen. By default it shows some topic name. To edit the topic heading, check mark "Custom" to give your custom heading for your section.
| |
| − |
| |
| − | <gallery mode="packed" heights="400px">
| |
| − | File:Moodle Section editing tools.png|Giving the custom heading
| |
| − | </gallery>
| |
| − |
| |
| − | Start adding section summary under the summary box (you can copy paste from an existing text document also). Use the top 'basic formatting' toolbar to format your text, you can '''bold''' or ''italicize'' your text and perform basic text editing functions.
| |
| − |
| |
| − | Under the restrict section, you can restrict the access to the page as in the screen shot below.
| |
| − |
| |
| − | <gallery mode="packed" heights="400px">
| |
| − | File:Moodle add restriction.png|Adding the access restriction
| |
| − | </gallery>
| |
| − |
| |
| − | Once you have completed your editing and added the text, images, videos in the section, you should click on "save changes" button to save your content under that section.
| |
| − |
| |
| − | ====Adding the resources ====
| |
| − | A resource is an item that a teacher can use to support learning, such as a file or web link.
| |
| − |
| |
| − | There are two ways you can add resources to the course page. Either embedding the resource directly to the section or adding the resources to the course section.
| |
| − |
| |
| − | =====Embedding the resource directly in the section=====
| |
| − | In the topic 'edit' mode, you will be seen variety of resources such as image, video, recording an audio, links etc that gets directly embedded to the page itself. <br>For example, web links can be provided directly in the section itself. You can give the link directly or 'embed' the link to existing text (which will show as a hyperlink). You can also embed images and videos directly on the section page, by providing the URL where the image or video file is stored (using the Insert -> Media option).
| |
| − |
| |
| − | <gallery mode="packed" heights="300">
| |
| − | File:Moodle Editing section adding link.png|Adding the link inside the 'topic'
| |
| − | </gallery>
| |
| − |
| |
| − | <gallery mode="packed" heights="200">
| |
| − | File:Moodle Insert Media.png|Inserting the media to the topic
| |
| − | </gallery>
| |
| − |
| |
| − | By selecting the words highlighted in the above screenshot & clicking the 'link' symbol, one more ‘pop – window’ will appear where you can paste the website link for quick access while reading a particular paragraph, for the students. Above is the screenshot on how to add the “hyperlink” to particular section of "text" by adding the Moodle LMS hyperlink.
| |
| − |
| |
| − | <gallery mode="packed" heights="300">
| |
| − | File:Moodle File upload.png|'File picker' window
| |
| − | </gallery>
| |
| − |
| |
| − | In addition to this, you can also embed other multimedia resources such as image, audio, video etc. To embed any content first it should be uploaded to the moodle server. To do that, click on the element to be added. It shows a page where there will be an option named "Browse repositories". Click that. It further shows another window to 'upload a file', click browse. Choose the file in your local system. Click 'upload this file' option.
| |
| − |
| |
| − | =====Adding resource to the course main page=====
| |
| − | The resources can also be added to the course main page. To add resources like files, folder, URLs or to create a book, assignment submission, choose the section in your course homepage where you would like it to appear and click on the "Add an activity or resource" available in that section and then select the type of resources you are going to add, from the list. This can be any file you have, which you will upload to Moodle and provide as a resource in this section.
| |
| − |
| |
| − | <gallery mode="packed" heights="300">
| |
| − | File:Moodle adding the activity1.png|Adding an activity or resource
| |
| − | File:Moodle activity page no border.png|Activity and resources list
| |
| − | </gallery>
| |
| − |
| |
| − | Click on the type of resource you want to add to the page, it will be redirected to the corresponding resource page.
| |
| − |
| |
| − | You can also search for the particular kind of activity or resource to the page. A resource could be any kind of 'material' that the faculty wants to share with the students where as activity is the methods to conduct the assessments.<br>
| |
| − |
| |
| − | ====Adding Activities====
| |
| − | Moodle supports a range of different activities that allow you to insert to any section. You can add interactive exercises for your students.
| |
| − |
| |
| − | To add a activities like quiz, discussion forum, attendances, forms and surveys turn on your editing. Choose the section in your course homepage where you'd like it to appear and click on the "Add an activity or resource" then select the type of activities you are going to add into section from the list (for example: Quiz).
| |
| − | ===== Quiz=====
| |
| − | <gallery mode="packed" heights="300px">
| |
| − | File:Moodle quiz1.png|Adding 'Quiz' as an activity
| |
| − | File:Moodle quiz settings.png|Settings in 'quiz' activity
| |
| − | </gallery>
| |
| − |
| |
| − | Once you click on any activity, you will be redirected to the settings of that activity as shown in the above screenshot.
| |
| − |
| |
| − | <gallery mode="packed" heights="200px">
| |
| − | File:Moodle quiz general setting.png|'General' settings in quiz
| |
| − | File:Moodle quiz settings timing.png|Timing settings in quiz
| |
| − | </gallery>
| |
| − |
| |
| − | * '''General'''
| |
| − | **Name : Type the name for your activity link, it will create a link which students will click on to view the file. It will be helpful to give it a name that suggests its purpose / contents.
| |
| − | **Description : Add a description of your activity if required.
| |
| − | **Display description on the course page : If this box is ticked, the description will appear on the course page just below the name of the activity.
| |
| − | * '''Timing'''
| |
| − | **Open the quiz and Close the quiz : Students can only start their attempt(s) after the open time and they must complete their attempts before the close time.
| |
| − | **Time limit : If enabled, the time limit is stated on the initial quiz page and a countdown timer is displayed in the quiz navigation block.
| |
| − | Once the all the settings have been filled out as required and saved, the activity will appear at the bottom of the section.
| |
| − |
| |
| − | You can move any activity around in the course with the move buttons while in 'edit' mode. In the 'Question behaviour', you can shuffle the questions. You will also find variety of options in 'Review options' to customize the quiz according to your choice.
| |
| − |
| |
| − | Moodle supports a range of different activities that allow you to insert to any section. You can add interactive questions for the other students in the course. Once done, you can click on 'Save and return to course'. You can 'Add question', in the 'Quiz' option. In the new page, 'Add a new question'. You can select the question type. Click 'Add'.
| |
| − |
| |
| − | <gallery mode="packed" heights="300px">
| |
| − | File:Moodle Quiz addq1.png|Add question in 'quiz'
| |
| − | File:Moodle quiz addq2.png|Creating a new question in 'quiz'
| |
| − | </gallery>
| |
| − |
| |
| − | <gallery mode="packed" heights="300px">
| |
| − | File:Moodle quiz addq2a.png|Selecting the type of question
| |
| − | File:Moodle quiz addq2b.png|thumb|Typing the question
| |
| − | </gallery>
| |
| − |
| |
| − | <gallery mode="packed" heights="300px">
| |
| − | File:Moodle quiz add2c.png|Giving the options for choice questions
| |
| − | </gallery>Question category is a collection of questions belonging to the some group, question name is a unique identifier to define a question, question text is the place where faculty could add the actual question and format the text using tools if required. This section is followed by number of choices. The general settings vary as per the question type the faculty selects.
| |
| − |
| |
| − | =====Assignment=====
| |
| − | Assignment helps course creators to give assignments to course participants. The participants can submit assignments in the form of text by typing in text editor or by they can upload their digitally created content. Creators can download the submissions.
| |
| − |
| |
| − | Assignment can be made available till a particular date by using the section 'Availability' section in the settings. Faculty can set due date, cut off date, reminder etc.
| |
| − |
| |
| − | <gallery mode="packed" heights="350px">
| |
| − | File:Moodle assignment1.png|Choosing 'Assignment' in activity
| |
| − | File:Moodle Assignment2.png|Settings in assignment
| |
| − | </gallery>
| |
| − |
| |
| − | 'Submission type' specifies what kind of submission the faculty is expecting. It could be either online text where student might enter some descriptive answer or share the public link of their assignment or may be it is the submission of file or document or may be even both.
| |
| − |
| |
| − | =====Forum=====
| |
| − | The forum activity allows students and teachers to exchange ideas by having discussions on any topic. Any teacher or student registered for the course can initiate a new topic, can post comments or respond to available discussions on any topic. The discussions for a topic are automatically shown as as part of a 'thread' by Moodle.
| |
| − |
| |
| − | There are several forum types to choose from, such as a standard forum where anyone can start a new discussion at any time; a forum where each student can post exactly one discussion; or a question and answer forum where students must first post before being able to view other students' posts. A teacher can allow files to be attached to forum posts. Any images attached in the forum post are displayed.
| |
| − |
| |
| − | The forums have many uses, such as
| |
| − | *A social space for students to get to know each other
| |
| − | * For course announcements (using a news forum with forced subscription, where only faculty can post)
| |
| − | *For discussing course content or reading materials
| |
| − | *For continuing on-line an issue raised previously in a face-to-face session
| |
| − |
| |
| − | To add discussion topic click on the add "an activity or resource" option and select forum option from the activities list.
| |
| − |
| |
| − | Under the "general" section type your discussion topic and under the "attachments and word count" you can limit the size of the attachment and word counts and number of attachments etc.
| |
| − |
| |
| − | After you complete the editing, click on "Save and display" to display third discussion thread under your selected section. Once faculty clicks on 'Add discussion topic', you can type the 'Subject', 'Message' regarding the topic. Click 'Post of forum'. In the 'Forum' option you can find your topic, students will click on that topic, to initiate the discussion. In the 'Replies' option, faculty can see the number of replies. Students can start replying to a topic / discussion by simply clicking on the 'reply' option.
| |
| − |
| |
| − | <gallery mode="packed" heights="300">
| |
| − | File:Moodle forum.png|Adding 'Forum' activity
| |
| − | File:Moodle Discussion forum5.png|Adding the subject and description to 'forum'
| |
| − | </gallery>
| |
| − |
| |
| − | Also there is a control menu which enables users to participate in the forums with word count and attachment size. This will help maintain the course with optimum sized files.
| |
| − |
| |
| − | <gallery mode="packed" heights="350">
| |
| − | File:Moodle discussion3.png|Forum page
| |
| − | </gallery>
| |
| − |
| |
| − | =====Questionnaire=====
| |
| − | Questionnaire module will help course creators to give quizzes, data collection etc.
| |
| − |
| |
| − | To add a questionnaire, click on "Add an activity/resource" and select "Questionnaire".
| |
| − |
| |
| − | <gallery mode="packed" heights="300px">
| |
| − | File:Moodle Questionnaire0.png|Adding 'Questionnaire' activity
| |
| − | File:Moodle Questionnaire1.png|Settings in 'Questionnaire'
| |
| − | </gallery>
| |
| − |
| |
| − | You can control response actions and also activity completion which gives more control to the creator/moderators.
| |
| − |
| |
| − | Once you create 'Questionnaire' activity, it shows faculty an option to 'Add questions'. By clicking on that they will be able to add different types of questions. The settings will vary according the type of question.
| |
| − |
| |
| − | <gallery mode="packed" heights="200px">
| |
| − | File:Moodle Questionnaire2.png|Adding the questions to the questionnaire
| |
| − | File:Moodle questionnaire4.png|Choosing the question types
| |
| − | </gallery>
| |
| − |
| |
| − | After you finish configuring your questionnaire, click on ''save and display'' to show the questionnaire or click on save and return to the course.
| |
| − |
| |
| − | =====Tracking attendance =====
| |
| − | The '''Attendance''' module is designed for faculty to be able take attendance during class, and for students to be able to view their own attendance record.
| |
| − |
| |
| − | <gallery mode="packed" heights="300px">
| |
| − | File:Moodle attendance1.png|Adding 'attendance' activity
| |
| − | File:Moodle attendance2a.png|Adding the session to attendance
| |
| − | </gallery>
| |
| − |
| |
| − | A teacher can mark the attendance status of a student as "Present", "Absent", "Late", or "Excused". These status descriptions are configurable, and more can be added. The teacher adds Attendance as an activity of a course, and then sets up the sessions whose attendance is to be tracked. To create course attendance go to any section and click an "Add an activity or resource".
| |
| − |
| |
| − | <gallery mode="packed" heights="300px">
| |
| − | File:Moodle attendance4.png|Session settings in 'Attendance'
| |
| − | File:Moodle attendance6.png|Taking attendance in the session
| |
| − | </gallery>
| |
| − |
| |
| − | The sessions for the attendance activity could be flexible. As and when faculty starts the session also they can modify it according to the situation. It can even be created for the entire semester or year with a few clicks.
| |
| − |
| |
| − | Once a session is created the session details will be shown, as shown in the above image. It will have the session date, time, type and description of the session. In addition, it will have a 'play' icon which shows the faculty student list along with the status of attendance. This icon is followed by a settings option and delete session option.
| |
| − |
| |
| − | ==== Changing the roles ====
| |
| − | When you are working as a manager or teacher of a course, you may want to see the course as a student. For instance, once you post a quiz you may want to check how it looks like for a student. Moodle allows you to change your role, so that you will get a view of other roles.
| |
| − |
| |
| − | To do that,
| |
| − |
| |
| − | * Click on your profile icon --> Switch role to option
| |
| − |
| |
| − | * It will take you to a page which shows variety of roles such as Teacher, Student, Guest etc.
| |
| − |
| |
| − | * You can choose the role you want and take a look at the course.
| |
| − |
| |
| − | Once you change the role, if you want to get back to your role, you can click on the profile icon —> click 'Return to my normal role'.
| |
| | | | |
| | ====Advanced Activities==== | | ====Advanced Activities==== |
| Line 428: |
Line 117: |
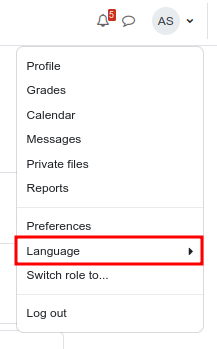
| | Login to your course and on the top right side of the screen your profile initial, it shows a list of options. Here, you can select the language which you want see your course. | | Login to your course and on the top right side of the screen your profile initial, it shows a list of options. Here, you can select the language which you want see your course. |
| | | | |
| − | * Course format section specifies the kind of format faculty would like to have in their course. | + | * Course format section specifies the kind of format faculty would like to have in their course. |
| | | | |
| − | === Student view in Moodle=== | + | === Explore Moodle as Educators and Students === |
| − | This page will help you to navigate around your course as student. Once the faculty enrolls you to a course, you can browse all the course content from the Moodle site.
| + | [[Category:Explore an application]] |
| − | | + | {| class="wikitable" style="width:100%;font-size:80%;border-collapse:separate;border-spacing:10px;" |
| − | ====Student/User information====
| + | |'''If you are a Educators,''' this manual provides a comprehensive guide for educators using Moodle. It covers course creation, creating resources and adding activities like assignment setup, quizes and etc...{{Color-table|theme=8|title=[[Learn_Moodle_-_Educators|Moodle manual for Educators]]}} |
| − | | + | |'''If you are student,''' this guide walks students through Moodle's essential features, including navigating courses, submitting assignments, participating in discussions, and tracking grades.{{Color-table|theme=9|title=[[Learn_Moodle_-_Students|Moodle manual for Students]]}} |
| − | <gallery mode="packed" heights="400">
| |
| − | File:Moodle Student Profile.png|Accessing the profile
| |
| − | File:Moodle Student Profile1a.png|Student profile details
| |
| − | </gallery>
| |
| − | | |
| − | Most courses will allow the student to see profile of the login user from the top right side. This block will allow the student to see information about themselves in the course.
| |
| − | {{Clear}}
| |
| − | | |
| − | ====Course navigation====
| |
| − | | |
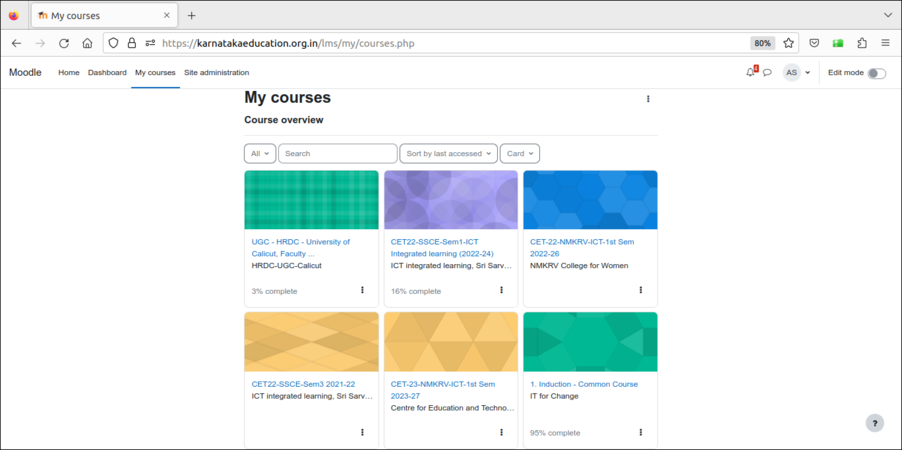
| − | In the main page, you can see "My courses" option. This list would contain the courses only that particular student have enrolled for. By clicking on any course that a student enrolled with, they could access the content.<gallery mode="packed" heights="400px">
| |
| − | File:Moodle student view1.png|Student course view
| |
| − | </gallery>
| |
| − | | |
| − | [https://youtu.be/TPRHv0-_Ebg Click here] to see the tutorial on how access course content from Moodle mobile app.
| |
| − | | |
| − | ====Participating in activities====
| |
| − | Under every section of the course, faculty will give some activities to be completed by students. Activities may be quizzes, assignments, checklists and also discussion topics. Click on the activity to participate in it.
| |
| − | =====Participating in discussion forum =====
| |
| − | Under the first general section you have to click on the "General discussion forum" link to see all the discussion topics. To reply to any topic, click on the topic and type your reply by clicking on the reply link under others replies. Under every reply text input box, also it will allow you to upload your files if needed.
| |
| − | | |
| − | <gallery mode="packed" heights="250px">
| |
| − | File:Moodle Student Discussion1.png|Participating in 'Discussion forum'
| |
| − | File:Moodle Student Discussion2.png|Replying to the discussion
| |
| − | </gallery>
| |
| − | | |
| − | | |
| − | | |
| − | In addition to responding to the existing topic, you can create new discussion topic by clicking on "Add a new discussion topic". <br>Also, [https://youtu.be/rRaNAdpPJFY click here] to see the video tutorial on how to participate in discussion forum in mobile app.
| |
| − | | |
| − | '''Note:''' The discussion forum need not be in any particular place. It may be an activity under a particular unit also. | |
| − | | |
| − | =====Participating in assignments activity=====
| |
| − | If the activity is assignments, you have click on the title of the activity to read the full assignment and click on "add submission" it will open "online text section" and "file submission" sections, under online text section directly you can give text input of your assignment. In file submission section you can upload any files like images, text files, audio’s etc.
| |
| − | | |
| − | <gallery mode="packed" heights="250px">
| |
| − | File:Moodle Student Assignment0.png|Opening assignment
| |
| − | File:Moodle Student Assignment2.png|Submission status
| |
| − | </gallery>
| |
| − | | |
| − | <gallery mode="packed" heights="250px">
| |
| − | File:Moodle Student Assignment3.png|Submitting online text as an assignment
| |
| − | File:Moodle Student Assignment4.png|Submitting files an an assignment
| |
| − | </gallery>
| |
| − | | |
| − | <gallery mode="packed" heights="450px" caption="Moodle – Uploading the assignment">
| |
| − | File:Gif to upload Assignment in Moodle.gif|This is how you can upload assignment through '''Moodle App'''
| |
| − | </gallery>
| |
| − | | |
| − | In these courses you can upload files up to 500 KB size as assignment. If you want to upload files which are more than 500KB, you can [[Learn Google Drive|'''use google drive''']] to upload your files and give the link here under online text input section. Once you finish your inputs click on "Save changes" to submit your assignment.
| |
| − | | |
| − | Note : - If you want submit any of the video you have created, use [[Learn Youtube|'''YouTube''']] to upload it and give the video link under online text input section.
| |
| − | | |
| − | [https://youtu.be/MBfFEuWCX20 '''Click here'''] to see video about assignment submission on Moodle mobile app.
| |
| − | | |
| − | ====Accessing the resources====
| |
| − | | |
| − | The students can access the resources which are posted by the teacher & given permission for downloading to the students.
| |
| − | | |
| − | <gallery mode="packed" heights="200px">
| |
| − | File:Moodle Student Download Resources1.png|Click on the required resource
| |
| − | File:Moodle Student Download Resource2.png|Choosing the path to save the resource
| |
| − | </gallery>
| |
| − | | |
| − | ===Advanced features===
| |
| − | | |
| − | * Adding content in the course page
| |
| − | | |
| − | For adding other language content into any section, after you enable the editing option and select click on edit -> edit topic.
| |
| − | | |
| − | Once the section open with edit option, for adding Kannada text in to the section just add '''{mlang kn}''' ('kn' means Kannada, replace this with your language) before your text began and at the end of your text just add '''{mlang}'''. follow the same steps for any other language which is already installed in your Moodle server.
| |
| − | | |
| − | * Tracking activities of students
| |
| − | * Tracking assessments and grading assessments
| |
| − | *Quizzes for ongoing assessment
| |
| − | *Event tracking using calendar
| |
| − | | |
| − | === Video Resources ===
| |
| − | {| class="wikitable" | |
| − | |+ | |
| − | !{{Youtube|D5nREFU6AAk|350|420}} <br />
| |
| − | How to create category in Moodle
| |
| − | !{{Youtube|PCqf8oGaLm8|350|420}} <br />
| |
| − | How to enable guest access
| |
| − | !{{Youtube|U2nKMwDZ4lo|350|420}} <br />
| |
| − | How to switch role
| |
| | |} | | |} |
| − |
| |
| − | ===Reference===
| |
| − | *[https://moodle.org/ Moodle]
| |
| − | * [https://docs.moodle.org/34/en/Main_page Moodle handout]
| |
| − | [[Category:Explore an application]]
| |
