|
|
| Line 20: |
Line 20: |
| | ==Overview of Features== | | ==Overview of Features== |
| | ** Ordering ideas (nodes) into a hierarchy connected by lines (edges); | | ** Ordering ideas (nodes) into a hierarchy connected by lines (edges); |
| − | ** Classifying nodes with metadata (attributes) and style types (system styles, user defined styles, level styles);
| |
| | ** Grouping nodes with visual containers (clouds) and accolade (summary node); | | ** Grouping nodes with visual containers (clouds) and accolade (summary node); |
| | ** Connecting nodes with dynamic links, free lines (connectors) and labels; | | ** Connecting nodes with dynamic links, free lines (connectors) and labels; |
Revision as of 09:18, 6 March 2017
Introduction
Freeplane is a free and open source software application that supports thinking, sharing information and getting things done at work, in school and at home. The software can be used for mind mapping and analysing the information contained in mind maps. For the purposes of this section, we can treat 'concept mapping' as nearly synonymous with 'mind mapping'.
Mind mapping is considered a brainstorming technique out of which we obtain desired results or even extraordinary ones. A mind map helps us to show our ideas to our readers and help them understand what you were imagining. You can show the results in different ways, in order to make it look more appealing or meaningful, according to the type of target audience that you are aiming at.
Educational application and relevance
Freeplane is an open source for educational use.
Educators consider mind mapping a good approach for supporting students with organizing ideas; they also find it a great asset for teaching. It is a great tool to students to help them organize their thought processes when writing.
Version
Stable release 1.5.18 (December 7, 2016.
Configuration
This tool has no specific configuration requirements. It is available as a part of Ubuntu custom distribution.
Overview of Features
- Ordering ideas (nodes) into a hierarchy connected by lines (edges);
- Grouping nodes with visual containers (clouds) and accolade (summary node);
- Connecting nodes with dynamic links, free lines (connectors) and labels;
- Automatically styling nodes (with a bubble, color, edge type, etc.) according to hierarchical level and content (conditional styles, automatic edge color, level styles);
- Changing views by hiding content (folding branches, filtering, roll-up of details and hiding extensions in tooltip), finding, scrolling and navigating;
- Password protecting of whole map and of individual nodes
Other similar applications
Freemind is another free and open source software for creating and editing mind maps
Development and community help
Working with the application
Functionalities
|
|
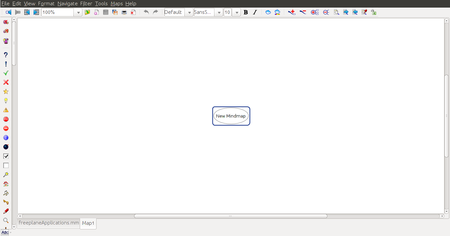
| Step 1 - To Open from the desktop menu select Applications > Office > Freeplane.
Once Freeplane is open you will see a window like this.
The new mind map is the root node and you can give it any name you want. The name of this root node will be the name of the mind map. Once you have given it a name, you can save the mind map.
|
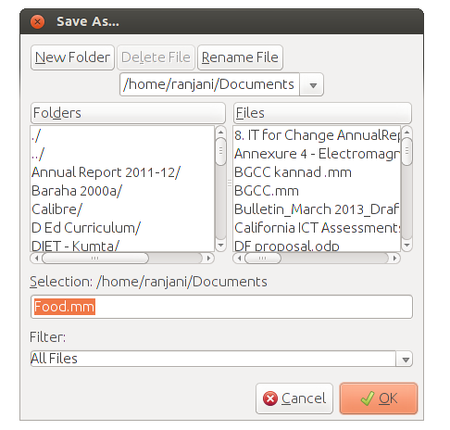
Step 2 - Once you click on save, you will see a window like this. By default it will take root name as file name, if you want to change the name you can change it here. Then choose your folder and then click on SAVE.
|
|
|
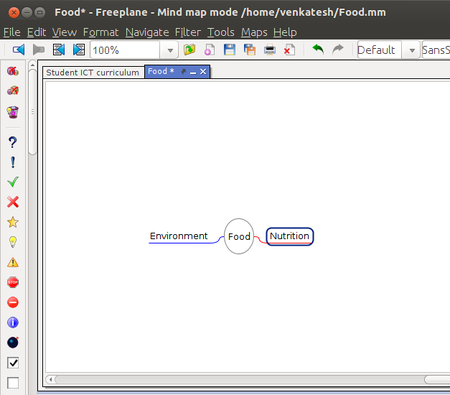
| Step 3 - Now you can see that the mind map is named Food and the root node is called Food. To insert other words that are connected, you can enter them as child nodes. To enter these nodes, you can use the "Enter" key or "Insert" key after selecting the node to which the child nodes must be added. Here, the child nodes have been added after selecting the node "Food". The child nodes added are called sibling nodes and the main node is called parent node.
|
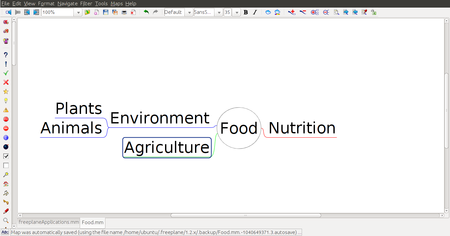
Step 4 - You can keep adding child nodes to any node. For example you can add child nodes to the node called environment by selecting and using "Insert" key. You can also add a sibling node to environment by selecting the node environment and using "Enter" key. "Plants" and "Animals" are child nodes for "environment" and "agriculture" is sibling node for "environment. You can create categories of information using the nodes and child nodes. Each node can signify a category with the sub nodes as the examples of that category, or sub-categories of that category. For example, "Animals" can be a category, under which we can create child nodes for 'vertebrates' and 'invertebrates'. Under 'vertebrates' we can create child nodes for the sub categories of vertebrates - amphibians, reptiles, birds and mammals. In this manner, a mind map can be used to classify and categorise information.
|
|
|
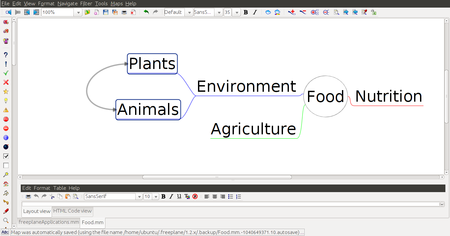
| Step 5 - When you discuss concepts, you can notice that sometimes concepts are connected, and you want to link them to study in detail. For doing this you can add a graphical link (an arrow) to connect two nodes.
To do this select two nodes, then go to Menu Bar and choose EDIT > CONNECT option. then you can see graphical link which is connected to two nodes. You can click on the arrow and move it around.
|
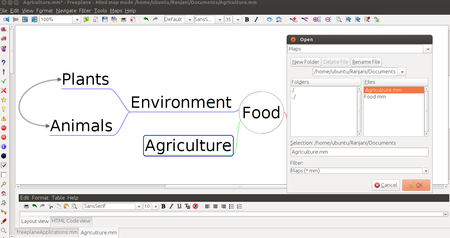
Step 6 - You will also see that sometimes these concepts are very large and you may want to create a new mind map to study them. For example, in this mind map you may want to create a new mind map called agriculture to study. After you create a new mind map called agriculture, you can insert a "file link" to open the new mind map when the node "agriculture" is clicked. To do this, click on node called agriculture and click on "Insert". Under Insert, click on "Hyperlink - File chooser". This will open a window from where you can select the document name to be opened. This can be a mind map. The file can be a picture or video also.
|
|
|
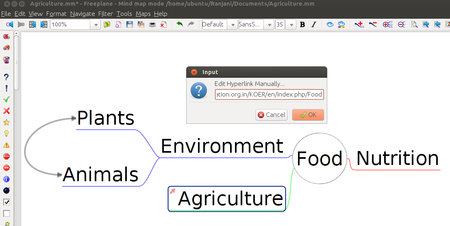
| Step 7 - You can also insert Weblinks to any node for additional information. To do this, you can select the node to which additional information is to be add and click on "Insert" >"Hyperlink - Text field". It will open a window in which you can enter the hyperlink manually. By short cut keys you can add hyperlinks ''Ctrl+K''
|
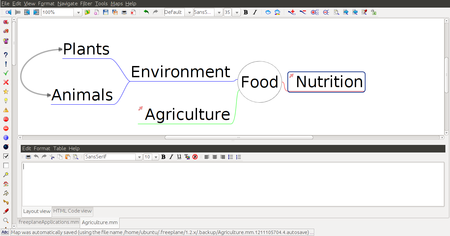
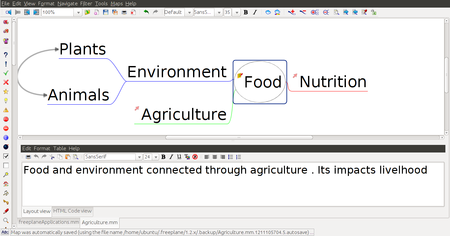
Step 8 - You can also add notes to a node to add more description to a node. To do this, you need to go to "View" and select "Note Window".
This will open a box where you can enter text. You can adjust the size of this box. To enter a note, select a node and enter the notes below in the note window.
|
|
|
| Step 9 - The completed mind map with links and notes will look like this below.
You can select the Format and Navigate to change colours, layout and also to move the nodes around.
|
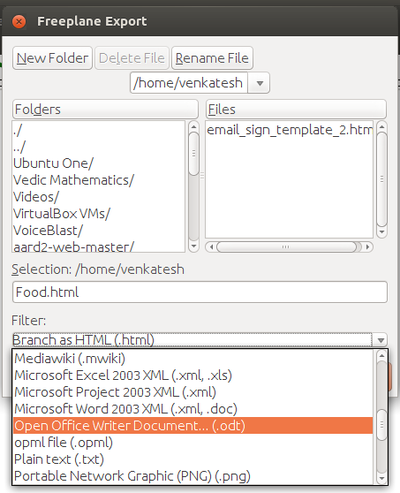
Step 10 - You can also export your mind map to Image or Text Document using File → Export As, and then you need to select the required format to export.
|
File formats for creation
Saving the file
Like in most applications, a file can be saved using the FILE – SAVE AS command, or by the shortcut key CTRL-S. Always give a meaningful file name, reading which you should get an idea of the file contents.
Export and publishing files
Like in most applications, a file can be exported to a PNG, JPEG and Libre office writer documents format.
Advanced features
- Inserting Graphics
- Cloud
- Blinkinhg
- Colour
- Tasking with calendar and reminders
Installation
| Method of installation |
Steps
|
| From Ubuntu software Centre |
Steps : Application - Ubuntu Software Centre - search box select and type (Freeplane)- install
|
| From Terminal |
sudo apt-get install Freeplane
enter password
|
| From the web |
We can download it from here - https://www.freeplane.org/wiki/index.php/Main_Page
|
| Web based registration |
Not Applicable
|
The application on mobiles and tablets
In Andorid Mobiles you can use this application through Freeplane reader
Ideas for resource creation
References
Freeplane Wikipedia
How to use template
{{subst:Explore_an_application}} on the page you create for your tool. Page Name should be "Learn ToolName"


