Difference between revisions of "Learn GIMP"
| Line 21: | Line 21: | ||
{| class="wikitable" | {| class="wikitable" | ||
|- | |- | ||
| − | |style="width: 50%;|{{ext-img|450px| | + | |style="width: 50%;|{{ext-img|450px|https://upload.wikimedia.org/wikipedia/commons/8/89/GIMP_1_Main_Window.png}} |
| − | |style="width: 50%;|{{ext-img|450px| | + | |style="width: 50%;|{{ext-img|450px|https://upload.wikimedia.org/wikipedia/commons/6/65/GIMP_2_Select_Tool.png}} |
|- | |- | ||
|style="width: 50%;|Step 1 - '''Open GIMP''' | |style="width: 50%;|Step 1 - '''Open GIMP''' | ||
| Line 33: | Line 33: | ||
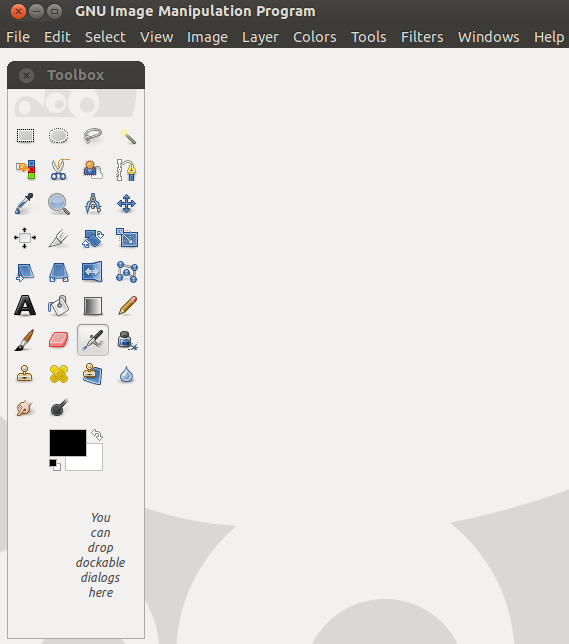
'''Free select tool''' : Select a hand-drawn region with free with polygonal segments | '''Free select tool''' : Select a hand-drawn region with free with polygonal segments | ||
|- | |- | ||
| − | |style="width: 50%;|{{ext-img|450px| | + | |style="width: 50%;|{{ext-img|450px|https://upload.wikimedia.org/wikipedia/commons/1/12/GIMP_3_Tool_Box.png}} |
| − | |style="width: 50%;|{{ext-img|450px| | + | |style="width: 50%;|{{ext-img|450px|https://upload.wikimedia.org/wikipedia/commons/a/ab/GIMP_4_Scale_Image.png}} |
|- | |- | ||
|style="width: 50%;|Step 3 - '''Crop''' | |style="width: 50%;|Step 3 - '''Crop''' | ||
| Line 46: | Line 46: | ||
* To reduce the size of heavy images. It makes uploading on websites more easy. | * To reduce the size of heavy images. It makes uploading on websites more easy. | ||
|- | |- | ||
| − | |style="width: 50%;|{{ext-img|450px| | + | |style="width: 50%;|{{ext-img|450px|https://upload.wikimedia.org/wikipedia/commons/8/83/GIMP_5_Move.png}} |
| − | |style="width: 50%;|{{ext-img|450px| | + | |style="width: 50%;|{{ext-img|450px|https://upload.wikimedia.org/wikipedia/commons/d/dc/GIMP_6_Add_Text.png}} |
|- | |- | ||
|style="width: 50%;|Step 5 - '''Move'''<br> After scaling an image, if you want to add another image to the frame, you would have to move the first image to the side. This can be done using the move tool. Select the move tool. Select the image. Click and drag to a suitable location.<br> | |style="width: 50%;|Step 5 - '''Move'''<br> After scaling an image, if you want to add another image to the frame, you would have to move the first image to the side. This can be done using the move tool. Select the move tool. Select the image. Click and drag to a suitable location.<br> | ||
| Line 56: | Line 56: | ||
* To add a title or caption explaining the text is useful. | * To add a title or caption explaining the text is useful. | ||
|- | |- | ||
| − | |style="width: 50%;|{{ext-img|450px| | + | |style="width: 50%;|{{ext-img|450px|https://upload.wikimedia.org/wikipedia/commons/1/16/GIMP_7_Gray_Scale.png}} |
| − | |style="width: 50%;|{{ext-img|450px| | + | |style="width: 50%;|{{ext-img|450px|https://upload.wikimedia.org/wikipedia/commons/a/ab/GIMP_4_Scale_Image.png}} |
|- | |- | ||
|style="width: 50%;|Step 7 - '''Grayscale'''<br> Select the image. Go to the menu bar on top and click on the 'Image' option. Then click on 'Mode' and finally click on 'Grayscale'. This would make the image grey.<br> | |style="width: 50%;|Step 7 - '''Grayscale'''<br> Select the image. Go to the menu bar on top and click on the 'Image' option. Then click on 'Mode' and finally click on 'Grayscale'. This would make the image grey.<br> | ||
| Line 63: | Line 63: | ||
* To make a photo black and white. It is preferrable for printing purposes. | * To make a photo black and white. It is preferrable for printing purposes. | ||
|style="width: 50%;|Step 8 - '''Scale Image size''' | |style="width: 50%;|Step 8 - '''Scale Image size''' | ||
| − | Select the image. Go to the menu bar on top and click on the 'Image' option. Then click on 'Scale image...' | + | Select the image. Go to the menu bar on top and click on the 'Image' option. Then click on 'Scale image...'This would show you options of 'width and height' along with 'X resolution' and 'Y resolution'. Enter in 72 pixels in both X and Y spaces. This would help reduce the file to a small size. <br> |
The tool is used:<br> | The tool is used:<br> | ||
* To reduce resolution which helps in file size. | * To reduce resolution which helps in file size. | ||
* To make photos for uploading on websites (should not be used for printing). | * To make photos for uploading on websites (should not be used for printing). | ||
|- | |- | ||
| − | |style="width: 50%;|{{ext-img|450px| | + | |style="width: 50%;|{{ext-img|450px|https://upload.wikimedia.org/wikipedia/commons/2/21/GIMP_9_Transparent_Background.png}} |
|- | |- | ||
|style="width: 50%;|Step 9 - '''Transparent background'''Open the image you want to work on. Once the image is open, go to File → Export as → and save it as a .png file. Once this is done, go to Layer → Transparency → and see if the option 'Color to Alpha' is active. If yes, then click on it and say yes. This will make your background transparent. If no, this tool cannot be applied to this image.<br> | |style="width: 50%;|Step 9 - '''Transparent background'''Open the image you want to work on. Once the image is open, go to File → Export as → and save it as a .png file. Once this is done, go to Layer → Transparency → and see if the option 'Color to Alpha' is active. If yes, then click on it and say yes. This will make your background transparent. If no, this tool cannot be applied to this image.<br> | ||
Revision as of 18:43, 14 October 2016
Introduction
GIMP is a powerful and complex open source image editing programme. The GIMPs tools are displayed as icons on the toolbox. A user can identify a tool by hovering over it. The name of the tool will appear below. Clicking on the icon will select that corresponding tool.
ICT Competency
Educational application and relevance
Version
GIMP version : 2.8.10
Configuration
No need to configure Its GIMP is part of the Ubuntu distribution. This can be opened from Applications → graphics → GIMP.
Overview of Features
Other similar applications
GIMP Inkscape , XGimp image editor, etc
Development and community help
Working with the application
Functionalities

|

|
Step 1 - Open GIMP
|
Step 2 - Select Tools Rectangle select tool : Select a rectangular Tool |

|

|
| Step 3 - Crop
Select the area that you would like to retain. The area can be extended or reduced by selecting one of the sides. Once your desired area is selected (the remaining area will turn grey or darker), then double click inside the desired area. The photo will be cropped to that size.
|
Step 4 - Scale:
Open the image that you want to work on in GIMP. Select the scale tool and click on the image. The image would then have tiny boxes on every side. Another box will pop up. You can insert the measurements that you want in this box. Or you could manually drag with the help of clicking one of the sides and reduce to the size you want.
|

|

|
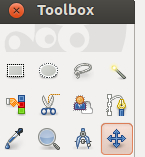
| Step 5 - Move After scaling an image, if you want to add another image to the frame, you would have to move the first image to the side. This can be done using the move tool. Select the move tool. Select the image. Click and drag to a suitable location. The tool is used:
|
Step 6 - Add Text Select the Text tool (a capital A). Now, drag the tool to were you want to insert text. A tiny box pops up. Type your text in the box. The size, colour, style of the text can be changed in the settings below the tool box. The length of the text box can be adjusted after you finishing typing your text by selecting the corners and dragging. The tool is used:
|

|

|
| Step 7 - Grayscale Select the image. Go to the menu bar on top and click on the 'Image' option. Then click on 'Mode' and finally click on 'Grayscale'. This would make the image grey. The tool is used:
|
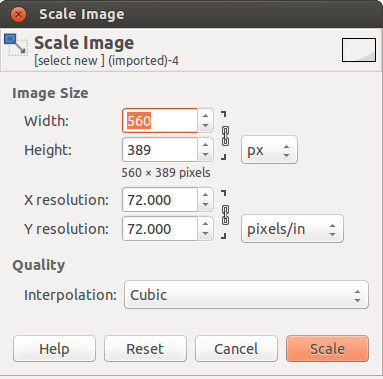
Step 8 - Scale Image size
Select the image. Go to the menu bar on top and click on the 'Image' option. Then click on 'Scale image...'This would show you options of 'width and height' along with 'X resolution' and 'Y resolution'. Enter in 72 pixels in both X and Y spaces. This would help reduce the file to a small size.
|

| |
| Step 9 - Transparent backgroundOpen the image you want to work on. Once the image is open, go to File → Export as → and save it as a .png file. Once this is done, go to Layer → Transparency → and see if the option 'Color to Alpha' is active. If yes, then click on it and say yes. This will make your background transparent. If no, this tool cannot be applied to this image. This tool is used:
|
File formats for creation
Saving the file
Like in most applications, a file can be saved using the FILE – SAVE AS command, or by the shortcut key CTRL+S. Always give a meaningful file name, reading which you should get an idea of the file contents. Its saving in .xcf
Export and publishing files
A file can be saved using the FILE – Export AS command. Always give a meaningful file name, reading which you should get an idea of the file contents. Its Exporting file in .PNG .JPEG .JPG
Advanced features
- Modifying Images
Installation
| Method of installation | Steps |
|---|---|
| From Ubuntu software Centre | Steps - type GIMP and install |
| From Terminal | Steps - type sudo apt-get install gimp and press Enter key. Type your password and press Enter to complete installation. |
| From the web | Steps |
| Web based registration | Steps |
The application on mobiles and tablets
Currently there is no GIMP app but alternative many image editing App available at play store.
Ideas for resource creation
Modify pictures hight, width, size, etc and creating resources.