Difference between revisions of "Learn Thunderbird"
| (21 intermediate revisions by 6 users not shown) | |||
| Line 1: | Line 1: | ||
| − | + | [[Category:Explore an application]] | |
| − | |||
| − | |||
| − | |||
| − | == | + | === Introduction === |
| − | Thunderbird is | + | Thunderbird (TB) is a '''“Free and Open Source software (FOSS)”''' email client tool for managing your emails, new feeds and new mailing groups. This mail client tool will help you to access and store your emails in multiple devices. Generally to access your emails from the mail servers (like gmail, rediff or hotmail) you need an Internet connectivity, with this thunderbird email client you can configure email account to access your emails even when you are offline (without Internet connectivity) as well. Thunderbird is an powerful email client tool with wide range of features like configuring multiple email accounts, filters, changing themes, add-ons and etc... |
| − | |||
| − | |||
| − | |||
| − | |||
| − | + | ==== Basic information ==== | |
| − | + | {| class="wikitable" | |
| − | + | |ICT Competency | |
| − | ==Overview of Features== | + | |Thunderbird is a free and open-source software email client tool. |
| − | Thunderbird is an email client, which does the usual functions of mailing – receiving, sending and storing emails. Mails can be stored in folders and sub folders to categorize mails based on subjects or senders or time periods or a combination of these. Files can be attached and shared with others. Emails can be searched easily by providing information on different elements such as sender, receiver, date etc. Mail ids can be connected to form ‘mailing-lists’ (such as google groups), by which, mail sent to the list id will be sent to all members of the group, this is ideal to create ‘professional learning communities’ of teachers with a common interest or need. | + | |- |
| − | == | + | |Version |
| − | + | |Latest version is 102 | |
| − | + | |- | |
| − | == | + | |Other similar applications |
| − | 1. | + | |Kmail, Mailspring, Evaluation, etc... |
| − | 2. | + | |- |
| + | |The application on mobiles and tablets | ||
| + | |Thunderbird is not available on smartphones. There are some other apps available for smartphones such as K-9 mail, Blue Mail, Spark Email, Clean-fox etc | ||
| + | |- | ||
| + | |Development and community help | ||
| + | |https://www.thunderbird.net/en-US/ | ||
| + | |} | ||
| + | |||
| + | ==== Overview of Features ==== | ||
| + | Thunderbird is an email client, which does the usual functions of mailing – receiving, sending and storing emails. Mails can be stored in folders and sub folders to categorize mails based on subjects or senders or time periods or a combination of these. Files can be attached and shared with others. Emails can be searched easily by providing information on different elements such as sender, receiver, date etc. Mail ids can be connected to form '''‘mailing-lists’''' (such as google groups), by which, mail sent to the list id will be sent to all members of the group, this is ideal to create '''‘professional learning communities’''' of teachers with a common interest or need. Thunderbird consider one of the powerful tool to manage multiple email accounts and emails include accessing feeds and public channels. The application helps you to manage your office email account (s) to in one place to manage your work and organizing emails based on your priorities and projects. | ||
| + | |||
| + | ====Installation==== | ||
| + | |||
| + | ===== For Ubuntu OS ===== | ||
| + | |||
| + | # This application is included in Ubuntu and many other Linux-based operating systems. | ||
| + | # If you cannot find this tool on your Ubuntu computer, you can install the app using the terminal by following these steps: | ||
| + | #* Open the terminal by clicking on '''"Applications/Menu → System Tools → Terminal"''' (or use the keyboard shortcut Ctrl+Alt+T). | ||
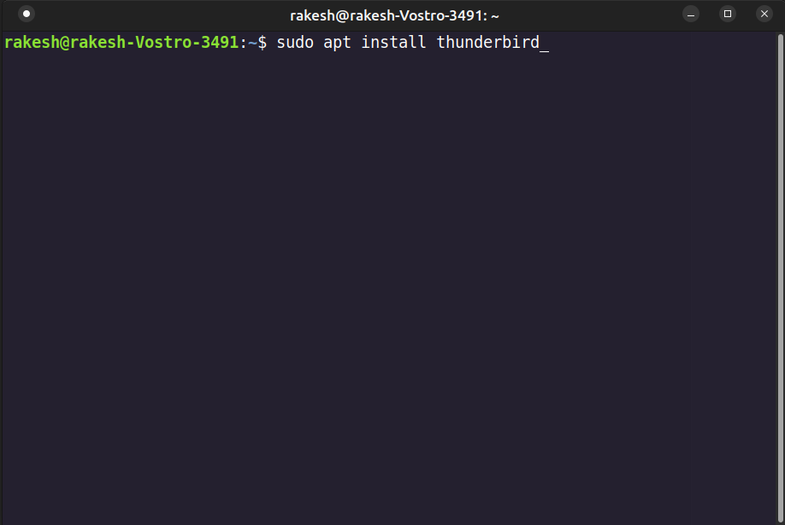
| + | #* Type the following command in the terminal window: '''''sudo apt install thunderbird''' (Shown in Fig1)'' | ||
| + | #*Press the '''"Enter"''' key on your keyboard. To initiate the installation process, you will be prompted to enter your system administrator password (no text will appear as you type it). | ||
| + | #*Press the '''"Enter"''' key again to start the installation process. | ||
| + | <gallery mode="packed" heights="350"> | ||
| + | File:Installation 1.png|Fig1: Installation in Ubuntu | ||
| + | </gallery> | ||
| + | ===== For Windows OS ===== | ||
| + | To download Thunderbird for Windows OS, please follow these instructions: | ||
| + | |||
| + | 1. Visit the official Thunderbird website by clicking here. | ||
| + | |||
| + | 2. On the website, locate the '''"Free Download"''' button and click on it. | ||
| + | |||
| + | 3. After the download is complete, navigate to the location where the file was saved. Double-click on the downloaded file to initiate the installation process. | ||
| + | |||
| + | 4. Follow the on-screen prompts: | ||
| + | |||
| + | ◦ When prompted to select a location, click on '''"Next".''' | ||
| + | |||
| + | ◦ If asked to choose a layout type, select your preferred option and click on '''"Next".''' | ||
| + | |||
| + | 5. Once the installation process is finished, you will see a '''"Done"''' or '''"Finish"''' button. Click on it to complete the installation. | ||
| + | |||
| + | ===== For MAC OS ===== | ||
| + | To download Thunderbird for mac OS from the official website, please follow these instructions: | ||
| + | |||
| + | 1. Click here to visit the official Thunderbird website. | ||
| + | |||
| + | 2. On the website, locate and click on the '''"Free Download"''' button. | ||
| + | |||
| + | 3. After the download is complete, locate the downloaded file and open it. | ||
| + | |||
| + | 4. Drag the Thunderbird application icon to your '''"Applications"''' folder to install it. | ||
| + | |||
| + | 5. Once the installation is complete, navigate to your '''"Applications"''' folder and open the Thunderbird application. | ||
| + | |||
| + | 6. Follow the on-screen prompts: | ||
| + | |||
| + | ◦ When asked to select a location, click on '''"Next".''' | ||
| + | |||
| + | ◦ If prompted to choose a layout type, select your preferred option and click on '''"Next".''' | ||
| + | |||
| + | 7. Once the installation is done, a '''"Done"''' or '''"Finish"''' button will appear. Click on it to complete the installation process. | ||
| + | |||
| + | ===== For Smart phones ===== | ||
| + | Unfortunately, Thunderbird is not available for phones. However, you can use an alternative mobile-based FOSS (Free and Open-Source Software) tool called K9 on your phone. | ||
| + | |||
| + | To install [https://play.google.com/store/apps/details?id=com.fsck.k9&hl=en_US K9 app], go to your app store on your phone, search for "k9" and click here to download and install K9 on your phone. | ||
| + | |||
| + | {{Note|Note: Please note that K9 is not available for iOS devices. iOS users can install the BlueMail app (which is not FOSS) instead.= Note: Please note that K9 is not available for iOS devices. iOS users can install the [https://apps.apple.com/us/app/blue-mail-email-calendar/id1063729305 BlueMail app] (which is not FOSS) instead.}} K9 is not available for iOS devices. iOS users can install the [https://apps.apple.com/us/app/blue-mail-email-calendar/id1063729305 BlueMail app] (which is not FOSS) instead. | ||
| + | |||
| + | === Working with the Application === | ||
| + | After installing the application on your computer, you can open it by following these steps on ubuntu: | ||
| + | |||
| + | 1. Navigate to the '''"Applications"''' menu on your computer. | ||
| + | |||
| + | 2. Go to the '''"Internet"''' category and look for either '''"Thunderbird"''' or '''"Mozilla Thunderbird".''' | ||
| + | |||
| + | 3. Click on the Thunderbird/Mozilla Thunderbird option to open the application. | ||
| + | |||
| + | Windows user can search the Thunderbird application from the application list. | ||
| + | |||
| + | To begin using Thunderbird, you need to configure your email account(s) by providing your email ID and password. | ||
| + | |||
| + | ==== Configuring email account ==== | ||
| + | To configure an email account follow the below steps. | ||
| + | |||
| + | # In the application screen, click on '''“Email”''' button to get the email configuration dialog box. | ||
| + | # Provide your name, email address, and password in the respective fields (As per the details available on mail server). | ||
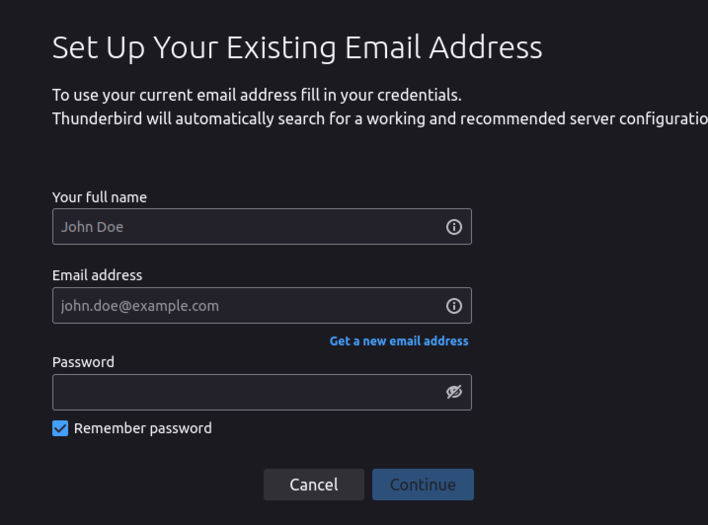
| + | # Once you type all the required details, click on continue. (as shown in the below Fig2) | ||
| + | <gallery mode="packed" heights="350"> | ||
| + | File:Setup Existing account.png|Fig2: Setting up existing account | ||
| + | File:Configaration found.png|Fig3: After finding the configuration | ||
| + | </gallery><gallery mode="packed" heights="350"> | ||
| + | File:Config 2.png|Fig4: Completing the configuration | ||
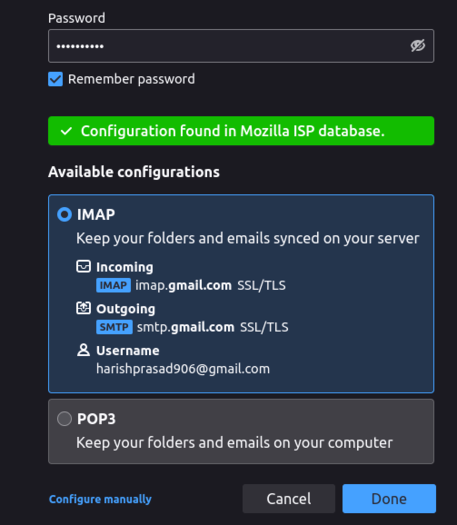
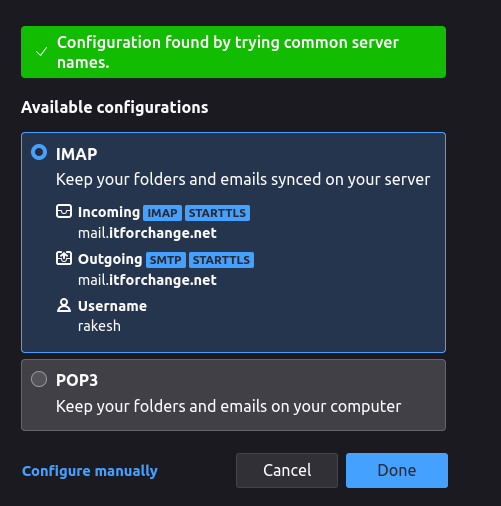
| + | </gallery>This will check your login details with e-mail server and in the next screen select '''“IMAP”''' (select POP3 only if you use single device to access emails) under the available configuration section (as shown in the below Fig4). | ||
| + | |||
| + | There are two types of commonly using email server connections which are IMAP and POP3. | ||
| + | |||
| + | • IMAP: It allows multiple devices at a time to access and read the mails include inbox, sent, draft and all other folders created on a device. This is suitable to user who wants to access emails from the multiple devices like laptop, mobile phones and etc...) | ||
| + | |||
| + | • POP3: It allows a single device at a time to access your emails through server. | ||
| + | <gallery mode="packed" heights="350"> | ||
| + | File:Config 3.png|Fig5: On successful account creation | ||
| + | </gallery> | ||
| + | |||
| + | Once you select the required configuration method (IMAP/POP3), now click on '''Done/Finish''' (as shown in the above Fig4 & Fig5). | ||
| + | |||
| + | This will take few minutes to connect to your email server and to check your login credentials. If all the given details are correct, thunderbird will start fetching the list of your folders and start synchronizing your mail. (as shown in the above Fig6). | ||
| + | <gallery mode="packed" heights="350"> | ||
| + | File:After completion of setup.png|Fig6: Thunderbird mail After successful configuration | ||
| + | </gallery> | ||
| + | |||
| + | ==== Enabling Menu Bar ==== | ||
| + | The menu bar in any application is an essential section that grants access to all available features and settings. By default, the menubar in Thunderbird is hidden, but you can temporarily enable it by pressing the '''"Alt"''' key on your keyboard. | ||
| + | |||
| + | If you prefer to have the menu bar displayed at all times in Thunderbird, follow these steps: | ||
| + | <gallery mode="packed" heights="350px"> | ||
| + | File:Enabling menu bar.png|Fig7: Enabling Menu bar | ||
| + | </gallery> | ||
| + | |||
| + | 1. Right-click on an empty space within the tab strip of Thunderbird. | ||
| + | |||
| + | 2. In the pop-up menu that appears, check the option labeled '''"Menu bar."''' (You may refer to the above image Fig7 for guidance.) | ||
| + | |||
| + | By following these steps, the menu bar will be shown continuously in Thunderbird (Fig8), allowing easy access to all its functionalities and settings. | ||
| + | <gallery mode="packed" heights="50px"> | ||
| + | File:Menu bar.png|Fig8: Menu bar | ||
| + | </gallery> | ||
| + | |||
| + | ==== Get Messages ==== | ||
| + | When you initially set up your email accounts in Thunderbird, by default thunderbird connect to your email server and download all new emails and folders from your webmail server. Additionally, Thunderbird will automatically check for new emails each time you start the application and at intervals of ten minutes (you can modify this interval under email account settings). | ||
| + | |||
| + | To manually check for new emails, you can click on the '''"Get Messages"''' button. This button serves two purposes: | ||
| + | |||
| + | 1. It fetches any new emails that are available on the mail server but have not been downloaded to your Thunderbird application yet. | ||
| + | |||
| + | 2. It helps you download emails that are still stored on the mail server. | ||
| + | <gallery mode="packed" heights="150px"> | ||
| + | File:get messages.png|Fig9: Get messages | ||
| + | </gallery> | ||
| + | |||
| + | To access the '''"Get Messages"''' button, look for it in the top left corner of the Thunderbird window. Clicking on this button will initiate the process of retrieving new emails and updating your Thunderbird inbox with the latest messages from your email server. | ||
| + | |||
| + | ==== Changing Thunderbird Layout ==== | ||
| + | <gallery mode="packed" heights="350px"> | ||
| + | File:Default layout.png|Fig10: Default Layout | ||
| + | </gallery> | ||
| + | The default layout in Thunderbird is the classic layout, but there are two additional layout options available: wide view and vertical view layout. To explore these layout options, follow these steps: | ||
| + | |||
| + | 1. Click on the '''"View"''' menu in Thunderbird. | ||
| + | |||
| + | 2. From the dropdown menu, select '''"Layout".''' | ||
| + | |||
| + | 3. In the submenu, you will find the options '''"View Classic"''', '''"View Wide"''', and '''"View Vertical"'''. | ||
| + | |||
| + | 4. Choose the layout that suits your preferences by selecting the corresponding option. | ||
| + | |||
| + | <gallery mode="packed" heights="350px"> | ||
| + | File:option for changing the layour.png|Fig11: Option for changing the layout | ||
| + | File:aFTER CHANIGN THE LAYOUT.png|Fig12: After changing the layout to verticle | ||
| + | </gallery> | ||
| + | |||
| + | ==== Message List Columns ==== | ||
| + | Thunderbird allows you to customize the columns displayed in the message list, providing flexibility in choosing the information you want to see for each email. Here are the steps to customize the message list columns in Thunderbird: | ||
| + | |||
| + | 1. In the Thunderbird interface, make sure you are in the Mail tab, where the message list is displayed. | ||
| + | |||
| + | 2. Right-click on the column headers in the message list. The column headers are typically labels such as '''"From,"''' '''"Subject,"''' '''"Date,"''' etc. | ||
| + | |||
| + | 3. A context menu will appear, showing a list of available columns that you can display in the message list. | ||
| + | |||
| + | 4. In the context menu, you can see a list of pre-defined columns, such as '''"Sender,"''' '''"Recipient,"''' '''"Size,"''' '''"Tags,"''' and more. These columns represent different information associated with the emails. | ||
| + | |||
| + | 5. To add a column, simply click on the checkbox next to the column name in the context menu. This will add the column to the message list, and the respective information will be displayed for each email. | ||
| + | |||
| + | 6. By clicking on each column heading the emails will be sorted accordingly. | ||
| + | |||
| + | 7. You can also rearrange the columns in the message list by clicking and dragging the column headers to your preferred positions. This allows you to customize the layout according to your preference. | ||
| + | |||
| + | <gallery mode="packed" heights="350px"> | ||
| + | File:Message list column.png|Fig13: Message list column | ||
| + | </gallery> | ||
| + | |||
| + | ==== Composing/sending new mail ==== | ||
| + | In addition to replying to emails which you receive to your inbox, you can compose new emails using the '''"Compose Email"''' or '''“Write”''' feature in Thunderbird. To compose a new email, follow these steps: | ||
| + | |||
| + | 1. Click on the '''"Write"''' button located in the top left corner of the thunderbird window. This will open a new email composition window. | ||
| + | |||
| + | 2. In the "From" section, you can select the email account through which you want to send the email. (this is applicable only if your have multiple account been added in your thunderbird) | ||
| + | |||
| + | 3. When composing a new email, you will come across the following fields: | ||
| + | |||
| + | a) '''"To"''': Enter the recipient's email address. You can add multiple recipients by separating their email addresses with commas. | ||
| + | |||
| + | b) '''"Cc"''': (Carbon Copy): If you want to send a copy of the email to additional recipients, enter their email addresses in this field. | ||
| + | |||
| + | c) '''"Bcc"''': (Blind Carbon Copy): If you want to send a copy of the email to recipients without disclosing their addresses to others, use this field. | ||
| + | |||
| + | d) '''"Subject"''': Provide a descriptive subject line for your email. | ||
| + | |||
| + | 4. In the main body of the email, type your message. If desired, you can format the text using the formatting options available in the toolbar. | ||
| + | |||
| + | 5. To attach files or documents, click on the paper-clip icon or select the '''"Attach"''' option from the menu. | ||
| + | |||
| + | 6. Once you have composed your email, click on the '''"Send"''' button to send it. | ||
| + | <gallery mode="packed" heights="320px"> | ||
| + | File:New e-mail composition window.png|Fig14: New e-mail composition window | ||
| + | File:Adding to, cc, bcc and subject.png|Fig15: Adding to, cc, bcc and subject | ||
| + | </gallery> | ||
| + | |||
| + | Thunderbird will send the email using the selected email account, and it will appear in the Sent folder as a record of your sent message. | ||
| + | |||
| + | ==== Adding Attachment to the email ==== | ||
| + | Your attachments refer to files that are sent alongside in your email message. Thunderbird supports a wide range of file types, including videos, audios, pictures, and documents (However, there are certain limitations on attachments, such as file size restrictions and permissible file extensions). | ||
| + | |||
| + | To attach files to your email in Thunderbird, please follow the steps below: | ||
| + | |||
| + | 1. Compose a new email or click on reply to an email you have received. | ||
| + | <gallery mode="packed" heights="300px"> | ||
| + | File:Composing new mail or replying to a mail.png|Fig16: Composing new mail or replying to a mail | ||
| + | </gallery> | ||
| + | |||
| + | 2. At the top right side of the Thunderbird screen, click on the '''"Attach"''' icon. This will open your computer's local folder location. | ||
| + | <gallery mode="packed" heights="350px"> | ||
| + | File:Attaching the file.png|Fig17: Attaching the file | ||
| + | </gallery> | ||
| + | 3. Browse through your folders to locate the file(s) you wish to attach. | ||
| + | |||
| + | 4. Select the desired file and click '''"Open."''' Repeat this step if you need to attach multiple files. | ||
| + | <gallery mode="packed" heights="360px"> | ||
| + | File:After attaching the file.png|Fig18: After attaching the file | ||
| + | </gallery> | ||
| + | |||
| + | Alternatively, you can use the drag-and-drop method to attach files. Simply locate the files you want to attach on your desktop or file explorer, and then drag and drop them into the compose window in Thunderbird. This method works with files from various applications as well. | ||
| + | |||
| + | ==== Adding Signature to your email ==== | ||
| + | Signatures allow users to include the information to be sent with every email, including name, contact details or a quote. To add a signature to your email in Thunderbird, follow these instructions: | ||
| + | |||
| + | 1. In the Thunderbird main window, click on the '''“edit”''' option from the menubar and then choose '''"Account Settings".''' (Fig19) | ||
| + | |||
| + | 2. In the Account Settings window, select the email account for which you want to add a signature. | ||
| + | |||
| + | 3. Under the selected account, scroll down and find the '''"Signature Text"''' section on the right side pane. | ||
| + | |||
| + | 4. Check the box next to '''"Attach the signature”''' (Fig20) | ||
| + | |||
| + | 5. Click on the '''"Choose..."''' button and browse your computer to select the file containing your desired signature in html format. | ||
| + | <gallery mode="packed" heights="300px"> | ||
| + | File:Adding signature to mail "Account settings".png|Fig19: Adding signature to mail "Account settings" | ||
| + | File:Adding signature to mail "Account settings".png|Fig20: Adding signature to mail "Attaching signature" | ||
| + | </gallery> | ||
| + | |||
| + | Once you add a signature to your email account going forward all your outgoing mails will have a signature at the end of the email thread. To change this option to add your signature just about the quote and just below your email body, follow the below steps. | ||
| + | <gallery mode="packed" heights="300px"> | ||
| + | File:Adding signature to mail "Attaching signature"2.png|Fig21: Adding signature to mail "Attaching signature" | ||
| + | </gallery> | ||
| + | |||
| + | 1. In the same account setting window navigate to the '''"Composition & Addressing"''' tab. Look for the '''"composition"''' section within the tab. (Fig22) | ||
| − | + | 2. Under when outgoing option, select '''“ start the reply above the quote”''' option and under place my signature setting select '''“below the reply (above the quote)”''' option. | |
| − | == | + | 3. Once you have finished configuring your signature, click on the '''"OK"''' button to save the changes. |
| − | + | <gallery mode="packed" heights="300px"> | |
| − | |- | + | File:Composition window.png|Fig22: Composition window |
| − | |style=" | + | </gallery> |
| − | | | + | |
| + | ==== Font configuration ==== | ||
| + | |||
| + | ===== Default font configuration ===== | ||
| + | To set the default font in Thunderbird's mail client, follow these steps: | ||
| + | |||
| + | 1. Click on the '''"Edit"''' menu at the top of the Thunderbird window. | ||
| + | |||
| + | 2. From the dropdown menu, select '''"Preferences"''' or '''"Settings".''' | ||
| + | |||
| + | 3. In the Preferences or Settings window, locate the '''"Fonts & Colors"''' section. You can use the search bar to find it quickly. (Fig23) | ||
| + | |||
| + | 4. Within the Fonts & Colors section, click on the '''"Advanced"''' button. This will open a new window with additional font settings. (Fig24) | ||
| + | |||
| + | 5. In the Advanced Fonts window, look for the option that says '''"Allow messages to use other fonts"''' and make sure it is unchecked. This will ensure that Thunderbird uses the default font consistently. | ||
| + | |||
| + | 6. Once you have made the necessary changes, click '''"OK"''' or '''"Apply"''' to save the settings. | ||
| + | <gallery mode="packed" heights="300px"> | ||
| + | File:Fonts & Colors.png|Fig23: Fonts & Colors | ||
| + | File:Advance Options.png|Fig24: Advance Options | ||
| + | </gallery> | ||
| + | |||
| + | By following these steps, you can set the default font in Thunderbird's mail client. This will ensure that the mail client uses the specified font for all your emails, providing a consistent appearance. | ||
| + | |||
| + | ===== Rewrap text ===== | ||
| + | The '''"Rewrap"''' option in Thunderbird allows you to reformat the text of an email or a specific paragraph to fit within a specified line length. This is particularly useful when you want to adjust the formatting of your email to ensure it is visually appealing and easy to read. | ||
| + | |||
| + | When you are replying to the other emails or composing new email, select the text or paragraph that you want to rewrap. You can do this by clicking and dragging the cursor over the desired text. | ||
| + | <gallery mode="packed" heights="200"> | ||
| + | File:Before rewrap the text.png|Fig25: Before rewrap the text | ||
| + | </gallery> | ||
| + | |||
| + | 1. Right-click on the selected text and choose the '''"Rewrap"''' option from the context menu. Alternatively, you can find the '''"Rewrap"''' option in the Thunderbird menu bar under '''"Edit"''' (Fig26) | ||
| + | |||
| + | 2. It will automatically adjust the formatting of the selected text to fit within the specified line length, which is usually determined by the width of the email composition window. (Fig27) | ||
| + | |||
| + | 3. Repeat the process if you need to rewrap additional paragraphs or sections of text. | ||
| + | <gallery mode="packed" heights="300"> | ||
| + | File:Selecting "rewrap" option.png|Fig26: Selecting "rewrap" option | ||
| + | File:After rewrap done for the selected text.png|Fig27: After rewrap done for the selected text | ||
| + | </gallery> | ||
| + | |||
| + | |||
| + | By using the '''"Rewrap"''' option, you can ensure that your text is properly formatted within the email, eliminating excessive line breaks and improving readability. It's a convenient feature to make your emails more visually appealing and professional. | ||
| + | |||
| + | Before sending the email make sure all your inserted links and tables are not effected with this option. | ||
| + | |||
| + | ===== Using text editor external tool ===== | ||
| + | To ensure your fonts remain intact when copying and pasting text into Thunderbird, follow these steps: | ||
| + | |||
| + | 1. If you need to copy text from other files or external sources, be aware that there is a chance it could disrupt the formatting of your email's fonts. | ||
| + | |||
| + | 2. To avoid this issue, first copy the content from the source application. | ||
| + | |||
| + | 3. Open a text editor application such as Pluma or gedit, or any other notepad-style app. | ||
| + | |||
| + | 4. Paste the copied text into the text editor (this will remove the pre-formatted style with the text). | ||
| + | |||
| + | 5. Once the text is pasted into the text editor, copy it again from there. | ||
| + | |||
| + | 6. Now, open Thunderbird and compose your email. | ||
| + | |||
| + | 7. Paste the text you copied from the text editor directly into your email in Thunderbird. | ||
| + | |||
| + | By following these steps, you can prevent any font style issues that may occur when copying and pasting text into Thunderbird. | ||
| + | <gallery mode="packed" heights="400px"> | ||
| + | File:Peek1.gif|Fig28: Copying text | ||
| + | </gallery> | ||
| + | |||
| + | ==== Managing Emails: Tag email ==== | ||
| + | Email tags will help you to organize your email messages by categories. You can tag your emails based on the projects or priority, personal, office and etc… | ||
| + | |||
| + | To tag emails in Thunderbird, you can follow these instructions: | ||
| + | |||
| + | 1. Navigate to the folder containing the message you want to tag (e.g., Inbox, Sent, or a custom folder). (Fig29) | ||
| + | |||
| + | 2. Select the message you wish to tag by clicking on it. You can also select multiple messages by holding down the Ctrl (Windows) or Command (Mac) key and clicking on the desired messages. (Fig30) | ||
| + | |||
| + | 3. Once the message(s) is selected, right-click on the message and choose '''"Tag"''' from the context menu (as shown in the above image ). Alternatively, you can also find the '''"Tag"''' option in the Thunderbird menu bar under '''"Message"''' or in the message toolbar. (Fig31) | ||
| + | |||
| + | 4. A list of available tags will be displayed. Click on the desired tag to apply it to the selected message(s). | ||
| + | |||
| + | 5. If the tag you want to use is not available, you can create a new tag. To do this, choose '''"Manage Tags"''' from the tag menu. In the '''"Tags"''' window, click on the '''"New"''' button and enter the name and color of the new tag. Click '''"OK"''' to create the tag and then apply it to the selected message(s). (Fig32 & Fig33) | ||
| + | |||
| + | 6. The selected message(s) will now be tagged with the chosen tag, and the tag will be displayed next to the message in the message list. | ||
| + | |||
| + | 7. Also, '''To remove a tag''', follow the same steps. | ||
| + | <gallery mode="packed" heights="325px"> | ||
| + | File:Navigating to folders to tag mail.png|Fig29: Navigating to folders to tag mail | ||
| + | File:Selecting the mail which should be tagged.png|Fig30: Selecting the mail which should be tagged | ||
| + | </gallery> | ||
| + | <gallery mode="packed" heights="300px"> | ||
| + | File:After tagged as important.png|Fig31: After tagged as important | ||
| + | </gallery> | ||
| + | <gallery mode="packed" heights="300px"> | ||
| + | File:Manage tags.png|Fig32: Manage tags | ||
| + | File:New Tag.png|Fig33: New Tag | ||
| + | </gallery> | ||
| + | |||
| + | Keyboard shortcut: See the numbers in the Tag menu, To quickly tag an email, press the respective number key. The email will be tagged with that tag. | ||
| + | |||
| + | By following these steps, you can easily tag messages in Thunderbird, allowing you to organize and categorize your emails based on different criteria or priorities. | ||
| + | |||
| + | ==== Managing Emails: with Folders ==== | ||
| + | Thunderbird folders help you to organize your emails in a hierarchical structure, making it easier to manage and locate specific emails quickly. You can create folders for different projects, categories, people, or any other criteria that suits your needs. By moving emails from your inbox to specific folders, you can keep your inbox clean. This allows you to focus on important emails and reduces the chances of missing any crucial messages. To create folders in Thunderbird and move emails into them, follow these steps: | ||
| + | |||
| + | In the Thunderbird interface, locate the left-hand pane where your email accounts and folders are displayed. | ||
| + | |||
| + | 1. Right-click on the email account or an existing folder where you want to create a new folder. A context menu will appear. (Fig34) | ||
| + | |||
| + | 2. From the context menu, select '''"New Folder."''' A dialog box will appear. (Fig35) | ||
| + | |||
| + | 3. In the dialog box, enter a name for the new folder. Choose a descriptive name that reflects the purpose or category of the emails you plan to store in it. | ||
| + | |||
| + | 4. Click '''"Create Folder"''' to create the new folder. | ||
| + | |||
| + | 5. The new folder will now appear in the left-hand pane, under the selected account or parent folder. | ||
| + | <gallery mode="packed" heights=350px> | ||
| + | File:Creating New folder.png|Fig34: Creating New folder | ||
| + | File:Creating Folder.png|Fig35: Creating Folder | ||
| + | </gallery> | ||
| + | <gallery mode="packed" heights=350px> | ||
| + | File:Folder created under the Inbox.png|Fig36: Folder created under the Inbox | ||
| + | </gallery> | ||
| + | |||
| + | Once you create a folder, now you can move any emails into it using move option. To move emails manually into a folder: | ||
| + | |||
| + | 1. Select the email or emails you want to move. You can do this by clicking on the email while holding down the Ctrl key to select multiple emails. | ||
| + | |||
| + | 2. Right-click on the selected email(s) to open the context menu. | ||
| + | |||
| + | 3. From the context menu, hover over the '''"Move To"''' or '''"Move"''' option. A sub-menu will appear with a list of folders. | ||
| + | |||
| + | 4. Click on the folder where you want to move the selected email(s). | ||
| + | |||
| + | 5. The selected email(s) will be moved to the chosen folder, and they will no longer appear in the original location (e.g., the inbox). | ||
| + | <gallery mode="packed" heights=350px> | ||
| + | File:Moving mails to Newly created folder.png|Fig37: Moving mails to Newly created folder | ||
| + | </gallery> | ||
| + | |||
| + | ==== Managing Emails: with local folders ==== | ||
| + | Thunderbird has a concept of 'Local folders'. Local folders are simply folders for e-mails that reside outside your actual mailbox. You can create a local folder in Thunderbird by following the instructions in the '''“Managing Emails: with Folders”''' section, except that you will create the folder under "Local Folders", and not "Inbox". When you create a local folder in Thunderbird, the folder is created on your workstation's hard-drive. Then, by moving e-mails from your Inbox to a local folder in Thunderbird, you can reduce your mailbox's size. | ||
| + | |||
| + | Note that you can create any hierarchy of folders under "Local Folders". Plan the hierarchy of folders based on your personal preference. For example, you can have a top-level folder named for the year, say '2023', and then multiple folders under '2023', one for each month or quarter of the year. You can also maintain separate local 'Sent Items' folders. You can move all your sent items from Inbox to this folder. These are examples. You should plan your local folder structure based on your individual e-mail habits and needs. | ||
| + | |||
| + | Depending on your e-mail volume, you should periodically move e-mails from your Inbox to local folders to keep your Inbox under the size limit. | ||
| + | |||
| + | This process of moving e-mails from your Inbox to local folders is also called 'archiving'. | ||
| + | |||
| + | ==== Managing Emails: with Message filtering ==== | ||
| + | Thunderbird allows you to set up message filters based on various criteria such as sender, subject, or keywords. These filters can automatically move incoming emails to specific folders, helping you automate the organization process. Each account has its own set of filters. Filters can move emails to folders, delete them, forward them to other email addresses, and more. | ||
| + | |||
| + | First you need to create folder for moving these auto filter emails to it. Follow the '''“Managing Emails: with Folders”''' section instruction to create folder and then follow the below steps to create filter. | ||
| + | |||
| + | 1. Go to Tools – Message filters option from the menu bar | ||
| + | |||
| + | 2. Click on '''New''' option from the Message filter dialog box. A Filter Rules dialog box will appear. (Fig38) | ||
| + | |||
| + | 3. In the '''"Filter Name"''' field, type a name for your filter and Under '''"Apply filter when"''', check one of the options or both. | ||
| + | |||
| + | Note: In most cases, you won’t want to change from the default '''“Getting New Mail”''' and '''“Manually Run”''' options. (Fig39) | ||
| + | <gallery mode="packed" heights="300px"> | ||
| + | File:Adding New filter.png|Fig38: Adding New filter | ||
| + | File:Filter name "Getting new mail" & Manually run.png|Fig39: Filter name "Getting new mail" & "Manually" run | ||
| + | </gallery> 4. In the '''"Getting New Mail: "''' dropdown menu, choose either Filter before Junk Classification or Filter after Junk Classification. | ||
| + | |||
| + | 5. Choose a property, a test and a value for each rule you want to apply: (Fig40) | ||
| + | |||
| + | ◦ A property is a email element or characteristic such as '''“Subject”''' or '''“From”''' | ||
| + | |||
| + | ◦ A test is a check on the property, such as '''“contains”''' or '''“is in my address book”''' | ||
| + | |||
| + | ◦ A value completes the test with a specific detail, such as an email address or keyword | ||
| + | |||
| + | 6. Choose one or more actions for emails that meet those criteria (Note: To add another rule, click Add a new rule '''“+”''' at the end of the last rule. To delete a rule, click Remove this rule '''“-”'''), and Click OK. (Fig41) | ||
| + | <gallery mode="packed" heights="300px"> | ||
| + | File:Adding Rules.png|Fig40: Adding Rules | ||
| + | File:Adding multiple Rules.png|Fig41: Adding multiple Rules | ||
| + | </gallery> 7. In the Message Filters dialog box, at the top line, select the account (from the dropdown list) that the filters are to apply to | ||
| + | |||
| + | 8. Click '''Run Now''' if you want the new filter to be applied to emails you’ve already received. The filter will automatically be applied to all new emails after it's saved. (Fig42) | ||
| + | <gallery mode="packed" heights="300px"> | ||
| + | File:Run now.png|Fig42: Run now | ||
| + | </gallery> | ||
| + | |||
| + | NOTE:Filters are executed in the order they appear in the list of filters, except when that order is not possible, in which case you will see the message Note: Filter actions will be run in a different order, and the link See execution order. If you click the link, you will see which order is used. | ||
| + | |||
| + | ==== Search emails: quick filter option ==== | ||
| + | The '''“Quick Filter”''' toolbar helps you limit the number of emails that are displayed in the email list or quickly filter messages within the selected email folder. It can be used, for example, to only show emails from the specific sender, emails containing a specific word or emails with attachments. | ||
| + | <gallery mode="packed" heights=200px> | ||
| + | File:Quick Filter option.png|Fig43: Quick Filter option | ||
| + | </gallery> | ||
| + | |||
| + | The Quick Filter toolbar is displayed above the message lists. You can show or hide it by clicking the Filter icon '''Quick Filter''' button in your toolbar. | ||
| + | |||
| + | In the Quick Filter bar, click the Tag button. The emails list will be narrowed down to all emails that contain at least one tag. | ||
| + | |||
| + | ==== Search emails : through Search emails option ==== | ||
| + | Searching mail will help easy in find the required mail by applying the filter. To search a mail Go to '''“Edit→Find→Search Messages”''' or right-click on the folder in which you want to search emails. A window will open as shown in the below image. | ||
| + | <gallery mode="packed" heights=300px> | ||
| + | File:Search image.png|Fig44: Search image | ||
| + | File:Popup window after clicking on search image.png|Fig45: Popup window after clicking on the search image | ||
| + | </gallery> | ||
| + | |||
| + | 1. Select the '''Search for messages''' in the drop-down menu to choose between All Mail, a specific address, or a folder. | ||
| + | |||
| + | 2. Select the '''Subject''' drop-down list to choose the criteria for the search.<gallery mode="packed" heights="300px"> | ||
| + | File:Subject drop-down list.png|Fig46: Subject drop-down list | ||
| + | </gallery> 3. In the next box, choose an operator (for example, '''contains, doesn't contain, or begins with''').<gallery mode="packed" heights="300px"> | ||
| + | File:Opting the Operation.png|Fig47: Opting the Operation | ||
| + | </gallery> | ||
| + | |||
| + | 4. Type a search term in the text field and select '''Search'''. Your results appear in the box below. | ||
| + | |||
| + | ==== Saved search messages ==== | ||
| + | A Saved Search is a special folder which shows a selection of emails which match your pre-defined search criteria. Saved Searches are a great way of saving time because instead of typing or recreating your most frequent searches again and again, you can just get immediate live results by looking at your Saved Search folder. | ||
| + | |||
| + | When you create a Saved Search, you can choose criteria such as email addresses, subject words, tags, or dates. You can even choose different source folders from several accounts. Thunderbird then creates a folder which shows only matching emails. New matching emails from the specified source folders will automatically be shown in the Saved Search folder. | ||
| + | |||
| + | For example, you may want to view all emails from your supervisor in their own folder named '''“Supervisor”.''' Just add their email address to a Saved Search and their emails will automatically show up in the '''“supervisor”''' folder as they arrive. Yet the same emails will also still be shown in the source folders like your Inbox. | ||
| + | <gallery mode="packed" heights=300px> | ||
| + | File:Saved search dialog box.png|Fig48: Optiong the saved search option | ||
| + | </gallery> | ||
| + | |||
| + | Let's see how to do this | ||
| + | |||
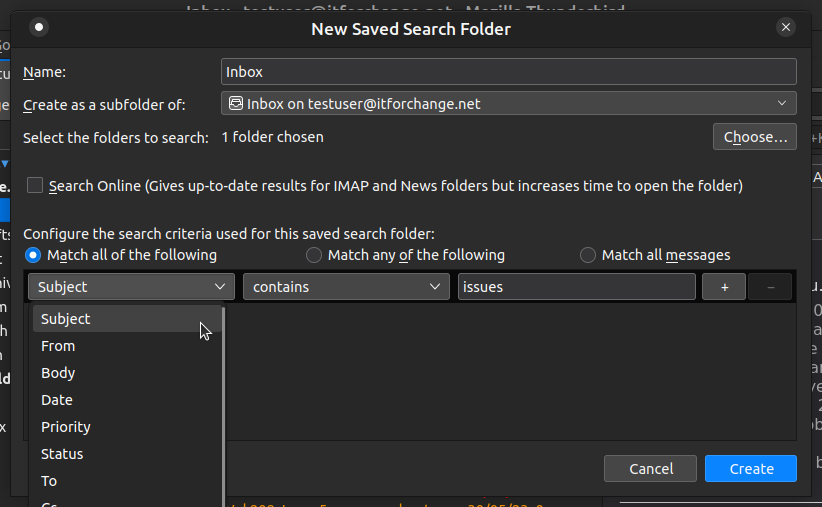
| + | 1. From the File menu, click New, and then Saved Search from the sub-menu. The '''New Saved Search Folder''' dialog appears. | ||
| + | |||
| + | 2. Change the Name for your Saved Search as you want to have it in the folder list. The folder that was selected when you opened the New Saved Search Folder dialog in step 1 will be displayed as the default name and location. | ||
| + | |||
| + | 3. Click the Create as a subfolder of dropdown if you wish to change the parent folder. | ||
| + | |||
| + | <gallery mode="packed" heights="300px"> | ||
| + | File:Saved search dialog box1.png|Fig49: Saved search dialog box | ||
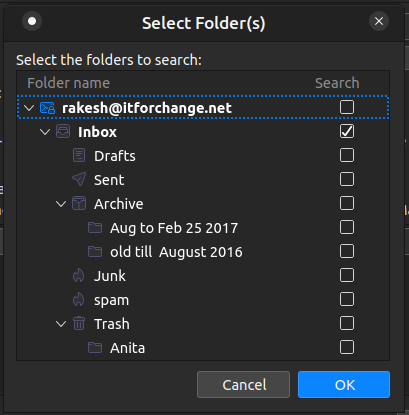
| + | </gallery> 4. To select the folders to search, click the '''Choose''' button. A dialog will be displayed that contains a hierarchical view of all the folders in all of your accounts. Select the checkbox next to each folder you wish to include in the search.<gallery mode="packed" heights="300px"> | ||
| + | File:Select folders to search.png|Fig50: Select folders to search | ||
| + | </gallery> | ||
| + | |||
| + | 5. If your emails are not stored on your local system for offline access (for example, if they are stored on a central IMAP server), check Search Online. This is only necessary if you are filtering based on the body of the email, as addresses and the subject line are stored locally even if you leave the email body on the server. | ||
| + | ==== Using Event and Task ==== | ||
| + | The Thunderbird calendar option allows you to create, edit, and manage events, appointments, and tasks. You can set reminders, specify start and end times, add descriptions, invite attendees, and categories events for better organization. By default the calendar will not be enabled on the thunderbird. | ||
| + | <gallery mode="packed" heights=300px> | ||
| + | File:Default Calender.png|Fig51: Default Calender | ||
| + | </gallery> | ||
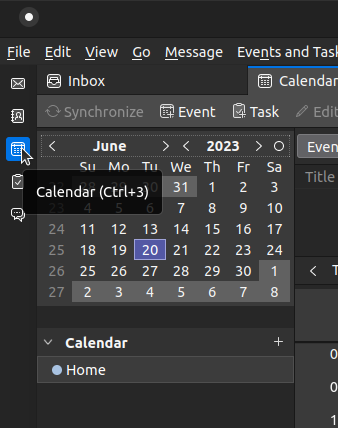
| − | | | + | To enable the calendar you need to click on the calendar icon on the right side pane of the thunderbird window, then you will find the calendar tab. On the left side of the Thunderbird windows screen, you will find the option to '''“Enable”''' the calendar click on it. Once you click on it '''“Event and Task”''' option will be enabled on the menu bar. |
| + | <gallery mode="packed" heights=250px> | ||
| + | File:Enabling Event & Task.png|Fig52: Enabling Event & Task | ||
| + | </gallery> | ||
| + | To create events and tasks in Thunderbird's calendar, follow these steps: | ||
| + | 1. In the Thunderbird interface, click on the '''"Calendar"''' tab at the top to switch to the calendar view. | ||
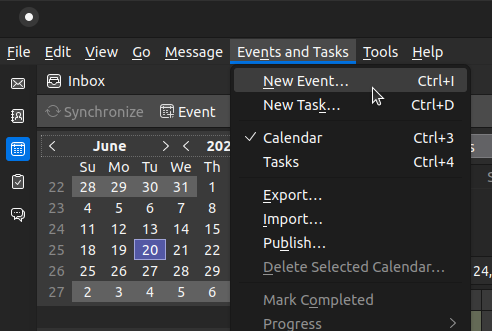
| − | + | 2. In the calendar view, select the specific calendar where you want to create the event or task. If you have multiple calendars, they will be listed on the left-hand side of the calendar view. Now click on the Event and Task option from the menu bar and select '''New Event''' or '''New Task''' as required, both has same template.<gallery mode="packed" heights="300px"> | |
| − | + | File:Selecting New Event.png|Fig53: Selecting New Event | |
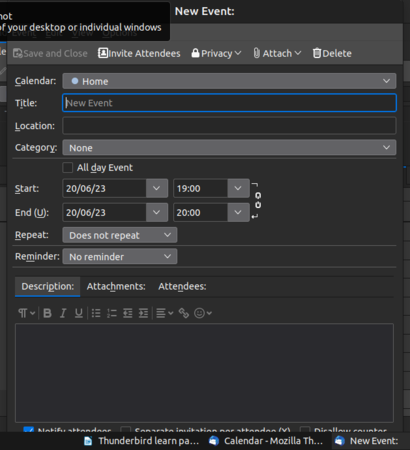
| − | + | </gallery> 3. A pop-up window will appear to create the event. Here, enter the event title, start and end times, and any additional details such as location, description, or attendees.<gallery mode="packed" heights="300px"> | |
| − | + | File:Adding details to New Event.png|Fig54: Adding details to New Event | |
| − | + | </gallery> | |
| − | |||
| − | |||
| − | |||
| − | |||
| − | |||
| − | |||
| − | + | 4. Adjust any other settings or options as needed, such as reminders, recurrence (if the event repeats), or privacy settings. | |
| − | |||
| − | |||
| − | |||
| − | |||
| − | |||
| − | + | 5. Click on the attendances and add the email Id of the people you to invite for the event (If it is task then attendances will not be available) | |
| − | |||
| − | |||
| − | |||
| − | |||
| − | |||
| − | Click on | ||
| − | |||
| − | |||
| − | |||
| − | |||
| − | |||
| − | |||
| − | |||
| − | |||
| − | |||
| − | |||
| − | |||
| − | |||
| − | |||
| − | |||
| − | |||
| − | |||
| − | |||
| − | |||
| − | |||
| − | |||
| − | |||
| − | |||
| − | |||
| + | 6. Click '''"Save"''' or '''"OK"''' to create the event. It will now appear on the selected calendar at the specified date and time. | ||
| + | You can edit or modify events and tasks by selecting them from the calendar or task list and making changes in the event or task details window. To access the details, double-click on the event or task. | ||
| + | Thunderbird's calendar also allows you to set reminders for events and tasks. When creating or editing an event or task, you can specify the reminder time and choose the notification method (e.g., pop-up alert, sound, email). | ||
| + | ==== Using Add-on ==== | ||
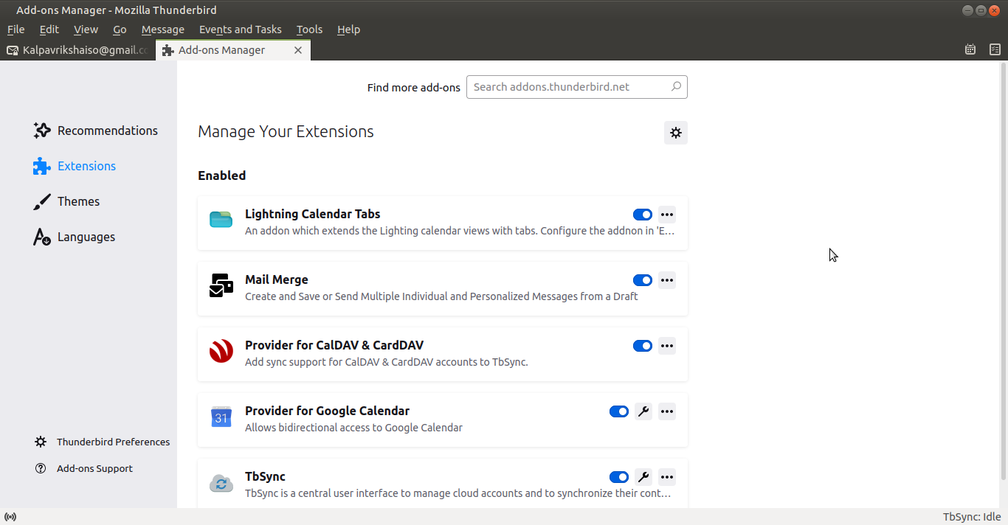
| + | Add-on will enrich your requirement of the mail client. To add the add-on Go to '''“Tools→ Add-on and Themes”''' you will get a new window as show in below image, click on the Extension option and search the required Add-on need to you like: '''Tbsyn, CalDAV and CardDAV, Lightning Calender, Mail Merge.''' | ||
| + | <gallery mode="packed" heights=350px> | ||
| + | File:Adding required extensions on thunderbird.png|Fig55: Adding required extensions on thunderbird | ||
| + | </gallery> | ||
| + | You will have the toggle option to enable and disable all the installed add-on’s . | ||
| + | ==== Configure Next-cloud Calendar ==== | ||
| + | Similar to Google calendar we have our own Cloud based calender called '''Next-cloud Calendar'''. To integrate the Nextcloud Calendar with Thunderbird mail client, follow these steps: | ||
| + | 1. Make sure you have two necessary add-ons, Tbsyn and CalDAV and CardDAV, installed in Thunderbird. These add-ons facilitate the synchronization between the calendar and the mail client. | ||
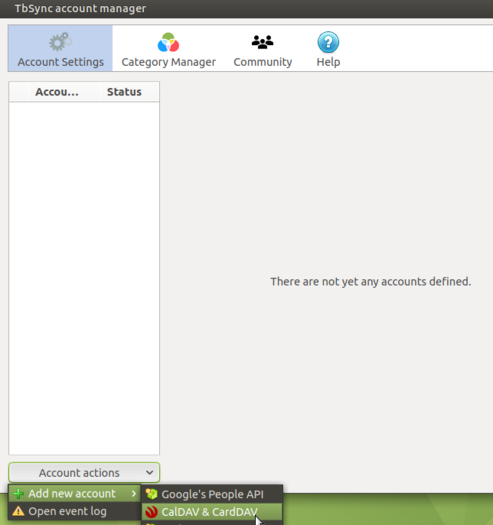
| + | 2. After adding the required add-ons, locate the Tbsyn settings by clicking on the spanner icon. This action will open a new window, as shown in the image below. | ||
| − | + | 3. To configure the Nextcloud calendar, follow these steps: | |
| − | + | ◦ Click on the '''"Account action"''' button. | |
| − | + | ◦ Select '''"Add new account"''' from the options. | |
| − | |||
| − | == | + | ◦ Click on '''"CalDAV & CardDAV."'''<gallery mode="packed" heights="350px"> |
| − | + | File:Configuring nextcloud calender.png|Fig56: Configuring NextCloud calender | |
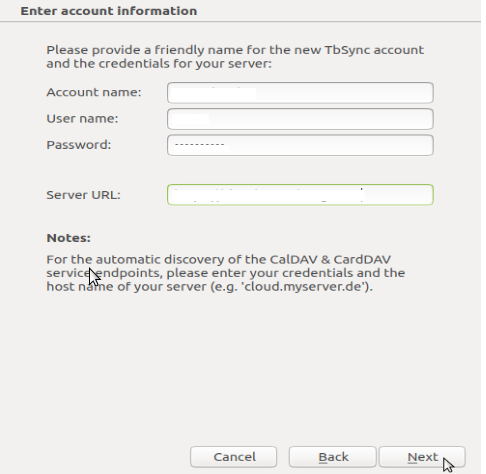
| + | </gallery> 4. A new tab will open, allowing you to enter the account information. Fill in the required details, such as the server address (cloud.itforchange.net), username (your nextcloud username), and password (Nextcloud login password) associated with your Nextcloud account.<gallery mode="packed" heights="350px"> | ||
| + | File:Adding NextCloud Details.png|Fig57: Adding NextCloud Details | ||
| + | </gallery> 5. Once you have entered the account information, click on '''"Next."''' The Calendar selection window will appear, displaying the available calendars associated with your Nextcloud account. Select the desired calendars (Blr calendar, your team calendar and etc...) that you want to synchronise with Thunderbird calender.<gallery mode="packed" heights="350px"> | ||
| + | File:Syncing the calenders.png|Fig58: Syncing the calenders | ||
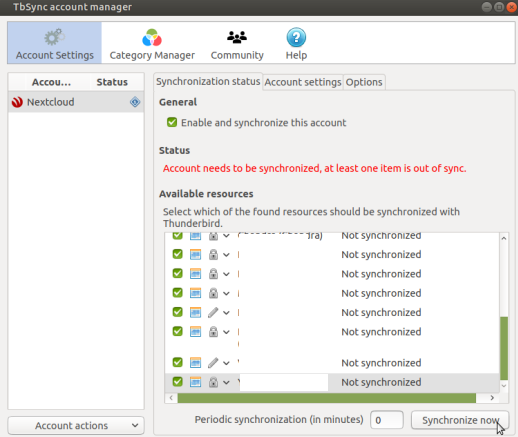
| + | </gallery> | ||
| − | + | 6. After selecting the calendar, click on '''"Synchronize now"''' to initiate the synchronization process. | |
| − | + | 7. The Nextcloud calendar is now configured in Thunderbird, and any updates or changes made to the nextcloud calendar will be notified within the mail client as well. | |
| − | |||
| − | |||
| − | |||
| − | |||
| − | + | By following these steps, you can successfully set up and synchronize the Nextcloud Calendar with Thunderbird, allowing you to manage your events and appointments seamlessly. | |
| − | = | + | === References === |
| + | 1. https://support.mozilla.org/en-US/ | ||
| − | + | 2. https://www.lifewire.com | |
| − | |||
| − | |||
Latest revision as of 16:14, 13 September 2024
Introduction
Thunderbird (TB) is a “Free and Open Source software (FOSS)” email client tool for managing your emails, new feeds and new mailing groups. This mail client tool will help you to access and store your emails in multiple devices. Generally to access your emails from the mail servers (like gmail, rediff or hotmail) you need an Internet connectivity, with this thunderbird email client you can configure email account to access your emails even when you are offline (without Internet connectivity) as well. Thunderbird is an powerful email client tool with wide range of features like configuring multiple email accounts, filters, changing themes, add-ons and etc...
Basic information
| ICT Competency | Thunderbird is a free and open-source software email client tool. |
| Version | Latest version is 102 |
| Other similar applications | Kmail, Mailspring, Evaluation, etc... |
| The application on mobiles and tablets | Thunderbird is not available on smartphones. There are some other apps available for smartphones such as K-9 mail, Blue Mail, Spark Email, Clean-fox etc |
| Development and community help | https://www.thunderbird.net/en-US/ |
Overview of Features
Thunderbird is an email client, which does the usual functions of mailing – receiving, sending and storing emails. Mails can be stored in folders and sub folders to categorize mails based on subjects or senders or time periods or a combination of these. Files can be attached and shared with others. Emails can be searched easily by providing information on different elements such as sender, receiver, date etc. Mail ids can be connected to form ‘mailing-lists’ (such as google groups), by which, mail sent to the list id will be sent to all members of the group, this is ideal to create ‘professional learning communities’ of teachers with a common interest or need. Thunderbird consider one of the powerful tool to manage multiple email accounts and emails include accessing feeds and public channels. The application helps you to manage your office email account (s) to in one place to manage your work and organizing emails based on your priorities and projects.
Installation
For Ubuntu OS
- This application is included in Ubuntu and many other Linux-based operating systems.
- If you cannot find this tool on your Ubuntu computer, you can install the app using the terminal by following these steps:
- Open the terminal by clicking on "Applications/Menu → System Tools → Terminal" (or use the keyboard shortcut Ctrl+Alt+T).
- Type the following command in the terminal window: sudo apt install thunderbird (Shown in Fig1)
- Press the "Enter" key on your keyboard. To initiate the installation process, you will be prompted to enter your system administrator password (no text will appear as you type it).
- Press the "Enter" key again to start the installation process.
For Windows OS
To download Thunderbird for Windows OS, please follow these instructions:
1. Visit the official Thunderbird website by clicking here.
2. On the website, locate the "Free Download" button and click on it.
3. After the download is complete, navigate to the location where the file was saved. Double-click on the downloaded file to initiate the installation process.
4. Follow the on-screen prompts:
◦ When prompted to select a location, click on "Next".
◦ If asked to choose a layout type, select your preferred option and click on "Next".
5. Once the installation process is finished, you will see a "Done" or "Finish" button. Click on it to complete the installation.
For MAC OS
To download Thunderbird for mac OS from the official website, please follow these instructions:
1. Click here to visit the official Thunderbird website.
2. On the website, locate and click on the "Free Download" button.
3. After the download is complete, locate the downloaded file and open it.
4. Drag the Thunderbird application icon to your "Applications" folder to install it.
5. Once the installation is complete, navigate to your "Applications" folder and open the Thunderbird application.
6. Follow the on-screen prompts:
◦ When asked to select a location, click on "Next".
◦ If prompted to choose a layout type, select your preferred option and click on "Next".
7. Once the installation is done, a "Done" or "Finish" button will appear. Click on it to complete the installation process.
For Smart phones
Unfortunately, Thunderbird is not available for phones. However, you can use an alternative mobile-based FOSS (Free and Open-Source Software) tool called K9 on your phone.
To install K9 app, go to your app store on your phone, search for "k9" and click here to download and install K9 on your phone.
![]() Note: K9 is not available for iOS devices. iOS users can install the BlueMail app (which is not FOSS) instead.
Note: K9 is not available for iOS devices. iOS users can install the BlueMail app (which is not FOSS) instead.
Working with the Application
After installing the application on your computer, you can open it by following these steps on ubuntu:
1. Navigate to the "Applications" menu on your computer.
2. Go to the "Internet" category and look for either "Thunderbird" or "Mozilla Thunderbird".
3. Click on the Thunderbird/Mozilla Thunderbird option to open the application.
Windows user can search the Thunderbird application from the application list.
To begin using Thunderbird, you need to configure your email account(s) by providing your email ID and password.
Configuring email account
To configure an email account follow the below steps.
- In the application screen, click on “Email” button to get the email configuration dialog box.
- Provide your name, email address, and password in the respective fields (As per the details available on mail server).
- Once you type all the required details, click on continue. (as shown in the below Fig2)
This will check your login details with e-mail server and in the next screen select “IMAP” (select POP3 only if you use single device to access emails) under the available configuration section (as shown in the below Fig4).
There are two types of commonly using email server connections which are IMAP and POP3.
• IMAP: It allows multiple devices at a time to access and read the mails include inbox, sent, draft and all other folders created on a device. This is suitable to user who wants to access emails from the multiple devices like laptop, mobile phones and etc...)
• POP3: It allows a single device at a time to access your emails through server.
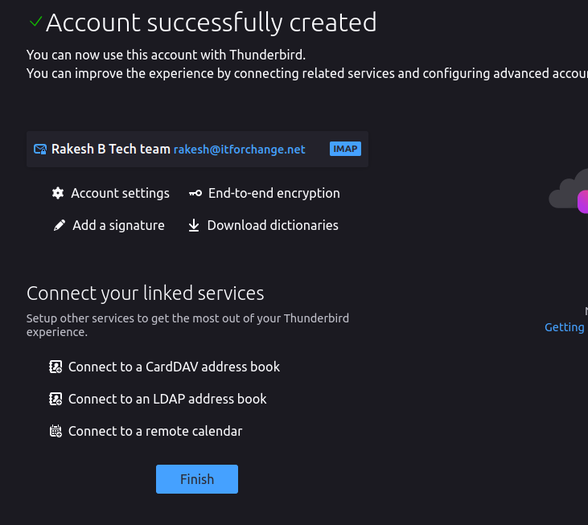
Once you select the required configuration method (IMAP/POP3), now click on Done/Finish (as shown in the above Fig4 & Fig5).
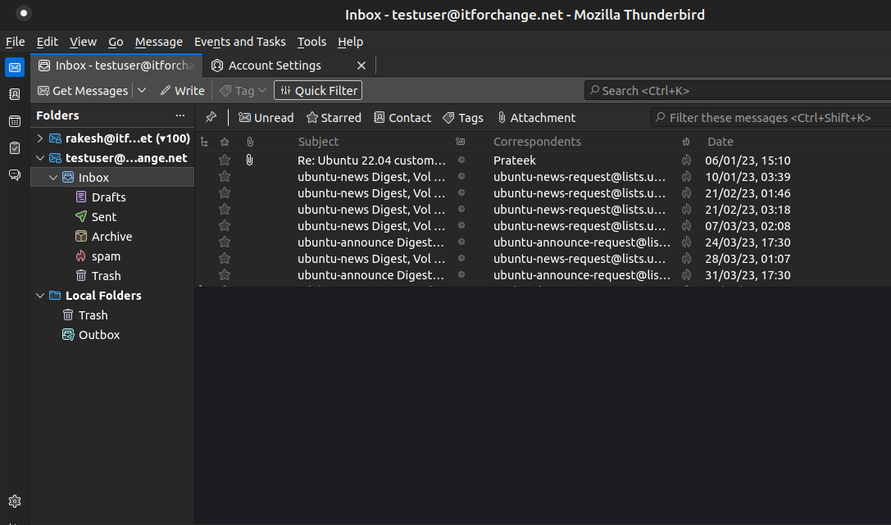
This will take few minutes to connect to your email server and to check your login credentials. If all the given details are correct, thunderbird will start fetching the list of your folders and start synchronizing your mail. (as shown in the above Fig6).
Enabling Menu Bar
The menu bar in any application is an essential section that grants access to all available features and settings. By default, the menubar in Thunderbird is hidden, but you can temporarily enable it by pressing the "Alt" key on your keyboard.
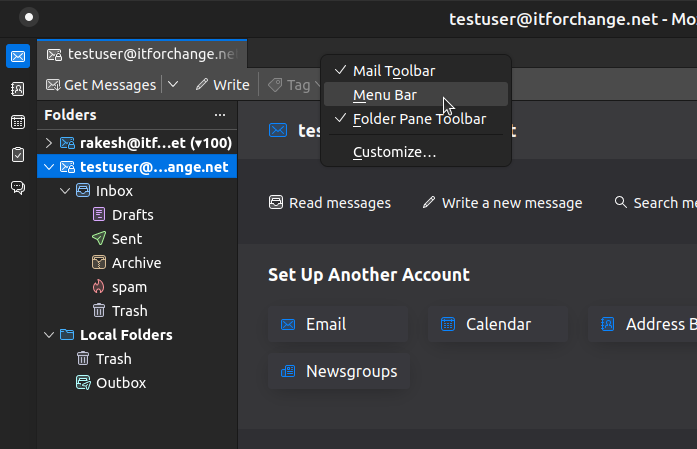
If you prefer to have the menu bar displayed at all times in Thunderbird, follow these steps:
1. Right-click on an empty space within the tab strip of Thunderbird.
2. In the pop-up menu that appears, check the option labeled "Menu bar." (You may refer to the above image Fig7 for guidance.)
By following these steps, the menu bar will be shown continuously in Thunderbird (Fig8), allowing easy access to all its functionalities and settings.
Get Messages
When you initially set up your email accounts in Thunderbird, by default thunderbird connect to your email server and download all new emails and folders from your webmail server. Additionally, Thunderbird will automatically check for new emails each time you start the application and at intervals of ten minutes (you can modify this interval under email account settings).
To manually check for new emails, you can click on the "Get Messages" button. This button serves two purposes:
1. It fetches any new emails that are available on the mail server but have not been downloaded to your Thunderbird application yet.
2. It helps you download emails that are still stored on the mail server.
To access the "Get Messages" button, look for it in the top left corner of the Thunderbird window. Clicking on this button will initiate the process of retrieving new emails and updating your Thunderbird inbox with the latest messages from your email server.
Changing Thunderbird Layout
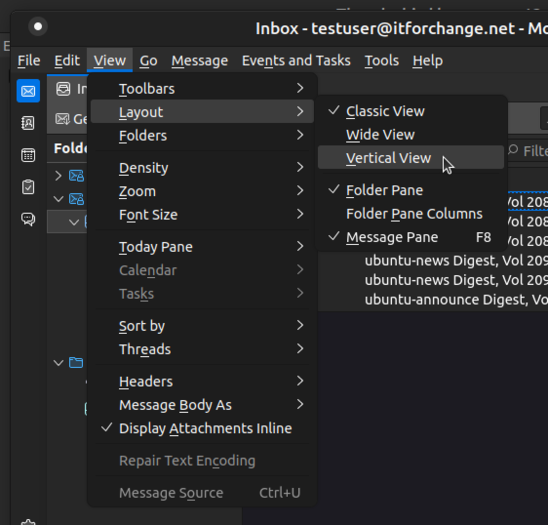
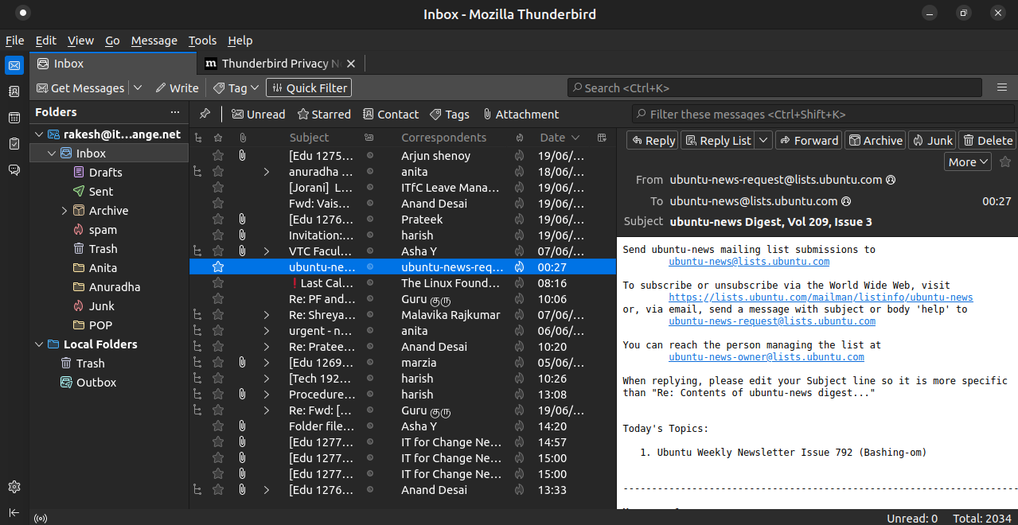
The default layout in Thunderbird is the classic layout, but there are two additional layout options available: wide view and vertical view layout. To explore these layout options, follow these steps:
1. Click on the "View" menu in Thunderbird.
2. From the dropdown menu, select "Layout".
3. In the submenu, you will find the options "View Classic", "View Wide", and "View Vertical".
4. Choose the layout that suits your preferences by selecting the corresponding option.
Message List Columns
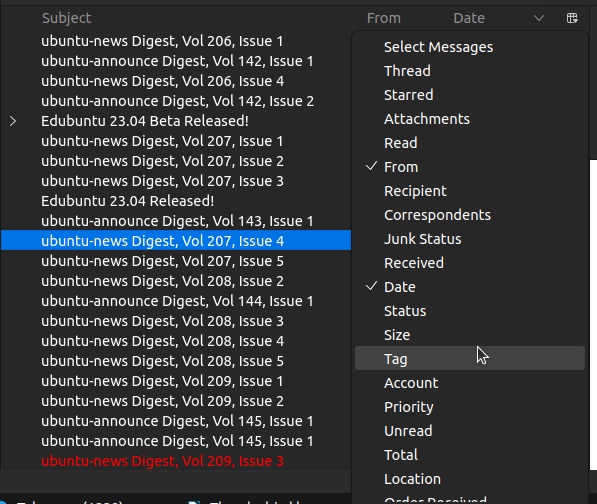
Thunderbird allows you to customize the columns displayed in the message list, providing flexibility in choosing the information you want to see for each email. Here are the steps to customize the message list columns in Thunderbird:
1. In the Thunderbird interface, make sure you are in the Mail tab, where the message list is displayed.
2. Right-click on the column headers in the message list. The column headers are typically labels such as "From," "Subject," "Date," etc.
3. A context menu will appear, showing a list of available columns that you can display in the message list.
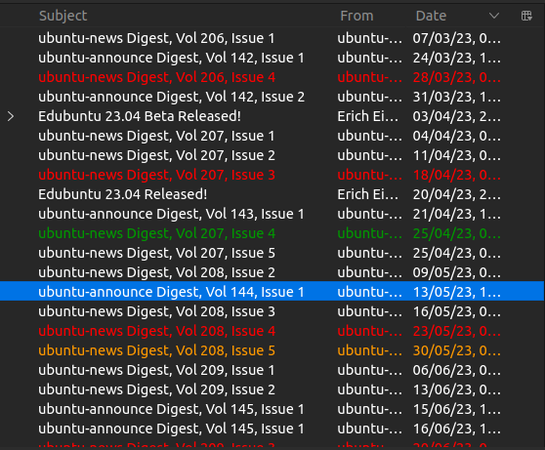
4. In the context menu, you can see a list of pre-defined columns, such as "Sender," "Recipient," "Size," "Tags," and more. These columns represent different information associated with the emails.
5. To add a column, simply click on the checkbox next to the column name in the context menu. This will add the column to the message list, and the respective information will be displayed for each email.
6. By clicking on each column heading the emails will be sorted accordingly.
7. You can also rearrange the columns in the message list by clicking and dragging the column headers to your preferred positions. This allows you to customize the layout according to your preference.
Composing/sending new mail
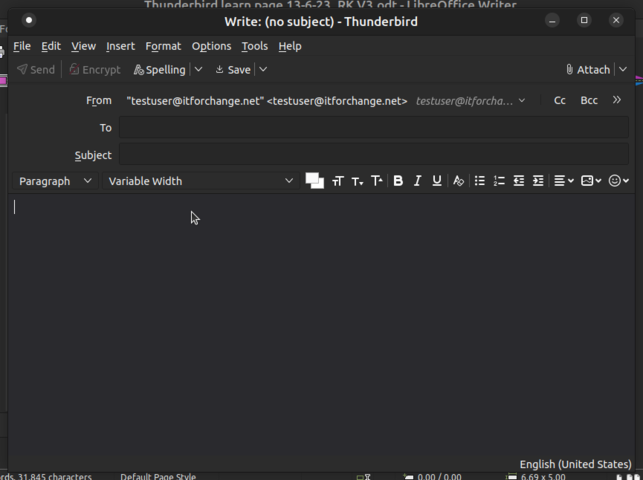
In addition to replying to emails which you receive to your inbox, you can compose new emails using the "Compose Email" or “Write” feature in Thunderbird. To compose a new email, follow these steps:
1. Click on the "Write" button located in the top left corner of the thunderbird window. This will open a new email composition window.
2. In the "From" section, you can select the email account through which you want to send the email. (this is applicable only if your have multiple account been added in your thunderbird)
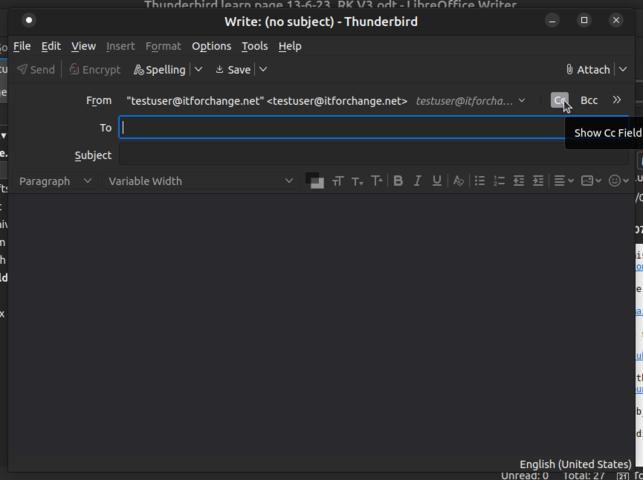
3. When composing a new email, you will come across the following fields:
a) "To": Enter the recipient's email address. You can add multiple recipients by separating their email addresses with commas.
b) "Cc": (Carbon Copy): If you want to send a copy of the email to additional recipients, enter their email addresses in this field.
c) "Bcc": (Blind Carbon Copy): If you want to send a copy of the email to recipients without disclosing their addresses to others, use this field.
d) "Subject": Provide a descriptive subject line for your email.
4. In the main body of the email, type your message. If desired, you can format the text using the formatting options available in the toolbar.
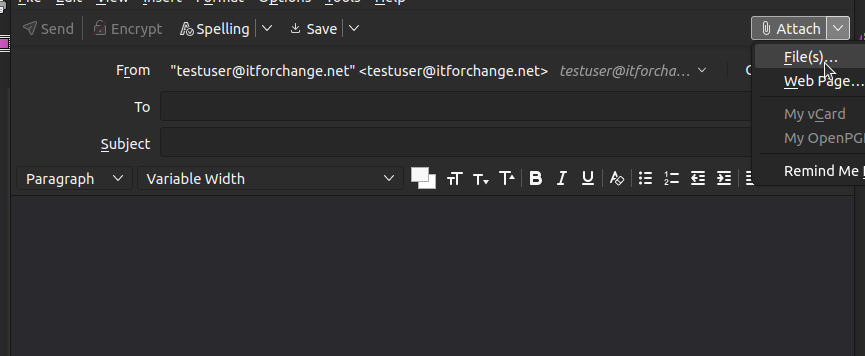
5. To attach files or documents, click on the paper-clip icon or select the "Attach" option from the menu.
6. Once you have composed your email, click on the "Send" button to send it.
Thunderbird will send the email using the selected email account, and it will appear in the Sent folder as a record of your sent message.
Adding Attachment to the email
Your attachments refer to files that are sent alongside in your email message. Thunderbird supports a wide range of file types, including videos, audios, pictures, and documents (However, there are certain limitations on attachments, such as file size restrictions and permissible file extensions).
To attach files to your email in Thunderbird, please follow the steps below:
1. Compose a new email or click on reply to an email you have received.
2. At the top right side of the Thunderbird screen, click on the "Attach" icon. This will open your computer's local folder location.
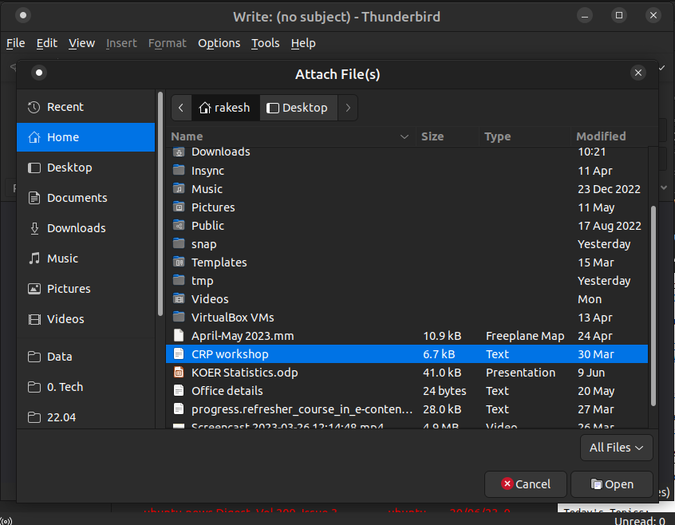
3. Browse through your folders to locate the file(s) you wish to attach.
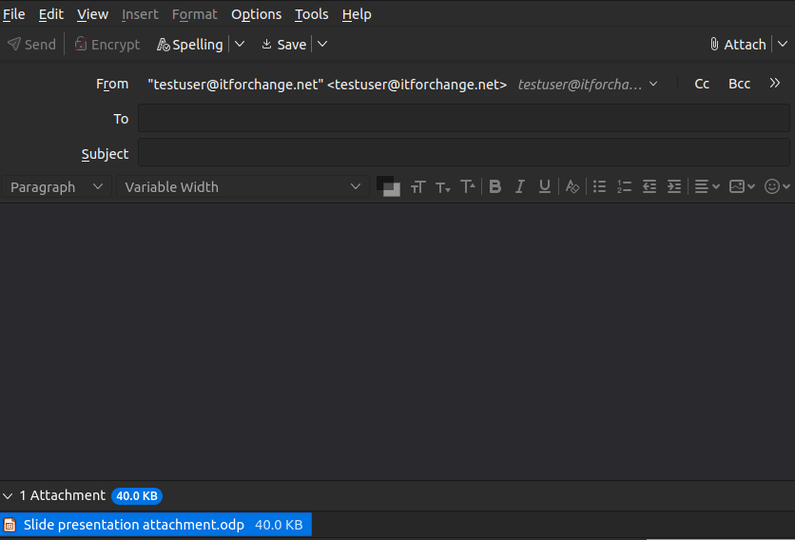
4. Select the desired file and click "Open." Repeat this step if you need to attach multiple files.
Alternatively, you can use the drag-and-drop method to attach files. Simply locate the files you want to attach on your desktop or file explorer, and then drag and drop them into the compose window in Thunderbird. This method works with files from various applications as well.
Adding Signature to your email
Signatures allow users to include the information to be sent with every email, including name, contact details or a quote. To add a signature to your email in Thunderbird, follow these instructions:
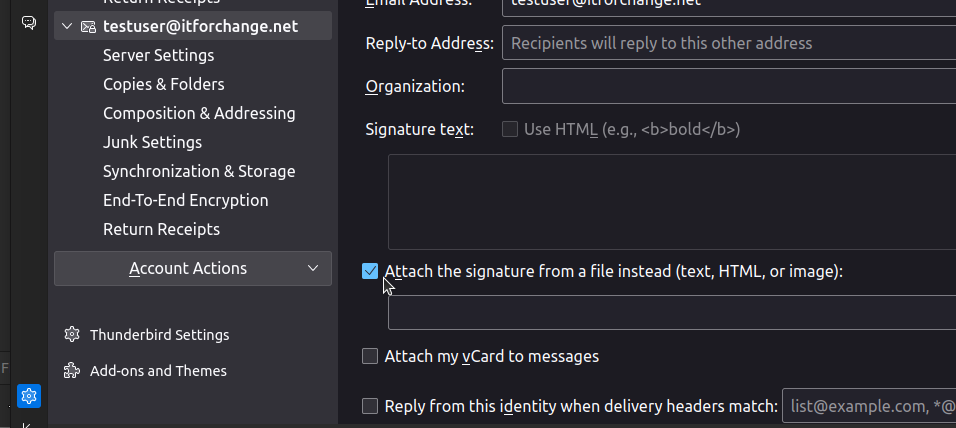
1. In the Thunderbird main window, click on the “edit” option from the menubar and then choose "Account Settings". (Fig19)
2. In the Account Settings window, select the email account for which you want to add a signature.
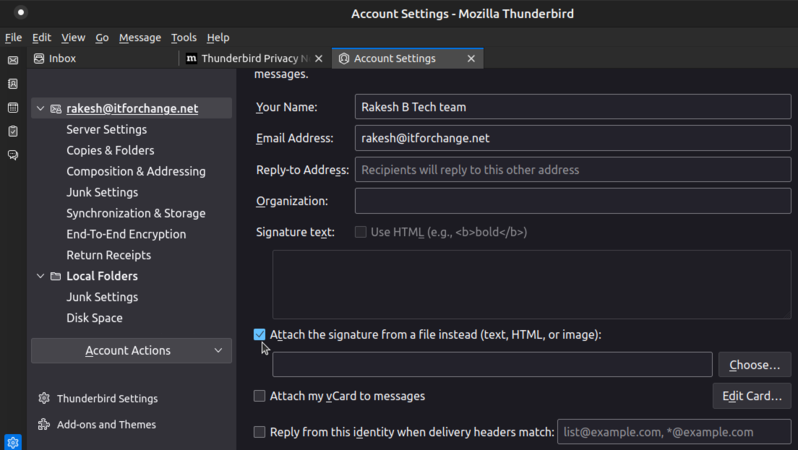
3. Under the selected account, scroll down and find the "Signature Text" section on the right side pane.
4. Check the box next to "Attach the signature” (Fig20)
5. Click on the "Choose..." button and browse your computer to select the file containing your desired signature in html format.
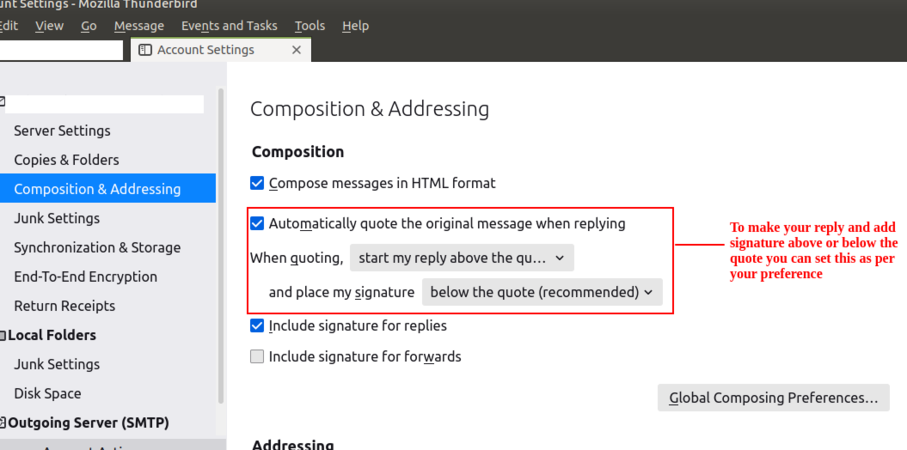
Once you add a signature to your email account going forward all your outgoing mails will have a signature at the end of the email thread. To change this option to add your signature just about the quote and just below your email body, follow the below steps.
1. In the same account setting window navigate to the "Composition & Addressing" tab. Look for the "composition" section within the tab. (Fig22)
2. Under when outgoing option, select “ start the reply above the quote” option and under place my signature setting select “below the reply (above the quote)” option.
3. Once you have finished configuring your signature, click on the "OK" button to save the changes.
Font configuration
Default font configuration
To set the default font in Thunderbird's mail client, follow these steps:
1. Click on the "Edit" menu at the top of the Thunderbird window.
2. From the dropdown menu, select "Preferences" or "Settings".
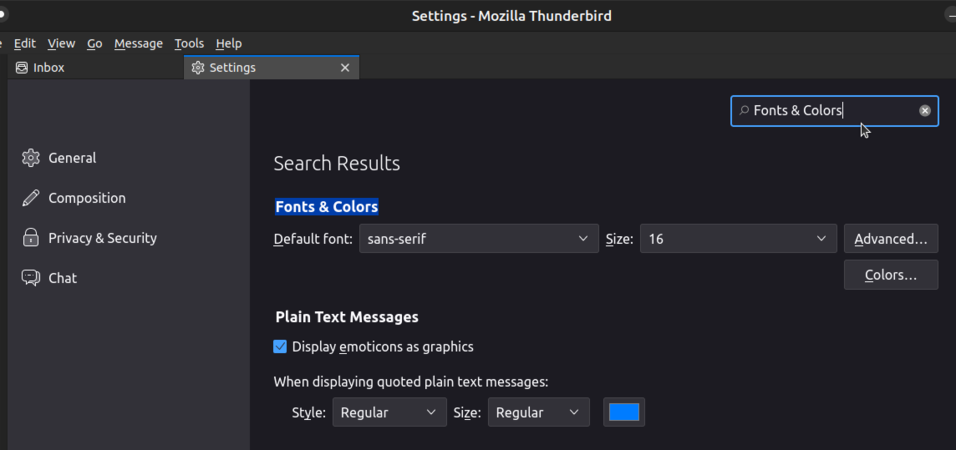
3. In the Preferences or Settings window, locate the "Fonts & Colors" section. You can use the search bar to find it quickly. (Fig23)
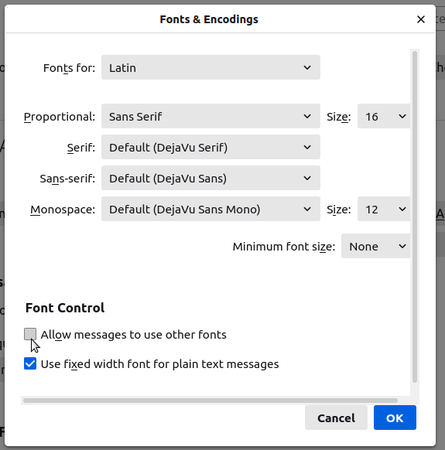
4. Within the Fonts & Colors section, click on the "Advanced" button. This will open a new window with additional font settings. (Fig24)
5. In the Advanced Fonts window, look for the option that says "Allow messages to use other fonts" and make sure it is unchecked. This will ensure that Thunderbird uses the default font consistently.
6. Once you have made the necessary changes, click "OK" or "Apply" to save the settings.
By following these steps, you can set the default font in Thunderbird's mail client. This will ensure that the mail client uses the specified font for all your emails, providing a consistent appearance.
Rewrap text
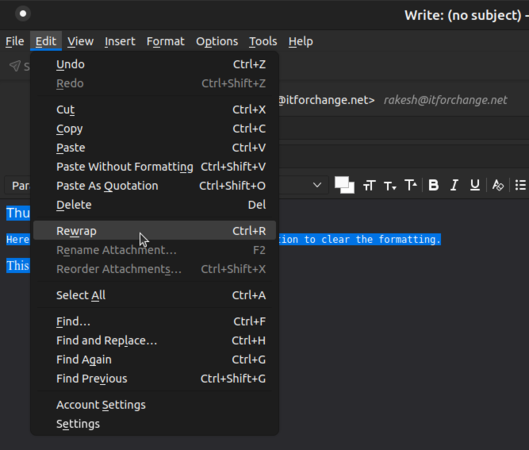
The "Rewrap" option in Thunderbird allows you to reformat the text of an email or a specific paragraph to fit within a specified line length. This is particularly useful when you want to adjust the formatting of your email to ensure it is visually appealing and easy to read.
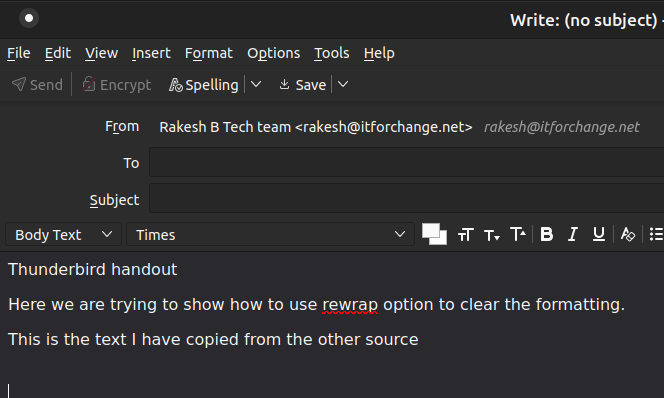
When you are replying to the other emails or composing new email, select the text or paragraph that you want to rewrap. You can do this by clicking and dragging the cursor over the desired text.
1. Right-click on the selected text and choose the "Rewrap" option from the context menu. Alternatively, you can find the "Rewrap" option in the Thunderbird menu bar under "Edit" (Fig26)
2. It will automatically adjust the formatting of the selected text to fit within the specified line length, which is usually determined by the width of the email composition window. (Fig27)
3. Repeat the process if you need to rewrap additional paragraphs or sections of text.
By using the "Rewrap" option, you can ensure that your text is properly formatted within the email, eliminating excessive line breaks and improving readability. It's a convenient feature to make your emails more visually appealing and professional.
Before sending the email make sure all your inserted links and tables are not effected with this option.
Using text editor external tool
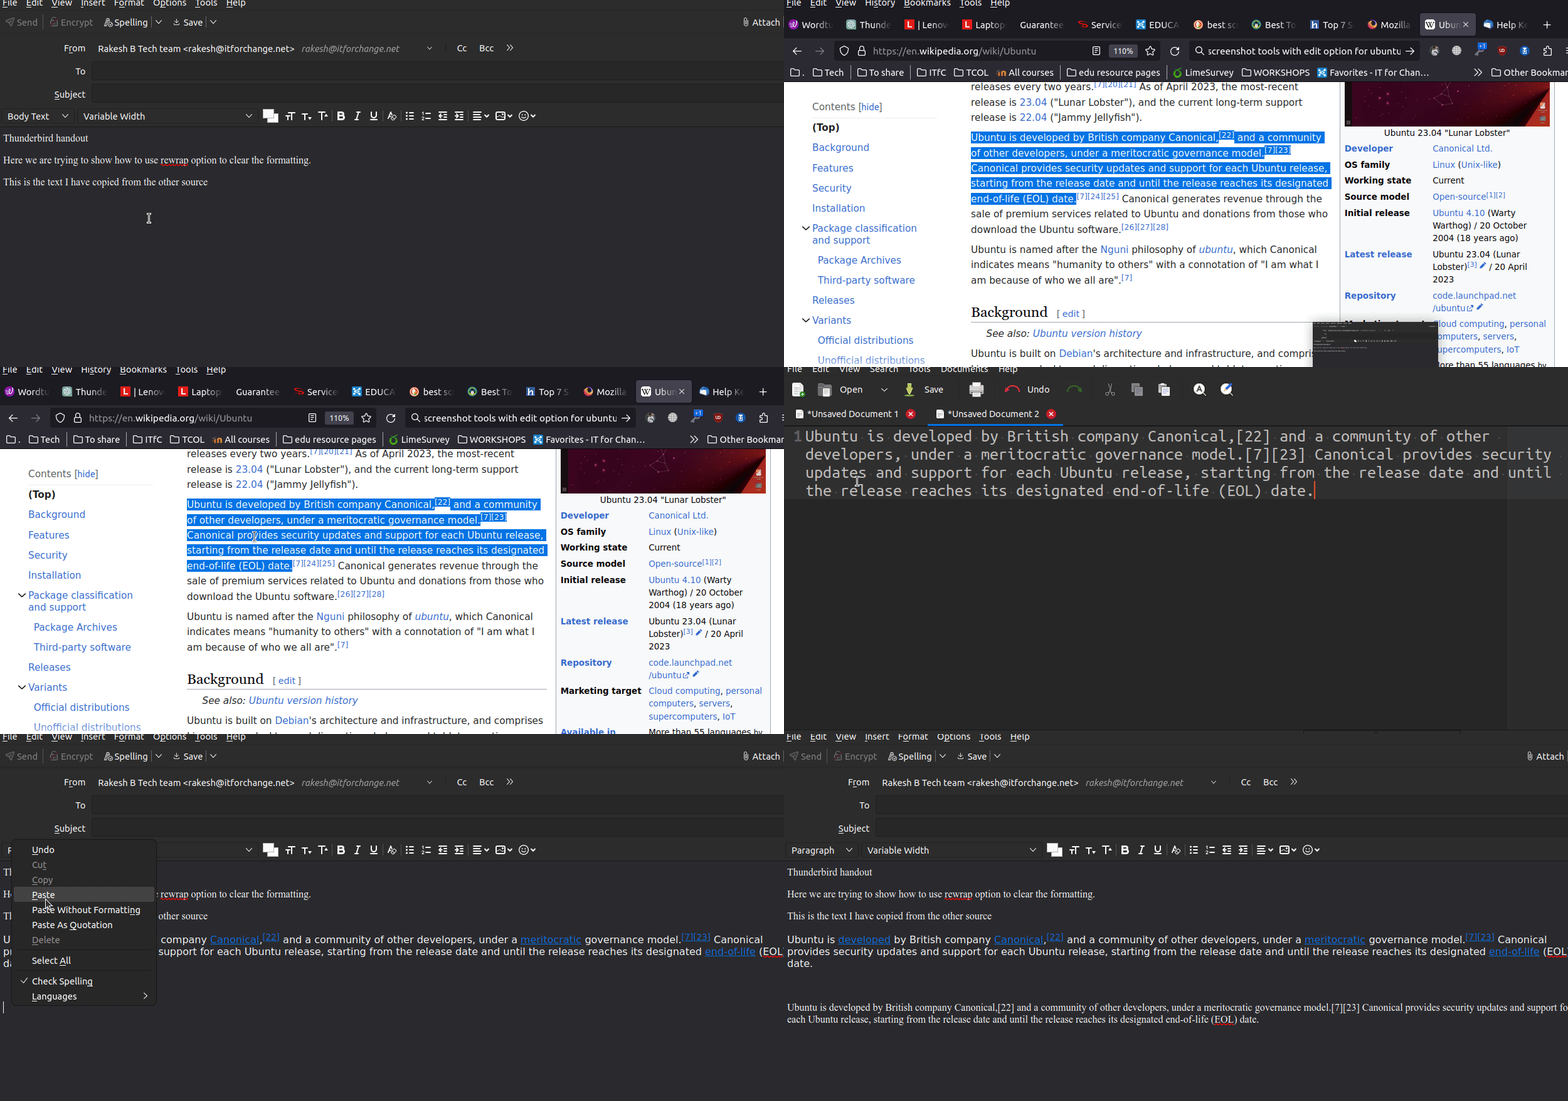
To ensure your fonts remain intact when copying and pasting text into Thunderbird, follow these steps:
1. If you need to copy text from other files or external sources, be aware that there is a chance it could disrupt the formatting of your email's fonts.
2. To avoid this issue, first copy the content from the source application.
3. Open a text editor application such as Pluma or gedit, or any other notepad-style app.
4. Paste the copied text into the text editor (this will remove the pre-formatted style with the text).
5. Once the text is pasted into the text editor, copy it again from there.
6. Now, open Thunderbird and compose your email.
7. Paste the text you copied from the text editor directly into your email in Thunderbird.
By following these steps, you can prevent any font style issues that may occur when copying and pasting text into Thunderbird.
Managing Emails: Tag email
Email tags will help you to organize your email messages by categories. You can tag your emails based on the projects or priority, personal, office and etc…
To tag emails in Thunderbird, you can follow these instructions:
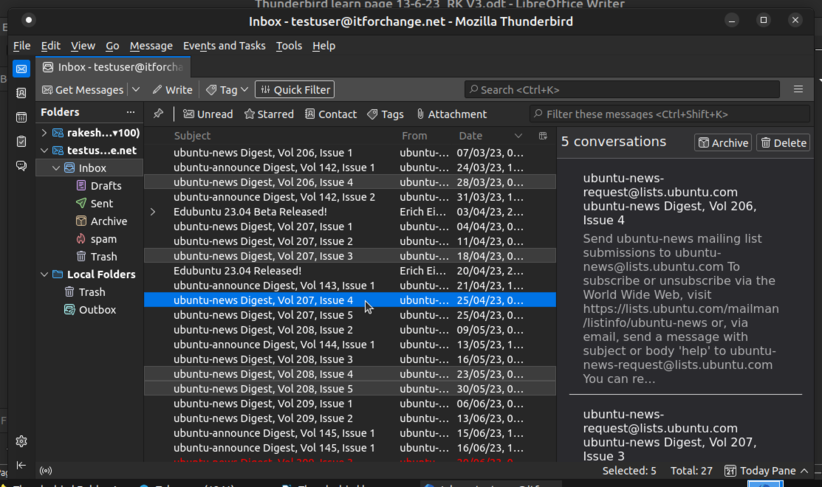
1. Navigate to the folder containing the message you want to tag (e.g., Inbox, Sent, or a custom folder). (Fig29)
2. Select the message you wish to tag by clicking on it. You can also select multiple messages by holding down the Ctrl (Windows) or Command (Mac) key and clicking on the desired messages. (Fig30)
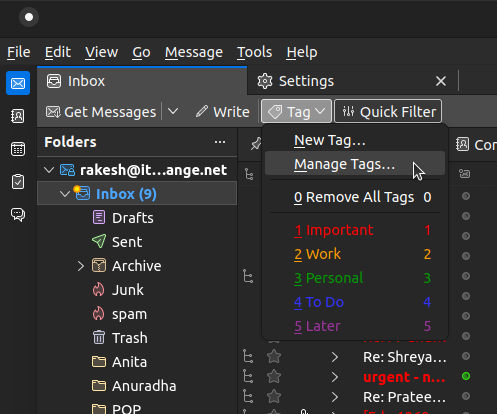
3. Once the message(s) is selected, right-click on the message and choose "Tag" from the context menu (as shown in the above image ). Alternatively, you can also find the "Tag" option in the Thunderbird menu bar under "Message" or in the message toolbar. (Fig31)
4. A list of available tags will be displayed. Click on the desired tag to apply it to the selected message(s).
5. If the tag you want to use is not available, you can create a new tag. To do this, choose "Manage Tags" from the tag menu. In the "Tags" window, click on the "New" button and enter the name and color of the new tag. Click "OK" to create the tag and then apply it to the selected message(s). (Fig32 & Fig33)
6. The selected message(s) will now be tagged with the chosen tag, and the tag will be displayed next to the message in the message list.
7. Also, To remove a tag, follow the same steps.
Keyboard shortcut: See the numbers in the Tag menu, To quickly tag an email, press the respective number key. The email will be tagged with that tag.
By following these steps, you can easily tag messages in Thunderbird, allowing you to organize and categorize your emails based on different criteria or priorities.
Managing Emails: with Folders
Thunderbird folders help you to organize your emails in a hierarchical structure, making it easier to manage and locate specific emails quickly. You can create folders for different projects, categories, people, or any other criteria that suits your needs. By moving emails from your inbox to specific folders, you can keep your inbox clean. This allows you to focus on important emails and reduces the chances of missing any crucial messages. To create folders in Thunderbird and move emails into them, follow these steps:
In the Thunderbird interface, locate the left-hand pane where your email accounts and folders are displayed.
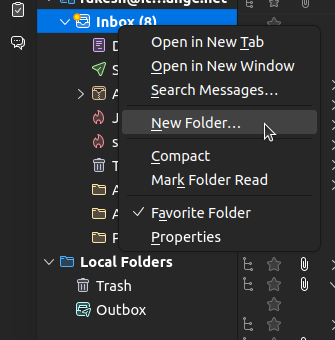
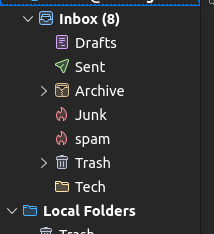
1. Right-click on the email account or an existing folder where you want to create a new folder. A context menu will appear. (Fig34)
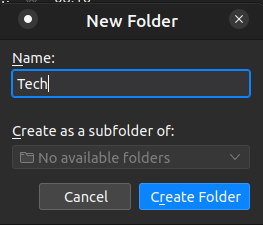
2. From the context menu, select "New Folder." A dialog box will appear. (Fig35)
3. In the dialog box, enter a name for the new folder. Choose a descriptive name that reflects the purpose or category of the emails you plan to store in it.
4. Click "Create Folder" to create the new folder.
5. The new folder will now appear in the left-hand pane, under the selected account or parent folder.
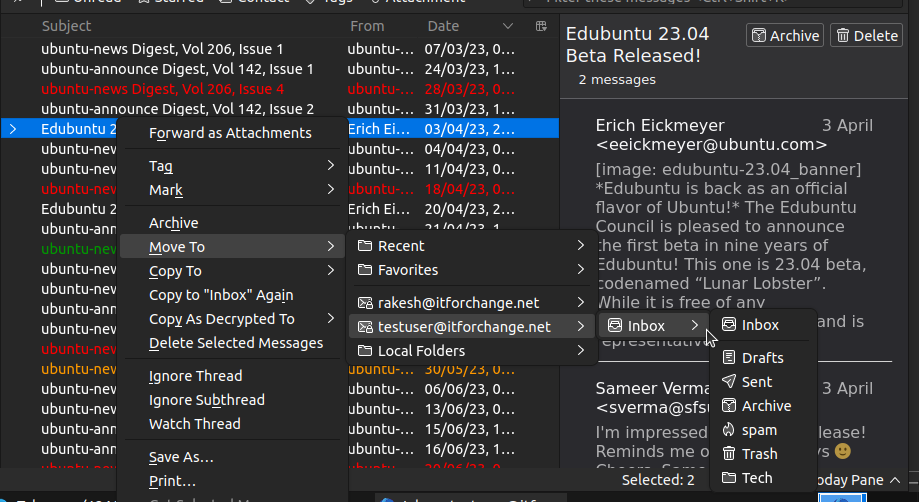
Once you create a folder, now you can move any emails into it using move option. To move emails manually into a folder:
1. Select the email or emails you want to move. You can do this by clicking on the email while holding down the Ctrl key to select multiple emails.
2. Right-click on the selected email(s) to open the context menu.
3. From the context menu, hover over the "Move To" or "Move" option. A sub-menu will appear with a list of folders.
4. Click on the folder where you want to move the selected email(s).
5. The selected email(s) will be moved to the chosen folder, and they will no longer appear in the original location (e.g., the inbox).
Managing Emails: with local folders
Thunderbird has a concept of 'Local folders'. Local folders are simply folders for e-mails that reside outside your actual mailbox. You can create a local folder in Thunderbird by following the instructions in the “Managing Emails: with Folders” section, except that you will create the folder under "Local Folders", and not "Inbox". When you create a local folder in Thunderbird, the folder is created on your workstation's hard-drive. Then, by moving e-mails from your Inbox to a local folder in Thunderbird, you can reduce your mailbox's size.
Note that you can create any hierarchy of folders under "Local Folders". Plan the hierarchy of folders based on your personal preference. For example, you can have a top-level folder named for the year, say '2023', and then multiple folders under '2023', one for each month or quarter of the year. You can also maintain separate local 'Sent Items' folders. You can move all your sent items from Inbox to this folder. These are examples. You should plan your local folder structure based on your individual e-mail habits and needs.
Depending on your e-mail volume, you should periodically move e-mails from your Inbox to local folders to keep your Inbox under the size limit.
This process of moving e-mails from your Inbox to local folders is also called 'archiving'.
Managing Emails: with Message filtering
Thunderbird allows you to set up message filters based on various criteria such as sender, subject, or keywords. These filters can automatically move incoming emails to specific folders, helping you automate the organization process. Each account has its own set of filters. Filters can move emails to folders, delete them, forward them to other email addresses, and more.
First you need to create folder for moving these auto filter emails to it. Follow the “Managing Emails: with Folders” section instruction to create folder and then follow the below steps to create filter.
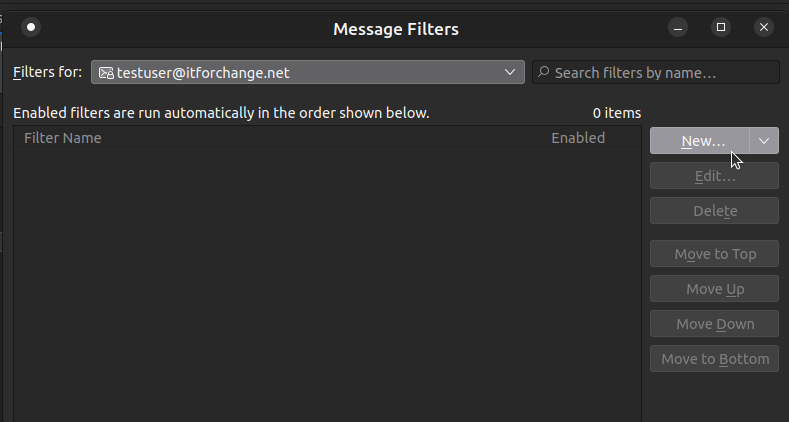
1. Go to Tools – Message filters option from the menu bar
2. Click on New option from the Message filter dialog box. A Filter Rules dialog box will appear. (Fig38)
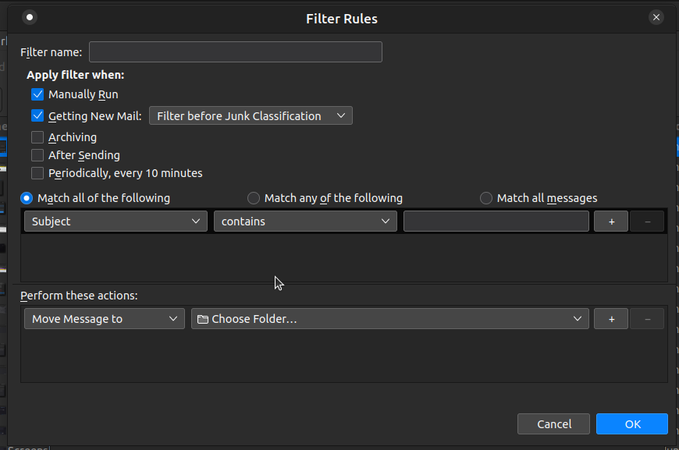
3. In the "Filter Name" field, type a name for your filter and Under "Apply filter when", check one of the options or both.
Note: In most cases, you won’t want to change from the default “Getting New Mail” and “Manually Run” options. (Fig39)
4. In the "Getting New Mail: " dropdown menu, choose either Filter before Junk Classification or Filter after Junk Classification.
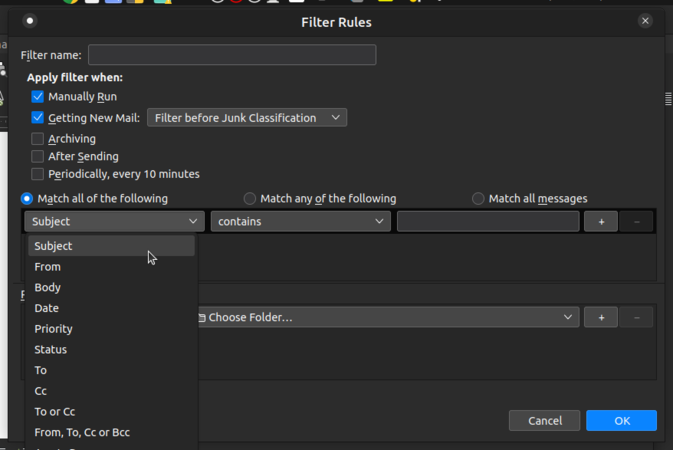
5. Choose a property, a test and a value for each rule you want to apply: (Fig40)
◦ A property is a email element or characteristic such as “Subject” or “From”
◦ A test is a check on the property, such as “contains” or “is in my address book”
◦ A value completes the test with a specific detail, such as an email address or keyword
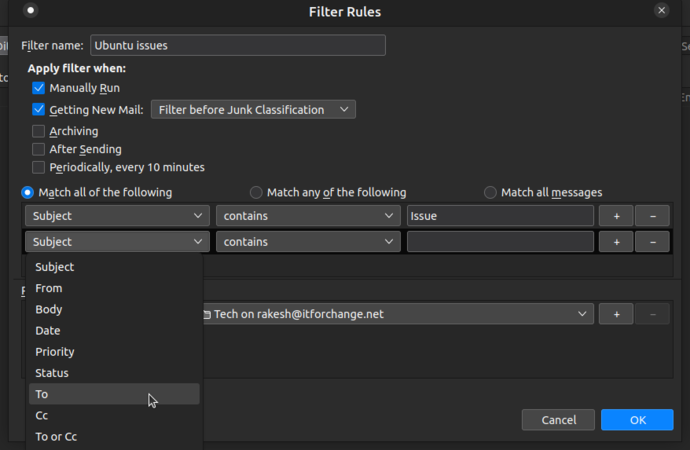
6. Choose one or more actions for emails that meet those criteria (Note: To add another rule, click Add a new rule “+” at the end of the last rule. To delete a rule, click Remove this rule “-”), and Click OK. (Fig41)
7. In the Message Filters dialog box, at the top line, select the account (from the dropdown list) that the filters are to apply to
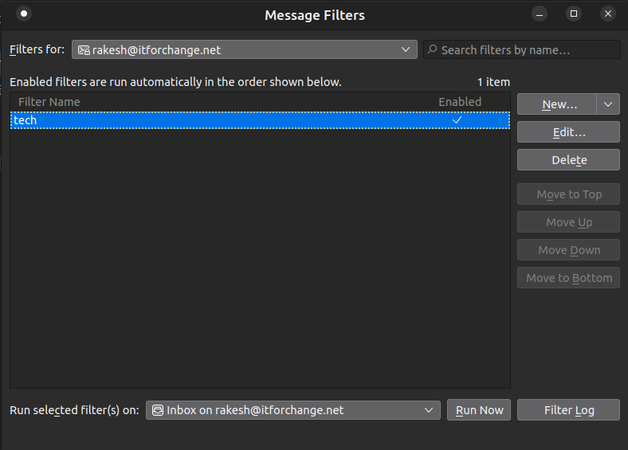
8. Click Run Now if you want the new filter to be applied to emails you’ve already received. The filter will automatically be applied to all new emails after it's saved. (Fig42)
NOTE:Filters are executed in the order they appear in the list of filters, except when that order is not possible, in which case you will see the message Note: Filter actions will be run in a different order, and the link See execution order. If you click the link, you will see which order is used.
Search emails: quick filter option
The “Quick Filter” toolbar helps you limit the number of emails that are displayed in the email list or quickly filter messages within the selected email folder. It can be used, for example, to only show emails from the specific sender, emails containing a specific word or emails with attachments.
The Quick Filter toolbar is displayed above the message lists. You can show or hide it by clicking the Filter icon Quick Filter button in your toolbar.
In the Quick Filter bar, click the Tag button. The emails list will be narrowed down to all emails that contain at least one tag.
Search emails : through Search emails option
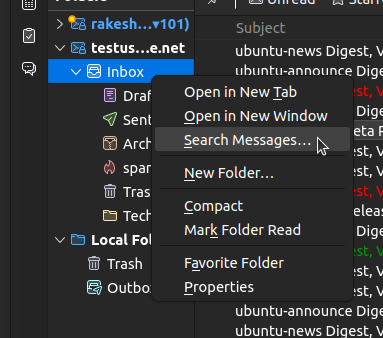
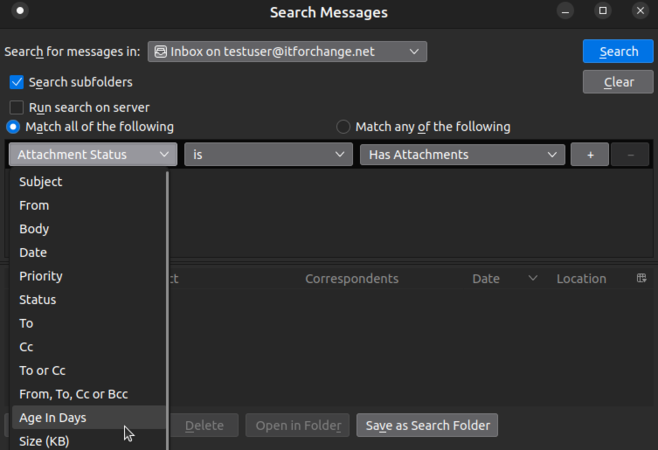
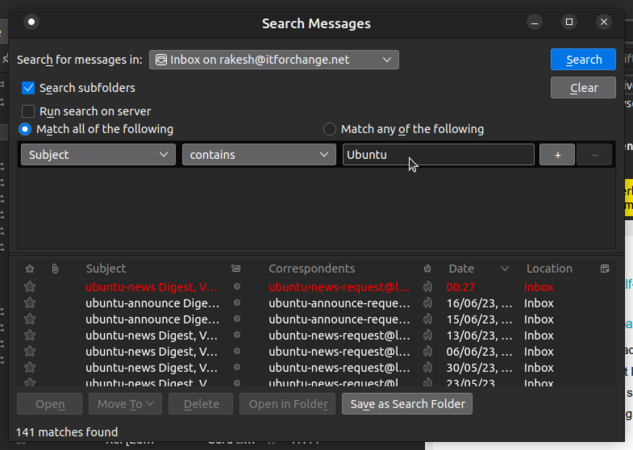
Searching mail will help easy in find the required mail by applying the filter. To search a mail Go to “Edit→Find→Search Messages” or right-click on the folder in which you want to search emails. A window will open as shown in the below image.
1. Select the Search for messages in the drop-down menu to choose between All Mail, a specific address, or a folder.
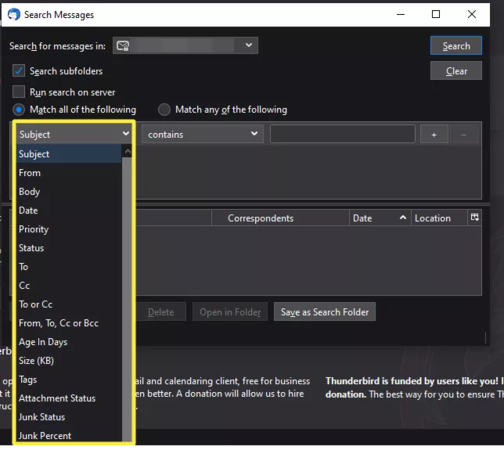
2. Select the Subject drop-down list to choose the criteria for the search.
3. In the next box, choose an operator (for example, contains, doesn't contain, or begins with).
4. Type a search term in the text field and select Search. Your results appear in the box below.
Saved search messages
A Saved Search is a special folder which shows a selection of emails which match your pre-defined search criteria. Saved Searches are a great way of saving time because instead of typing or recreating your most frequent searches again and again, you can just get immediate live results by looking at your Saved Search folder.
When you create a Saved Search, you can choose criteria such as email addresses, subject words, tags, or dates. You can even choose different source folders from several accounts. Thunderbird then creates a folder which shows only matching emails. New matching emails from the specified source folders will automatically be shown in the Saved Search folder.
For example, you may want to view all emails from your supervisor in their own folder named “Supervisor”. Just add their email address to a Saved Search and their emails will automatically show up in the “supervisor” folder as they arrive. Yet the same emails will also still be shown in the source folders like your Inbox.
Let's see how to do this
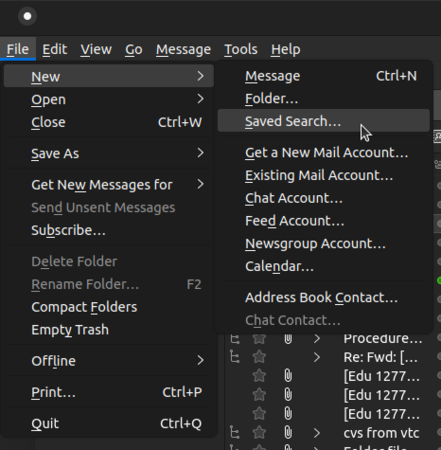
1. From the File menu, click New, and then Saved Search from the sub-menu. The New Saved Search Folder dialog appears.
2. Change the Name for your Saved Search as you want to have it in the folder list. The folder that was selected when you opened the New Saved Search Folder dialog in step 1 will be displayed as the default name and location.
3. Click the Create as a subfolder of dropdown if you wish to change the parent folder.
4. To select the folders to search, click the Choose button. A dialog will be displayed that contains a hierarchical view of all the folders in all of your accounts. Select the checkbox next to each folder you wish to include in the search.
5. If your emails are not stored on your local system for offline access (for example, if they are stored on a central IMAP server), check Search Online. This is only necessary if you are filtering based on the body of the email, as addresses and the subject line are stored locally even if you leave the email body on the server.
Using Event and Task
The Thunderbird calendar option allows you to create, edit, and manage events, appointments, and tasks. You can set reminders, specify start and end times, add descriptions, invite attendees, and categories events for better organization. By default the calendar will not be enabled on the thunderbird.
To enable the calendar you need to click on the calendar icon on the right side pane of the thunderbird window, then you will find the calendar tab. On the left side of the Thunderbird windows screen, you will find the option to “Enable” the calendar click on it. Once you click on it “Event and Task” option will be enabled on the menu bar.
To create events and tasks in Thunderbird's calendar, follow these steps:
1. In the Thunderbird interface, click on the "Calendar" tab at the top to switch to the calendar view.
2. In the calendar view, select the specific calendar where you want to create the event or task. If you have multiple calendars, they will be listed on the left-hand side of the calendar view. Now click on the Event and Task option from the menu bar and select New Event or New Task as required, both has same template.
3. A pop-up window will appear to create the event. Here, enter the event title, start and end times, and any additional details such as location, description, or attendees.
4. Adjust any other settings or options as needed, such as reminders, recurrence (if the event repeats), or privacy settings.
5. Click on the attendances and add the email Id of the people you to invite for the event (If it is task then attendances will not be available)
6. Click "Save" or "OK" to create the event. It will now appear on the selected calendar at the specified date and time.
You can edit or modify events and tasks by selecting them from the calendar or task list and making changes in the event or task details window. To access the details, double-click on the event or task.
Thunderbird's calendar also allows you to set reminders for events and tasks. When creating or editing an event or task, you can specify the reminder time and choose the notification method (e.g., pop-up alert, sound, email).
Using Add-on
Add-on will enrich your requirement of the mail client. To add the add-on Go to “Tools→ Add-on and Themes” you will get a new window as show in below image, click on the Extension option and search the required Add-on need to you like: Tbsyn, CalDAV and CardDAV, Lightning Calender, Mail Merge.
You will have the toggle option to enable and disable all the installed add-on’s .
Configure Next-cloud Calendar
Similar to Google calendar we have our own Cloud based calender called Next-cloud Calendar. To integrate the Nextcloud Calendar with Thunderbird mail client, follow these steps:
1. Make sure you have two necessary add-ons, Tbsyn and CalDAV and CardDAV, installed in Thunderbird. These add-ons facilitate the synchronization between the calendar and the mail client.
2. After adding the required add-ons, locate the Tbsyn settings by clicking on the spanner icon. This action will open a new window, as shown in the image below.
3. To configure the Nextcloud calendar, follow these steps:
◦ Click on the "Account action" button.
◦ Select "Add new account" from the options.
◦ Click on "CalDAV & CardDAV."
4. A new tab will open, allowing you to enter the account information. Fill in the required details, such as the server address (cloud.itforchange.net), username (your nextcloud username), and password (Nextcloud login password) associated with your Nextcloud account.
5. Once you have entered the account information, click on "Next." The Calendar selection window will appear, displaying the available calendars associated with your Nextcloud account. Select the desired calendars (Blr calendar, your team calendar and etc...) that you want to synchronise with Thunderbird calender.
6. After selecting the calendar, click on "Synchronize now" to initiate the synchronization process.
7. The Nextcloud calendar is now configured in Thunderbird, and any updates or changes made to the nextcloud calendar will be notified within the mail client as well.
By following these steps, you can successfully set up and synchronize the Nextcloud Calendar with Thunderbird, allowing you to manage your events and appointments seamlessly.
