Difference between revisions of "Learn Tux Paint"
| Line 37: | Line 37: | ||
|- | |- | ||
|style="width: 50%;| Step-1,<br> | |style="width: 50%;| Step-1,<br> | ||
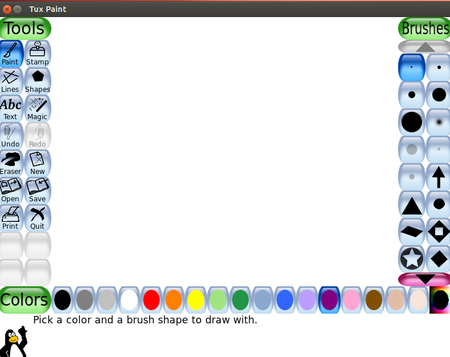
| − | + | When we open the Tux Paint we will get window like this. This window or main screen contains following sections: | |
left side:Tool bar | left side:Tool bar | ||
Tool bar contains drawing and editing controls. | Tool bar contains drawing and editing controls. | ||
Revision as of 10:11, 13 October 2016
Introduction
ICT Competency
Educational application and relevance
Version

|
|
Configuration
Overview of Features
Other similar applications
Development and community help

|
This tool is developed by KDE and supports the continuous development of the application.
KDE is a world-wide network of software engineers, artists, writers, translators and facilitators who are committed to Free Software development. This community has created hundreds of Free Software applications as part of the KDE Development Platform and KDE Software Distribution. Visit http://www.kde.org/ for more information about the KDE community and the software we produce. |
Working with the application
Functionalities
- Please label images as Step 1
- Please add 500px
 Image Image
|

|
| Step-1, When we open the Tux Paint we will get window like this. This window or main screen contains following sections: left side:Tool bar Tool bar contains drawing and editing controls. Middle:drawing convas The largest part of the screen, in the center, is the drawing canvas. Right Side: Selector Depending on the current tool, the selector shows different things. e.g., when the Paint Brush tool is selected, it shows the various brushes available. When the Rubber Stamp tool is selected, it shows the different shapes you can use. Lower: Colors A palette of available colors are shown near the bottom of the screen. Bottom: Help Area At the very bottom of the screen, Tux, the Linux Penguin, provides tips and other information while you draw. |
Texttexttexttexttext Texttexttexttexttext Texttexttexttexttext Texttexttexttexttext Texttexttexttexttext Texttexttexttexttext Texttexttexttexttext Texttexttexttexttext Texttexttexttexttext Texttexttexttexttext |
| Image Image Image Image (Step 3) | Image Image Image Image (Step 4) |
| Texttexttexttexttext Texttexttexttexttext Texttexttexttexttext Texttexttexttexttext Texttexttexttexttext Texttexttexttexttext Texttexttexttexttext Texttexttexttexttext Texttexttexttexttext Texttexttexttexttext | Texttexttexttexttext Texttexttexttexttext Texttexttexttexttext Texttexttexttexttext Texttexttexttexttext Texttexttexttexttext Texttexttexttexttext Texttexttexttexttext Texttexttexttexttext Texttexttexttexttext |
File formats for creation
Saving the file
Export and publishing files
Advanced features
Installation
| Method of installation | Steps |
|---|---|
| From Ubuntu software Centre | Steps |
| From Terminal | Steps |
| From the web | Steps |
| Web based registration | Steps |
The application on mobiles and tablets
Ideas for resource creation
References
How to use template
{{subst:Explore_an_application}} on the page you create for your tool. Page Name should be "Learn ToolName"