Learn VokoscreenNG
Introduction
Basic information
| ICT Competency | VokoscreenNG is a Free and Open Source screencasting desktop application.
screencasting: digital recording of computer screen output, also known as a video screen capture, often containing audio narration. |
| Educational application and relevance | Creating video and image resources, combining audio, text, image, video, and dubbing audio of any video. This can be used in digital storytelling activities |
| Version | VokoscreenNG 3.0.7 |
| Other similar applications | Kazam, RecordMyDesktop, Simple screen recorder |
| The application on mobiles and tablets | There are many similar applications are available on android mobile phones. For example, AZ screen recorder |
| Development and community help |
Overview of features
Installation
For Windows
- Go to this link to select latest and stable version of the VokoscreenNG installable file (take the first linked file from the list).
- Locate and double-click the .exe file. (It will usually be in your Downloads folder.)
- An Installation dialogue box will appear, follow the instructions to install the software.
- The software will be installed. You can now open the VokoscreenNG application by double-clicking on the VokoscreenNG icon on the desktop screen or go to the applications list, search using the search box feature, and click on the application icon to open.
For Linux (Ubuntu)
- To install VokoscreenNG through the terminal, follow the below steps :
- Open terminal by clicking Applications->System Tools->Terminal or through keyboard shortcut
Ctrl+Alt+T - In the terminal window, type below command and press enter key
sudo snap install vokoscreen-ng- Now type your ubuntu password(it will not dispaly on your screen),press Enter
- Open terminal by clicking Applications->System Tools->Terminal or through keyboard shortcut
Working with application
Vokoscreen is an Free and Open Source Software desktop application, which will allow you to record the computer screen along with your audio input, live recordings of the browser and video conferences. VokoscreenNG also captures your face using your computer webcam at the same time.
Getting familiar with application
You can access Vokoscreen from the Ubuntu applications menu.
And in Windows Operating system, double-clicking on the VokoscreenNG icon on the desktop screen or go to the applications list, search vokoscreen using the search tab ,and click on the application icon to open.

The Vokoscreen User Interface
The Vokoscreen home screen has a user interface with setting tabs such are screen, Audio, Video, General settings, and Webcam settings.

Home page of VokoscreenNG

There is some standard button that will always appear on the bottom of the Vokoscreen window.
Start: to starts the recording process
Stop: to stops the recording
Pause:to Pauses the screencasting, which can be resumed using the "start button"
Play:to play the screencasted videos
Send: to share your screencasted videos directly from the application (to use this you need to prior configure your email client).
Audio Settings
The second tab on the screen view you can make your input audio device settings such as:
The microphone symbol-allows you to do audio setting to improve audio quality. You can choose the options by checkboxes provided monitor of Built in audio analog stereo or Built_in Audio analog Stereo to start recording audio. If you are using external headphone/earphone you need to select "Built-in Audio analog Stereo"option.
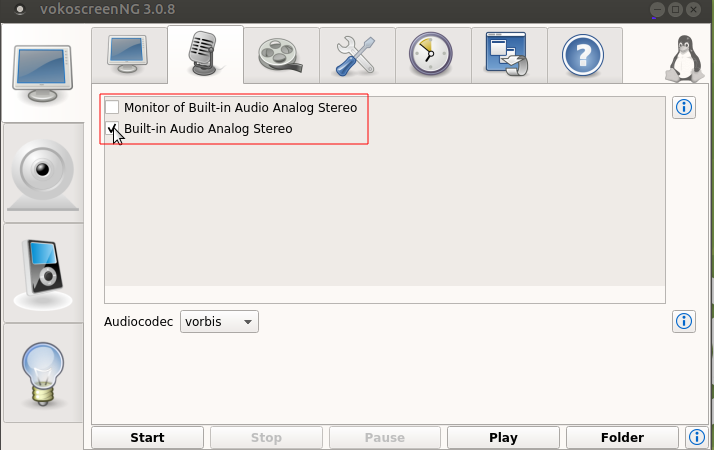
Audio settings of VokoscreenNG

Recording settings
Once you've configured your settings, you're ready to finally record your screen. To start recording your video, press Start at the bottom of the window.
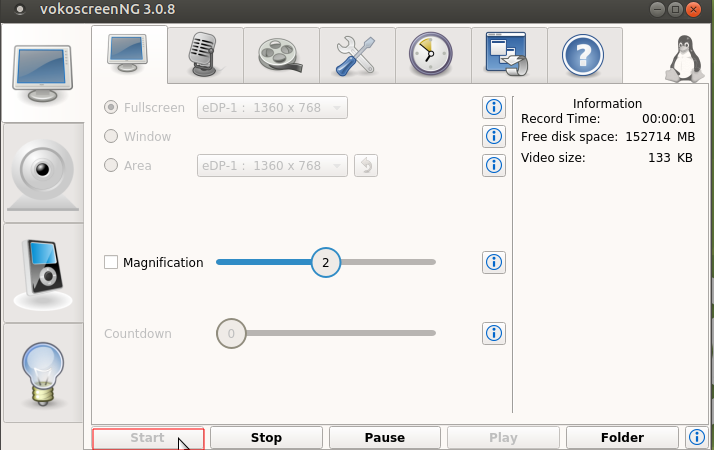
Click on start for recording in VokoscreenNG

As soon as you press Start, Vokoscreen will begin recording. Everything you do from here out will be part of your video ( if you want to temporarily stop recording, press Pause. When you press Start again, Vokoscreen will pick back up where it left off) When you're done recording, maximize the Vokoscreen window again, and press Stop. Also, you can use the shortcut keys to start, pause and stop recording.
- Start recording: <CTRL + SHIFT + F10>
- Pause recording: <CTRL + SHIFT + F12
- Stop recording: <CTRL + SHIFT + F11>
When you're done recording, maximize the Vokoscreen window again, and press Stop.
Screen Capturing Settings
The following “Screen” view will open when you launch the tool for the first time:

Screen Capturing Settings of VokoscreenNG

You can see that you have three options for screen recording
- Full Screen.
- A specific Window.
- An Area on the screen.
Select Fullscreen by clicking on radio button beside fullscreen, as you press Start, Vokoscreen will begin fullscreen recording. Everything you do from here out will be part of your video ( if you want to temporarily stop recording, press Pause. When you press Start again, Vokoscreen will pick back up where it left off).
After you stop your recording, you can safely close the Vokoscreen window, and your recording will be located in the folder that you configured under the Settings tab (In Ubuntu by default recording will be saved under the "Videos" folder).

Saved path of file in VokoscreenNG

Select Area to record
In case if you do not want to record your entire monitor screen, you can use “Area” option to select your required area to be recorded in the video. To do this, go to “Screen” option tab and select “Area” and then adjust the green coloured square box on the selected window and click on start to record.

Select_Area_to_Record in VokoscreenNG

The webam Settings
The webcam view that appears as follows, you need to check camera option to use your computer webcam and if you are using external USB webcams, then you may need to select your webcam from the dropdown. Also you can choose your camera best resolution from the same screen.

WebCam Settings in VokoscreenNG

Using Magnifier
You can turn the Magnification option on, and also select Dialog options for magnification. This will help you in turning focus on an area of a screen by making it appear prominent.
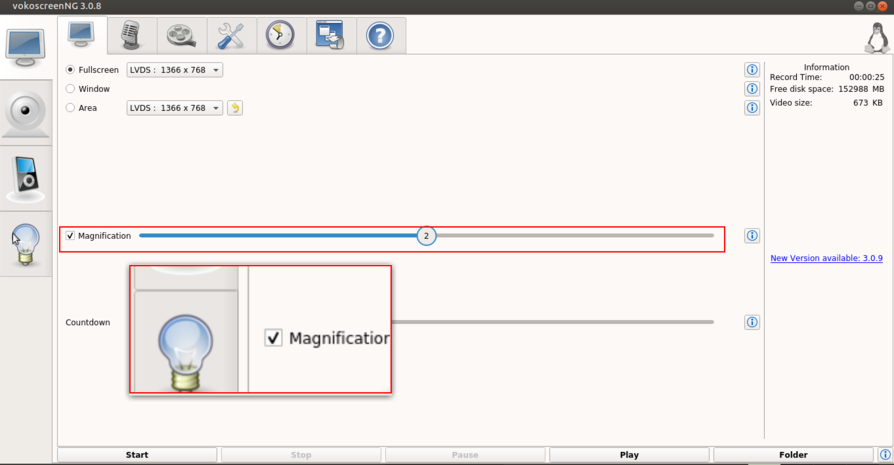
Using Magnifier in VokoscreenNG
