Difference between revisions of "Learn Openshot Video Editor"
m (added Category:Explore an application using HotCat) |
|||
| (13 intermediate revisions by 5 users not shown) | |||
| Line 1: | Line 1: | ||
| − | + | ''[http://karnatakaeducation.org.in/KOER/index.php/%E0%B2%93%E0%B2%AA%E0%B2%A8%E0%B3%8D%E2%80%8C%E0%B2%B6%E0%B2%BE%E0%B2%9F%E0%B3%8D%E2%80%8C_%E0%B2%B5%E0%B3%80%E0%B2%A1%E0%B2%BF%E0%B2%AF%E0%B3%8B_%E0%B2%8E%E0%B2%A1%E0%B2%BF%E0%B2%9F%E0%B2%B0%E0%B3%8D_%E0%B2%95%E0%B2%B2%E0%B2%BF%E0%B2%AF%E0%B2%BF%E0%B2%B0%E0%B2%BF ಕನ್ನಡದಲ್ಲಿ ನೋಡಿ]'' | |
| − | |||
| − | |||
| − | |||
| − | |||
| − | |||
| − | |||
| − | |||
| − | |||
| − | + | {{Template:Book-sidebar}} | |
| − | + | ===Introduction=== | |
| − | == | + | ====Basic information==== |
| − | |||
| − | == | ||
| − | |||
| − | == | ||
| − | |||
| − | |||
| − | |||
| − | |||
| − | |||
| − | |||
| − | |||
| − | == | ||
{| class="wikitable" | {| class="wikitable" | ||
|- | |- | ||
| − | | | + | |ICT Competency |
| − | + | |Openshot Video editor is generic resource creation tool | |
|- | |- | ||
| − | | | + | |Educational application and relevance |
| − | + | |Working with video, audio, text and image resources. This can be used in digital story telling vities | |
| − | |||
| − | |||
| − | |||
| − | | | ||
| − | |||
|- | |- | ||
| − | | | + | |Version |
| − | | | + | |version 1.4.3 |
|- | |- | ||
| − | | | + | |Other similar applications |
| − | + | |[https://kdenlive.org/ Kdenlive], [http://www.pitivi.org/ Pitivi] and advance [https://www.lwks.com/ Lightwork] | |
| − | | | ||
| − | |||
| − | |||
| − | |||
| − | |||
|- | |- | ||
| − | | | + | |The application on mobiles and tablets |
| − | | | + | |there is many similar application are available in android mobile phones. |
|- | |- | ||
| − | | | + | |Development and community help |
| − | + | |[http://www.openshot.org/ Official Website] | |
| − | + | ||
| − | + | |} | |
| − | + | ||
| − | + | ====Overview of features==== | |
| − | + | Openshot is an video editor; here you can combine multiple multimedia and can create a video. OpenShot Video Editor is designed to create and edit videos. Here you can easily combine multiple video clips, audio clips, and images into a single project, and then export the video into many common video format. All video clip edits (trimming, cutting, etc...) in openshot are non-destructive, means that the original video clips are never modified. <br> | |
| + | You can use this tool to create a photo slide shows with adding background music. | ||
| + | |||
| + | ====Installation==== | ||
| + | #The application is part of the Ubuntu custom distribution. | ||
| + | #In case you do not find it on your computer, you can install by choosing “openshot” in Ubuntu Software Centre | ||
| + | #If you would like to install through the terminal follow these steps below: | ||
| + | ##Open terminal by clicking (Ctrl+Alt+T), | ||
| + | ##Once Window page is open, in front of dollar($) symbol just type below command. | ||
| + | ##'''sudo apt-get install openshot''' | ||
| + | ## Then, just type your ubuntu password(it will not display on your screen), press Enter. | ||
| + | |||
| + | === Working with application === | ||
| + | ====Getting familiar with the application==== | ||
| + | [[File:Openshot Main Window.png|550px|left|thumb|The Openshot application main window]] | ||
| + | 1. Tool Bar : will use this for importing, saving and for exporting files. <br> | ||
| + | 2. Project file window : This is where you import the various video clips and other files you wish to use in the video. <br> | ||
| + | 3. Sorting tab : Use to sort project files by type. <br> | ||
| + | 4. Preview : View individual clips or the output from the Timeline. <br> | ||
| + | 5. Edit toolbar : will use this for triming, copy, move and resizing the files in track. <br> | ||
| + | 6. Zoom slider : will use this to zoom our working tracker or time line. <br> | ||
| + | 7. Tracks :here you place and edit clips into the finished product. You can create multiple tracks. Its good to use separate tracks for photos, audios, videos clips and titles<br> | ||
| + | {{clear}} | ||
| − | + | ====Import Files – Audio, Video, and Images==== | |
| − | + | <gallery mode="packed" heights="250px" caption="Import files into your project"> | |
| − | + | File:Openshot importing files.png|Importing files into Openshot | |
| − | + | File:Openshot - after imported files .png|After imported | |
| − | + | </gallery> | |
| + | Before we can begin making a video, we need to import files into OpenShot. To Import pictures, video & Music, click on "'''+'''" symbol from the toolbar and browse all the files required for your edit work and click '''OK'''. Don't move any files from this project. | ||
| + | {{clear}} | ||
| − | |||
| − | |||
| − | |||
| − | |||
| − | |||
| − | + | ====Arranging files in tracks==== | |
| + | [[File:Openshot 2 Arrange photos on timeline.jpg|400px|left|thumb|Arranging files in tracks]] | ||
| + | After you have imported some files, the next step is to adding files into the timeline and arranging it. Click on each photo (one at a time), and drag them onto Track 2(or right click and add to timeline) on the timeline. <br> | ||
| + | If you are adding different multi media in track, use different tracks for different media(always back ground sound should be in track no 1).<br> | ||
| + | Click on '''play''' from the preview window to see the changes you have done.<br> | ||
| + | {{clear}} | ||
| − | + | ====Cutting, moving and deleting clips==== | |
| − | To | + | <gallery mode="packed" heights="250px"> |
| + | File:Openshot - Cutting video clip by using cut tool.png| Cutting clips(video or audio) in some point | ||
| + | File:Openshot - moving video clips part by dragging .png| Moving clips | ||
| + | </gallery> | ||
| + | 1. To cut a clip into two parts, select '''Razor''' from edit toolbar. The mouse cursor will change to a dotted line & razor icon.Click on a clip at the point you want to cut / slice it.<br> | ||
| + | And also if you want to remove one part of this clip, just right click on the clip and '''remove clip'''. <br> | ||
| + | 2. After you cut a clip, now it will be two part. Click on '''cursor icon(Select Mode)''', click on a clip which you want to move. Then,drag the clip to a new position on the timeline, and drop it. | ||
| − | + | ====Adding sub titles==== | |
| − | + | OpenShot has built-in title creator/editor. It has some basic functionality to help you create small titles for your video project. you can directly import .svg text files, if you have already created by external tools. <br> | |
| + | To add a new subtitle, click the Title > New Title from the menu option. This will launch the Title Editor. <br> | ||
| + | <gallery mode="packed" heights="350px" caption="Adding subtitle in to track"> | ||
| + | File:Openshot - Creating subtittle to the track .png| Selecting subtitle style | ||
| + | File:Openshot - Creating Sub-title 2.png| editing subtitle | ||
| + | </gallery> | ||
| + | 1. Once the title editor launches, you need to select any template, and click on the '''Create New Title''' button. ENter the name for your title file and click '''OK'''. Now you need to type or copy paste your subtitle content in the title window and click '''Apply'''. If you want change the color, font , font size etc.. use the side tool bar. after you done all the changes, click on '''Apply'''. <br> | ||
| − | + | 2. This sub title text will be added to your project file. Drag drop this title file(.svg) into the track where you preferred place. | |
| − | + | Always use separate track for all your subtitles and you should use the top track. | |
| − | + | ====Adding fade in fade out effect==== | |
| − | + | [[File:Openshot add fade in and fade out.png|450px|left|thumb|Adding fade in and fade out to clip]] | |
| − | + | By adding fade-in and fade-out for the clips, it will smoothly changing the slides from one to next.<br> | |
| − | | | + | You right click your mouse, on the slide which you want to add fade effect and select Fade -> Fade in or Fade Out as per the requirement. This fade in / fade out will effect for both audio and video. |
| − | | | + | {{clear}} |
| − | + | ||
| − | + | ====Adding transition into clips==== | |
| − | + | [[File:Openshot-adding transaction.png|450px|left|thumb|Adding transition to the track]] | |
| + | Transitions are used to gradually move between 2 different clips. Many different transitions are available in OpenShot. They are easy to drag and drop onto the timeline, and can add lots of fun to a video project. <br> | ||
| + | To add a transition, click on Transition Tab, and select any transition by clicking on it. Drag and drop the transition onto the timeline. It will place between 2 tracks. Always transition should be place in buttom side for the track. <br> | ||
| + | To resize a transition, select to Resize tool on the edit Toolbar, and drag the left or right edge to a new size. <br> | ||
| + | {{clear}} | ||
| + | |||
| + | ====Save project files==== | ||
| + | |||
| + | OpenShot needs a project file to save the information that makes up a video project. Information such as the name and location of your project, video and audio files, timeline information, which clips have been trimmed, arranged, etc. This project file you can use it later if you need to do any change in your file. <br> | ||
| + | [[File:Openshot - Save projects.png|450px|left|thumb|Save your work as project]] | ||
| + | Click on '''FIle-> Save Project''' <br> | ||
| + | 1. Project Name : The name of your project file (.osp file extension) <br> | ||
| + | 2. Project Folder :The folder location to save your project file <br> | ||
| + | 3. Project Type : By default it will be DVD/CD, you may change this to as you required(this will not effect on your final video). <br> | ||
| + | Project files have an .OSP file extension (ExampleProject.osp). Also, project files need a /thumbnail/ folder, which contains all of the thumbnails in your project. If you move a project file, be sure to move the /thumbnail/ folder also. <br> | ||
| + | {{clear}} | ||
| − | + | ==== Export as Video ==== | |
| − | + | Once done with your all editing work, next is to export your video. This will convert your OpenShot project into a single video file, which should work on any platform. <br> | |
| + | Click on the Export video icon at the top menu tool bar (or use the File > Export Video... menu). | ||
| − | + | <gallery mode="packed" heights="400px" caption="Exporting as video"> | |
| − | + | File:Openshot - Exporting video.png | |
| + | File:Openshot - exporting video.png | ||
| + | </gallery> | ||
| + | 1. Open shot editor is supporting many video formats to export video, in that '''.ogg''' is the open format. As show in the above image, you need to give all the details for video.<br> | ||
| + | a. File name : Name for your exported vide <br> | ||
| + | b. Export folder :<br> | ||
| + | c. Profile : All formats<br> | ||
| + | d. Target : file formate (Select .ogg) this will support with all the devices.<br> | ||
| + | e. Video profile : Select the profile ( will prefer HD 720 24fs)<br> | ||
| + | f. Quality : Define your video quality. If you select High - Video size will be increase.<br> | ||
| + | Now click on '''export'''. his will start exporting. | ||
| + | <br> | ||
| − | + | 2. Do not click on cancel or do not try to play the video, while the exporting process is going on. <br> | |
| − | |||
| − | |||
| − | |||
| − | |||
| − | |||
| − | |||
| − | |||
| − | == | + | ==== Advanced features ==== |
| − | == | ||
| − | |||
| − | |||
| − | |||
| − | |||
| − | + | # Create moving scrolling titles. | |
| − | + | # working with different layouts. | |
| − | + | # Change video brightness, contrast | |
| − | + | # Create animated title. | |
| + | # Working with video effect. | ||
| − | == | + | === Ideas for resource creation === |
| − | + | You can use this application to create image slide video, creating video with subtitling and create video by adding multiple media files like Image, video, audio and text slides. | |
| − | |||
| − | |||
| − | |||
| − | |||
| − | |||
| − | |||
| − | |||
| − | |||
| − | |||
| − | |||
| − | |||
| − | |||
| − | |||
| − | |||
| − | |||
| − | |||
| − | |||
| − | |||
| − | |||
| − | |||
| − | |||
| − | |||
| − | |||
| − | |||
| − | |||
| − | |||
| − | |||
| − | |||
| − | |||
| − | = | + | === References === |
| − | + | # [https://en.wikipedia.org/wiki/OpenShot Wikipedia page] | |
| − | = | ||
| − | |||
| − | = | ||
| − | [https://en.wikipedia.org/wiki/OpenShot Wikipedia] | ||
[[Category:Explore an application]] | [[Category:Explore an application]] | ||
Latest revision as of 10:40, 23 October 2018

Introduction
Basic information
| ICT Competency | Openshot Video editor is generic resource creation tool |
| Educational application and relevance | Working with video, audio, text and image resources. This can be used in digital story telling vities |
| Version | version 1.4.3 |
| Other similar applications | Kdenlive, Pitivi and advance Lightwork |
| The application on mobiles and tablets | there is many similar application are available in android mobile phones. |
| Development and community help | Official Website |
Overview of features
Openshot is an video editor; here you can combine multiple multimedia and can create a video. OpenShot Video Editor is designed to create and edit videos. Here you can easily combine multiple video clips, audio clips, and images into a single project, and then export the video into many common video format. All video clip edits (trimming, cutting, etc...) in openshot are non-destructive, means that the original video clips are never modified.
You can use this tool to create a photo slide shows with adding background music.
Installation
- The application is part of the Ubuntu custom distribution.
- In case you do not find it on your computer, you can install by choosing “openshot” in Ubuntu Software Centre
- If you would like to install through the terminal follow these steps below:
- Open terminal by clicking (Ctrl+Alt+T),
- Once Window page is open, in front of dollar($) symbol just type below command.
- sudo apt-get install openshot
- Then, just type your ubuntu password(it will not display on your screen), press Enter.
Working with application
Getting familiar with the application

1. Tool Bar : will use this for importing, saving and for exporting files.
2. Project file window : This is where you import the various video clips and other files you wish to use in the video.
3. Sorting tab : Use to sort project files by type.
4. Preview : View individual clips or the output from the Timeline.
5. Edit toolbar : will use this for triming, copy, move and resizing the files in track.
6. Zoom slider : will use this to zoom our working tracker or time line.
7. Tracks :here you place and edit clips into the finished product. You can create multiple tracks. Its good to use separate tracks for photos, audios, videos clips and titles
Import Files – Audio, Video, and Images
- Import files into your project
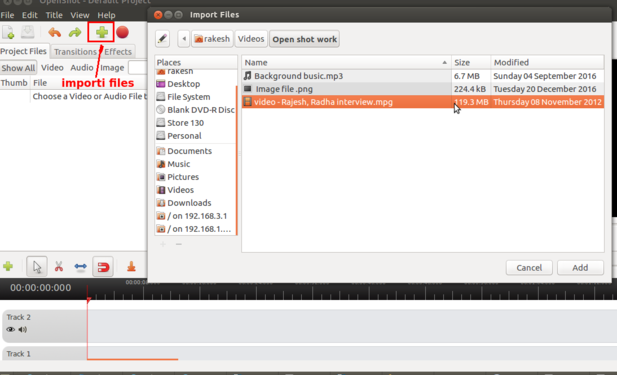
Importing files into Openshot
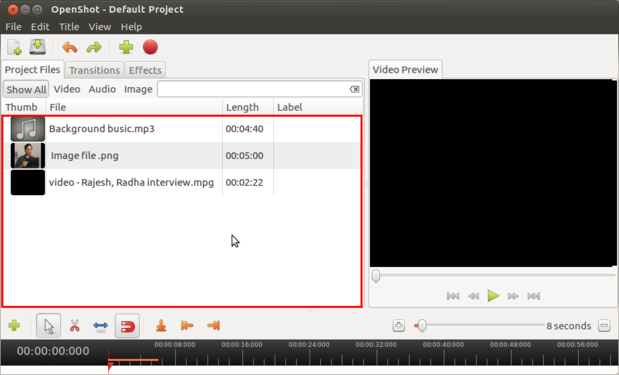
After imported


Before we can begin making a video, we need to import files into OpenShot. To Import pictures, video & Music, click on "+" symbol from the toolbar and browse all the files required for your edit work and click OK. Don't move any files from this project.
Arranging files in tracks

After you have imported some files, the next step is to adding files into the timeline and arranging it. Click on each photo (one at a time), and drag them onto Track 2(or right click and add to timeline) on the timeline.
If you are adding different multi media in track, use different tracks for different media(always back ground sound should be in track no 1).
Click on play from the preview window to see the changes you have done.
Cutting, moving and deleting clips
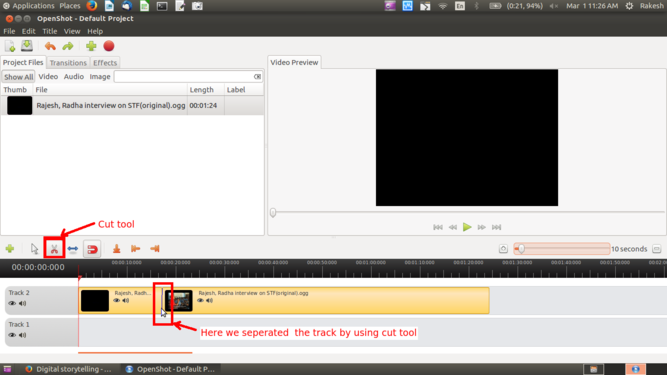
Cutting clips(video or audio) in some point
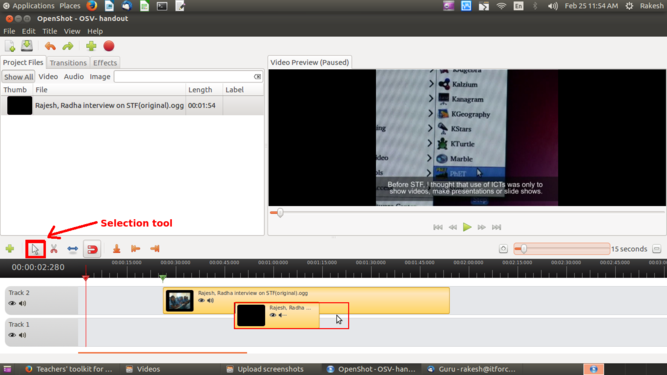
Moving clips


1. To cut a clip into two parts, select Razor from edit toolbar. The mouse cursor will change to a dotted line & razor icon.Click on a clip at the point you want to cut / slice it.
And also if you want to remove one part of this clip, just right click on the clip and remove clip.
2. After you cut a clip, now it will be two part. Click on cursor icon(Select Mode), click on a clip which you want to move. Then,drag the clip to a new position on the timeline, and drop it.
Adding sub titles
OpenShot has built-in title creator/editor. It has some basic functionality to help you create small titles for your video project. you can directly import .svg text files, if you have already created by external tools.
To add a new subtitle, click the Title > New Title from the menu option. This will launch the Title Editor.
- Adding subtitle in to track
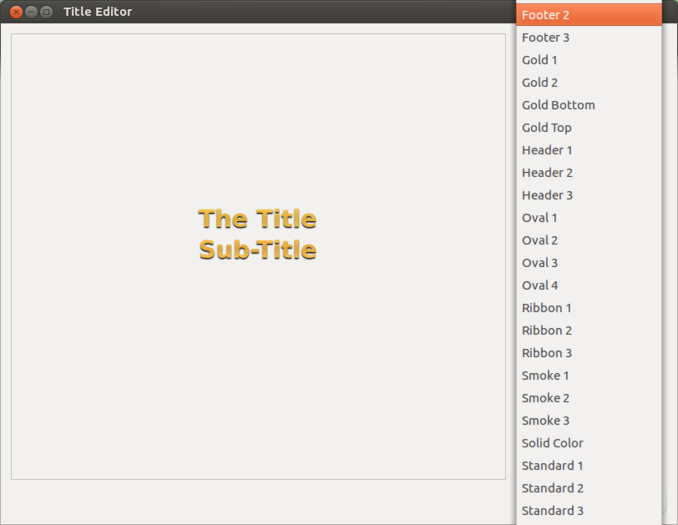
Selecting subtitle style

editing subtitle


1. Once the title editor launches, you need to select any template, and click on the Create New Title button. ENter the name for your title file and click OK. Now you need to type or copy paste your subtitle content in the title window and click Apply. If you want change the color, font , font size etc.. use the side tool bar. after you done all the changes, click on Apply.
2. This sub title text will be added to your project file. Drag drop this title file(.svg) into the track where you preferred place. Always use separate track for all your subtitles and you should use the top track.
Adding fade in fade out effect
By adding fade-in and fade-out for the clips, it will smoothly changing the slides from one to next.
You right click your mouse, on the slide which you want to add fade effect and select Fade -> Fade in or Fade Out as per the requirement. This fade in / fade out will effect for both audio and video.
Adding transition into clips
Transitions are used to gradually move between 2 different clips. Many different transitions are available in OpenShot. They are easy to drag and drop onto the timeline, and can add lots of fun to a video project.
To add a transition, click on Transition Tab, and select any transition by clicking on it. Drag and drop the transition onto the timeline. It will place between 2 tracks. Always transition should be place in buttom side for the track.
To resize a transition, select to Resize tool on the edit Toolbar, and drag the left or right edge to a new size.
Save project files
OpenShot needs a project file to save the information that makes up a video project. Information such as the name and location of your project, video and audio files, timeline information, which clips have been trimmed, arranged, etc. This project file you can use it later if you need to do any change in your file.

Click on FIle-> Save Project
1. Project Name : The name of your project file (.osp file extension)
2. Project Folder :The folder location to save your project file
3. Project Type : By default it will be DVD/CD, you may change this to as you required(this will not effect on your final video).
Project files have an .OSP file extension (ExampleProject.osp). Also, project files need a /thumbnail/ folder, which contains all of the thumbnails in your project. If you move a project file, be sure to move the /thumbnail/ folder also.
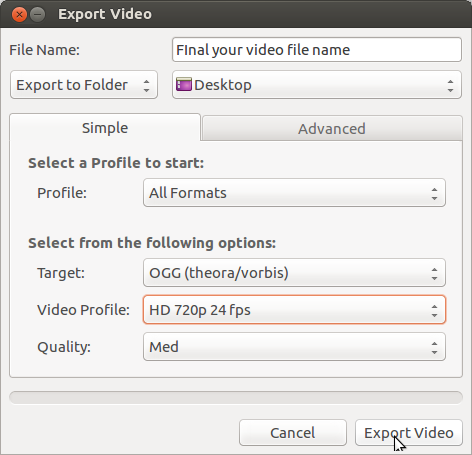
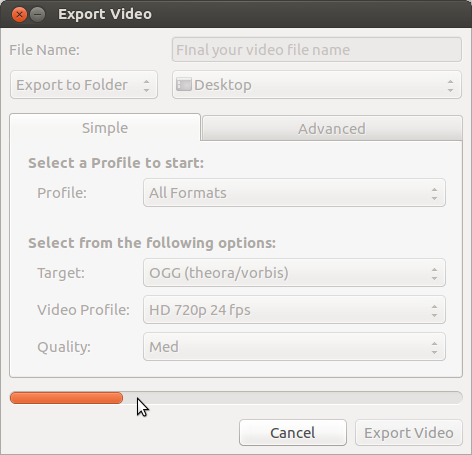
Export as Video
Once done with your all editing work, next is to export your video. This will convert your OpenShot project into a single video file, which should work on any platform.
Click on the Export video icon at the top menu tool bar (or use the File > Export Video... menu).
- Exporting as video


1. Open shot editor is supporting many video formats to export video, in that .ogg is the open format. As show in the above image, you need to give all the details for video.
a. File name : Name for your exported vide
b. Export folder :
c. Profile : All formats
d. Target : file formate (Select .ogg) this will support with all the devices.
e. Video profile : Select the profile ( will prefer HD 720 24fs)
f. Quality : Define your video quality. If you select High - Video size will be increase.
Now click on export. his will start exporting.
2. Do not click on cancel or do not try to play the video, while the exporting process is going on.
Advanced features
- Create moving scrolling titles.
- working with different layouts.
- Change video brightness, contrast
- Create animated title.
- Working with video effect.
Ideas for resource creation
You can use this application to create image slide video, creating video with subtitling and create video by adding multiple media files like Image, video, audio and text slides.