Difference between revisions of "Learn Openshot Video Editor"
| Line 26: | Line 26: | ||
{| class="wikitable" | {| class="wikitable" | ||
|- | |- | ||
| − | |style="width: 50%;| | + | |style="width: 50%;|{{ext-img|450px|https://upload.wikimedia.org/wikipedia/commons/7/7a/Openshot_1_Main_Window.png}} |
| − | |style="width: 50%;| | + | |style="width: 50%;|{{ext-img|450px|https://upload.wikimedia.org/wikipedia/commons/6/6a/Openshot_2_Arrange_photos_on_timeline.jpg}} |
|- | |- | ||
|style="width: 50%;|Step 1- 1. How to Launch OpenShot Video Editor | |style="width: 50%;|Step 1- 1. How to Launch OpenShot Video Editor | ||
| Line 37: | Line 37: | ||
After you have imported some files, the next step is adding them to the timeline and arranging them. Click on each photo (one at a time), and drag them onto Track 2 on the timeline. Drag and drop the files to arrange them. | After you have imported some files, the next step is adding them to the timeline and arranging them. Click on each photo (one at a time), and drag them onto Track 2 on the timeline. Drag and drop the files to arrange them. | ||
|- | |- | ||
| − | |style="width: 50%;| | + | |style="width: 50%;|{{ext-img|450px|https://upload.wikimedia.org/wikipedia/commons/d/d2/Openshot_3_Add_music_to_timeline.jpg}} |
| − | |style="width: 50%;| | + | |style="width: 50%;|{{ext-img|450px|https://upload.wikimedia.org/wikipedia/commons/2/22/Openshot_4_Adding_title_to_video.png}} |
|- | |- | ||
|style="width: 50%;|Step 3-Add Music to Timeline | |style="width: 50%;|Step 3-Add Music to Timeline | ||
| Line 48: | Line 48: | ||
While Creating Simple Title select the pattern of the title in the list and click on “Create Title”. When we click on Create title a small window appears, give the name of the title file and click “OK”. Provide the required title and subtitle and click “Apply”. We can edit the font style and font color by clicking font properties and colors. Now click “OK”. Your title file appears along with the project files. | While Creating Simple Title select the pattern of the title in the list and click on “Create Title”. When we click on Create title a small window appears, give the name of the title file and click “OK”. Provide the required title and subtitle and click “Apply”. We can edit the font style and font color by clicking font properties and colors. Now click “OK”. Your title file appears along with the project files. | ||
|- | |- | ||
| − | |style="width: 50%;| | + | |style="width: 50%;|{{ext-img|450px|https://upload.wikimedia.org/wikipedia/commons/a/a8/Openshot_5_Slice_a_clip.png}} |
| − | |style="width: 50%;| | + | |style="width: 50%;|{{ext-img|450px|https://upload.wikimedia.org/wikipedia/commons/c/c1/Openshot_7_Transitions.jpg}} |
|- | |- | ||
|style="width: 50%;|Step 5-'''Move & Trim Clips on Timeline ''' | |style="width: 50%;|Step 5-'''Move & Trim Clips on Timeline ''' | ||
| Line 70: | Line 70: | ||
Click on a clip at the point you want to cut / slice it. | Click on a clip at the point you want to cut / slice it. | ||
If snapping is enabled, the razor will jump to the play-head position, if it is close-by. | If snapping is enabled, the razor will jump to the play-head position, if it is close-by. | ||
| − | |||
|style="width: 50%;|Step 6-'''Transitions''' are used to gradually move between 2 different clips. Many different transitions are available in OpenShot. They are easy to drag and drop onto the timeline, and can add lots of fun to a video project. | |style="width: 50%;|Step 6-'''Transitions''' are used to gradually move between 2 different clips. Many different transitions are available in OpenShot. They are easy to drag and drop onto the timeline, and can add lots of fun to a video project. | ||
| − | |||
1. Add a Transition- | 1. Add a Transition- | ||
To add a transition, switch to the Transition Tab, and select a transition by clicking on it. Drag and drop the transition onto the timeline. It will snap between 2 tracks. | To add a transition, switch to the Transition Tab, and select a transition by clicking on it. Drag and drop the transition onto the timeline. It will snap between 2 tracks. | ||
| Line 85: | Line 83: | ||
Just like a clip, a transition has a properties window. To launch the properties window for a transition or a mask, right-click on the item, and choose Properties. To save your changes, click on the Apply button. | Just like a clip, a transition has a properties window. To launch the properties window for a transition or a mask, right-click on the item, and choose Properties. To save your changes, click on the Apply button. | ||
|- | |- | ||
| − | |style="width: 50%;| | + | |style="width: 50%;|{{ext-img|450px|https://upload.wikimedia.org/wikipedia/commons/5/59/Openshot_8_Effect.jpg}} |
| − | |style="width: 50%;| | + | |style="width: 50%;|{{ext-img|450px|https://upload.wikimedia.org/wikipedia/commons/1/1e/Openshot_9_Preview.jpg}} |
|- | |- | ||
|style="width: 50%;|Step 7 - 7. Effects | |style="width: 50%;|Step 7 - 7. Effects | ||
OpenShot has over 40 effects designed to manipulate the video or audio output of a clip. Adjusting color hue, brightness, and gamma can all be done with effects. Also, more exotic effects, such as distort, wave, old-film, green screen (also known as Chroma Key), and audio effects. | OpenShot has over 40 effects designed to manipulate the video or audio output of a clip. Adjusting color hue, brightness, and gamma can all be done with effects. Also, more exotic effects, such as distort, wave, old-film, green screen (also known as Chroma Key), and audio effects. | ||
| − | |||
1. Add an Effect | 1. Add an Effect | ||
To add an effect, switch to the Effects tab, select an effect from the list, and drag the effect onto a clip on the timeline. | To add an effect, switch to the Effects tab, select an effect from the list, and drag the effect onto a clip on the timeline. | ||
| − | |||
2. Adjust Effect Settings : | 2. Adjust Effect Settings : | ||
To adjust the settings of an effect, right-click on a clip, and choose Properties. Switch to the Effects tab, and you will see a list of all effects that have been applied to the current clip. | To adjust the settings of an effect, right-click on a clip, and choose Properties. Switch to the Effects tab, and you will see a list of all effects that have been applied to the current clip. | ||
| − | |||
|style="width: 50%;|Step 8-Preview your Project | |style="width: 50%;|Step 8-Preview your Project | ||
To preview what our video looks & sounds like, click the Play button under the preview window. Click the Play button again to pause your video. Remember, if you need to re-arrange any clips, just drag and drop the clips to move them. | To preview what our video looks & sounds like, click the Play button under the preview window. Click the Play button again to pause your video. Remember, if you need to re-arrange any clips, just drag and drop the clips to move them. | ||
|- | |- | ||
| − | |style="width: 50%;| | + | |style="width: 50%;|{{ext-img|450px|https://upload.wikimedia.org/wikipedia/commons/6/63/Openshot_10_Export.png}} |
|style="width: 50%;|Step 10-'''Export your Video''' | |style="width: 50%;|Step 10-'''Export your Video''' | ||
Once you are happy with your photo slide-show video, the next step is to export your video. This will convert your OpenShot project into a single video file, which should work on any Any media player (such as Totem, VLC, SMPlayer, Video Player etc...) or websites (such as YouTube, Vimeo, etc...). | Once you are happy with your photo slide-show video, the next step is to export your video. This will convert your OpenShot project into a single video file, which should work on any Any media player (such as Totem, VLC, SMPlayer, Video Player etc...) or websites (such as YouTube, Vimeo, etc...). | ||
Revision as of 06:36, 15 October 2016

Introduction
OpenShot can take your videos, photos, and music files and help you create the film you have always dreamed of. Easily add sub-titles, transitions, and effects, and then export your film to DVD, YouTube, Vimeo, Xbox 360, and many other common formats. OpenShot Video Editor is a free and open-source video editing software for Linux, OS X, and Windows
ICT Competency
Educational application and relevance
Openshot Video editor is generic resource creation tool and we can use this tool to create and edit academic videos.
Version
version 2.0, OpenShot is written in C++
Configuration
Its part of Ubuntu custom and no need to configure.
Overview of Features
The tool has several features...like…., OpenShot has many great features, such as trimming and arranging videos, adjusting audio levels, transitions between videos, compositing multiple layers of video, chroma-key / green screen effect, and support of most formats and codecs. Digital video effects, including brightness, gamma, hue, greyscale, chroma key (bluescreen / greenscreen) , and many more! OpenShot provides extensive editing and compositing features, and has been designed as a practical tool for working with high-definition video including HDV and AVCHD .
Other similar applications
Avidemux, Adobe Pre, miere Pro, Kdenlive, Imovie, Cinelerra
Development and community help
Working with the application
Functionalities

|

|
| Step 1- 1. How to Launch OpenShot Video Editor
Applications menu Choose Sound & Video Select OpenShot Video Editor. Before we can begin making a video, we need to import files into OpenShot. The files may be any image file, vector editor file, or any format of video file. Click on “+” icon in the menu bar and select the photos and music you want and click OK. |
Step 2- Arrange Photos on Timeline
After you have imported some files, the next step is adding them to the timeline and arranging them. Click on each photo (one at a time), and drag them onto Track 2 on the timeline. Drag and drop the files to arrange them. |

|
|
| Step 3-Add Music to Timeline
To make our photo slide-show more interesting, we need to add some music. You should have imported a music file as in first step. Click on the music file, and drag it onto Track 1 on the timeline. |
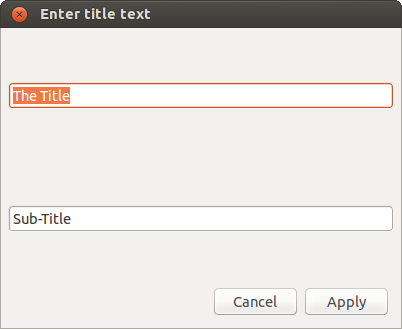
Step 4-Adding Title to Video
To create simple title click on Title → New Title While Creating Simple Title select the pattern of the title in the list and click on “Create Title”. When we click on Create title a small window appears, give the name of the title file and click “OK”. Provide the required title and subtitle and click “Apply”. We can edit the font style and font color by clicking font properties and colors. Now click “OK”. Your title file appears along with the project files. |

|

|
| Step 5-Move & Trim Clips on Timeline
Once you have files (also referred to as clips) on the timeline, we need to arrange them onto tracks, and put them in the correct order. Also, we will need to trim off the beginning and endings of the video clip (if needed). 1. Move a Clip (Select Mode)- Switch to Select Mode (this is the default mode) Click on a clip. Drag the clip to a new position on the timeline, and drop it. If snapping is enabled, the clip will jump to any close-by clips (or the play-head, if it is close-by). 2. Trim a Clip (Resize Mode) - Switch to Resize Mode, by clicking on the resize icon. Move you mouse cursor over the right or left edge of a clip. Drag the edge of the clip to trim the video. As you drag the edge of the clip, the preview window will display where the clip will begin or end (based on which side of the clip you are dragging). 3. Slice a Clip (Razor Mode) - To slice a clip into 2 pieces, switch to Razor Mode . The mouse cursor will change to a dotted line & razor icon. Click on a clip at the point you want to cut / slice it. If snapping is enabled, the razor will jump to the play-head position, if it is close-by. |
Step 6-Transitions are used to gradually move between 2 different clips. Many different transitions are available in OpenShot. They are easy to drag and drop onto the timeline, and can add lots of fun to a video project.
1. Add a Transition- To add a transition, switch to the Transition Tab, and select a transition by clicking on it. Drag and drop the transition onto the timeline. It will snap between 2 tracks. 2. Move a Transition- To move a transition, switch to Select Mode on the Timeline Toolbar, and drag it to a new position. 3. Resize a Transition- To resize a transition, switch to Resize Mode on the Timeline Toolbar, and drag the left or right edge to a new size. 4. Transition Properties- Just like a clip, a transition has a properties window. To launch the properties window for a transition or a mask, right-click on the item, and choose Properties. To save your changes, click on the Apply button. |

|

|
| Step 7 - 7. Effects
OpenShot has over 40 effects designed to manipulate the video or audio output of a clip. Adjusting color hue, brightness, and gamma can all be done with effects. Also, more exotic effects, such as distort, wave, old-film, green screen (also known as Chroma Key), and audio effects. 1. Add an Effect To add an effect, switch to the Effects tab, select an effect from the list, and drag the effect onto a clip on the timeline. 2. Adjust Effect Settings : To adjust the settings of an effect, right-click on a clip, and choose Properties. Switch to the Effects tab, and you will see a list of all effects that have been applied to the current clip. |
Step 8-Preview your Project
To preview what our video looks & sounds like, click the Play button under the preview window. Click the Play button again to pause your video. Remember, if you need to re-arrange any clips, just drag and drop the clips to move them. |

|
Step 10-Export your Video
Once you are happy with your photo slide-show video, the next step is to export your video. This will convert your OpenShot project into a single video file, which should work on any Any media player (such as Totem, VLC, SMPlayer, Video Player etc...) or websites (such as YouTube, Vimeo, etc...). Click on the Export Video icon (Red Button) at the top of the screen (or use the File > Export Video). Choose from one of the many preset export options, and click the Export Video button. |
File formats for creation
Saving the file
Save as Project- When OpenShot is launched, it creates a new project file automatically. You can start using OpenShot immediately, without first creating a project. Before exporting your edited video save your project for further editing and easy exporting. Since OpenShot creates a project by default when you launch the program, you can simply choose File > Save. The Save Project screen will open. Change the project name, project type, length of timeline, and then click “Save Project”.
Export and publishing files
Export- Once you are happy with your photo slide-show video, the next step is to export your video. This will convert your OpenShot project into a single video file, which should work on any Any media player (such as Totem, VLC, SMPlayer, Video Player etc...) or websites (such as YouTube, Vimeo, etc...). Click on the Export Video icon (Red Button) at the top of the screen (or use the File > Export Video). Choose from one of the many preset export options, and click the Export Video button.
Advanced features
- Cross-platform (Supports Linux, OS X, and Windows)
- Support for many video, audio, and image formats (based on FFmpeg)
- Powerful curve-based Key Frame animations
- Desktop integration (drag and drop support)
- Unlimited tracks / layers
- Clip resizing, scaling, trimming, snapping, rotation, and cutting
- Video transitions with real-time previews
- Compositing, image overlays, watermarks
- Title templates, title creation, sub-titles
- 3D Animated Titles (and Effects)
- SVG friendly, to create and include vector titles and credits
- Scrolling motion picture credits
- Solid color clips (including alpha compositing)
- Support for Rotoscoping / Image sequences
- Advanced Timeline (including Drag & drop, scrolling, panning, zooming, and snapping)
Installation
| Method of installation | Steps |
|---|---|
| From Ubuntu software Centre | From Software center type Openshot Video Editor in search bar and Click on install |
| From Terminal | Follow these commands
sudo apt-get update sudo apt-get install openshot |
| From the web | click here download from web |
| Web based registration | Not Applicable |
The application on mobiles and tablets
Openshot video editor is not available in mobiles, but there are many other application similer to openshot video editors are available and can download from google playstore of all android version.
Ideas for resource creation
can create and modify educational videos