Difference between revisions of "Learn LibreOffice Writer"
m |
|||
| Line 17: | Line 17: | ||
|- | |- | ||
|Version | |Version | ||
| − | | | + | |LibreOffice Writer is also available on the Windows (visit [https://libreoffice.org/download/download/?type=win-x86_64&version=6.3.3&lang=en-US download LibreOffice on Windows] to install LibreOffice on a Windows system) and Macintosh operating systems. |
| − | LibreOffice Writer is also available on the Windows and Macintosh operating systems. | ||
| − | |||
This tool has no specific configuration requirements but in this application you can use many extra features by installing [https://extensions.libreoffice.org/extensions extensions] | This tool has no specific configuration requirements but in this application you can use many extra features by installing [https://extensions.libreoffice.org/extensions extensions] | ||
|- | |- | ||
Revision as of 07:09, 3 November 2019

Introduction
LibreOffice Writer is the free and open-source text editor application of the LibreOffice software package. Writer is a text editor similar to Microsoft Word.
Basic information
| ICT Competency | ICT for creating generic resources |
| Educational application and relevance | LibreOffice Writer is a software used for creating (including writing, editing, formatting, and possibly printing) text resources. Apart from entering and editing text, you can insert images and links also. |
| Version | LibreOffice Writer is also available on the Windows (visit download LibreOffice on Windows to install LibreOffice on a Windows system) and Macintosh operating systems.
This tool has no specific configuration requirements but in this application you can use many extra features by installing extensions |
| Other similar applications | Microsoft Word, OpenOffice writer, Google Docs |
| The application on mobiles and tablets | You can download https://www.libreoffice.org/download/android-viewer. There are text editors on the mobile / tablet platform like ''"OpenDocumentReader" App and WPS Office App. |
| Development and community help | The Document Foundation |
Overview of features
LibreOffice Writer lets you design and produce text documents that can include graphics, tables, or charts. In this application you can save the documents in a variety of formats, including the standardized Open Document Format (ODF), Microsoft Word format(.doc), or HTML. Here you can easily export your document to the Portable Document Format(PDF).
Installation
- The application is part of the Ubuntu custom distribution.
- In case you do not find it on your computer, you can install by choosing “LibreOffice” in Ubuntu Software Centre
- If you would like to install through the terminal follow these steps below:
- Open terminal by clicking (Ctrl+Alt+T),
- Once Window page is open, in front of dollar($) symbol just type below command.
- sudo apt-get install libreOffice-writer
Working with the application
Creating and saving a text file
- Creating and saving a text file
LibreOffice Writer main page
Save a document
Save window


- Opening LibreOffice Writer - When you click on Application - Office - LibreOffice Writer, the main page will show as in the first image. You can add text, image, table and graphs in a text document. You can also type in multiple languages in the same document. To change the language click on "EN" button in top panel, and select the language you want to type in.
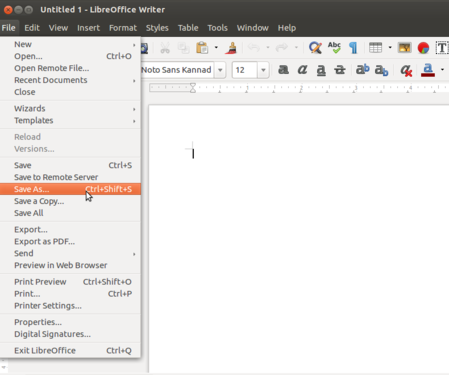
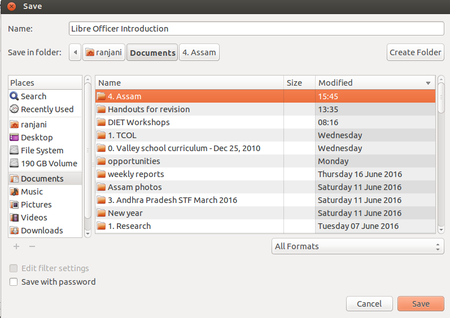
- Saving a file - When you start entering text into the document, save your document by using SAVE option. Documents can be saved using the FILE – SAVE option or by using short-cut key CTRL+S. Always give a meaningful file name for your documents. To save a file with another file name, you can use the Save-as option from the File menu.
- Saving a file - After selecting file name and folder click on "SAVE".
- The file will be saved with a .odt extension. ODT is the short form of Open Document Text.
- LibreOffice Writer menu

LibreOffice Writer menu bar

The LibreOffice menu bar has multiple options for file operations (including saving discussed above), editing, viewing the document, inserting images, links, tables, etc in the document and formatting and defining styles in the document. There is also a tools option with functionalities for spell check, grammar, defining frequently used words, etc. You can either click on the menu bar on each item or click on the symbols shown for each. The commonly used options are discussed below.
Editing and formatting a document

- To copy text from one place to another, or from one document to another, you can select the text, go to Edit --→ Copy and go to a different place in the document to paste it; Edit → Paste. The editing menu also has an important feature for searching selected words. You can use the Edit--> Find option for searching selected words.
- The format option is for changing the format of the text, changing the text font, text size, page format and text wrapping options. many of these option we can use short cut icons from formatting text tool bar, the letter “B” and “I” can be used to make the text bold and italics.
- You can type in text in different languages, not only in English. You can type a paragraph of text with words/sentences in different languages. The IBUS application allows you to type in most Indian languages. To type in Hindi or Kannada or Telugu or Tamil, visit the Learn_Ubuntu page
Inserting images and tables
- Insert option in LibreOffice Writer

Insert Menu

Inserting Image

Inserted Image View


- The insert menu option is for inserting images, hyper links, charts, page numbers, page breaks, formulas. Page numbers can be inserted in the footer of the page
- Inserting an image - Go to Insert → Image → This will open a folder from which images are to be inserted
- The image (triangle) inserted above will looks like this.
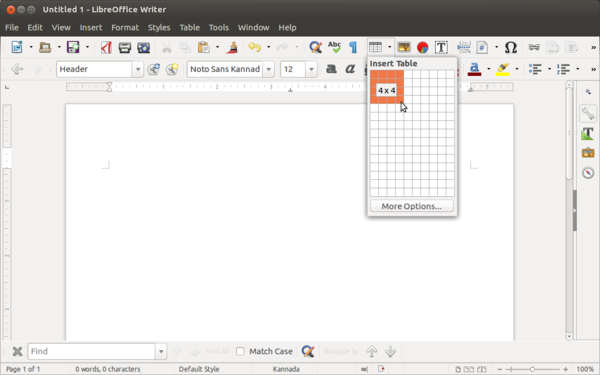
- Inserting Table
Insert Table
Format Table


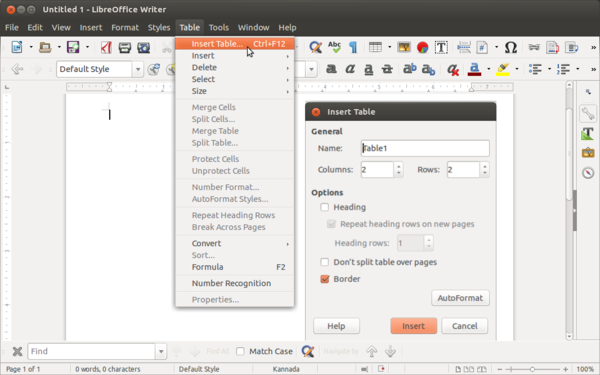
- To insert Table, go to Table from Menu bar and select "Insert Table", in given window choose required number of rows and columns. Alternatively you can also insert table from toolbar, Click on table grid from toolbar and move the cursor over the grid until you highlight the number of columns and rows you want. Click and the table appears in the document.
- You can format your table by selecting the options in 'Table'. Move your cursor inside the table and 'Select -> Table'. You can then adjust the row and column widths (Table -> Size), add or remove borders (Table -> Properties -> Borders), split or merge cells (Table -> Merge Cells, Table -> Split Cells) etc
- You can also copy data from a spreadsheet. You can simply copy that data (in rows and columns) from the spreadsheet and paste into the document, it will create a copy of the spreadsheet in your document. If you do not want it as a spreadsheet, but only as a table, you need to select 'Paste Special -> Formatted text (RTF)' option.
Creating bulleted and numbered lists

- The formatting option allows you to create numbered or bullet lists in the document. For this select the text input that has been entered, go to Format, select Bullets and Numbering and choose the numbering type that is needed. You can create sub-numbered lists.
- In the format option under Format-->Paragraph you can also define spacing between paragraphs, indents,etc.
Creating an automatic Table of Contents
- Inserting Table of Content
Paragraph style for Table of Content

Insert Table of Content


- Often it is useful to create text documents which are organize into headings and sub headings to denote different sections. This can be done in two ways
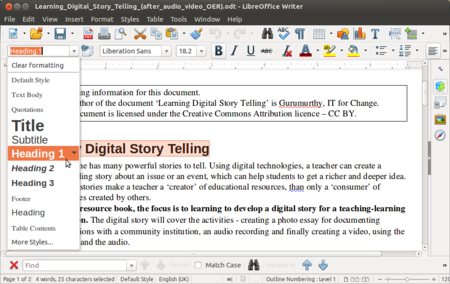
- You can select the text you want to define as a heading and choose from the predefined headings style, by selecting from the first drop down box as shown in the first image.
- You can also define this from the Style menu by clicking on Style and selecting the given heading.
- You can define the appearance of each heading under the Styles and formatting option by changing the default font colour, size, etc.
- Once the headings are defined, you can insert the Table of Contents. Click in your document where you want to create the table of contents. Choose Insert - Table of Contents and Index – Index Entry, just click on “OK”. For updating table of content, right click on the table of content and Update Index or Table of Contents. Note that if you add any headings in the document, it will not automatically update the TOC, hence you will need to come to the TOC and do the update manually.
Adding header and footers for the page
Inserting page fields


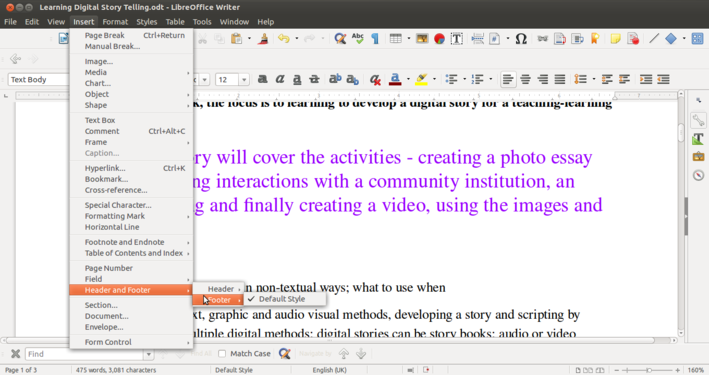
- You can add a header and / or footer to your document. You could provide the name of the document (or any other static information) in the footer. You can also insert page number in the header or the footer, which will be dynamically generated by Writer. It is useful to have page number and name of your document on every page, this is specially useful if the reader wants to read a print copy. LibreOffice Writer allows you to easily insert this information at the bottom or top of each page. This can be done using Insert--->Footer.
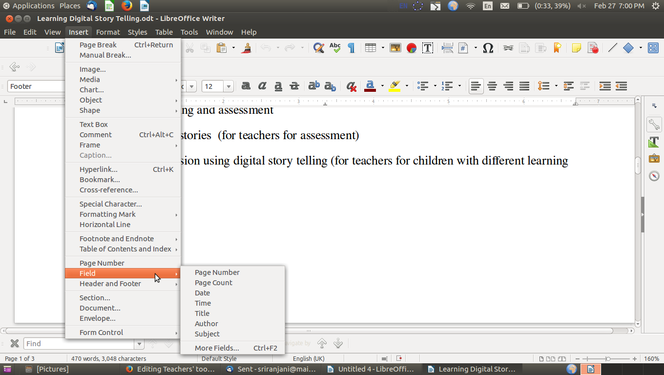
- Once a footer has been inserted, you can go to the bottom of the page and insert multiple fields of information using Insert--->Fields. You can type any text in this footer, it will come on all pages. Other than page number, other dynamic information you can provide is the date/time stamp of the document. A similar method can also be adopted for inserting a header as well.
Spelling check
- Formatting in LibreOffice Writer
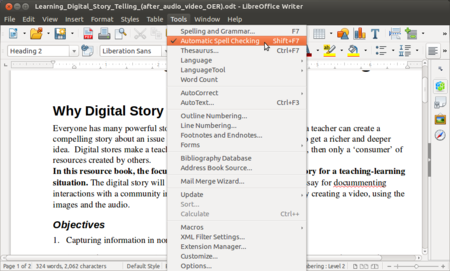
Auto spell checking
Spelling and grammar checking


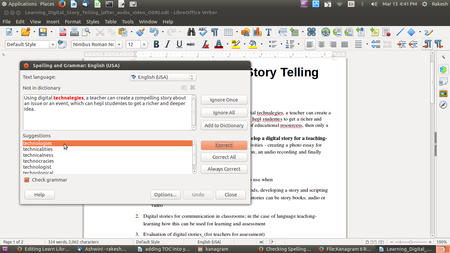
- Spelling - By enabling automatic spell checking under tools, you can check spelling within your document. You will see a red underline below a word spelt wrongly. (If you see a green line below a word, it suggests a grammatical error). You can move your cursor to the word and right click to get suggestions for correcting the spelling. In case you are clear your word is correct, you can also 'add your word to the dictionary' so that the next time you use it, it will not be treated as a wrong spelling.
- You can also do a manual spelling and grammar checking of the document. Select the text and click on spelling and grammar under tools option. it will start looking spelling and grammar for the document. It is a good habit to always run a spelling check on your document before sharing.
- To check the spelling and the grammar of a text, the appropriate dictionaries must be installed. You can have dictionaries for your own language (Telugu, Urdu etc) installed, apart from the one in English.
Saving the file
Like in most applications, a file can be saved using the FILE –> SAVE command, or by the shortcut key CTRL+S. Always give a meaningful file name, reading which you should get an idea of the file contents. Often adding the month-year information when the file was created can be useful later File will save in .odt format, ODT is the short form of Open Document Text. ODT conforms to Open Document Format (ODF) which is recommended by the Government of India through its Policy on open standards””.
Like in most applications, a file can be exported to a PDF format. This is useful when you only need to print the file and do not want any changes to it. You can also export a document to a 'html' (web page) format, which can be opened by a web browser.

Advanced features
- Track changes (recording editing changes by another person in another colour in the document, which can be accepted or rejected by the author)
- Multiple columns (useful for making newsletters and magazines) and other page layout functions
Ideas for resource creation
- You can use this application to create and edit text resources. You can insert images, web links, hyper links in the document and connect the text to other resource formats. You can insert and edit tables, create sections (with section headings) and format it in many ways to create a text document.
- Infographics, posters, comic strips are some resources you can create using text editors in addition to making reports.