Learn Audacity

Introduction
Audacity is a free and open source multi-track audio editor and recorder for GNU/Linux, Windows, Mac OS X and other operating systems.
Basic information
| ICT Competency | It is a generic audio resource creation and editing tool. |
| Educational application and relevance | You can use this tool to create own voice recordings, modify existing audio recordings as per your academic requirements. You can mix multiple audio's together to create educational resources. |
| Version | Audacity Version 2.4.2 |
| Other similar applications |
|
| The application on mobiles and tablets | Ringdroid, using Fdroid -
WavePad Audio Editor, using Google Play store |
| Development and community help | Audacity Team |
Overview of Features
- Importing and exporting of wav, aiff, mp3, ogg Vorbis file formats.
- Recording and playing back sounds.
- Editing via cut, copy, and paste, with unlimited levels of undo.
Installation
For Ubuntu
- The application is part of the Ubuntu custom distribution.
- In case you do not find it on your computer, you can install by typing
Audacityon top search bar in Software Centre. - If you would like to install through the terminal follow these steps below:
- Open terminal by clicking Applications->System Tools->Terminal or through Keyboard shortcut
Ctrl+Alt+T - In the terminal window, type below command and press enter to start the installation by providing your machine password:
sudo apt-get install audacity
- Open terminal by clicking Applications->System Tools->Terminal or through Keyboard shortcut
For Windows
- Go to this link and click on "Audacity windows Installer" to download .exe file, save this file in your computer.
- You can save Audacity executable (.exe) to your desktop or to a folder
- Double-click on Audacity executable to begin installation
- Click Yes if it ask your permission to allow this program make change to the computer, Keep clicking on "Next" button to continue and complete the installation.
Note : After you installed Audacity in your windows computer, you need to install this this .mp3 plugin to export your audio in mp3 format. Without installing this you can able export audio in .ogg, .wav and any other audio format.
For Smartphones
Download "WavePad Audio Editor Free" app for your smartphones.
Working with the application
Click here to access/Download different kinf of OER background music files
Obtaining Audio from different sources
Audio files can be obtained from many different sources such as audio recorders in phone, camera, or laptops. The audio recording in laptops can be done using Audacity which is explained in Step 3 below. Similarly, audio can be recorded in other recording devices and transferred to a laptop to edit them using Audacity. Importing audio files from different sources to the laptop is explained in Step 8 of Learn Ubuntu page.
Recording with Audacity
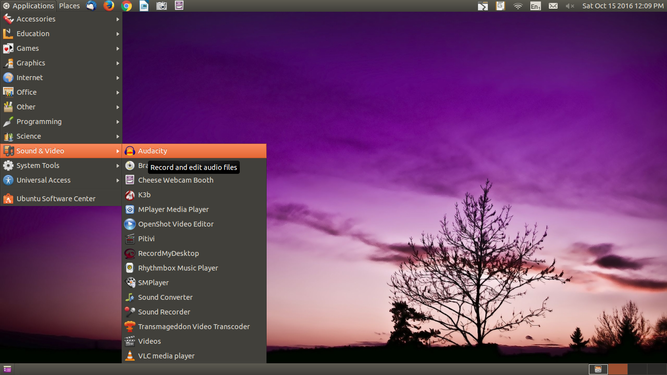
Step 1 -This can be opened from Applications > Sound & Video > Audacity
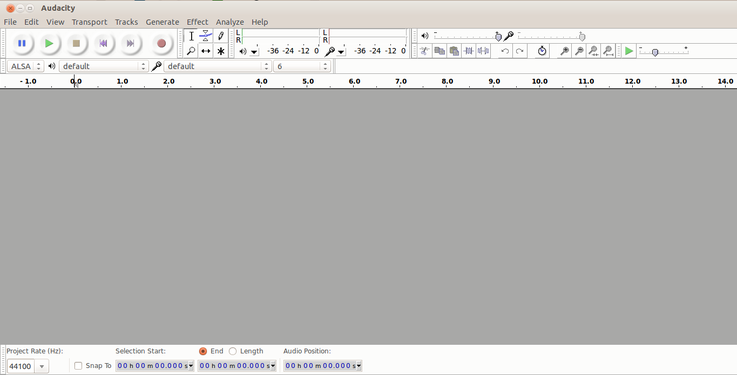
Step 2 - When you open the Audacity application, it will show the window as above


To start recording, click the red record button in the Toolbar as shown in the left image. Begin talking or playing any audio and continue for as long as you want. When you feel you've recorded enough, click the yellow stop button. Until you stop the recording, other functions on the Menu and Toolbar will be disabled. You can record audio playing on your computer itself, or playing in another external audio device
Importing audio and multiple tracks
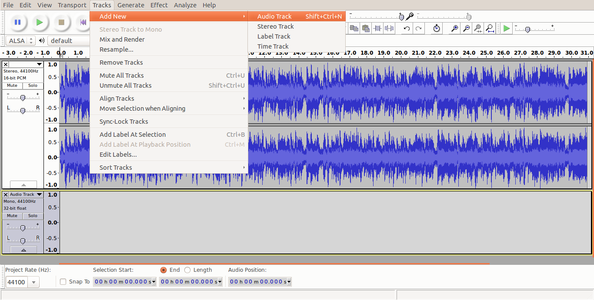
Audio track and adding new track
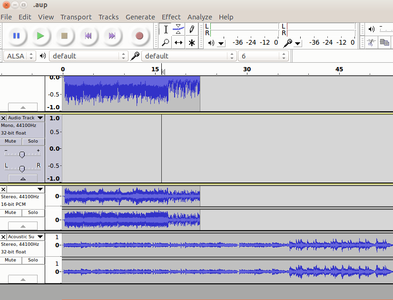
Multiple tracks


To import audio, click File -> Import -> Audio from the menu as shown in the first image above. Choose the music file from your computer, and then click on Open. Once you import an audio clip it will appear in Audacity as an audio track as you can see in the second image. If you want to add multiple tracks, you can do so by clicking on Tracks -> Add new -> Audio track from the Menu as shown in the same second image. With the use of multiple tracks, you can record and at the same time import several audio tracks to work in Audacity as shown in the third image above.
Basic audio editing

Selection of Audio
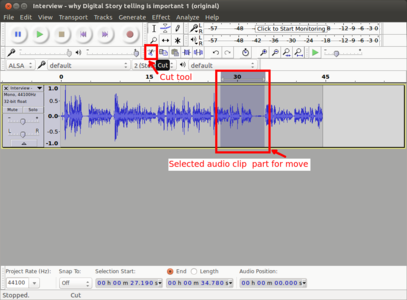
Cutting selected audio
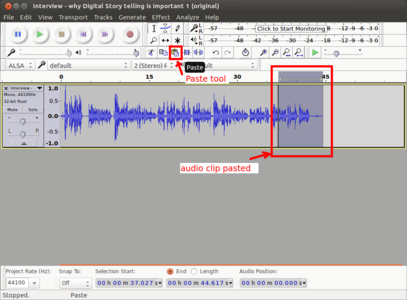
Pasting selected audio


Similar to how we do cut (or copy) paste a selection of text in a text document, we can cut (copy) and paste a selection of audio in an audio file in Audacity. To delete a part of the track, we can select the area of the track we wish to delete as shown in the first image above and then press delete key on the keyboard to delete. To move a part of the audio to another place on the same track or to another track, we need to select it first as we did before and then click on the cut icon on the toolbar as shown in second image. Then the same audio can be pasted by clicking on paste icon on the toolbar as shown in the third image above. The usual keyboard shortcuts for cut(Ctrl+X), copy(Ctrl+C) and paste(Ctrl+V) will also work on Audacity. Once you are done with editing, the final audio can be exported to any audio format from the Menu by clicking on File->Export and then Save.
Saving and exporting to different formats
- All the edits including files can be saved in uncompressed, lossless quality using the AU format. An AUP project file is created, along with a folder with the same name as the AUP file that contains the project's audio data. For example, if you save a project as
chanson.aup, a folder calledchanson_datawill contain the audio data. We can save the AUP project file with keyboardCtrl+Sshortcut or through File->Save from the Menu. - Exporting to different audio formats can be done with
Ctrl+Shift+Ekeyboard shortcut or by clicking on File -> Export through Menu. List of all available export formats supported by Audacity can be found here.
Adjusting the volume of the audio
Occasionally, you may find that recordings are either too quiet or of poor quality once you come to edit them. This can be remedied to a certain degree in Audacity.
- Increase your recorded volume by using amplify feature

Select amplify tool from effect menu
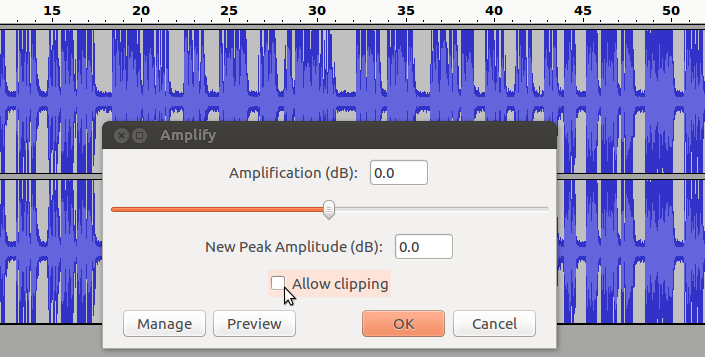
Select "allow clipping" to increase volume


To amplify the clip select the track which you want to increase (amplify) the volume, go to ‘Effect’ tab from the top of the screen and choose ‘Amplify’ from the drop-down menu and Finally, use the slider in the new dialogue box to tell Audacity how much you wish to amplify your clip and click ‘OK to apply.
You have to select "allow clipping" to increase the volume.
Removing noise
n order to remove ‘noise,’ we must first tell Audacity what the ‘noise’ sounds like so it can be isolated within the audio. Do this by firstly selecting a portion of the audio where nobody is talking –like a break in the conversation, so you just get the ‘noise.’ Next, go to ‘Effect’ and select ‘Noise Removal’ from the drop-down menu:
- Remove noise by using noise reduction option

Select Noise reduction tool from effect menu

Select get noise profile and select OK


From the dialogue box, select ‘Get Noise Profile.’ This will then take a sample of the ‘noise’ you wish to cancel out.Next, select ‘Edit’ from the top left of the screen, ‘Select...’and then ‘All’ to highlight the whole clip. Once you have highlighted the whole clip, return to the ‘Effect’ tab, choose ‘Noise Removal’ from the drop-down menu and then click ‘OK’ at the bottom of the dialogue box (see right). This will process the file and remove all of the ‘noise’ from your recording.
Fade a section in or fade it out
These basic fades apply a fade to the selected audio such that the amplitude of the selection goes from absolute silence to the original amplitude (Fade In), or from the original amplitude to absolute silence (Fade Out). The shape of the fade is linear, so it appears as a straight line from beginning to end.
- Add fade in or fade out for your track

After added fade in for the track

After added fade out for the track


Highlight the section of audio you want to fade out to silence. The larger a section you select, the longer and slower the fade effect will be. Click "Effect," followed by "Fade Out" or "Fade In".
Advanced features
Audacity is a full-fledge audio editor which has many advanced features. This page lists tutorials that provide step-by-step instructions for performing all the interesting things with audio in Audacity.
Ideas for resource creation
This tool can be used to create own voice recordings, modify existing audio as per academic requirements and to mix multiple audio files together to create educational resources.