ICT teacher handbook/Learning maths with Geogebra
Introduction
Geogebra is a graphics software application, this enables a teacher to create lessons and resources which can be used for teaching-learning. It is a free educational application and and has its own respository of files, http://Geogebratube.org, available as Open Educational Resources. It can be downloaded freely (from http://sourceforge.net/projects/Geogebra) and it is available on GNU/Linux and Windows platrforms.
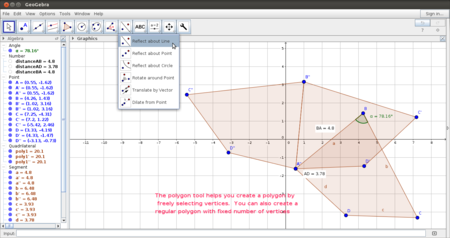
Geogebra allows you to make sketches on a graphic view and the algebra pane describes the co-ordinates of the construction. Functions can also be defined using the input bar. It is possible to animate constructions in Geogebra by defining the variable as a slider. Geogebra also allows instruction to be typed in Indic languages. The graphics view of Geogebra can be viewed in 2 dimensions or 3 dimensions. The tool also has a spreadsheet option to work with list values for plotting a function.
Geogebra construction follows the logic of mathematical constructions and the tool bar, will work in the same way, a paper and pencil construction would work. The construction protocol can be viewed by anyone using a Geogebra file. This is useful for the teacher and student to make comparisons between the two processes.
Different curricula have identified key competencies that should result from a mathematics teaching learning program. These include conceptual understanding, procedural fluency, problem solving, reasoning and logic and communicating and engaging with mathematics.
The Telangana state academic standards for mathematics also emphasize problem solving, communication, reasoning and visualization as key learning attainments.
Geogebra with it possibilities for visualization and animation can help support the building of these competencies. The precision possible in drawing supports building the procedural fluency of geometric constructions, helping students understand why a particular step is necessary. Teachers can use Geogebra to set up investigative questions for students to explore.
Chapter Objectives
- Understanding the interface of Geogebra and making different sketches
- Appreciating the different possibilities of using Geogebra in classrooms
- as a pre-made resource in classroom discussion and demonstration
- co-creating a resource in the classroom and using the process of constructing the resource to clarify concepts
- student investigations which can be used for formative assessments
- Helping students independently explore Geogebra for self-learning
- Building a library of Geogebra files for further learning and sharing the resources with the world wide Geogebra community.
Digital learning resources
- Handout for Ubuntu
- Handout for Geogebra
- Handout for Geogebratube
Additional resources
Click here for additional geogebra resources.
Level 1 --> 5 weeks
The first level of Geogebra requires five weeks of 3 periods each: 1 period is for teacher demonstration and discussion; two periods for hands-on work by students.
A suggested break-up of activity-wise periods is given below. This is indicative, the teacher is encouraged to adjust the periods between activities and also between demonstration and hands on activity as needed.
| Title | Reading | No of weeks
(3 periods each) |
Teacher
demonstration periods |
Student activity
periods |
| About Geogebra | Reading included | |||
| Drawing with Geogebra | 2 | 2 | 4 | |
| Understanding lines and angles with Geogebra | 3 | 3 | 6 |
Drawing with Geogebra
The focus of this activity is to help students get familiarized with the tool bar and create various shapes. Free hand as well as given shapes have to be drawn. The geometry can be left for students to self-explore in this activity and can be formally introduced in the next activity.
The students need to be introduced to the following:
- Tool bar options like line, circle, making a closed shape (polygon)
- Drawing and coloring objects
- Defining the axes and grid
- Moving an object and rotating an object
- Saving a file
- Taking a screenshot of the Geogebra sketch created
Understanding lines and angles with Geogebra
In this activity, students can be introduced to basis geometric concepts of lines, segments and angles and how angles are formed by intersection of lines. Geogebra models the way constructions are done in traditional mathematics classes. Hence, one way the teacher can use this activity is to construct the figures - line, angles and engage the students in a discussion. For instance you can draw two segments, by rotating one segment and asking the students to name and measure the angle. Depending upon the direction in which they measure, the angle will be different. This can be an useful point to talk about clockwise and counter clockwise rotation.
Another useful activity to do with Geogebra is to help students construct complementary and supplementary angles. Often students add the numbers to say 90 degrees or 180 degrees and the visualization of the angle is not there. Encourage students to create and move angles to make a right angle or straight angle.
Introduce the following to the students:
- Drawing lines, rays and segments
- Rotating a segment to make an angle, label the angle
- Use a text box to type the angle
- Create and move angles to make complementary and supplementary angles
- Drawing lines parallel and perpendicular
- Marking the angles formed between parallel lines
- Using the attached worksheet to record their observations
In both the activities, the teacher must construct the Geogebra file in class as a demonstration and ask students to construct the files. There are also questions for students to attempt in a worksheet. All the files have been uploaded as part of the student textbook.
Level 2 --> 3 weeks
Learning about triangle properties
In this activity, students can be introduced to ideas of exploring a triangle. Students have a lot of conceptual difficulties around triangles, methods of construction and the properties. By using an interactive interface like Geogebra where students can create different kinds of triangles and recording their observations, students can be supported to build visualizations of geometric concepts. This topic allows multiple explorations and 2 weeks may not be enough for this activity; this can be taken up for extended work within the regular subject periods, as needed.
The following things need to be introduced:
- Drawing lines
- Plotting intersection and labeling angles
- Using a textbox to summarize the properties observed
- Using the attached worksheet to record their observations
Exploring symmetry
This activity is intended to introduce students to basics of symmetry, rotational symmetry and creation of symmetric objects. The students will explore the difference between rotation and reflection as they explore symmetry.
The following features need to be introduced:
- Rotation by an angle
- Reflection around a point
- Reflection along a line
- Dilation and translation of objects
In both the activities, the teacher must construct the Geogebra file in class as a demonstration and ask students to construct the files. There are also questions for students to attempt in a worksheet. All the files have been uploaded as part of the student textbook.
Level 3 --> 3 weeks
Learning about quadrilateral properties
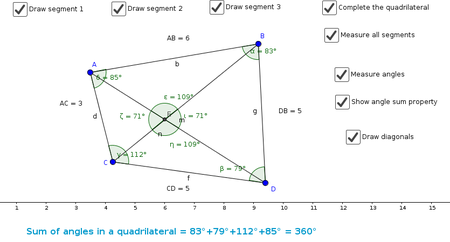
In the class 8 mathematics syllabus, the students are introduced to the properties of quadrilaterals. In an activity similar to the triangles, students can be asked to create Geogebra sketches on quadrilaterals.
Building animations in Geogebra
Animations are powerful to demonstrate properties. This can be done using a feature called Slider which allows you to change parameter value and observe changes. Deciding which parameter to change can be a useful discussion by itself and can demonstrate to the teacher the students' understanding.
The following features need to be introduced:
- Adding a slider
- Animating
- Adding a text box and summarizing observations
- Constructing a triangle using slider
- Constructing a circle using slider


