परिचय
संचालन तंत्र को तंत्र सॉफ्टवेयर भी कहते हैं क्योंकि यह हार्डवेयर के साथ कार्य करता है। प्रत्येक कंप्यूटर में अन्य कप्यूटर कार्यक्रमों
फाइलों और फोल्डरों का निर्माण और प्रबंधन – जब आप एक निबंध लिखते हैं या कागज़ पर कोई चित्रकारी करते हैं, तो आप उसे भविष्य के लिए रखना चाहते हैं, ठीक है न? आप शायद गत्ते से बने फोल्डर में इसे रखेंगे। हो सकता है, आपके पास एक से अधिक निबंध या चित्र हैं, तो आपके पास एक फोल्डर निबंधों के लिए और एक आपके चित्र रखने के लिए होगा।
को चलाने के लिए एक संचालन तंत्र होना चाहिए। यहाँ तक कि आपके मोबाइल में भी एक संचालन तंत्र होगा। जब आप कंप्यूटर को चालू करते हैं तो संचालन तंत्र स्वचालित रूप से प्रारम्भ होते हैं, यह प्रक्रिया बूटिंग कहलाती है। अन्य सभी कंप्यूटर कार्यक्रम, जैसे पेंट करने, टाइप करने, संगीत सुनने, गणित सीखने, आदि के कार्यक्रम अनुप्रयोग सॉफ्टवेयर या 'ऐप्स' कहलाते हैं, जो तंत्र सॉफ्टवेयर के साथ कार्य करते हैं।
उबंटू एक स्वतंत्र और खुला सॉफ्टवेयर (संक्षेप में फॉस/FOSS) संचालन तंत्र है। आप माइक्रोसॉफ्ट विंडोज़ से परिचित हो सकते हैं या एडोब रीडर नामक अनुप्रयोग को काम में लिया होगा। विंडोस या एडोब फोटोशॉप 'मालिकाना' हैं, अर्थात इसे हमारे द्वारा नकल, साझा या बदला नहीं जा सकता। फॉस अनुप्रयोग 'जनरल पब्लिक लाइसेंस' के अंतर्गत लाइसेंस प्राप्त हैं। इसलिए हम सब इस सॉफ्टवेयर को स्वतंत्र रूप से साझा कर सकते हैं, हम इसे अपनी आवश्यकताओं के अनुसार संशोधित भी कर सकते हैं। अत: यह महत्वपूर्ण है कि हम फॉस को अपने स्कूलों में उपयोग में लें। शिक्षक आवश्यक रूप से फॉस को सीखें और सिखाएँ तथा मालिकाना सॉफ्टवेयर से बचें, क्योंकि हम सब के लिए मालिकाना सॉफ्टवेयर की उपलब्धता और उपयोग संभव नहीं हो पाता, और किसी के लिए भी (विक्रेता के अलावा) इस सॉफ्टवेयर का अध्ययन करना या उसमें कोई संशोधन करना संभव नहीं होता।
चूँकि ऑफिस सूट, वेब ब्राउज़र, शैक्षिक सॉफ्टवेयर जैसे सभी सॉफ्टवेयर उबंटू जीएनयू/लिनक्स संचालन तंत्र के साथ समूहित किए जा सकते हैं, इसलिए ये सभी अनुप्रयोग कंप्यूटर पर एक साथ स्थापित किए जा सकते हैं। मालिकाना सॉफ्टवेयर विंडोज़ पर, प्रत्येक सॉफ्टवेयर को अलग से स्थापित करना पड़ता है, जो इसे बोझिल तथा समय लेने वाला बना सकता है। अन्य कंप्यूटर को माउस से चलाने के लिए संचालन तंत्र ग्राफिक यूज़र इंटरफेस (GUI, जिसका उच्चारण गूई है) नामक एक कार्यक्रम को उपयोग में लेते हैं। लोकप्रिय संचालन तंत्र माइक्रोसॉफ्ट विंडोस, जीएनयू/लिनक्स और मैक ओएसएक्स हैं। इस भाग में, आप उबंटू जीएनयू/लिनक्स संचालन तंत्र के उदाहरण का उपयोग कर, एक संचालन तंत्र के कार्यों के बारे में सीखेंगे। यह सीखने के बाद, आप एक कंप्यूटर को विंडोस या मैक ओएसएक्स संचालन तंत्रों के साथ भी संचालित कर सकते हैं। याद रखें कि हम एक सॉफ्टवेयर अनुप्रयोग की प्रक्रियाओं को सीखने पर ध्यान दे रहे हैं, ताकि इसको सीखने के बाद हम इसी प्रकार के अन्य अनुप्रयोगों को भी उपयोग कर सकें।
मूलभूत जानकारी
| आईसीटी सक्षमता
|
उबंटू जीएनयू/लिनक्स कंप्यूटर के लिए एक संचालन तंत्र है। यह संचालन तंत्र वह नीव है जो उपयोगकर्ता और अन्य सॉफ्टवेयर अनुप्रयोगों के मध्य इंटरफ़ेस का आधार बनता है। इसलिए उबंटू सीखना मूलभूत डिजिटल साक्षरता का गठन करता है।
|
| शैक्षिक अनुप्रयोग तथा प्रासंगिकता
|
उबंटू पर गणित, विज्ञान, सामाजिक विज्ञान, भाषा, आदि से संबंधित बहुत से स्वतंत्र रूप से साझा करने योग्य साधन (टूल्स) उपलब्ध हैं, जिनका उपयोग सभी स्कूलों में किया जा सकता है। इसके अलावा जीएनयू/लिनक्स पर बहुत सारे स्वतंत्र रूप से साझा करने योग्य साधन हैं, जैसे आईबीयूएस जो तेलंगाना में उपयोग की जाने वाली सभी भाषाओं, जैसे तेलगू, उर्दू, कन्नड़, तमिल, मराठी, हिन्दी, आदि सहित 50 से अधिक भाषाओं में वर्ड प्रोसेसिंग में मदद करता है। दृष्टिबाधितों द्वारा कंप्यूटर स्क्रीन पर विषयवस्तु पढ़ने के लिए ओआरसीए स्क्रीन रीडर का उपयोग किया जा सकता है। डेस्कटॉप प्रकाशन के लिए स्क्रिबस का प्रयोग किया जा सकता है।
|
| संस्करण
|
कैनोनिकल छह माह में एक बार उबंटू का एक नया संस्करण जारी करता है। पहली बार उबंटू अप्रैल 2004 में जारी हुआ था। पिछला जारी उबंटू 16.10 (दिसंबर 2016) है, परंतु उबंटू 16.04 नवीनतम एलटीएस (लॉन्ग टर्म स्पोर्ट) संस्करण है, जिसका आप उपयोग करेंगे।
|
| विन्यास
|
अपने कंप्यूटर पर उबंटू को स्थापित करने और उसका उपयोग करने के लिए उसमें निम्नलिखित विन्यास होना चाहिए :
प्रोसेसर : 2 गीगाहर्ट्ज़ द्विक कोर प्रोसेसर या उससे बेहतर
मेमोरी : 1 जीबी रैम (अनुशंसित 2 जीबी)
डिस्क : विकल्पों के आधार पर 30 जीबी का डिस्क स्पेस
ग्राफ़िक्स : यदि आप नेटबुक इंटरफेस का उपयोग करने की सोच रहे हैं तो आपको उबंटू पर 3D त्वरण का समर्थन करने वाले ग्राफिक कार्ड की आवश्यकता होगी।
इंस्टालर मीडिया के लिए एक डीवीडी ड्राइव या एक यूएसबी पोर्ट।
यदि आपका कंप्यूटर ऊपर दिए गए हार्डवेयर के विशेष विवरणों के अनुसार नहीं है या पुराना है, तो लुबंटू ओएस स्थापित करें। लुबंटू निम्न हार्डवेयर विन्यास वाले कंप्यूटरों के लिए उबंटू आधारित वितरण है। लुबंटू एक तेज़ और हल्का संचालन तंत्र है। इसमें निम्न हार्डवेयर आवश्यकताएँ हैं। यहाँ से लुबंटू आईएसओ 32 बीआईटी और यहाँ से 64 बीआईटी डाउनलोड करें।
|
| ऐसे ही अन्य अनुप्रयोग
|
मिंट, डेबियन, ओपन एसयूएसई, और फेडोरा लोकप्रिय लिनक्स वितरण हैं।
|
| मोबाइल और टैबलेट पर अनुप्रयोग
|
उबंटू कुछ चुनिंदा मोबाइल फोन तथा टैबलेट पर उपलब्ध है।
|
| विकास और सामुदायिक सहायता
|
उबंटू उपयोगकर्ताओं की मदद करने वाले कई सामुदायिक मंच हैं।
|
विशेषताओं का संक्षिप्त विवरण
उबंटू किसी संचालन तंत्र से अपेक्षित सभी मूलभूत कार्यों को पूरा करता है।
- यह उपयोगकर्ता को लॉगिन और लॉगआउट करने तथा उस लॉगिन के भीतर उपयोगकर्ता के आँकड़ों को सुरक्षित रखने देता है।
- उपयोगकर्ता एक फाइल ब्राउज़र का उपयोग करके फोल्डरों और फाइलों को ब्राउज़ कर सकते हैं।
- उपयोगकर्ता फाइलें बनाने और उन्हें उपयोग करने के लिए अपने कंप्यूटर पर विभिन्न अनुप्रयोगों का उपयोग कर सकते हैं। इसमें पाठ्यसामग्री, चित्र, ऑडियो, वीडियो, ऐनिमेशन फाइलों को प्राप्त करना, बनाना, संपादित करना शामिल है।
- उपयोगकर्ता अन्य साधनों जैसे प्रिंटर तथा स्कैनर, मोबाइल फोन, पेन ड्राइव, बाहरी हार्डडिस्क और अन्य संचयन युक्तियों, बाहरी डीवीडी लेखकों, आदि से जुड़ सकते हैं।
उपयोगकर्ता इंटरनेट से जुड़ सकते हैं।
उबंटू को जीकॉमप्रिस, केडीई एडूटेनमेंट सूट,उबंटू मेन्यू एडिटर,लिबरेऑफिस,जीनोम नैनी,आदि सहित शिक्षा के लिए प्रासंगिक अनेक अनुप्रयोगों से लाद दिया गया है। उबंटू स्वतंत्र रूप से डाउनलोड करने हेतु उपलब्ध है। एडूबुंटू का डीफॉल्ट जीयूआई यूनीटी है जबकि जीनोम (GNOME) भी उपलब्ध है।
अनुप्रयोग के साथ कार्य करना
अपना कंप्यूटर शुरू करना और बंद करना
- Starting and stopping work on your computer
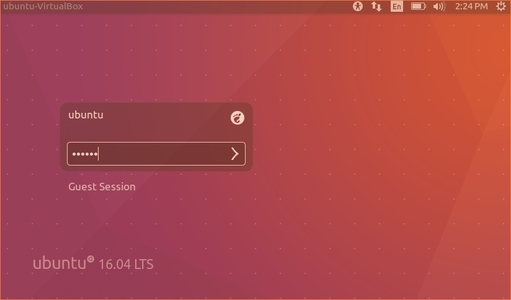
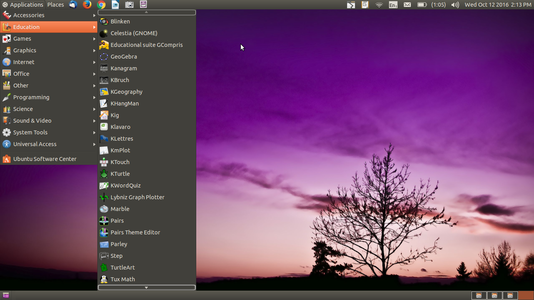
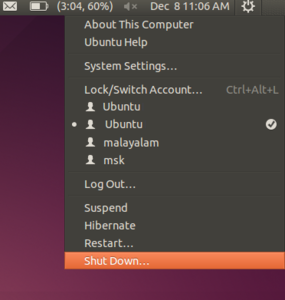
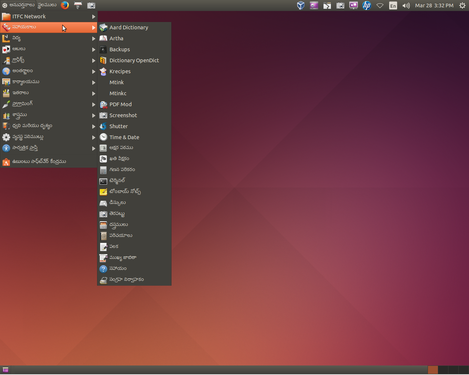
ऊपर दिए गए चित्र आपको मूल उबंटू इंटरफेस दिखाते हैं।
- लॉग इन करना :जब आप अपना कंप्यूटर चालू करते हैं, तो आपको एक लॉगिन स्क्रीन दिखेगी। उपयोगकर्ता की आईडी (नाम) तथा तंत्र प्रशासक द्वारा बनाए गए पासवर्ड के साथ लॉग इन करे। अपनी उपयोगकर्ता आईडी बनाते समय, अपनी भाषा को उपयोगकर्ता की भाषा दर्शाने पर उबंटू आपको अपनी भाषा में उपयोगकर्ता इंटरफेस रखने देता है। एक बार आप लॉग इन कर लेते हैं तो होम स्क्रीन आपके सामने दिखने लगेगी।
- दूसरा चित्र आपको उबंटू होम स्क्रीन दिखाता है। सबसे ऊपर बाईं तरफ़ अनुप्रयोग मेन्यू में आपके कंप्यूटर पर उपलब्ध सारे कार्यक्रमों (ऐप्स) की सूची है। इसके अगला, प्लेसेज़ मेन्यू आपको हार्ड डिस्क, सीडी/डीवीडी या पेन ड्राइव्स सहित आपके कंप्यूटर पर 'प्लेसेज़' (स्थानों) तक पहुँचने देता है। प्लग-इन होने पर डिजिटल कैमरे और एमपी 3 प्लेयर भी यहाँ सूचीबद्ध होते हैं। अनुप्रयोग मेन्यू में शिक्षा, ऑफिस, इंटरनेट, खेलों आदि के लिए उप-मेन्यू होते हैं। प्रत्येक उप-मेन्यू के अनेक अनुप्रयोग होते हैं। आप इन्हें क्लिक करके और विकल्पों को चुनकर स्वयं सीखने की कोशिश कर सकते हैं।
- कंप्यूटर को बंद करना:अपना काम समाप्त करने के बाद आप क्या करेंगे? आपको अपना कंप्यूटर बंद करना होगा। आप दायीं ओर सबसे ऊपर कोने में आखिरी बटन पर क्लिक करके और शट डाउन का चयन कर इसे अवश्य बंद कर दें। कंप्यूटर को सही तरीके से बंद किए बिना पावर बटन को कभी भी बंद न करें।
फोल्डरों और फाइलों का निर्माण और प्रबंधन
- Creating and managing folders and files
Managing files and folders
- फाइलों और फोल्डरों का निर्माण और प्रबंधन – जब आप एक निबंध लिखते हैं या कागज़ पर कोई चित्रकारी करते हैं, तो आप उसे भविष्य के लिए रखना चाहते हैं, ठीक है न? आप शायद गत्ते से बने फोल्डर में इसे रखेंगे। हो सकता है, आपके पास एक से अधिक निबंध या चित्र हैं, तो आपके पास एक फोल्डर निबंधों के लिए और एक आपके चित्र रखने के लिए होगा।
- नया फोल्डर बनाने के लिए अपने माउस पर दायीं ओर क्लिक करें और "नए फोल्डर" पर क्लिक करें। फोल्डर को नया नाम दें और अपनी फाइलें इसमें सहेजें। आप उसके अंदर बहुत सारे उप-फोल्डर भी बना सकते हैं।
- फोल्डरों को सदा अर्थपूर्ण नाम दें,ताक बाद में आप उन्हें आसानी से खोज सकें।
- आप फोल्डर में फोल्डरों और फाइलों क स्थानांतरित कर सकते हैं।
- आप एक अनुप्रयोग खोलकर एक फाइल बना सकते हैं और अपनी पाठ्यसामग्र तैयार करने के लिए नई फाइल बना सकते हैं। आप लिबरेऑफिस राइटर के साथ पाठ्यसामग्र दस्तावेज़ बना सकते हैं,टक्स पेंट आदि के साथ चित्र बना सकते हैं।
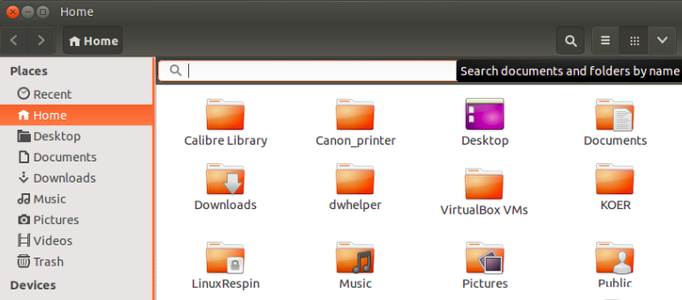
- होम फोल्डर से आप किसी भी फाइल और फोल्डर को खोज सकते है,जो आपने अपने कंप्यूटर पर बनाए हैं। टूलबार पर खोज विकल्प पर क्लिक करें और फाइल या फोल्डर के प्रमुख शब्द टाइप करें। यह आपको आपके कंप्यूटर में उपस्थित आप द्वारा टाइप किए गए प्रमुख शब्दों से संबंधित सभी फाइलें दिखाएगा। यदि आपको अपने द्वारा खोजी जाने वाली फाइल के स्थान का अनुमान है तो आप होम फोल्डर के बजाय उस फोल्डर के भीतर ही खोज कर सकते हैं,यह आपको कम संख्या में फाइलें दिखाएगा।
"ओपन विद" विकल्प क साथ फाइल खोलना
- Opening files with applications
Openwith Multiple Application
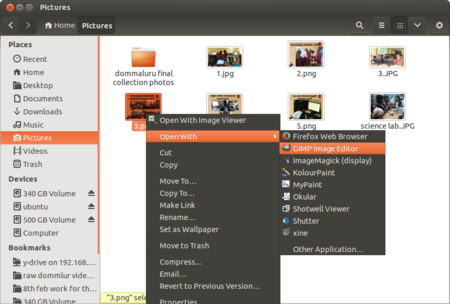
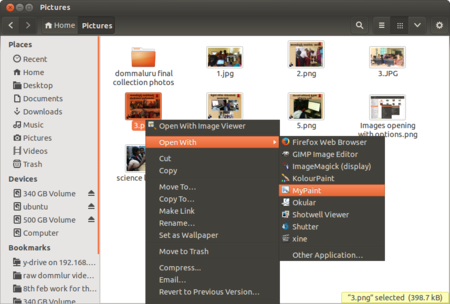
- कोई भी फाइल सामान्यता उबंटू में एक दिए गए अनुप्रयोग से खोली जा सकती है जो उस विशेष फाइल का समर्थन करता है। उदाहरण के लिए, एक चित्र फाइल को इमेज व्युअर(चित्र दर्शक),गिंप आदि द्वारा खोला जा सकता है। अत:यदि आप अपनी पसंद के अनुप्रयोग के साथ खोलना चाहते हैं,तो उपलब्ध विकल्प देखने के लिए"ओपनविद"फाइल चयन पर दायीं ओर क्लिक करें।
- फाइल को उबंटू में दिए गए एकाधिक अनुप्रयोग से खोली जा सकती है,जो उस विशेष फाइल का समर्थन करता है। उदाहरण के लिए, एक चित्र फाइल को इमेज व्युअर (चित्र दर्शक),और गिंप,माइपेंट,कोलोरपेंट,शॉटवेल व्युअर, आदि द्वारा भी खोला जा सकता है। अत:यदि आप अपनी पसंद के अनुप्रयोग के साथ फाइल खोलना चाहते हैं,तो उपलब्ध एकाधिक विकल्प देखने के लिए "ओपनविद" फाइल चयन पर दायीं ओर क्लिक करें।
बाहरी साधन से फाइल और फोल्डर आयात करें
- Access and copy from external device
Copy from external device
- आप अन्य साधनों से फाइलें आयात कर सकते हैं। आप अपने कंप्यूटर में सीडी, डीवीडी या मेमोरी कार्ड जैसे साधन डाल सकते हैं।
- अपने कंप्यूटर में, केबल का उपयोग करते हुए पेन ड्राइव, मेमोरी कार्ड होल्डर, बाहरी डीवीडी ड्राइव जैसे साधन जोड़ें।
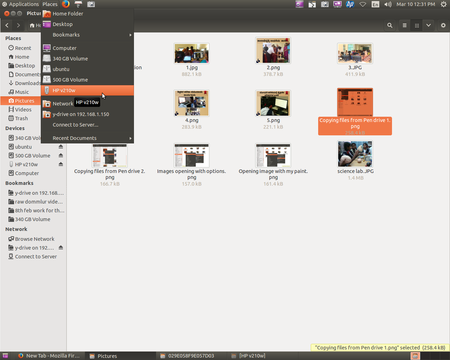
- अपने डेस्कटॉप पैनल से "प्लेसेज" पर क्लिक करें। आप अपने साधन (डिवाइस) का नाम देख सकते हैं।
- साधन से फाइल देखने के लिए अपने साधन के नाम पर क्लिक करें।
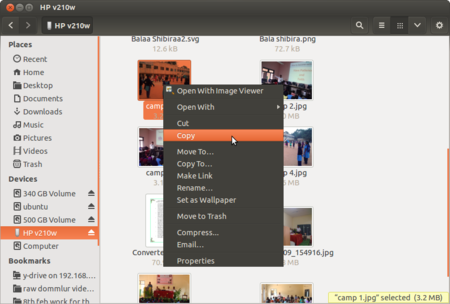
- साधनों से फाइलों का आयात करने के लिए,उस फाइल पर दायीं ओर क्लिक करें और "कॉपी" पर क्लिक करें,फिर अपने कंप्यूटर के फोल्डर पर चिपका दें। आप अपने कंप्यूटर पर ऑडियो और वीडियो फाइलों की नकल कर सकते हैं,जिन्हें आपने अपने मोबाइल फोन पर रिकॉर्ड किया है। आप इन फाइलों का संपादन भी कर सकते हैं। इसी तरह,आप इन फाइलों और अन्य फाइलों को अपने कंप्यूटर से अपने मोबाइल फोन पर कॉपी कर सकते हैं।
आपको समय समय पर अपने कंप्यूटर पर महत्वपूर्ण फाइलों का बैकअप लेते रहें और एक पेन ड्राइव या बाहरी हार्ड डिस्क में संग्रहित कर लेना चाहिए। ताकि यदि आपके कंप्यूटर की हार्ड डिस्क में कोई समस्या हो या वह नष्ट हो जाए तो आप अपने सारे आँकड़े नहीं खोएँगे।
उबंटू में उपयोगकर्ता इंटरफ़ेस भाषा बदलना
उबंटू में अँग्रेज़ी डिफ़ाल्ट इंटरफ़ेस होगी,परंतु आप उबंटू को अपनी स्थानीय भाषा जैसे हिन्दी,तेलुगू,कन्नड़ या तमिल में भी उपयोग में ले सकते हैं।
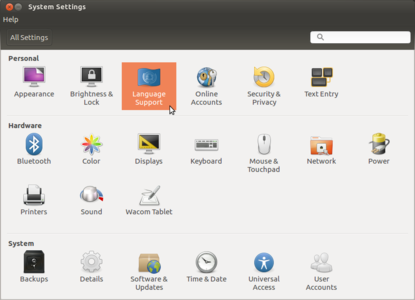
Select Language support from System settings
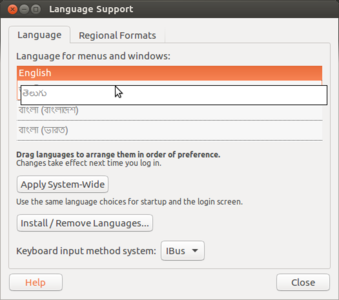
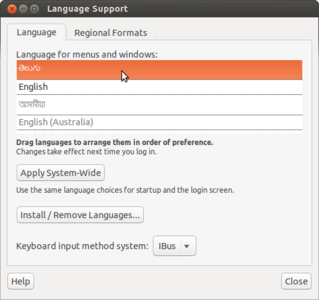
Changing language from English to Telugu
- To get started, goto Applications -> System tools -> System settings -> Language support.
- It may ask you to update or add components to your current default language when you first open the dialog. If you do not have internet connect then click "Remind Me Later" and If you have good internet connection, select install to update your language lists.
- Now we are ready to change our Ubuntu interface language. Find your new language in the list, and then click and drag it to the top of the list and click Apply System-Wide.
- Once you have set you language as first and click on "system-wide", you will need to log out of your account and log in to see your new interface language.
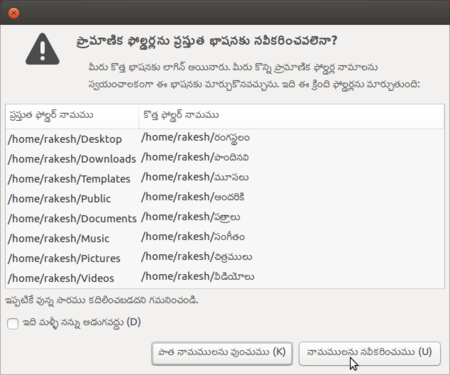
5. Ubuntu may ask if you want to update your user folders names to your new language, Select Rename folder option.
Adding software applications to your computer system
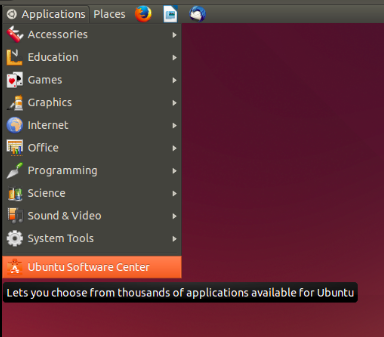 Ubuntu software centre You can add many more FOSS applications to your computer. Select the "Ubuntu software centre" - You can download applications from the Internet. Teachers can explore new FOSS educational tools and utilities.
Go to Applications > System Tools -> Software. You will need to type the required application name in the search bar. It will show all applications with the words you have entered and you will get an option for "Install". Click on "install" if you want to install the application. If your search does not get the application(s) you want, try with fewer letters / words to search.
It may ask your Ubuntu log in password for authentication, just type your Ubuntu password press enter.
If you have doubts or difficulties in using the Ubuntu operating system or any of the applications, you can search for solutions on the Internet using a search engine or refer to 'Frequently asked questions'.
Saving the files and formats
Not applicable
Adding your languages to type in Ubuntu
In Ubuntu by default you can type English in any application and by default it will use only Unicode fonts unless you manually changing it to non-unicode.
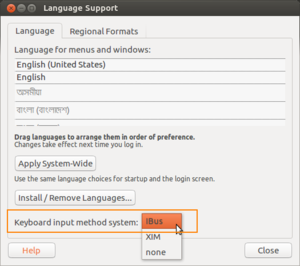 Selecting Ibus for typing languages
- Go to Applications -> System tools -> System Settings -> Language Support ->Look at the Keyboard input method system Select IBus and close the window.
- Log-out your computer and log-in to applying this changes.
Now you have to add your languages in "Text Entry" to type it. You can type multiple language in any application by adding it in this list.
- Adding languages in Text Entry
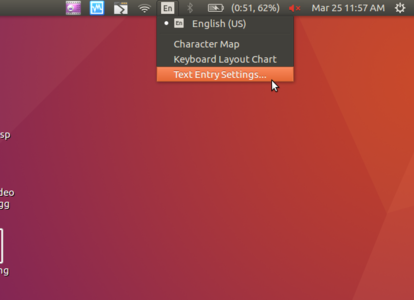
Selecting Text Entry from the top panel
Adding languages in Text Entry
Adding Telugu to my language list
- Click on "En" from the top panel and select "Text Entry".
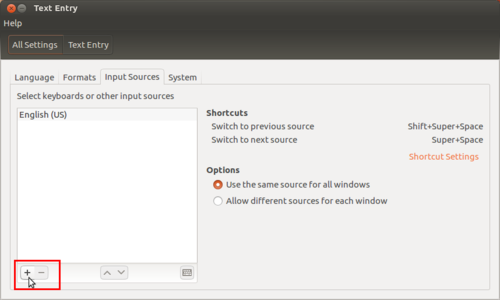
- Once the Text Entry window opens, click on "+" arrow mark, as shown in image.
- The language list window will open, search your languages by typing it in search box. It will show the all the typing methods for the language. Choose a keyboard layout you are comfortable with and click "Add".
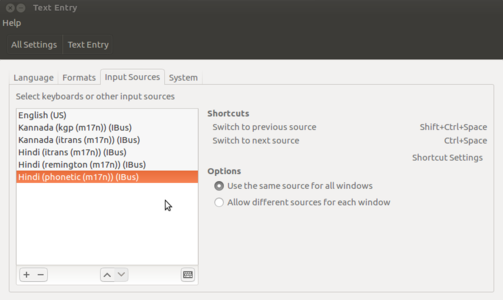
- Yes, you are finished all the set up, after this your language list looks like below.
- Adding languages in Text Entry
Added Telugu 3 typing methods
Now it time to type type your added language in most of the applications. Click on the language panel "En" (right top corner of the screen) and select language in which you want to type. When you select language, icon will change to that language. The very important is you can add multiple languages in this list.
Advanced features
Ubuntu contains a wide range of software that includes LibreOffice, Firefox, Thunderbird and several games and Educational tools. Many additional software packages are accessible from the built in Ubuntu Software Center. More complex commands can be given to the computer using the 'Terminal' interface, this is really for those who have technical expertise.
Installation
Hardware requirement for Ubuntu installation
- Dual core processor and above
- 2 GB RAM (system memory)
- 30 GB of hard-drive space (or USB stick, memory card or external drive but see LiveCD for an alternative approach)
- Either a CD/DVD drive or a USB port for the installer media
To install Ubuntu into different version OS, please refer document for detail steps.
Telugu
Telugu Video produced by Balaji Sir, UPS Kondapur, Telangana.
|
Kannada
|
Steps to install Ubuntu
- Using a DVD?
It’s easy to install Ubuntu from a DVD. Here’s what you need to do: Put the Ubuntu DVD into the DVD-drive Restart your computer. You should see a welcome screen prompting you to choose your language and giving you the option to install Ubuntu or try it from the DVD.
- Using a USB drive?
Most newer computers can boot from USB. You should see a welcome screen prompting you to choose your language and giving you the option to install Ubuntu or try it from the USB. If your computer doesn’t automatically do so, you might need to press the F12 key to bring up the boot menu, but be careful not to hold it down - that can cause an error message.
- Prepare to install Ubuntu- We recommend you plug your computer into a power source
- Enough space You should also make sure you have enough space on your computer to install Ubuntu. We advise you to select Download updates while installing and Install this third-party software now You should also stay connected to the internet so you can get the latest updates while you install Ubuntu If you are not connected to the internet, you will be asked to select a wireless network, if available. We advise you to connect during the installation so we can ensure your machine is up to date
- Allocate drive space- Use the check boxes to choose whether you’d like to Install Ubuntu alongside another operating system, delete your existing operating system and replace it with Ubuntu, or — if you’re an advanced user — choose the ’Something else’ option
- Begin the installation Depending on your previous selections, you can now verify that you have chosen the way in which you would like to install Ubuntu. The installation process will begin when you click the Install Now button. Ubuntu needs about 4.5 GB to install, so add a few extra GB to allow for your files.
- Select your location- If you are connected to the internet, this should be done automatically. Check your location is correct and click ’Forward’ to proceed. If you’re unsure of your time zone, type the name of the town you’re in or click on the map and we’ll help you find it. Select your preferred keyboard layout Click on the language option you need. If you’re not sure, click the ’Detect Keyboard Layout’ button for help.
- Enter your login and password details
After this, Install process will get start and it may take 20-40 min to complete. once its done it will ask you to remove the device and restart that system.
After login into you Ubuntu and if it is not showing Applications and places menu option, you just logout from your user and click on the Ubuntu icon (in front of your user name)
- Opening kdenlive from menu option
Ubuntu login screen-gnome.png
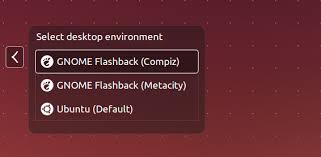
Click on Ubuntu icon from login screen
Change to Gnome classic compize or metacity
and here select the Gnome flashback(metacity) and now login to your username with password. see the below gif for your reference.
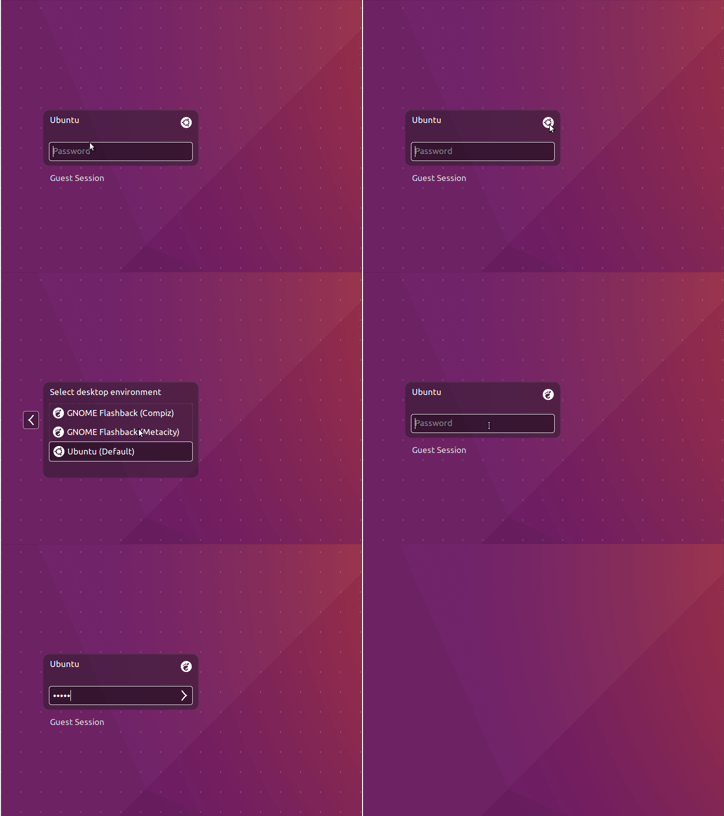
NOTE: If you are not able to find any icons in the login screen, means you need to install this gnome flashback packages to get Applications, places menu. Follow the below steps to install it in your ubuntu computer.
You have to use terminal for installing this application. Applications -> System tools -> Terminal or key board shortcut Ctrl+Alt+T.
- Once terminal window is open, in front of dollar($) symbol just type below command.
- sudo apt update && sudo apt-get install kdenlive
- Then, just type your ubuntu password(it will not display on your screen), press Enter.
After you complete the installation, follow the above steps to switch to gnome.
References
- Ubuntu releases
- Ubuntu LTS
- Wikipedia
- Kalpavriksha
|

