Difference between revisions of "Learn Audacity"
| (149 intermediate revisions by 7 users not shown) | |||
| Line 1: | Line 1: | ||
| + | ''[http://karnatakaeducation.org.in/KOER/index.php/%E0%B2%85%E0%B2%A1%E0%B2%BE%E0%B2%B8%E0%B2%BF%E0%B2%9F%E0%B2%BF_%E0%B2%95%E0%B2%B2%E0%B2%BF%E0%B2%AF%E0%B2%BF%E0%B2%B0%E0%B2%BF ಕನ್ನಡದಲ್ಲಿ ನೋಡಿ]'' | ||
{{Template:Book-sidebar}} | {{Template:Book-sidebar}} | ||
| − | =Introduction= | + | ===Introduction=== |
| − | Audacity is a free and open source | + | Audacity is a free and open source multi-track audio editor and recorder. Audacity is a high-quality sound recording application, designed to be easy to use. It works on GNU/Linux, Windows, Mac OS X and other operating systems. We recommend Audacity to most computer users, because it is simple and has many features and capabilities |
| − | + | ====Basic information==== | |
| − | |||
| − | |||
| − | |||
| − | |||
| − | |||
| − | |||
| − | |||
| − | |||
| − | |||
| − | |||
| − | |||
| − | |||
| − | |||
| − | |||
| − | |||
| − | |||
| − | |||
| − | |||
| − | |||
| − | |||
| − | |||
| − | |||
| − | |||
| − | |||
| − | == | ||
| − | |||
| − | |||
| − | = | ||
| − | == | ||
{| class="wikitable" | {| class="wikitable" | ||
|- | |- | ||
| − | | | + | |ICT Competency |
| − | | | + | |It is a generic audio resource creation and editing tool. |
|- | |- | ||
| − | | | + | |Educational application and relevance |
| − | + | |You can use this tool to create own voice recordings, modify existing audio recordings as per your academic requirements. You can mix multiple audio's together to create educational resources. | |
|- | |- | ||
| − | | | + | |Version |
| − | + | |Audacity Version 3.1.3 | |
|- | |- | ||
| − | | | + | |Other similar applications |
| − | + | | | |
| − | + | # [https://ocenaudio.com OcenAudio] is a cross-platform audio editor. | |
| + | # [https://www.wavosaur.com/ Wavosaur] is a free audio editor software for editing, processing and recording sounds, wav and mp3 files | ||
| + | # [https://traverso-daw.en.softonic.com/ Traverso DAW] is an audio recording and editing program which is very well suited to record a single voice, a band, an ensemble, a whole orchestra or any other source of music! | ||
| + | Ardour, Qtractor, or Rosegarden tools can be used for audio resource creation. | ||
|- | |- | ||
| − | | | + | |The application on mobiles and tablets |
| − | + | |[https://f-droid.org/repo/com.ringdroid_20703.apk Ringdroid using Fdroid] | |
| + | [https://play.google.com/store/apps/details?id=com.nchsoftware.mixpad_free&hl=en Mixpad Free for Android] | ||
|- | |- | ||
| − | | | + | |Development and community help |
| − | + | |[http://audacityteam.org/help/documentation/ Audacity Team] | |
| − | |||
| − | |||
| − | |||
| − | |||
| − | |||
| − | |||
| − | |||
| − | |||
| − | |||
|} | |} | ||
| − | ==File | + | ====Overview of Features==== |
| + | Audacity features importing and exporting of various audio formats such as wav, aiff, mp3, ogg, vorbis. It enables to record and playback sounds. Sound effects can be added in variety of ways. Editing is possible via cut, copy, and paste, with unlimited levels of undo. It supports multitrack features including navigation controls, zoom and single-track edit, project pane, audio file manipulation etc. | ||
| + | |||
| + | ====Installation==== | ||
| + | |||
| + | ===== For Ubuntu OS ===== | ||
| + | #The application is part of the Ubuntu custom distribution. | ||
| + | #In case you do not find it on your computer, you can install by typing <code>Audacity</code> on the top search bar in the Software Center. | ||
| + | #If you would like to install through the terminal follow these steps below: | ||
| + | ##Open terminal by clicking "Applications --> System Tools --> Terminal" or through Keyboard shortcut <code>Ctrl+Alt+T</code> | ||
| + | ##In the terminal window, type below command and press enter to start the installation by providing your machine password: | ||
| + | ##<code>sudo apt-get install audacity</code> | ||
| + | =====For Windows OS ===== | ||
| + | # To install Audacity in Windows OS click [https://www.audacityteam.org/download/windows/ this link] and click on "Audacity windows Installer" to download .exe file, save this file in your computer. | ||
| + | # You can save Audacity executable (.exe) to your desktop or to a folder. | ||
| + | # Double-click on Audacity executable to begin the installation. | ||
| + | # Click "Yes" when asked. "Do you want to allow this app from an unknown publisher to make changes to your PC?". | ||
| + | # Choose "English" when asked to select the language to use during installation and click "OK". | ||
| + | # Close any other opened programs before clicking "Next" in the audacity Installation window. | ||
| + | # Read the information section on licenses, Click "Next" | ||
| + | # Click "Next" on the Select Destination installer window, Click "Next" in the "Desktop Icon" screen. | ||
| + | # Click "Install" The installation wizard will now show a progress bar during the installation | ||
| + | {{Note}} After you installed Audacity in your windows computer, you need to [https://drive.google.com/file/d/13ScfBeZcgFUtpMbHiOyjDNpsLZ-P9iRk/view?usp=sharing install this] .mp3 plugin to export your audio in mp3 format. Without installing this you will not be able to export audio in .ogg, .wav and any other audio format | ||
| + | =====For MAC OS ===== | ||
| + | # click on [https://www.audacityteam.org/download/mac/ this link] to download audacity installable file and save this file in your computer. | ||
| + | # Once the download is completed and the downloaded file has been saved in your Downloads folder, double-click the DMG file to mount it. (Some browsers may offer the option to automatically open the DMG file for you.) | ||
| + | # Drag the Audacity.app icon rightwards onto the Applications folder shortcut. | ||
| + | # You can also drag Audacity.app out of the DMG to any other location. You need the administrator password to copy Audacity to Applications. | ||
| + | # Launch Audacity.app from Applications or from your chosen location. | ||
| + | '''Note:''' Recent installation of Audacity requires a supporting application to be setup along with the Audacity named "FFMpeg". Otherwise it might produce some errors during importing or exporting the audio from or to different formats. | ||
| + | |||
| + | FFmpeg allows the user to import or export additional audio file formats into / from Audacity. | ||
| + | |||
| + | To know how to install and configure FFMpeg in your system, [https://support.audacityteam.org/basics/installing-ffmpeg click here]. | ||
| + | |||
| + | ===Working with the application=== | ||
| + | You need an audio interface to use Audacity. If you will record audio with Audacity, you must have at least one microphone connected to your audio interface and you need speaker to listen and edit existed audio file. | ||
| + | ====Obtaining Audio from different sources==== | ||
| + | Audio files can be obtained from many different sources such as audio recorders in phone, camera, or laptops devices and transferred to a laptop to edit them using Audacity. The audio recording in laptops can be done using Audacity which is explained in "Step 3" Screenshot. | ||
| + | |||
| + | ==== Testing the Mic and Speaker ==== | ||
| + | * Since Audacity deals with recording, we need to take care of the Mic and Speaker settings first. A very simple method to check and monitor the audio levels in the Audacity software is as follows. | ||
| + | <gallery mode="packed" heights="200"> | ||
| + | File:Mic Setting in Audacity.png|Monitoring Audio levels | ||
| + | File:Audacity Mic Testing fine.png|Showing input levels | ||
| + | </gallery> | ||
| + | * In the above picture you can observe there is an option near the toolbar that is, "Click to Start Monitoring". Once you click on that it will show you the levels of Mic audio. At this time, you can try your mic by speaking something just to verify your hardware peripheral is working fine. If the levels in audio varies that means the device is working without any issue. If the levels are not varying then there must be some issue with your hardware. | ||
| + | * To test the speaker you can look at the levels in right side of this "Mic monitoring". If your output device and all its settings are well and good then it shows the levels of output audio. | ||
| + | {{Clear}} | ||
| + | |||
| + | ====Recording with Audacity==== | ||
| + | <gallery mode="packed" heights="250px"> | ||
| + | File:Audacity_1_Option_Menu_To_Open.png|Step 1 -This can be opened from Applications --> Sound & Video --> Audacity | ||
| + | File:Audacity_2_Main_Window.png|Step 2 - When you open the Audacity application, it will show the window as above | ||
| + | File:Audacity 3 Start Record.png|Step 3 - Recording and other tools | ||
| + | </gallery> | ||
| + | To start recording, click the "Red record" button in the Toolbar as shown in the left image. Begin talking or playing any audio and continue for as long as you want. When you feel you've recorded enough, click the "Yellow stop" button. Until you stop the recording, other functions on the Menu and Toolbar will be disabled. You can record audio playing on your computer itself, or playing in another external audio device. | ||
| + | |||
| + | |||
| + | |||
| + | ==== Importing audio and multiple tracks ==== | ||
| + | Audacity allows you to import more than one tracks to the audio thereby making your audio more effective and attractive. | ||
| + | |||
| + | For example, If you are narrating a story, effects related to the elements of the story can be added at the required positions. Even the background music can be added which does not make your audio boring.<gallery mode="packed" heights="300px"> | ||
| + | File:Audacity_4_Add_New_track.png|Audio track and adding new track | ||
| + | File:Audacity 5 Multipal Track.png| Multiple tracks | ||
| + | </gallery> | ||
| + | |||
| + | * To import audio, click "File --> Import --> Audio" from the menu as shown in the first image above. Choose the music file from your computer, and then click on "Open". Once you import an audio clip it will appear in Audacity as an audio track as you can see in the second image. | ||
| + | * If you want to add multiple tracks, you can do so by clicking on "Tracks --> Add new --> Audio track" from the Menu as shown in the same second image. With the use of multiple tracks, you can record and at the same time import several audio tracks to work in Audacity as shown in the third image above. | ||
| + | |||
| + | See below animation to know the steps to import second track. [[File:Import_2nd_audio_track_to_Audacity.gif|alt=|center]] | ||
| + | <br> | ||
| + | |||
| + | ==== Basic audio editing ==== | ||
| + | <gallery mode="packed" heights="300px"> | ||
| + | File:Audacity 6 Delete middle Song.png|Selection of Audio | ||
| + | </gallery> | ||
| + | |||
| + | <gallery mode="packed" heights="300px"> | ||
| + | File:Cut selected audio clip for moving to other place - audacity.png|Cutting selected audio | ||
| + | File:Paste selected audio clip to other place - audacity.png| Pasting selected audio | ||
| + | </gallery> | ||
| + | Similar to how we do cut (or copy) paste a selection of text in a text document, we can cut (copy) and paste a selection of audio in an audio file in Audacity. To delete a part of the track, we can select the area of the track we wish to delete as shown in the first image above and then press "Delete" key on the keyboard to delete. To move a part of the audio to another place on the same track or to another track, we need to select it first as we did before and then click on the cut icon on the toolbar as shown in the second image. Then the same audio can be pasted by clicking on the paste icon on the toolbar as shown in the third image above. The usual keyboard shortcuts for "Cut" (<code>Ctrl+X</code>), "Copy" (<code>Ctrl+C</code>) and "Paste" (<code>Ctrl+V</code>) will also work on Audacity. Once you are done with editing, the final audio can be exported to any audio format from the Menu by clicking on "File -->Export" and then "Save". | ||
| + | |||
| + | ==== Repeat an Already-Recorded Segment ==== | ||
| + | You can repeat a segment of audio that is already recorded. | ||
| + | # Click "Selection Tool", then select a portion of audio. | ||
| + | # Choose "Edit --> Copy" or press Ctrl+C in your keyboard. | ||
| + | # Click in a track near where you want the copy to start playing. | ||
| + | # Choose "Edit --> Paste" or press Ctrl+V in your keyboard. | ||
| + | # You can repeat this steps to repeat as many times you want, by using copy, paste feature. | ||
| + | |||
| + | ==== Zoom in and Zoom out tracks ==== | ||
| + | <gallery mode="packed" heights="300"> | ||
| + | File:Audacity Zoom in Zoom out.png|Zoom in Zoom out tool | ||
| + | </gallery> | ||
| + | Sometimes it may be required to zoom in and zoom out the particular segment in the audio. To do this, there is an option in toolbar icon for both as marked in the image. You can keep on click '+' to zoom in and '-' to zoom out respectively. | ||
| + | |||
| + | ==== Adjusting the volume of the audio ==== | ||
| + | Occasionally, you may find that recordings are either too quiet or of poor quality once you come to edit them. This can be remedied to a certain degree in Audacity. | ||
| + | <gallery mode="packed" heights="250px" caption="Increase your recorded volume by using amplify feature"> | ||
| + | File:Audacity - amplify audio 0.png|Select amplify tool from effect menu | ||
| + | File:Audacity - amplify audio 1.png| Select "allow clipping" to increase the volume | ||
| + | </gallery> | ||
| + | To amplify the clip select the track which you want to increase (amplify) the volume, go to "Effect" tab from the top of the screen and choose "Amplify" from the drop-down menu and Finally, use the slider in the new dialogue box to tell Audacity how much you wish to amplify your clip and click "OK" to apply. | ||
| + | [[File:Audacity Amplifynew.gif|thumb|alt=|center|900x900px]] | ||
| + | |||
| + | You have to select "Allow clipping" to increase the volume. See below animation to use amplify function to adjust the volume, <br> | ||
| + | ====Changing the Pitch, Speed and Tempo==== | ||
| + | Pitch change option changes the pitch of your original recording without changing its speed. This is useful when you have some conversation in your recording involving more than one person. You can make your normal voice to be a magnetic voice, cartoon voice, male to female voice and viceversa and many more depending on the value given as input. | ||
| + | |||
| + | Change Speed option changes the speed of a selection which affects its tempo, pitch and frequency. When reducing speed, all frequencies become lower. When increasing speed, all frequencies become higher. | ||
| + | |||
| + | Change Tempo option changes the tempo and thus the length or duration of a selection, without changing its pitch. | ||
| + | |||
| + | Basic difference between Speed and Tempo is that Speed affects the pitch whereas Tempo does not!<gallery mode="packed" heights="250px"> | ||
| + | File:Change Pitch1.png|Changing the Pitch | ||
| + | File:Change Tempo1.png|Changing the Tempo | ||
| + | </gallery> | ||
| + | '''Pitch:''' Audacity allows you to change the pitch of the entire audio or a part of it. You can directly mention the percentage of change which the music file expects or can change if having some basic idea of pitch notes in music. For changing the pitch you can click on "Effects--> Change pitch". In the dialogue box you can simply increase and decrease the slider to change the pitch. You can preview the changes you made to the portion of the audio by clicking on "Preview", Click "OK" if changes are final. | ||
| + | |||
| + | '''Speed:''' You can change the speed of the audio by clicking on "Effects-->Change Speed". It shows the multiplier column where you can put the value and those much of time audio gets the speed also you can move the slider to adjust the speed. You can preview the changes you made to the portion of the audio by clicking on "Preview", Click "OK" if changes are final. | ||
| + | |||
| + | '''Tempo:''' You can also change the tempo of the audio by clicking on "Effects -->Change Tempo". It also shows the multiplier option, beats per minute and Length of the selected portion options. Here you can change according to your needs and You can preview the changes you made to the portion of the audio by clicking on "Preview", Click "OK" if changes are final. | ||
| − | == | + | ====Adding Echo Effect to the music==== |
| − | + | <gallery mode="packed" heights="350px"> | |
| − | You can | + | File:Echo effect.png|Adding Echo Effect |
| + | </gallery> | ||
| + | {{clear}} | ||
| + | You can include Echo effect on to your audio by clicking on "Effects-->Echo". Delay Time indicates the amount of delay between the echoes, Delay Factor increases or decreases the amplitude or loudness of the each echo. | ||
| − | == | + | ==== Removing noise ==== |
| − | + | Noise is part of an audio signal that is not the intended signal. When you listen to music on the radio, you can hear the music, and usually also some noise. When computers record or play audio, the electronic components sometimes create extra noise. Sometimes it can be your background noise recorded your audio. | |
| − | == | ||
| − | |||
| − | |||
| − | |||
| − | |||
| − | |||
| − | |||
| − | |||
| − | = | + | In order to remove ‘noise,’ we must first tell Audacity what the ‘noise’ sounds. Do this by selecting a portion of the audio where nobody is talking and noise has recorded – like a break in the conversation, so you just get the ‘noise’. |
| − | + | ||
| − | |- | + | <gallery mode="packed" heights="300px" caption="Remove noise by using noise reduction option"> |
| − | + | File:Audacity - noise reduction 1.png|Select Noise reduction tool from effect menu | |
| − | + | File:Audacity - noise reduction - click OK 2.png|Select get noise profile and select OK | |
| − | + | </gallery> | |
| − | + | # Choose "Effect --> Noise Removal". The "Noise Removal" window appears. Click Get Profile. The Noise Removal tool uses the selected audio as an example of the noise to remove. | |
| − | + | # Select the whole track. | |
| − | + | # Open the "Noise Removal" window. Click "OK". The Noise Removal tool processes the audio. The Noise Removal tool is not effective in this example because most of the signal is noise. | |
| − | + | ||
| − | + | ==== Fade a section in or fade it out ==== | |
| − | + | Audacity has tools to fade in and out. When you "fade in," it means to gradually increase the volume level from silence to the original level. When you "fade out," it means to gradually decreased the volume level from the original level to silence. Professional recordings of concerts often fade out after a song, while the audience applauds. Fading out avoids an abrupt stop at the end of the recording, because the volume level is decreased gradually to silence. | |
| − | + | ||
| − | + | <gallery mode="packed" heights="200px" caption="Add fade in or fade out for your track"> | |
| − | = | + | File:Audacity - fade in.png|After added fade in for the track |
| − | + | File:Audacity -fade out.png|After added fade out for the track | |
| + | </gallery> | ||
| + | # Click "Selection Tool", then select a portion of audio to fade in or out. | ||
| + | # Choose "Effect --> Fade In" or "Effect --> Fade Out". | ||
| + | Generally fade in at the beginning of an audio segment, and fade out at the end of an audio segment. You can use Audacity to create special effects if you fade in or fade out in the middle of an audio segment. You can make a surprising effect by setting Audacity to fade in or out over a few second, then adding the opposite fade inside the first fade. | ||
| + | ==== Saving and exporting to different formats ==== | ||
| + | Audacity saves its data in a format that only Audacity can use. Audacity saves more information than just the audio files, and this information cannot be stored in conventional audio files like OGG, MP3, or WAV. | ||
| + | |||
| + | When you want to share your work, or use it in another application, you must export it. When you "export" audio, Audacity converts the Audacity-only file into a conventional audio file. Audacity does not delete the original Audacity-only file, but the exported file cannot be converted into the Audacity-only format. | ||
| + | # Save Project: All the edits including files can be saved in uncompressed, lossless quality using the "''AUP"'' format. An "''AUP"'' project file is created, along with a folder with the same name as the AUP file that contains the project's audio data. For example, if you save a project as <code>independence day.aup</code>, a folder called <code>independence day_data</code> will contain the audio data. We can save the "AUP" project file with keyboard <code>Ctrl+S</code> shortcut or through "File --> Save Project" from the Menu. | ||
| + | # Export Audio: Audio can be exported to many formats such as mp3, ogg, wav. According to your need you can export the audio. | ||
| + | <gallery mode="packed" heights="300"> | ||
| + | File:Audacity Exporting options.png|Exporting to various formats | ||
| + | </gallery> | ||
| + | # Choose "File --> Export'''"'''. | ||
| + | # Select the format, filename, and directory of the audio that will be exported. Click "Save" when you are finished. | ||
| + | # Depending on which format you choose, the "Metadata" window appears. You can input this information if you wish (Don't forget mention creative common license under the comment section. In this way you will other to reuse your audio). Metadata basically contains information about the Audio that is exported. Artist name, Track title, Album title, Track number, Year, Genre and Comments are included here. They are optional. | ||
| + | # Audacity processes the audio to export. This may take some time, depending on the audio. | ||
| + | List of all available export formats supported by Audacity can be found [http://manual.audacityteam.org/man/export_formats_supported_by_audacity.html here]. | ||
| + | |||
| + | ==== Advanced features ==== | ||
| + | Audacity is a full-fledged audio editor which has many advanced features. Click [http://manual.audacityteam.org/man/tutorials.html This page] which lists tutorials that provide step-by-step instructions for performing all the interesting things with audio in Audacity. | ||
| + | |||
| + | === Ideas for resource creation === | ||
| + | This tool can be used to create own voice recordings, modify existing audio as per academic requirements and to mix multiple audio files together to create educational resources. | ||
| − | + | === References === | |
| − | = | + | # [[Wikipedia:Audacity_(audio_editor)|Audacity Wikipedia page]] |
| − | + | # [http://manual.audacityteam.org/index.html#using Audacity Manual] | |
| + | # [https://www.gloucestershire.gov.uk/media/1889/editing_sound_files_with_audacity-62400.pdf gloucestershire.gov.uk] | ||
| − | = | + | === Video Tutorials === |
| − | + | {{#widget:YouTube|id=HZ569xmD4bc|height=250|width=400}} | |
| − | + | {{#widget:YouTube|id=Aczy5WpzZMg|height=250|width=400}} | |
| + | {{#widget:YouTube|id=CvujzGWhYP8|height=250|width=400}} | ||
| + | {{#widget:YouTube|id=hWF1Gw-h_2E|height=250|width=400}} | ||
[[Category:Explore an application]] | [[Category:Explore an application]] | ||
Latest revision as of 11:55, 6 May 2024

Introduction
Audacity is a free and open source multi-track audio editor and recorder. Audacity is a high-quality sound recording application, designed to be easy to use. It works on GNU/Linux, Windows, Mac OS X and other operating systems. We recommend Audacity to most computer users, because it is simple and has many features and capabilities
Basic information
| ICT Competency | It is a generic audio resource creation and editing tool. |
| Educational application and relevance | You can use this tool to create own voice recordings, modify existing audio recordings as per your academic requirements. You can mix multiple audio's together to create educational resources. |
| Version | Audacity Version 3.1.3 |
| Other similar applications |
Ardour, Qtractor, or Rosegarden tools can be used for audio resource creation. |
| The application on mobiles and tablets | Ringdroid using Fdroid |
| Development and community help | Audacity Team |
Overview of Features
Audacity features importing and exporting of various audio formats such as wav, aiff, mp3, ogg, vorbis. It enables to record and playback sounds. Sound effects can be added in variety of ways. Editing is possible via cut, copy, and paste, with unlimited levels of undo. It supports multitrack features including navigation controls, zoom and single-track edit, project pane, audio file manipulation etc.
Installation
For Ubuntu OS
- The application is part of the Ubuntu custom distribution.
- In case you do not find it on your computer, you can install by typing
Audacityon the top search bar in the Software Center. - If you would like to install through the terminal follow these steps below:
- Open terminal by clicking "Applications --> System Tools --> Terminal" or through Keyboard shortcut
Ctrl+Alt+T - In the terminal window, type below command and press enter to start the installation by providing your machine password:
sudo apt-get install audacity
- Open terminal by clicking "Applications --> System Tools --> Terminal" or through Keyboard shortcut
For Windows OS
- To install Audacity in Windows OS click this link and click on "Audacity windows Installer" to download .exe file, save this file in your computer.
- You can save Audacity executable (.exe) to your desktop or to a folder.
- Double-click on Audacity executable to begin the installation.
- Click "Yes" when asked. "Do you want to allow this app from an unknown publisher to make changes to your PC?".
- Choose "English" when asked to select the language to use during installation and click "OK".
- Close any other opened programs before clicking "Next" in the audacity Installation window.
- Read the information section on licenses, Click "Next"
- Click "Next" on the Select Destination installer window, Click "Next" in the "Desktop Icon" screen.
- Click "Install" The installation wizard will now show a progress bar during the installation
![]() Note: After you installed Audacity in your windows computer, you need to install this .mp3 plugin to export your audio in mp3 format. Without installing this you will not be able to export audio in .ogg, .wav and any other audio format
Note: After you installed Audacity in your windows computer, you need to install this .mp3 plugin to export your audio in mp3 format. Without installing this you will not be able to export audio in .ogg, .wav and any other audio format
For MAC OS
- click on this link to download audacity installable file and save this file in your computer.
- Once the download is completed and the downloaded file has been saved in your Downloads folder, double-click the DMG file to mount it. (Some browsers may offer the option to automatically open the DMG file for you.)
- Drag the Audacity.app icon rightwards onto the Applications folder shortcut.
- You can also drag Audacity.app out of the DMG to any other location. You need the administrator password to copy Audacity to Applications.
- Launch Audacity.app from Applications or from your chosen location.
Note: Recent installation of Audacity requires a supporting application to be setup along with the Audacity named "FFMpeg". Otherwise it might produce some errors during importing or exporting the audio from or to different formats.
FFmpeg allows the user to import or export additional audio file formats into / from Audacity.
To know how to install and configure FFMpeg in your system, click here.
Working with the application
You need an audio interface to use Audacity. If you will record audio with Audacity, you must have at least one microphone connected to your audio interface and you need speaker to listen and edit existed audio file.
Obtaining Audio from different sources
Audio files can be obtained from many different sources such as audio recorders in phone, camera, or laptops devices and transferred to a laptop to edit them using Audacity. The audio recording in laptops can be done using Audacity which is explained in "Step 3" Screenshot.
Testing the Mic and Speaker
- Since Audacity deals with recording, we need to take care of the Mic and Speaker settings first. A very simple method to check and monitor the audio levels in the Audacity software is as follows.
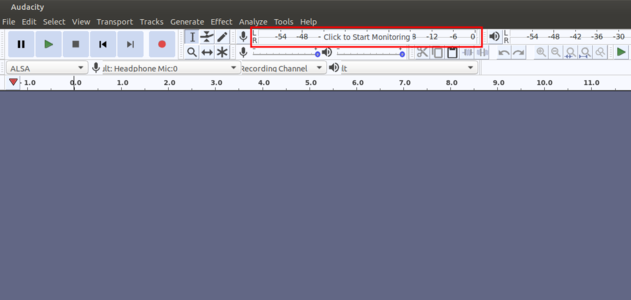
Monitoring Audio levels

Showing input levels


- In the above picture you can observe there is an option near the toolbar that is, "Click to Start Monitoring". Once you click on that it will show you the levels of Mic audio. At this time, you can try your mic by speaking something just to verify your hardware peripheral is working fine. If the levels in audio varies that means the device is working without any issue. If the levels are not varying then there must be some issue with your hardware.
- To test the speaker you can look at the levels in right side of this "Mic monitoring". If your output device and all its settings are well and good then it shows the levels of output audio.
Recording with Audacity
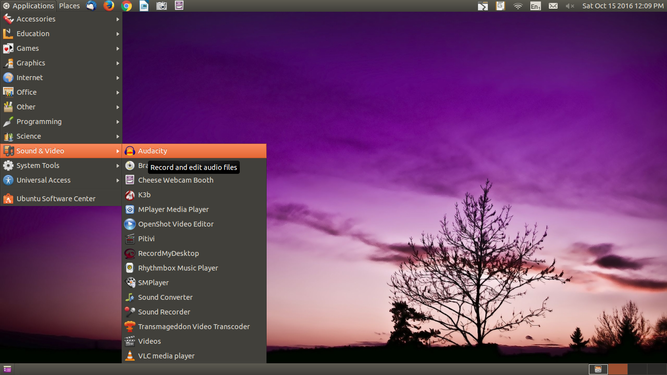
Step 1 -This can be opened from Applications --> Sound & Video --> Audacity
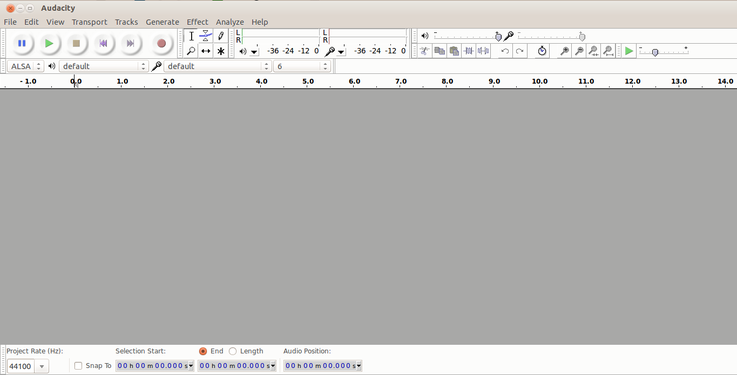
Step 2 - When you open the Audacity application, it will show the window as above
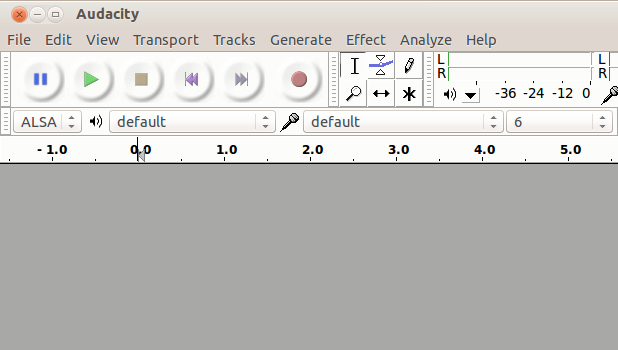
Step 3 - Recording and other tools


To start recording, click the "Red record" button in the Toolbar as shown in the left image. Begin talking or playing any audio and continue for as long as you want. When you feel you've recorded enough, click the "Yellow stop" button. Until you stop the recording, other functions on the Menu and Toolbar will be disabled. You can record audio playing on your computer itself, or playing in another external audio device.
Importing audio and multiple tracks
Audacity allows you to import more than one tracks to the audio thereby making your audio more effective and attractive.
For example, If you are narrating a story, effects related to the elements of the story can be added at the required positions. Even the background music can be added which does not make your audio boring.
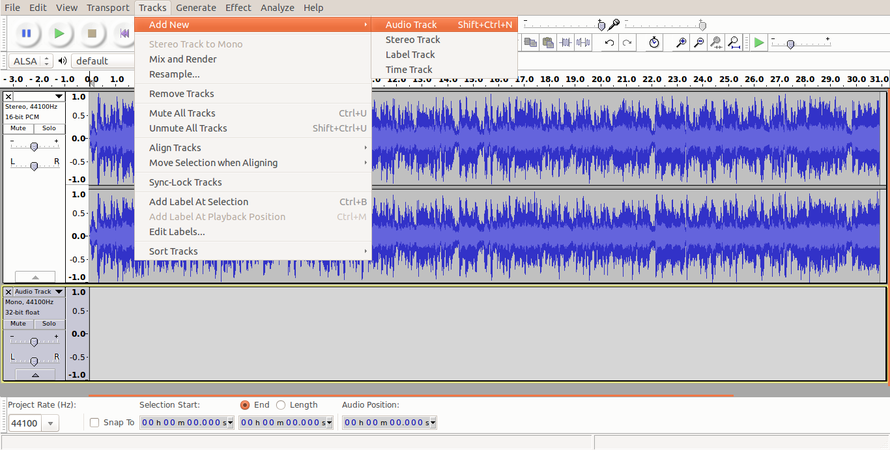
Audio track and adding new track
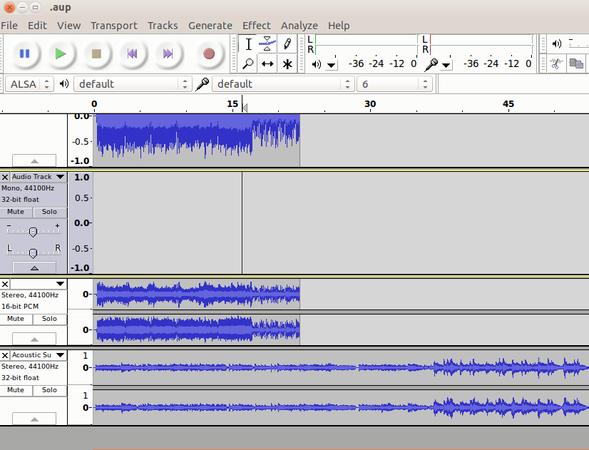
Multiple tracks


- To import audio, click "File --> Import --> Audio" from the menu as shown in the first image above. Choose the music file from your computer, and then click on "Open". Once you import an audio clip it will appear in Audacity as an audio track as you can see in the second image.
- If you want to add multiple tracks, you can do so by clicking on "Tracks --> Add new --> Audio track" from the Menu as shown in the same second image. With the use of multiple tracks, you can record and at the same time import several audio tracks to work in Audacity as shown in the third image above.
See below animation to know the steps to import second track.

Basic audio editing
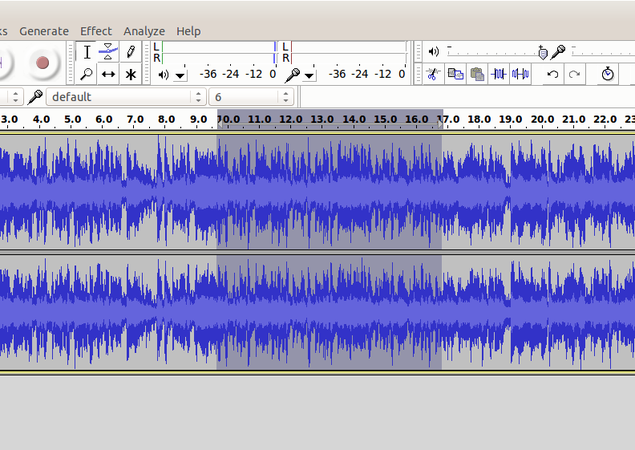
Selection of Audio

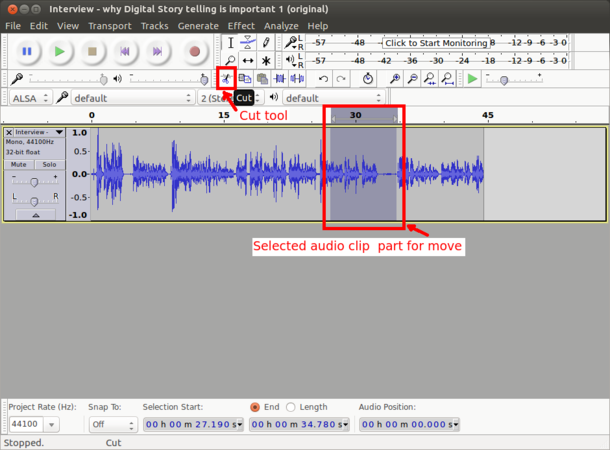
Cutting selected audio
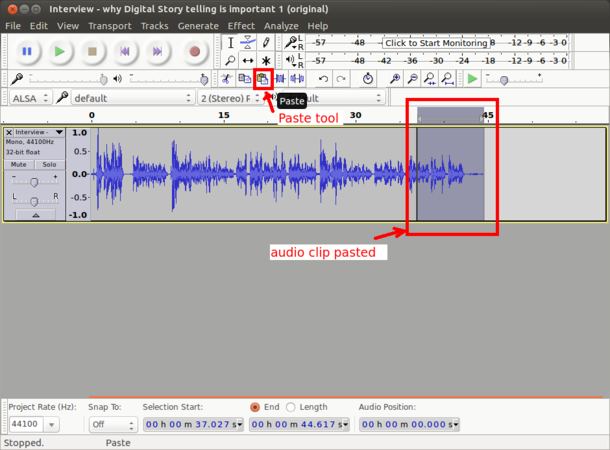
Pasting selected audio


Similar to how we do cut (or copy) paste a selection of text in a text document, we can cut (copy) and paste a selection of audio in an audio file in Audacity. To delete a part of the track, we can select the area of the track we wish to delete as shown in the first image above and then press "Delete" key on the keyboard to delete. To move a part of the audio to another place on the same track or to another track, we need to select it first as we did before and then click on the cut icon on the toolbar as shown in the second image. Then the same audio can be pasted by clicking on the paste icon on the toolbar as shown in the third image above. The usual keyboard shortcuts for "Cut" (Ctrl+X), "Copy" (Ctrl+C) and "Paste" (Ctrl+V) will also work on Audacity. Once you are done with editing, the final audio can be exported to any audio format from the Menu by clicking on "File -->Export" and then "Save".
Repeat an Already-Recorded Segment
You can repeat a segment of audio that is already recorded.
- Click "Selection Tool", then select a portion of audio.
- Choose "Edit --> Copy" or press Ctrl+C in your keyboard.
- Click in a track near where you want the copy to start playing.
- Choose "Edit --> Paste" or press Ctrl+V in your keyboard.
- You can repeat this steps to repeat as many times you want, by using copy, paste feature.
Zoom in and Zoom out tracks
Zoom in Zoom out tool

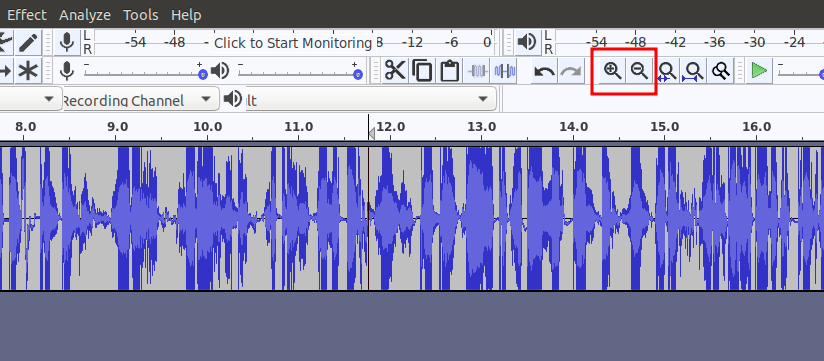
Sometimes it may be required to zoom in and zoom out the particular segment in the audio. To do this, there is an option in toolbar icon for both as marked in the image. You can keep on click '+' to zoom in and '-' to zoom out respectively.
Adjusting the volume of the audio
Occasionally, you may find that recordings are either too quiet or of poor quality once you come to edit them. This can be remedied to a certain degree in Audacity.
- Increase your recorded volume by using amplify feature

Select amplify tool from effect menu
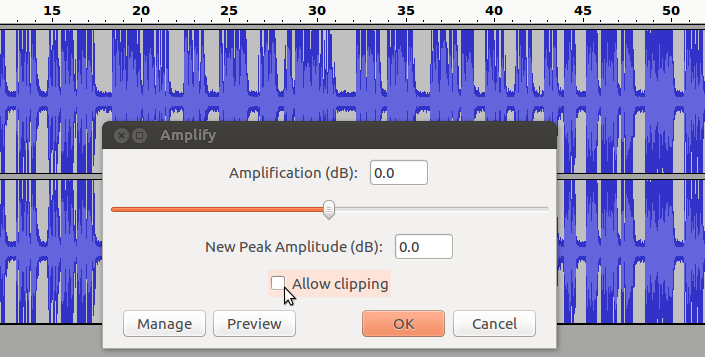
Select "allow clipping" to increase the volume


To amplify the clip select the track which you want to increase (amplify) the volume, go to "Effect" tab from the top of the screen and choose "Amplify" from the drop-down menu and Finally, use the slider in the new dialogue box to tell Audacity how much you wish to amplify your clip and click "OK" to apply.

You have to select "Allow clipping" to increase the volume. See below animation to use amplify function to adjust the volume,
Changing the Pitch, Speed and Tempo
Pitch change option changes the pitch of your original recording without changing its speed. This is useful when you have some conversation in your recording involving more than one person. You can make your normal voice to be a magnetic voice, cartoon voice, male to female voice and viceversa and many more depending on the value given as input.
Change Speed option changes the speed of a selection which affects its tempo, pitch and frequency. When reducing speed, all frequencies become lower. When increasing speed, all frequencies become higher.
Change Tempo option changes the tempo and thus the length or duration of a selection, without changing its pitch.
Basic difference between Speed and Tempo is that Speed affects the pitch whereas Tempo does not!
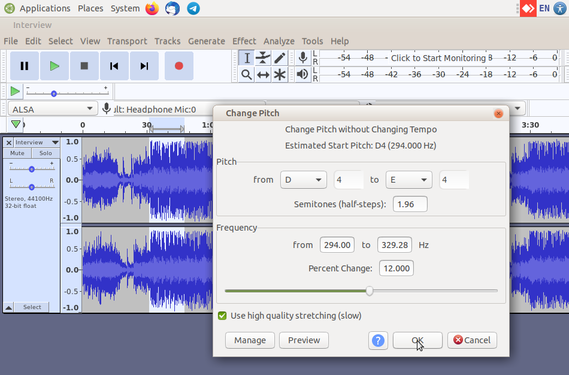
Changing the Pitch

Changing the Tempo


Pitch: Audacity allows you to change the pitch of the entire audio or a part of it. You can directly mention the percentage of change which the music file expects or can change if having some basic idea of pitch notes in music. For changing the pitch you can click on "Effects--> Change pitch". In the dialogue box you can simply increase and decrease the slider to change the pitch. You can preview the changes you made to the portion of the audio by clicking on "Preview", Click "OK" if changes are final.
Speed: You can change the speed of the audio by clicking on "Effects-->Change Speed". It shows the multiplier column where you can put the value and those much of time audio gets the speed also you can move the slider to adjust the speed. You can preview the changes you made to the portion of the audio by clicking on "Preview", Click "OK" if changes are final.
Tempo: You can also change the tempo of the audio by clicking on "Effects -->Change Tempo". It also shows the multiplier option, beats per minute and Length of the selected portion options. Here you can change according to your needs and You can preview the changes you made to the portion of the audio by clicking on "Preview", Click "OK" if changes are final.
Adding Echo Effect to the music
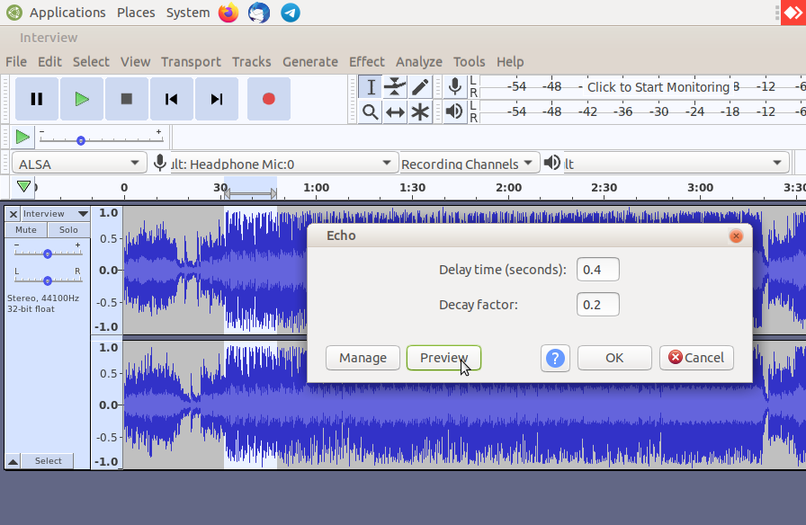
Adding Echo Effect

You can include Echo effect on to your audio by clicking on "Effects-->Echo". Delay Time indicates the amount of delay between the echoes, Delay Factor increases or decreases the amplitude or loudness of the each echo.
Removing noise
Noise is part of an audio signal that is not the intended signal. When you listen to music on the radio, you can hear the music, and usually also some noise. When computers record or play audio, the electronic components sometimes create extra noise. Sometimes it can be your background noise recorded your audio.
In order to remove ‘noise,’ we must first tell Audacity what the ‘noise’ sounds. Do this by selecting a portion of the audio where nobody is talking and noise has recorded – like a break in the conversation, so you just get the ‘noise’.
- Remove noise by using noise reduction option

Select Noise reduction tool from effect menu

Select get noise profile and select OK


- Choose "Effect --> Noise Removal". The "Noise Removal" window appears. Click Get Profile. The Noise Removal tool uses the selected audio as an example of the noise to remove.
- Select the whole track.
- Open the "Noise Removal" window. Click "OK". The Noise Removal tool processes the audio. The Noise Removal tool is not effective in this example because most of the signal is noise.
Fade a section in or fade it out
Audacity has tools to fade in and out. When you "fade in," it means to gradually increase the volume level from silence to the original level. When you "fade out," it means to gradually decreased the volume level from the original level to silence. Professional recordings of concerts often fade out after a song, while the audience applauds. Fading out avoids an abrupt stop at the end of the recording, because the volume level is decreased gradually to silence.
- Add fade in or fade out for your track

After added fade in for the track

After added fade out for the track


- Click "Selection Tool", then select a portion of audio to fade in or out.
- Choose "Effect --> Fade In" or "Effect --> Fade Out".
Generally fade in at the beginning of an audio segment, and fade out at the end of an audio segment. You can use Audacity to create special effects if you fade in or fade out in the middle of an audio segment. You can make a surprising effect by setting Audacity to fade in or out over a few second, then adding the opposite fade inside the first fade.
Saving and exporting to different formats
Audacity saves its data in a format that only Audacity can use. Audacity saves more information than just the audio files, and this information cannot be stored in conventional audio files like OGG, MP3, or WAV.
When you want to share your work, or use it in another application, you must export it. When you "export" audio, Audacity converts the Audacity-only file into a conventional audio file. Audacity does not delete the original Audacity-only file, but the exported file cannot be converted into the Audacity-only format.
- Save Project: All the edits including files can be saved in uncompressed, lossless quality using the "AUP" format. An "AUP" project file is created, along with a folder with the same name as the AUP file that contains the project's audio data. For example, if you save a project as
independence day.aup, a folder calledindependence day_datawill contain the audio data. We can save the "AUP" project file with keyboardCtrl+Sshortcut or through "File --> Save Project" from the Menu. - Export Audio: Audio can be exported to many formats such as mp3, ogg, wav. According to your need you can export the audio.
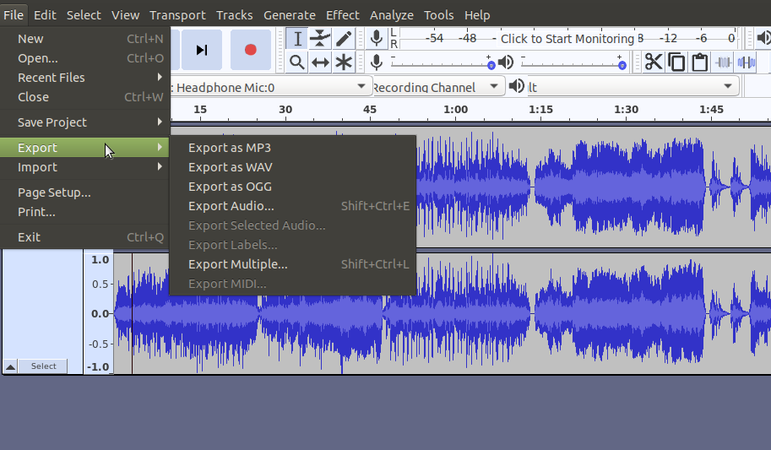
Exporting to various formats

- Choose "File --> Export".
- Select the format, filename, and directory of the audio that will be exported. Click "Save" when you are finished.
- Depending on which format you choose, the "Metadata" window appears. You can input this information if you wish (Don't forget mention creative common license under the comment section. In this way you will other to reuse your audio). Metadata basically contains information about the Audio that is exported. Artist name, Track title, Album title, Track number, Year, Genre and Comments are included here. They are optional.
- Audacity processes the audio to export. This may take some time, depending on the audio.
List of all available export formats supported by Audacity can be found here.
Advanced features
Audacity is a full-fledged audio editor which has many advanced features. Click This page which lists tutorials that provide step-by-step instructions for performing all the interesting things with audio in Audacity.
Ideas for resource creation
This tool can be used to create own voice recordings, modify existing audio as per academic requirements and to mix multiple audio files together to create educational resources.
References
Video Tutorials