Teachers' toolkit for creating and re-purposing OER using FOSS/Print version
| This is the print version of Teachers' toolkit for creating and re-purposing OER using FOSS You won't see this message or any elements not part of the book's content when you print or preview this page. |

The current, editable version of this book is available at
https://teacher-network.in/OER/index.php/Teachers%27_toolkit_for_creating_and_re-purposing_OER_using_FOSS
Table of contents
Preface
A toolkit for creating and re-purposing OER using FOSS tools
Installing Ubuntu - creating the FOSS platform
Text OER
Image and animation OER
Audio and Video OER
File formats
Publishing OER
Annexure
___________________________________________________________________________________________________________________
The Teachers' toolkit for creating and re-purposing OER using FOSS tools is licensed under CC BY 4.0 license
Preface
In a society that is becoming increasingly digital, it is no surprise that educational processes are also getting impacted by digital technologies (popularly known as Information and Communication Technologies, or simply ICTs). A significant development in the educational domain has been the rise of Open Educational Resources (OER), with the promise of delivering quality education. An essentially, digital phenomenon, OER seek to leverage the possibilities of digital methods for accessing, creating, modifying and sharing educational content. OER has redefined the copyright regime, stimulating the sharing of content with license to re-use, modify and share or publish. While the advantages seem obvious in terms of increased availability of curricular materials and reducing costs of education, research suggests that OER seems to have not achieved its potential for adoption.
There is need to promote the creation, revision, publishing and adoption of OER across the world. One way to do this, could be to make available more digital tools for people to use, to create, revise and publish OER. The “Hands-On Toolkit for Teachers to Create, Re-purpose and Publish Open Educational Resources (OER) using Free and Open Source Software (FOSS)”, aims to promote the creation, re-purposing and publishing of OER using FOSS applications.
A tool-kit to create, re-purpose and publish OER
The toolkit has been developed by IT for Change, an organization working with teachers and school systems on the use of FOSS for OER creation. The development of this course material was supported by the Commonwealth of Learning, Burnaby, Canada as part of the Grant #2015-2585 generously made by The William and Flora Hewlett Foundation, USA.
This toolkit is aimed at native and non-English native speakers, hence the language has been kept simple and accessible.
The toolkit is available in two formats. One is this print edition, (soft copy through a PDF format, which you can use for printing, if you need a hard copy). The second format is an on-line edition in the form of a “Wiki book[3]”. The Wiki book edition will also be shared off-line on a DVD, with the printed version of the tool-kit, which will enable user to read the digital version without internet connectivity.
Along with the tool-kit, a custom software distribution which contains the FOSS desktop tools covered in the handbook is shared as a DVD, which you should install on your computer, to create, re-purpose and publish OER.
In line with the philosophy of OER, the toolkit is released under the CC-BY license, and the custom software distribution is released under the General Public License (GPL). The CC BY license enables you to make copies of the tool-kit with or without modifications and distribute it for profit or without profit. The GPL license enables you to make copies of the software applications with or without modifications. Modifications if any, to the software, can be re-distributed only as FOSS.
Copyright
©2017 by the Commonwealth of Learning. Except where otherwise noted, Teachers' toolkit for creating and re-purposing OER using FOSS is made available under a Creative Commons Attribution 4.0 International (CC BY 4.0) License: https://creativecommons.org/licenses/by/4.0. By using the content of this publication, the users accept to be bound by the terms of use of the Commonwealth of Learning’s Open Access repository (http://oasis.col.org).
The Commonwealth of Learning (COL) is an intergovernmental organisation created by Commonwealth Heads of Government to promote the development and sharing of open learning and distance education knowledge, resources and technologies.
Images: All images used in this toolkit, unless otherwise specified have been created by the author. Most of these are screen shots of the FOSS applications discussed in the toolkit.
Disclaimer: The ideas and opinions expressed in this publication are those of the author; they are not necessarily those of Commonwealth of Learning and do not commit the organization.
Caveat: This course material was published to support the learning of students. Neither IT for Change nor the Commonwealth of Learning grants any degree, certification or credits based solely on your completion of this course material.
Acknowledgement: The development of this course material was supported by the Commonwealth of Learning, Burnaby, Canada as part of the Grant #2015-2585 generously made by The William and Flora Hewlett Foundation, USA.
Author
IT for Change, Bengaluru
393, 17 Main, 35 Cross, Jaya nagar IV T Block, Bengaluru 560041. India
Phone – 91-80-26654134, Mail , Website
Acknowledgements
The toolkit was written by a team of editors, subject experts and technology experts from IT for Change.
Authors – Gurumurthy Kasinathan, Director and Sriranjani Ranganathan, Deputy Director
Content support - Rakesh B., Technology Associate and Venkatesh T.Gowda, Program Associate
Technical support - Yogesh K.S., Technology Associate
Formatting support - Harish - Technology Assistant and Sunil C., Program Assistant
Graphics - Smriti Khera, Research and Communications Assistant
___________________________________________________________________________________________________________________
The Teachers' toolkit for creating and re-purposing OER using FOSS tools is licensed under CC BY 4.0 license
A toolkit for creating OER using FOSS tools
Text OER
Now that you have Ubuntu on your computer, you are ready to create and re-purpose OER. We will begin with text OER. Text OER includes text documents, web pages, PDF documents, spreadsheets. Currently a large amount of text OER is created using proprietary software applications and made available in proprietary or PDF formats. In some cases, OER created in proprietary formats may not be able to be easily reused or modified, without having access to the proprietary software. PDF formats do not enable easy editing and hence limit re-purposing. Using FOSS tools to create text OER can allow more and more users to create content; this can also support the expansion of the universe of OER creation in languages other than English.
One important advantage of the digital tools is the possibility of creating different kinds of text resources. We are no longer thinking of linear typed text alone; it is now possible to create concept maps, flow charts, diagrams, combine text and images and create info-graphics and so on. The 'hypertext' which makes web pages possible is also another form of text. In this chapter of the toolkit, we will look at how to access, create and re-purpose text OER; the tools discussed are basically text editing tools.
Objectives
By the end of this chapter, you will be able to
- access text OER from popular repositories
- create your personal digital library for organizing your OER
- access, create and re-purpose concept maps using a concept map editor (using Freeplane)
- access, create and re-purpose text resources using a text editor (using LibreOffice Writer).
- present text resources in a ‘slide presentation’ format (using LibreOffice Impress)
Your personal digital library for OER
As mentioned, you will also develop a OER for your chosen topic. In the toolkit, at every logical point where you can practice the explanation and case illustration, we will have 'Activity time' where you can practice the steps discussed relating to a particular tool or method, to create or re-purpose the OER on your topic. You will begin by creating your 'personal digital library' on your computer.
| Activity Time - As a part of using this tool-kit to learn FOSS tools and create OER, you will be accessing and creating many documents / files. It is necessary for you to organize these files carefully on your computer so that you can access them easily later. You should create a folder on your computer (this could be under your 'home' folder or your 'documents' folder) with the <name of the topic> that you would like to create OER on; this can have sub folders for ‘Text OER’, ‘Image OER’ and ‘Audio Video OER’ for saving your save your text, image, audio and video files respectively. By organizing your files and folders carefully on any topic, you are creating what can be termed as a ‘Personal Digital Library’ on that topic. Having personal digital libraries allows you to access and re-use OER easily and effectively.
You could instead create sub folders for different sub-topics for your topic and save your files based on the sub topic. For instance, the topic 'energy' could serve as the name of your folder, within which you could create sub-folders for heat, light, magnetism, electricity etc. You should think about the way you would want to access your OER later, and create the sub-folders (and sub sub-folders) on basis of this hierarchy. Searching for files later becomes easier if you have categorised them and then organised them in folders based on these categories. As a teacher, you could also have the 'academic year' as the base folder, within which you could create the OER folders and sub folders. This way, when you begin a new year (2017-18), you can simply copy the folder of the previous academic year (2016-17) with the new year (2017-18) as the folder name. You can then add, modify or delete files in the sub folders within this year folder as per your requirements for the new year. In the last chapter on ‘Publishing OER’, we will explain how you can upload these resources on the world wide web, which can be considered as the ‘Global Digital Library’ accessible to anyone with connectivity. Please create the folder and sub-folders for your topic, on which you will be creating and re-purposing OER as a part of using and learning this toolkit |
Accessing text OER repositories
An OER creation process should begin with reuse of existing OER; the Internet is a rich source of text OER. It is important to access OER while creating your own because you cannot use content not licensed for reuse. You could either access popular known OER repositories or you could search the internet for resources you want. A browser is needed for accessing the internet, Mozilla Firefox is a free and open source web browser.
Search from known repositories
One method of accessing existing OER is to search available text repositories. The most globally popular text OER repository is the digital encyclopedia, Wikipedia (https://wikipedia.org). You can search for your topic in Wikipedia, by simply typing this text in the Wikipedia search bar. We will do this search for item ‘Digital Story Telling’ (DST) (see image 1) which is the OER proposed to be created as an exemplar by this tool-kit (search result in image 2).


Wikipedia is available in more than hundred other languages (image 3), so you may also be able to search for text OER in your native language(s).

Other popular OER sites include http://www.wikieducator.org, https://oercommons.org. A list of OER sites is available on http://www.searchoer.com/list-of-oer.html.
Searching the web for OER
In addition to accessing OER on Wikipedia, you could also use a search engine such as Google search engine or DuckDuckGo search engine to access information. While Google search engine (and many other popular search engines) track your searches and store the trail, DuckDuckGo does not. This also means that if you do not want to receive targeted advertising, based on your searches, you should use DuckDuckGo. An option is to add DuckDuckGo search engine to your Firefox browser, so that you can use it whenever you want to, and use Google or other search engines which are configured on your Firefox toolbar.
You could look for information by simply typing in Digital Story Telling in the search bar of the search engine; shown below are examples of how a search for "Digital Story Telling" (image 4 and image 5 demonstrating search on Google and DuckDuckGo search engines respectively) would look like.


The search engine will retrieve web pages for your topic that are both OER and non OER and you need to check each result you want to use, if it is OER.
When you visit any site returned by the search results, you need to look for copyright information to ascertain that the resource is OER and you can re-use it.
If there is no information on the web page accessed through the search, you should visit the home page or the 'About Us' page of the web site to find out if there is any information or link which gives information about the copyright for the content on that site.
In many website, no copyright information is given. In such a case, since the default copyright is 'All rights reserved', you should not download any materials from that site or web page. In some cases, the website / web page may clearly specify copyright as 'All rights reserved', here also you should not download any materials.
Thus, if the resource is not explicitly declared to be an OER (allowing you to re-use), you should not use it in making your OER.
Introducing OER as a criteria in your search

Some search engines allow for search results to be filtered and displayed by license. You can do this by specifying OER as a criteria while setting your search preferences. In Google search you need to select Settings → Advanced Search. (image 6) In Advanced Search, you can select Usage Rights as ‘free to use, share or modify, even commercially’ to get OER that you can re-use with or without modification.
Popular Text OER repositories
Some of the large-scale repositories created through the OER movement include:
You should refer to these, while creating or re-purposing your OER. These repositories may have OER in different formats, not only in text format. You should refer to them when you access image, audio and video OER repositories in subsequent chapters.
Pages or articles listing OER repositories
You can also get a list of OER repositories from the following web pages:
- Wikipedia
- WikiEducator
- COL Workshop on OER
- DiscoverEd from the Creative Commons
- Edutopia
- Nova Library
| Activity time - You should search for OER for the topic you have selected. You could download documents, web pages that you think you will use for creating and re-purposing OER on your topic, on relevant folders of your personal digital library. As mentioned earlier, these sub-folders could be created by OER format (text, image, audio, video) or by concept- sub concept or any other taxonomy that you find meaningful. |
Creating a text OER - a concept map
Concept maps can be an effective way of creating a textual resource that can be organized graphically, in the form of a map or tree of ideas; it provides a pictorial overview of the concepts, related concepts / sub-concepts for a topic. A concept map helps you to create a text OER with possibilities for linking to additional resources, adding annotations, as well as graphically organizing ideas through links.
A Concept map can also be used to plan and design the OER by identifying areas of resource requirements as well as linking to additional resources, thus serving as a blue print for OER development. Concepts acquire power and meaning when they are connected to other concepts. Hence, organizing the concepts relevant to your topic is an important first step of OER creation.
20x20pxFreeplane is a FOSS application that can be used to create concept maps (image 8); this toolkit will introduce you to use of Freeplane and its various functionalities.


In the custom distribution of the Ubuntu operating system, accompanying this toolkit, all FOSS applications have been bundled. To open Freeplane, select Applications → Office → Freeplane (image 7).
Inserting nodes
To learn working with Freeplane, we will start by creating a concept map for Digital Story Telling; you will see, when you opened Freeplane that the application has opened a window with a box with text "New mindmap". This node, also called the "root node" will contain the core idea/ theme of the resource. Additional ideas are added by adding more nodes, called child nodes. The concept map gets built by adding further child nodes, for topics and sub-topics. Use the ‘insert’ key to create a ‘child node’ this is a sub-concept of your current concept. Use the ‘enter’ key to create a ‘sibling’ this is a parallel concept to your current concept. Thus you can create a concept map (image 9) with knowing just two functions – add child node (insert) and add sibling node (enter).


We have developed a concept map on digital story telling (image 10). Concept maps can be stored on your folders; they are saved with an extension ".mm", which stands for mindmap. We have created a concept map called Learning Digital Story Telling.mm and saved it on our folder for text resources as part of the personal digital library for digital story telling. Our map has nodes for the ‘why’, ‘what’ and ‘how’ of DST, with sub-nodes. (For all practical purposes for our learning, we can treat mindmap and concept map as being synonymous)
| Activity time - Please create a concept map and save it with the 'topic' name in your folder you have created for your topic. Note that simply saving the file will save it with the name you have given in the root node. Create the sub-nodes for each node as per your imagination / thinking about the topic. Like with any editor, you can create new maps and edit existing concept maps using Freeplane |
Inserting hyper links
Did you notice the red arrow in the root node of our concept map? This main node has a hyper-link which opens the wikipedia page on DST. You can embed a hyper-link on a node, such that clicking that node will open a page on the Internet or a file on your computer (image 11). This connects a node on your map to related resources you may want the reader to access.


In our Learning Digital Story Telling.mm concept map, we have inserted a hyper-link for the main node ‘Learning Digital Story Telling’ (image 12). Move your cursor to this node and select Edit → Link → Add or Modify hyperlink (type). You can also use the keyboard short cut CTRL-K. Freeplane will open an input bar (image 11). We will type in our web page address https://en.wikipedia.org/wiki/Digital_storytelling into this input bar
| Activity time - You should identify a useful web resource for any one node, in the concept map you are making for your topic. You should similarly insert this hyper link for that node following the same steps. Note that Freeplane displays a pink arrow in the node, to signify that the node has a hyper link. Clicking on this pink arrow will open the web page that is linked, when there is an internet connection.
In this manner, your concept map OER can provide links for different nodes, to access information on the world wide web, enriching the concept map text OER. |
Inserting a note
In our Learning Digital Story Telling.mm concept map, you will also see a yellow label beside the arrow and if you place your mouse over the yellow label, you will see a note description. To add a note, you can click on the node, go to View--->Notes--->Display note panel; this will open a window in which you can type your notes (image 13). You can change the position and size of this note window.

| Activity time - You should practice inserting a note for any one of your nodes in your concept map (image 14), following these steps. In this manner, your concept map OER can provide notes for each node, to provide richer and more detailed information (image 15) for that node. (Advanced tip – If you export your concept map as a ‘odt’ or ‘doc’ text file, your note will be added to the section created for the node. This way you can actually write a book using Freeplane). |


Our aim here is to get you started with concept map OER creation using Freeplane. For advanced functions, you should refer to the User Manual for the application. The Freeplane tutorial is available within Freeplane itself, which you can access any time by pressing the F1 function key. The tutorial itself is a concept map, and you should browse this concept map, not only to get help that you may require, but also as a lesson on how a concept map can communicate so much information in such a simple manner!!
You should make concept mapping as an default for your own OER creation. It is a wonderful way to document your ideas, and keep ideating, iterating as you think / document. You will find this very process of making the concept map helpful in enriching your thinking.
Saving your concept map
By default your concept map is saved by Freeplane as a '.mm' format file (image 16). However, the concept map can be saved in many other formats. You can export the map to a text document file (in .odt or .doc formats). You can also export the map as an image (in .png or .jpeg formats) or as a web page (in .html format)(image 17). We will discuss how you can use this image in the next chapter. The images below show you how to save and export concept maps in Freeplane. While saving the file, Freeplane will display the file browser, to allow you to select the folder in which you can save your file. By default, the file is saved in your home folder.


Freeplane on other platforms
Freeplane is also available on Microsoft Windows, on https://freeplane.en.softonic.com/download. The functions and menu options of Freeplane on Windows are similar to those on Ubuntu platform. Learning Freeplane on Windows is similar to learning it on Ubuntu. In Android Mobiles we can view concept maps through Freeplane reader.
https://en.wikipedia.org/wiki/Freeplane has more information about Freeplane and https://freeplane.org is the official website of the application. This information is also provided in an Annexure to this toolkit, for all the FOSS applications discussed in this toolkit. For subsequent FOSS applications, please refer to the Annexure for this information.
| Activity time - You should create a concept map for your topic. Add nodes and child nodes. Insert hyper links to web pages and notes as you think will make your map richer and more useful. You should save the concept map in your personal digital library, you could save in a sub folder called 'concept map'. You should also save/ export the map in different formats in this folder. |
To learn more features of Freeplane to enrich your concept map, refer to the simple user manual available in this site.
Creating text OER as a text document
You are familiar with typing text to create a text document, you may have used a software like Microsoft Word. We will use the FOSS Office Suite application called LibreOffice Writer (LibreOffice Writer) to create a text document.
Open LibreOffice Writer on your computer, through Applications → Office – ![]() LibreOffice Writer (image 18).
LibreOffice Writer (image 18).


| Activity time - We have created a document called- ‘Learning Digital Story Telling’ (image 20) and this is saved in the personal digital library folder. You should create a ‘new’ document, giving the title as the topic name of your OER. You should save this document, on your folder created for your personal digital library (image 19). Saving this document, creates a text document “Learning Digital Story Telling.odt” where odt stands for Open Document Text. The concept map that you have prepared for your topic can give you a plan for writing the text document. You should also refer to the OER text resources from Wikipedia and other sites for your topic that you have searched. |

You will learn the following basic functions in a text editor which you need to use in creating OER.
- Entering and formatting text
- Inserting a numbered list
- Inserting a table / box item
- Insert page numbers
- Insert section headings
Entering and formatting text
You can enter text by simply typing into this document. In our document, we have entered text under following four paragraphs
- Why Digital Story Telling
- Introduction to Digital Story Telling
- Creating a simple text story
- Adding a concept map on ‘Digital Story Telling’
UNICODE font
In the case of languages which use a script other than Latin, you must choose only UNICODE font for the text entry. Non-UNICODE fonts are likely to not render correctly on a web page. This is not an issue in case of the Latin script, used by English, French and many other languages.
Formatting text
You can format your text in many ways either through Format--->Text (image 21) or Format--->Character (image 22) or by changing the parameters on the tool bar. Click on the Format menu option of LibreOffice Writer to see the options. Commonly used formatting includes selecting text to highlight it through the ‘bold’ ‘italic’ or ‘underline’ functions (image 24), changing the font color or size and adding text highlighting. All these functionalities are also available on the tool bar.


Here we will take a section from our document and format to make it bold, italicized or underlined (images 23, 24 and 25). Remember to select the text before clicking on these options.

_using_LOW.png)

Inserting a numbered list
You may be making a list of items in your document. Instead of manually entering the numbers, you could use automatic numbering.
You can select Format → Bullets and Numbering and select the numbering type you want (image 26).
In our document, we have created a numbered list under Objectives.


Hit the ‘enter’ key to go to the next line with the next number. For indenting and sub numbering, you can use the ‘Tab’ and 'shift Tab' keys. Hitting the tab key while at the beginning of a line, will move the cursor further and create a sub-number. Hitting Shift-Tab will move the cursor to the next higher level numbering. Using these keys, you can create any number of levels of numbering and sub-numbering.
Inserting a table / box item
You may want to put a specific information inside a box to highlight it separately. You can also use box to provide additional information, which the reader may skip, if they want to read the article quickly.
You can select Table. Select number of rows and number of columns as ‘1’. You will get a box (which is nothing but a table with one row and one column). Enter your text in this box.
In our document, we have created a box for providing the license information for the document.

| Activity time - You should create a numbered list for a relevant section of your OER. You should create a box for providing similar license information for your document (image 27). You can insert this box at the beginning of the document. |
Inserting a hyper-link
You can provide a hyper link in your text document to a web page. Clicking this link in the text document will open the web page (this requires internet connectivity).
We will now open our 'Learning Digital Story Telling' and insert a hyper-link to the Wikipedia page which discusses 'digital storytelling'. We will type "Read Wikipedia page on 'digital storytelling' in the text document. We will select the text 'digital storytelling' and then select Insert -> Hyperlink(Image 28). In the window that opens, we need to (image 28) click on the 'Internet' icon on the left frame, and then type the web page address (URL), to specify the web page https://en.wikipedia.org/wiki/Digital_storytelling (image 29).


Inserting hyper links in relevant places in your text document (image 30), allows you to lead the reader to web resources that supplement or complement the information you are providing in your text OER document. This way you need not provide information that is already publicly available, and instead focus on information or a perspective that is not available, in your document.
It is useful to have page number and name of your document on every page, this is specially useful if the reader wants to read a print copy. LibreOffice Writer allows you to easily insert this information at the bottom or top of each page. This can be done using Insert--->Footer (image 31). Once a footer has been inserted, you can go to the bottom of the page and insert multiple fields of information using Insert--->Fields (image 32). You can type any text in this footer, it will come on all pages. Other than page number, other dynamic information you can provide is the date/time stamp of the document. A similar method can also be adopted for inserting a header as well. Page numbers can also be inserted directly using Insert--->Page Number.
In our document, we have inserted the document name and page number in the footer.


Insert section headings

It is sometimes useful to create sections in a document to allow for easy reading and referencing. This can be done using the Styles--->Styles and formatting option. Select the text you want to mark as a section and then go to the the top left of your menu bar. Select the heading level (Heading 1, 2, 3, etc) , you want to set it at (image 33). Headings can be at multiple levels to indicate sub-points. You should create similar section headings in your document.
Continuing editing text OER
You can re-open this file from this folder any time to continue editing your text document using LibreOffice Writer. You can add, move, modify and remove text. You can format your text in different ways. In this way, you can keep enhancing your text OER on your topic regularly.
Note that this tool-kit is not intended to provide the complete user manual for the applications explained. The aim here is to get you started with OER creation using the tool. For advanced functions, you should refer to the User Manual for the application. The LibreOffice Writer User Manual is available on https://help.libreoffice.org/Writer/Welcome_to_the_Writer_Help
Short videos on LibreOffice Writer are available on http://spoken-tutorial.org/tutorial-search/?search_foss=LibreOffice+Suite+Writer&search_language=English. Each video is less than 10 minutes and focuses on select features of the application. The information about user manuals and tutorials is provided in Annexure for all FOSS applications used in this toolkit.
| Activity time - You should create a text document for your topic. Add sections for different ideas related to the topic. Insert your concept map image in the document and write about it. Insert hyper links to web resources, as you think will make your document richer and more useful. Insert a footer and provide name of your document and page number.
Save the text document in your personal digital library, you could save in a sub folder called 'text document' |
Creating a slide presentation (LibreOffice Impress)
A slide presentation is a document that consists of slides, each slide can be considered as a ‘page’ which will contain a coherent set of information, usually presented as bullet points. A slide presentation is a useful method of sharing information, or in training or teaching. While a text document is useful as a descriptive resource, a presentation can be more useful as a summarized view. A presentation can be created as a summary of a text OER. Like in a text document, you can embed images, audio links, video links in the presentation. You can subsequently do a ‘slide show’ of this presentation, when you are finished creation.

We create a slide presentation - ‘Learning Digital Story Telling’ using LibreOffice Impress (LibreOffice Impress). Open LibreOffice Writer on your computer, through Applications → Office → LibreOffice Impress (image 34).
You will learn the following basic functions in LibreOffice Impress which you need to use in creating a slide presentation OER.
- Managing slides
- Entering text
- Formatting text
- Inserting a numbered list
- Inserting a text box
Managing slides

You can create a slide presentation with as many slides (Slide → Create New slide) as you want using LibreOffice Impress (image 35). You can duplicate a slide (Slide → Duplicate Slide) if you want to create a slide using the contents (or the format) of another slide. You can move slides across using drag-drop in the slide sorter view (View → Slide Sorter).
Entering text, formatting text, inserting a numbered list and inserting a text box
A useful feature of the LibreOffice suite is that the Writer and Impress products are fully integrated and have the same interface. Hence the method in which you insert a numbered list or an image is similar in both applications.

When you select File → Open, you get to chose if you will create a text file or a presentation file. Hence, these four functions mentioned above for LibreOffice Impress are identical to perform as was explained in the LibreOffice Writer section (image 36).
In our slide presentation, we have entered text (by simply typing the text) and formatted text (changed font colour – Format → Character → Font Effects → Font colour) on the first slide.
In the second slide, we copy pasted the objectives from our text file. We created a numbered list (Selecting the text and then → Format → Bullets and Numbering → Numbering Type) (images 37 and 38).


Adding colour to your presentations
We have also inserted a text box (Insert → Shape → Basic → Rectangle) at the bottom of the slide and typed the text ‘Can you suggest more possible objectives of DST?’. The background colour in this box is blue, to change the colour, select Format → Style → Edit Style → Area. Select the colour you want (white is a good background). Similarly, if you do not want a border for the text box, you can remove it. Select Format → Style → Edit Style → Line → Style → None.


| Activity time - You should create a slide presentation for your topic. Add slides for different ideas related to the topic. Insert text boxes in the presentation document. Insert hyper links to web resources, as you think will make your slide presentation richer and more useful. Save the slide presentation in your personal digital library, you could save in a sub folder called 'slide presentation'. You should open the file again and see the slides in the 'slide show' mode (Slide Show -> Start from the first slide). |
Text OER editors on other platforms
- Freemind is an alternative to Freeplane for making concept maps. Its features and interface is similar to Freeplane.
- An alternative to LibreOffice for creating text resources and slide presentations is OpenOffice.org. OpenOffice.org also has a similar Writer and Impress applications.
- Gedit is a plain text editor. If you are copying content from a website into your LibreOffice Writer document, sometimes the formating of the content on the web page will be copied to the Writer document but may be garbled. If you do not want the formatting but only the content, you could instead copy from the website and paste into a gedit file and then copy from the gedit file to your LibreOffice Writer document, this will remove all formatting and help you organize the text more easily.
- LibreOffice Writer is also available on Microsoft Windows, on http://libreoffice.org/download/download. LibreOffice Writer is part of the LibreOffice suite on Windows. Wikipedia has more information about LibreOffice Writer. The functions and menu options of LibreOffice Writer on Windows are similar to those on Ubuntu platform. Learning LibreOffice Writer on Windows is similar to learning it on Ubuntu.
- LibreOffice Impress is also available on Microsoft Windows, on http://libreoffice.org/download/download. LibreOffice Impress is part of the LibreOffice suite on Windows. The functions and menu options of LibreOffice Impress on Windows are similar to those on Ubuntu platform. Learning LibreOffice Impress on Windows is similar to learning it on Ubuntu
- Short videos on LibreOffice Impress are available on http://spoken-tutorial.org/tutorial-search/?search_foss=LibreOffice+Suite+Impress&search_language=English
- In Android Mobiles we can view text documents through "OpenDocumentReader" App or WPS Office App
See Annexure for more information on alternative applications and platforms.
___________________________________________________________________________________________________________________
The Teachers' toolkit for creating and re-purposing OER using FOSS tools is licensed under CC BY 4.0 license
Image and animation OER
One of the most important advantages of OER is the possibility of creating resources in multiple formats - images being one of them. Images can be used standalone, or in a sequence as an animation, or in combination with text to create picture stories for communication. With increasing use of ICT, creating, editing and remixing image resources is becoming more and more prevalent. Availability of free and open source tools for creation and re-purposing of image resources can help the greater creation, re-purposing and publishing of image and animation OERs. This chapter will focus on accessing image repositories, tools for creating image and animation OER, editing image OER, remixing image OER with other formats and publishing.
By the end of this chapter, you will be able to
- access image OER from popular repositories
- create image OER using your camera (on your feature mobile phone)
- create image OER using a drawing tool (using Tux Paint)
- create a simple animation OER (using Tux Paint)
- create image OER using a screen capture tool (using Screenshot)
- edit image OER using an image editor (using GIMP).
- embed / insert images in a text document to create a picture story (using LibreOffice Writer)
- present image resources in a ‘slide presentation’ format (using LibreOffice Impress).
Accessing image OER repositories
Searching popular image OER repositories
Like Wikipedia is a text OER repository, Wikimedia commons is a repository of media (images, audio and video), managed by the same WikiMedia Foundation. You can search images related to your topic in Wikimedia Commons, by simply typing the topic name in the search bar(image 1). We will do this for ‘Digital Story Telling’ (DST) which is the OER being created as an exemplar in this toolkit. Flickr is also another popular source of OER images

Search the web for image OER
You can use a search engine such as Google search engine or DuckDuckGo search engine, using a FOSS web browser such as Mozilla Firefox to search for image OER. You can search for images relating DST to simply typing in Digital Story Telling in the search bar of the search engine and selecting the ‘Images’ link (image 2). As in the case of text, you can select images that are licensed for re-use by specifying this in the search settings (image 3).


Creating image resources
Using your camera
A simple and easy way to create an image OER is to take a photo of the object you want an image of, using your camera or a mobile phone. Of course this will apply only where the topic is such that you have objects you can take a photo of. Sometimes an image can also be a digitization of hand-drawn images or paintings. Digitized representations of student drawings or paintings can be a useful collection of image OER. These photographs can be edited for further re-purposing as OER. Usually images are stored in .jpeg or .png formats.
Note – Taking a photo of a copyrighted material (such as another photo), is a violation of the copyright law, with exception given for ‘fair use’. For more information on what you can photograph and cannot, read the WIPO advisory. Wherever possible, you could take permission of the copyright holder to use an photo of the material.
| Activity time - Imaging what kind of photographs may enrich the OER you are creating. Identify a few of them and use your camera / mobile phone to take photographs. You can copy these from the camera / mobile phone to your computer in your image OER folder. |
Using a drawing software -  Tux Paint
You can also use a drawing software application to draw an image. Open Tux Paint on your computer, through Applications → Education → Tux Paint

The screen contains two tool bars on either side of the drawing canvas. The left side tool bar contains drawing and editing controls. The right side tool bar provides the various options for the specific tool that you select on the left side tool bar (image 4). For e.g., when the "Paint brush" tool is selected on the left tool bar, it shows the various brushes available on the right tool bar. When the "Rubber Stamp" tool is selected on the left tool bar, it shows the different stamps you can use, on the right tool bar. At the bottom, you can see a palette of colours. Below this, at the bottom of the screen, Tux, the Linux Penguin, provides tips and other information while you draw.
You can use the ‘brush’ tool, select the brush and the colour you want and paint on the drawing canvas. You can use the stamps for drawing / inserting predefined shapes into the canvas. The left tool bar also has an eraser in case you want to erase any part of your drawing.
Tux Paint is a very simple and easy to use application. You should familiarize yourself with the tool options by simply using them, in your drawing work.
The files created by you, are stored in the home/.tuxpaint/saved folder, in the 'png' format. To open the .tuxpaint folder, you may need to select the 'view hidden' files in the /home folder on Ubuntu. The file name will begin with 'year+month+date' in YYYYDDMM format, followed by a serial number.
| Activity time - You should also create a drawing on an issue connected to your topic. Another possibility is you could use any image you found as a reference, and draw it using Tux Paint. A third possibility is to copy the image you have created by taking a photo to the Tux Paint folder (mentioned above) and open it in Tux Paint and edit it to create the image OER you want. |
Creating image resources using a screen capture tool  Screenshot

One of the simplest and yet very powerful ways of creating an image is to simply take a picture of your computer screen. You may have opened a web page on which there is an image or some text you want to store as an image, or it may be from a file on your computer, or it may be a snapshot of a video you are playing.
You can use the tool Screenshot for this. Open Screenshot on your computer, through Applications → Accessories → ![]() Screenshot
Screenshot
You have an option of capturing the entire display on your screen or selecting a smaller area. For the latter option, chose ‘select area to grab’ (image 5). Then use your mouse to drag drop the (rectangular) area you want to capture. (Move your cursor to the left top of the area, keep your left mouse click pressed, move the cursor to the right bottom point and release it).
| Activity time - You should create an image OER using Screenshot of an image from your computer or the web, when it is sharing information which you find relevant to your OER.
As mentioned earlier, taking a photo of a copyrighted material (such as a photo), is a violation of the copyright law, with exception given for ‘fair use’. |
Creating a simple animation (Tux Paint)
Tux Paint allows you to create simple animations by letting you create a slide presentation of a set of images. You can save the image you drew. Make small changes to it and save it as a new file. You can then ‘play’ the photos in a recurring manner (image 6) to create a simple animation. Your animation can have as many images as you like. You can also select the speed of presenting the images in the animation. More the speed, the more you get a feel of an animation.
We have created four drawings of a tree, to represent different views over the year. The first one is barren, second with leaves, third with leaves and flowers and fourth one with leaves, flowers and fruits. The second, third and fourth images are created by modifying the previous one and saving the same. Playing these images recurrently in Tux Paint creates a simple animation of the changes in the tree over time (image 6).
A second example of creating an animation using a series of images in Tux Paint is also shown here. Here with very minimum changes between the images, an animation of a walking person has been created. (image 6a).
| Activity time - You should create an animation using a series of images in Tux Paint. You should carefully do the first drawing, then make minor changes to an image, using a brush and eraser, and save it as the next image in the animation. It needs a bit of practice and effort initially. But over time, it will be a very simple method to create animations |
Creating and editing image resources using an image editor  GIMP
GIMP
Whether we capture using camera or an application like Tux Paint or Screenshot, the images have been captured digitally based on the resolution of the computer or mobile screen; this is indicated in terms of pixels. Such images are called raster images and they are dependent on the resolution of the device for their quality. All raster graphics or images are those that involve capturing some image or object using various devices. GNU Image Manipulation Program (GIMP) is an image editing software, that can edit and make raster images.
There is another kind of digital image called the vector graphics which is not discussed in the toolkit. Vector graphics or images involve creating drawings based on defined geometrical information; this can be defined in terms of the shapes and is not governed by the resolution of the device. Inkscape is a tool that can be used to create and edit vector images.
GIMP can be opened from Applications--->Graphics--->![]() GIMP Image Editor (image 7). GIMP stands for GNU Image Manipulation program.
GIMP is very powerful with many sophisticated features. We will learn a few commonly used functions in image editing:
GIMP Image Editor (image 7). GIMP stands for GNU Image Manipulation program.
GIMP is very powerful with many sophisticated features. We will learn a few commonly used functions in image editing:
- Cropping an image
- Adding text to an image
- Reducing the size of an image
Once you have opened the GIMP application, open the image you would like to edit (image 8). You can see the menu bar providing different options for editing the image.


Cropping an image
Often, you want some part of a larger image to re-use in a different resource. GIMP allows you to select parts of an image - in different shapes or even using a freehand selection to select parts of an image.

This is different from a screen shot where you can only grab an area that is in the shape of a rectangle. You can select parts of an image from Select Tools → Selection Tools → Free Select You can move your cursor on the image to outline the area you want to crop, this is free hand, not necessarily in the form of a rectangle. Then crop the image to your selection through Image → Crop to Selection (image 9). We have cropped the image to free select only the teacher and the student (see the dotted line in image 9).
You can export this cropped image using File → Export as and export to an image format like .png or .jpeg.
Adding text to an image
You may want to add a caption to an image and make that caption a part of the image itself. You can do this using GIMP.

Select Tools → Text. A text tool box appears.
Place your cursor where you want to type your text. You can format the text (change font size, colour) through the Text tool box.
In our image, we have added the text ‘Digital Storytelling, Health centre’ and selected the yellow colour for the text, since it will display better against a dark background (image 10). (Tip - the text should be in a colour contrasting with the background, for easier visibility).
Reducing the size of an image
Sometimes image files can be heavy (compared to text only files). You can reduce the size of an image using GIMP. Select Image → Scale image (image 11).

You can reduce the resolution in the form that opens. The more you reduce the resolution, the greater the reduction of file size.
You should then over write the file, File → Overwrite <your file name>.
GIMP will open a form asking for reduction in quality. You can reduce quality up to 30% without visible degradation in quality. We reduced the size of a file from 10.7MB to 1.2 MB using above approach.
| Activity time – You should use GIMP to work on your image OER that you have created. You should use the text input option to enter captions on your image OER. You can crop a part of an image which contains the message you want to convey. You should also try and reduce the size of your images |
Combining images and text
Inserting images in a text document (LibreOffice Writer)
One of the ways of making OER powerful and high quality is by suitably integrating multiple resource formats. Images can be embedded / inserted into a text document. The image and the related text enhance the value of the other in the document.
We have already seen in the previous chapter on text OER how to export a concept map as an image (image 12) and save in your resource folder. This image of a concept map can be inserted into a text document; we have inserted our concept map on digital story telling into a document on digital story telling. For this we will open the document we have been working on in the previous chapter "Learning Digital Story Telling.odt". You can increase or reduce the size of this image by moving your cursor to one of the vertices of the image and drag-dropping your cursor.
We will create a section ‘Concept map’ in the text document. Move the cursor below this heading and select Insert → Image. LibreOffice Writer will open the file browser. Use file browser to select the image file of your concept map. The image will be inserted in your text document as shown (image 13).


By inserting images into a text document, you can present a story a series of text and images, this is called a picture book. Picture stories are useful to support language learning. Another variation is to allow students to see a word and draw a digital image associate the word, this can simulate the pictionary game.
Presenting image resources in a ‘slide presentation’ format (LibreOffice Impress)
The process of inserting an image into a LibreOffice Impress slide is similar to the process explained earlier for LibreOffice Writer. You can manipulate the size as well as the location of the image on the slide using your mouse and drag-dropping the vertices of the image on the slide.

Inserting a set of images on a set of slides (an image a slide) can be nice way of telling a story as well. For instance, if you want to tell the story of your visit to a historical place, you could insert the photos in the order you want to talk about them, in a set of slides. Then using slide show (Slide Show -> Start from the first slide), you can narrate a story, explaining the photos sequentially.
You can also move the image to one side of the slide and on the other side, insert a text box and add text which explains the image (image 14). Moving the image is done by simply clicking on the image and moving your cursor to the place you want to position the image.
We have inserted the image of the students interacting with the Community Health Institution official and a text box by the side of the image. The combination of an image and text resource adds more power and meaning of the information conveyed, than only the text or only the image would have conveyed.
Activity time - You should insert the image OER related to your topic on a presentation slide. Add text in text boxes adjacent to the images to communicate the message in your OER.
Alternative applications and alternative platforms
Tux Paint and GIMP are also available on Microsoft Windows. The functions and menu options of these tools on Windows are similar to those on Ubuntu platform. Learning these tools on Windows is similar to learning it on Ubuntu.
Please refer to Annexure, for a list of equivalent Free and Open Source Software applications on the GNU/Linux, Microsoft Windows and Android (Mobile phone) platforms and on the web, for image and animation software.
___________________________________________________________________________________________________________________
The Teachers' toolkit for creating and re-purposing OER using FOSS tools is licensed under CC BY 4.0 license
Audio and Video OER
As teachers, you would no doubt appreciate the effectiveness of an audio visual communication. The audio visual format allows expression by people and this is specially useful for those who may have an inhibition in expressing themselves in written forms. How liberating it might be for a student struggling with the letters to be able to express a piece of creativity with an video recording! Other than as forms of expression, an audio visual communication can be an effective form of digital story telling and creating community stories around people, events and institutions. With devices like mobiles and sound recorders, creating audio and even video files is becoming easier and more common. You will get familiar with different FOSS tools for creating, re-purposing and publishing audio and video OER can, in this chapter.
By the end of this chapter, you will be able to
- access audio and video OER from popular repositories
- create audio resources (using your audio recorder in your mobile phone)
- edit audio resources using an audio editor (using Audacity)
- create video resources (using your video recorder in your mobile phone)
- create simple video resource using a screen-casting tool (using RecordMyDesktop)
- edit video resources using a video editor (using OpenShot)
- embed / insert links to audio and video resources in a text document (using LibreOffice Writer)
- insert links to audio and video resources in a ‘slide presentation’ (using LibreOffice Impress)
Accessing audio OER repositories
Freesound is an audio OER repository. You can search for sounds in this repository. Soundcloud is also an audio repository. As in the case of text and image resources, you will need to check the copyright of the audio you want to re-use. Refer to the section on OER in this toolkit if required.
You can use a search engine such as Google search engine or DuckDuckGo search engine, using a FOSS web browser such as Mozilla Firefox to search the web for audio resources. In the search engine, you would need to specify "videos" as a filter for search results.
When you visit the site or check a specific resource, you need to look for copyright information to ascertain that the audio resource is OER and you can re-use it. If the resource is not explicitly declared to be an OER (allowing you to re-use), you should not use it in creating your OER. The search for audio OER is can be made easier by providing OER as a criteria in your search itself.
Accessing video OER repositories
- Youtube is a popular repository for videos, it contains both OER and non OER videos. It is the largest collection of videos in the world. Note that as per Youtube terms of use, if you do not see a “download” or similar link displayed by YouTube on that page, you should not download. You can use a third party add-on available in Mozilla Firefox to download videos, which are licensed under creative commons. Wikimedia is another resource for various media -including audio and video.
- There are other OER video sources too, you can visit, such as Vimeo . Wikipedia has a list of educational video websites. A google search on ‘OER Videos’ will also give you a list of sites to explore.
Image 1 shows you how to filter videos on Youtube by license.

You can enter your topic name in the search bar in Youtube to search for videos on that topic. To get videos which you can re-use, you need to click on the ‘Filter’ link on the Youtube page and select ‘Creative Commons’ (image 1), with this step you will see videos that have the CC license (are OER).

You can click on the video, this will open the video and it will begin playing. You can download the video by clicking on the download link below the video (image 2). You can download in different formats.
Creating audio resources using your audio recorder
You can record an audio clip using your mobile phone itself, using any audio recording app, such as ‘Audio Recorder’. You can copy the audio file from your phone to your computer for editing and re-mixing to create OER. While recording, make sure that no copyright music or sound is playing in the background. We have recorded a short interview with a teacher on why Digital Storytelling is important, using a mobile phone (image 3). We have copied this audio clip to our computer, by connecting the mobile phone to the computer with a data cable and renamed the file as ‘Interview - why Digital Storytelling.’
| Image 3 - Click to listen to the audio. |
Editing audio resources using audio editor -  Audacity

Just like text or image, audio clips can also be edited. Audacity is a audio editing software that you can use to edit your audio clips. Audacity is a simple yet powerful application for audio editing. You can also use it to record audio.
Open Audacity on your computer, through Applications → Sound and Video → ![]() Audacity (image 4).
To edit an audio file, we will need to ‘import’ the audio we have (of the teacher interview) into Audacity.
Audacity (image 4).
To edit an audio file, we will need to ‘import’ the audio we have (of the teacher interview) into Audacity.

To import audio, click on File → Import → Audio and select your audio file (image 5). Audacity is very powerful audio editor, with many sophisticated features. For advanced features, refer to the user manual and tutorials. However, we will learn a few commonly used functions, in audio editing, which are useful to teachers in creating and re-purposing OER:
- Moving a selection of audio to rearrange audio
- Adding a background music track to an audio
- Reducing background noise levels
Moving and combining audio clips

Once you import an audio clip it will appear in Audacity ls shown in image 6; it is called an audio track. Just like you can cut (or copy) paste a selection of text in a text document, you can cut (or copy) and paste a selection of audio in an audio file (image 6). You can use this function to remove any part of the audio clip you do not want. You can move a part of a clip from one place to another (for instance if you want to re-order responses in an interview) (image 7 and 8).
You can also delete a part of the clip also using the same functionality.


Listen to the following clips - the original interview on Digital Story Telling (image 9) and the edited clip (image 10). Can you tell the difference?
|
|
||
| Image 9 - Original teacher interview Audio | Image 10 - Edited teacher interview |
Using audacity we have selected a part of the audio track and moved this part.
Adding background music
You may want to add background music to an audio recording. It is easy to do this with Audacity. You can do this by importing another audio clip (your background music) to a second track, by clicking File -> Import -> Audio (image 11). We can add as many tracks as we want, with one audio file per track (image 12) by repeating the importing option.


| Image 13 - Teacher interview with background music |
Amplifying sound
While editing an audio, you may find it necessary to adjust the sound levels in individual tracks. You can use the ‘amplify’ function to increase or reduce the sound level in a track. Select Effect -> Amplify. Reduce the amplification by moving the slider leftward (image 14). Increase the amplification by moving the slider rightward.
_the_background_music.png)
| Image 15 - Audio file with amplification (sound reduced) |
You may have an audio recording where there is some unwanted disturbance throughout, such as traffic sounds. You can use the ‘Noise Reduction’ function in Audacity to reduce the background noise. (Select Effect -> Noise Reduction)
Exporting the Audacity project to create audio output file
After completing your editing tasks, select File → Export and select the file format as .ogg and click export (image 16), to create an output audio file in the .ogg format.
In case you would like to continue editing this file later, you should also save the Audacity project, for this select File → Save.
This will save the work done as an Audacity project. You can go back to this file (using File -> Open) to continue editing


Audacity is particularly useful for a language teacher to create audio resources for language learning. Students can hear it multiple times to become familiar with the language. The same content can be recorded in more than one language (one of which can be a language that the student is familiar with) and saved as distinct audio files. This can help the student to take the support of her competence in one language, to acquire another language.
| Activity time - You should create audio and video resources for your topic. You could interview key resource persons on the topic, or even have a panel discussion amongst experts. You could interview practitioners and laypersons as well. Edit the audio to make it crisp, clear and coherent.
As discussed in this chapter, you should move a part of the clip to another location in the file to re-order the audio, combine two audio clips to add some background music, amplify a part of the clip and finally export the Audacity project to create audio output file. You should save the audio files in your personal digital library, you could save in a sub folder called 'Audio documents'. You will need to practice these steps multiple times to become comfortable. In the beginning, focus on the technical aspects, on the processes in Audacity, without worrying much of the quality of the output itself. Over time, as you become comfortable in using Audacity, you will be able to focus increasingly on the audio quality rather than the steps in Audacity. You should prepare multiple audio clips for your OER. As you keep practising, you will find the quality improve. You will also find it easier and quicker to do this. Hence patience and persistence is vital for learning to create and re-purpose audio OER. |
Creating video resources
Creating video resources using your video recorder
You can record a video clip using your mobile phone itself, using the camera on the phone. While recording the video, take care to ensure that you are not shooting copyright materials or private spaces. You can copy the video file from your phone to your computer for editing and re-mixing to create OER.
Creating a video resource using a screen-casting tool - RecordMyDesktop
Screen casting is also a simple yet powerful way of creating a video resource. The RecordMyDesktop software records the computer output display as the video and audio (image 18). This can be used to record the functioning of a software or any educational application. In addition to the audio played on the computer as part of the running of the application, additional audio spoken and provided as an input to the computer can also be recorded as a part of the video.
You can set your computer audio output to mute, and provide the audio entirely from an external source (which can be your own voice). In this way you can combine the video from the computer with your own narrative to make a lesson plan on a topic.
There are some powerful ways of using this tool for creating video OER:
- You could "slide show" your presentations or play your images and add a narration to it to explain further. This can be shared as supplementary materials for your class and can be used by students who need reinforcement, additional reviews of your lessons.
- You may have used a particular software or educational application to demonstrate a concept in class. You could use the screen cast application to re-create the lesson by recording your description of the activity and sharing with students.
- Dubbing a video can create a resource in another language. In a teaching setting, you may want to use an existing video, and voice over it to add explanations to reflect the language and learning context of your class; this can be done quite effectively using this application.
Make sure you are not displaying copyright material on the screen when recording the video. If you record any copyright material in the video, it will be a copyright violation. Select Applications → Sound & Video → RecordMyDesktop (image 17) to open Record My Desktop.


Configuring record my desktop application
There are different settings that you can choose for recording on screen cast software based on the kind of content you are capturing on the content as well as method of sharing and publishing. Here are some pointers for changing the settings.
| You can define the audio and video quality of your recording by moving the slider. A higher quality video means a larger file (image 19) so, you would need to decide based on the content as well as the intended use (if the video is to be published, it may be better to have a smaller output file size). A video quality of 50% is good enough for most purposes and will keep file size lower). You can also click on Advanced--->Performance to adjust the frame per second to adjust video quality. |
You can also select the window of the screen which you want to record. Click on Select window (image 20), you will be asked to grab the area to select. You can select only that part of the screen that you want to record. This is useful if you are opening photos or playing a video on only part of your screen and want to record that part only. |


Recording and exporting
| When you click on Record button, desktop recording will start (image 21). The recording can be paused and resumed at any time, by right clicking on the RecordMyDesktop icon in the top panel and selecting Pause (and later Resume when you want to continue recording). Clicking on ‘Stop’ will stop the recording and initiate the export of the video output. | We need to wait till the export is completed, to get the output file (image 22). If we close the process before, we will lose the output file. The output file will be saved in your "Home" folder by default, with .ogv format. The file will usually have a name like ‘out.ogv’, however you can use the ‘save as’ button on the RecordMyDesktop screen to give a file name of your choice. |


Editing video resources
Dubbing a video using Record My Desktop
One of the most common ways of editing a video is to dub it in another language. For instance, you may find many OER videos where the language or accent is not easy to understand and you may want to change the language of narration to your own native language, to make the video more useful to your students.
To dub a video using record my desktop , you need to set the sound settings on your computer to ‘mute’ (no output). Then start record my desktop application and play the video. As the video plays, read out your script. The audio read out by you will be combined with the video being shown on the screen to create the video in your language.
We have taken a video of a teacher speaking in Kannada about a program he has been a part of, and dubbed it in English.
|
|
|
| Activity time - Take any OER video you like, which is in accented English spoken in the USA or UK and dub it with your own voice, in English or your native language. Save the video files in your personal digital library, you could save in a sub folder called 'Video documents'. The effectiveness of this editing will depend on how well you have prepared the script to match the original video. Also to make the recording more effective, you should use a microphone connected to the computer. You should record a couple of times and listen to it, to get feedback on what to do to improve, such as raising the audio volume, providing gaps and voice modulations etc. After you practice a few times, you are bound to get a good video! |
Using video editor to reuse videos -  Openshot
You may also want to edit your videos in other ways - including adding narration to specific parts, adding text (including subtitles), photographs or adding music or additional sounds. Open Shot Video editor is is a simple yet powerful application that allows you to do these things. Just like in Audacity, when you use Open Shot editor, your video or audio clips will be shown as tracks and by moving and combining, you can edit the files as needed.
Open OpenShot on your computer, through Applications → Sound and Video →![]() OpenShot (image 23). Import your video into OpenShot through File → Open and select your video file (image 24). You can also add images or audio clips that you want to add to the video by importing these as tracks.
OpenShot (image 23). Import your video into OpenShot through File → Open and select your video file (image 24). You can also add images or audio clips that you want to add to the video by importing these as tracks.


This software is very powerful with many sophisticated features (for advanced features, refer to the user manual and tutorials) . However, we will learn a few commonly used functions, in video editing, which are useful to teachers in creating and re-purposing OER:
- Moving a selection of video and combining
- Adding a slide (this can be used for sub-titling as well)
- Adding fade in and fade out
- Adding a transition
Moving a selection of video
We saw earlier that audio clip can be cut and pasted like text documents. A similar moving and combining is possible for video clips also. You can do this in Open Shot video editor application, by cutting (image 25) and using drag and drop options of the video file. You can also delete a part of the clip also using delete key from the keyboard (or right click and remove clip) and remove any part of the video clip you do not want. You can move a part of a clip (image 26) from one place to another (for instance if you want to re-order responses in an interview).


To demonstrate this we have edited a video where two teachers (one male and second female) are speaking about their work in integrating technology in their subject teaching (image 27). (Author of video - IT for Change). We have used this option to move the interview of the male teacher after the interview of the female teacher (image28). Watch the two videos below.
|
|
|
| Image 27 - Original video | Image 28 - Edited video where interviews are interchanged |
Adding a slide
Often you want to add images or text to a video. These can be inserted as slides. By inserting the slides at different times in the track, we can add images or text to a video. To demonstrate this, we have worked with our video of teachers and introduced a title slide introducing each teacher before they begin speaking (image 29). You can add slides as required to introduce your own narrative in your video to practice.
|
|

Sub-titling existing videos
You can provide sub-titles to the video, this will provide text input to supplement the audio/video. You can provide the sub-titles in English or in your native language. First we have to create our subtitle file by selecting Title -> create new title.

Here, select the style of your sub-title (we have selected Footer3 (image 31)- this will give 'my sub-title' in the footer area) and click on 'create new Title'.

You should give a name for your sub-title file, then enter the text you want as the subtitle (image 32), and click Apply. This sub title text will be added to your project file.

Image 33 - Video - See the video where we have added subtitle
Adding fade in and fade out
By adding fade-in and fade-out for the clips, it will smoothly change the slides from one to next. You should right click your mouse, on the slide and select Fade -> Fade in or Fade Out as per the requirement (image 34). This fade in / fade out will effect for both audio and video.

Image 35 - Added fade in and fade out in the video.
Adding a transition
You may want to add a 'transition' in your video, to introduce a new section. For instance you are moving between showing an interview of a person and visuals of a program, and want to have a separation between the two. Introducing a transition every time you switch will make the video easier to follow. You can do this selecting Transition, you will see icons of different transitions. Select one transition and drag-drop it on the video, at the spot you want to introduce the transition.
Image 37 - In this video we have added transition in 0.35 sec time frame.
| Activity time - You can record videos using your phone, or through RecordMyDesktop. The interviews mentioned above can be video recordings as well. You can bring together a series of images and add your own audio narrative to make a video, using either RecordMyDesktop or OpenShot editor. Edit the videos to make it crisp, clear and coherent. Add background music, transition slides as required, following the steps discussed in the chapter. Save the video files in your personal digital library, you could save in a sub folder called 'Video documents'.
You will need to practice these steps multiple times to become comfortable. In the beginning, focus on the technical aspects, on the processes in RecordMyDesktop and OpenShot, without worrying much of the quality of the output itself. Over time, as you become comfortable in using Audacity, you will be able to focus increasingly on the audio and video quality rather than the steps in the software. You should prepare multiple video clips for your OER. As you keep practising, you will find the quality improve. You will also find it easier and quicker to do this. Hence patience and persistence is vital for learning to create and re-purpose audio OER. Creating and re-purposing video resource is perhaps the most difficult and complex and hence you should feel a sense of satisfaction when you are able to complete a video OER for your use, or that of your students. A video OER can be very useful for any subject teacher, and for any topic you want to teach or learn about. Do try to create videos by dubbing an existing video, in your own voice, in your own language. Creating educational videos in languages other than English will be quite useful to students learning in these languages. |
Different resource formats can be accessed together
Inserting links to audio and video resources in a text document - LibreOffice Writer
We saw earlier that you can add images to a text document. In the video, we have added text and image as well. It is also possible to provide links and references to an audio / video file in a text document to provide a multimedia experience to the reader. There is an important difference between images and audio/video when integrating with a text document. While an image is embedded within the text document, an audio or video file resides out of the text document in a file folder and is separately accessed to play. This is done by inserting a hyper-link to the audio file or video file in your computer, to the document. Clicking on this link will access the audio/ video and play it, using the audio/video player. While publishing on a web page, it is possible for different formats to be displayed on a single page. We saw earlier that file links and hyper links can be added to a text document; we use the same approach to link an audio/ video.
To try this, we will open our 'Learning Digital Story Telling.odt' and insert a hyper-link to the audio interview with an expert on Digital Storytelling. We begin by creating a section called 'Interview with an expert on digital storytelling' and enter the text "An interview with an expert on digital storytelling is available here". We will select the text 'here' and then (image 38) select Insert -> Hyperlink. In the window that opens, we need to click on the 'Document' icon on the left frame (image 39), and then click on the folder icon on the form (image 40), to select the path (location) of the audio file and the file. We will see the hyper link in the text file (image 41).


If you 'control-click' on this link (that is press control and simultaneously press the mouse left click), the link will play the audio file on your computer. You can follow an identical process to insert a link to a video file on your computer.
Inserting links in a ‘slide presentation’ format LibreOffice Impress

Inserting links in your slide presentation document, to file on your computer, is identical to the process followed in LibreOffice Writer. We have inserted a hyper-link to a video file on our computer "Interview with two teachers of the Subject Teacher Forum program - with transition.ogg" in the slide, to the word 'Video' in the slide presentation. In the 'normal slide view', you will need to 'control-click' to open the video. In the 'Slide Show' view, simply clicking on the link will play the video (image 42).
| Activity time - Work on your text document and slide presentation. The text document can be a detailed and rich explanation for the topic you have chosen, while the slide presentation can be a crisp outline of the main points you want to communicate about. Insert, as relevant, images as well as hyper links to web pages, audio and video files on your computer, to make an interesting narrative on the topic. Read the documents multiple times, to review and refine. Request your colleagues to also read and review it and offer feedback. The 'review-revise' loop is an important and iterative one that makes for a good quality OER!! |
Alternative applications and alternative platforms
Audacity and OpenShot are available on Windows as well. The functions and menu options of these applications on Windows is similar to those on Ubuntu platform. Learning Audacity and OpenShot on Windows is similar to learning it on Ubuntu
Please refer to Annexure, for a list of equivalent Free and Open Source Software applications on the GNU/Linux, Microsoft Windows and Android (Mobile phone) platforms and on the web.
___________________________________________________________________________________________________________________
The Teachers' toolkit for creating and re-purposing OER using FOSS tools is licensed under CC BY 4.0 license
File formats
Different programs store information in different formats. The format is indicated by the extension to the file name, which is usually 3 characters (but in some cases can be 2 or 4 characters also). For e.g. a text file may be stored in a .docx or a .odt or a .txt format, a music file may be in a .wav or a .mp3 or a .ogg format.
Objectives
By the end of this chapter, you will be able to
- know about open and closed file formats
- publish your OER in open formats and convert a document to an open format.
You may have a need to convert a file from one format to another, to use it. A video that plays on your computer may not play on your DVD player, or a music clip that plays on your computer may not play on your mobile phone. You may also want to convert a document from a 'closed' format to an 'open format'.
Open and closed formats
Some formats are ‘open’ while others are ‘closed’. An open format is a "file format for storing digital data, defined by a published specification usually maintained by a standards organization, and which can be used and implemented by anyone, whereas a non-open or closed format may not be possible to be implemented by anyone other than the vendor" (Source - https://en.Wikipedia.org/wiki/Open_format). Open formats should be preferred for OER, since they share the underlying rationale of being used/usable by anyone. Hence, you may want to convert your file from a closed format to an open format.
Open and closed formats for the different OER you have learnt is provided in table below:
| No | Category | open format | closed format |
| 1 | Text OER | odt | doc |
| 2 | Text OER – Presentations | Odp | ppt |
| 3 | Image OER | png, jpeg | ecw |
| 4 | Audio OER | ogg | wav |
| 5 | Video OER | Ogg, ogv | mpeg4 |
Usually FOSS applications save files in open formats. Usually closed formats are created by proprietary applications. You may be able to open the closed format created by a proprietary application, in an equivalent FOSS application and 'save as' an open format.
Converting text files (LibreOffice)
The default formats that LibreOffice saves files in, conform to the ‘Open Document Format’ for text (odt or open document text), spreadsheet (ods or open document spreadsheet), and presentation (odp or open document presentation). You can convert a document which is in another format into these formats by simply opening the document in LibreOffice and then using File → Save As to save in these open formats.
LibreOffice Writer can open a Microsoft Office Word document, in a doc or docx format. It can edit this file and 'save as' a odt file. It also lets you save it as a doc or docx file. Similarly LibreOffice Calc lets you open a Microsoft Office 'Excel' 'xls' file and save it as an 'ods' file. LibreOffice Impress lets you open a 'PowerPoint' 'ppt file and save it as a 'odp' file. You can thus use LibreOffice to convert files in text formats.
You can also save a LibreOffice file as a web page (html format, which is an open format). A file saved as a web page can be opened by a web browser.
You can also save a LibreOffice file as a pdf. The pdf format has two advantages, printing it will give a hard copy which looks identical to the soft copy. Secondly, it can be read on all systems, since the fonts are stored with the file. This is particularly useful in case where certain fonts, not available on all computers are used (such as non-UNICODE fonts); saving and sharing in PDF format will allow it to be read by others in their computers.
All these format changes can be done in the LibreOffice Writer, Calc and Impress applications, for text, spreadsheet and presentation documents respectively.
Converting image files (GIMP)
You can import an image file into GIMP (File -> Open) and then export the same file (File -> Export) into a format of your choice (image 1). GIMP allows export into a wide variety of image formats.

You can export your image to the popular open image formats such as png and jpeg.
Converting audio and video media files (Selene Media converter)
You can convert media files using the Selene Media converter.
Open Selene Media converter on your computer, through Applications → Sound and Video → Selene Media converter (image 2).

You can click on the ‘settings’ icon to specify the folder (image 3) in which the converted file should be saved.

We will need to ‘import’ the audio or video file we have into Selene Media converter (image 4). You can specify the output format.
We will click on the ‘Add’ icon to open a music file in .mp3 format. We will convert it into the .ogg open format.

We will select the file and click on the ‘Start’ icon to begin the conversion. On right clicking the file, you will get an option to open the output folder (image 5).

You can save the new .ogg audio file in the folder of your choice. Selene can be used to convert audio and video files.
___________________________________________________________________________________________________________________
The Teachers' toolkit for creating and re-purposing OER using FOSS tools is licensed under CC BY 4.0 license
Publishing OER
In the previous chapters of this toolkit, you have accessed existing text, image, audio and video OER from the Web, to create and re-purpose OER. You have so far retained your OER in your personal digital library (PDL), in your own computer. This is accessible only to you. You can create a concept map of your PDL automatically using Freeplane, and use this map to navigate your PDL.
However if you publish your OER on the world wide web, it will be available to anyone, any time. Publishing content on-line is making available a copy of your personal digital library on the the web, which is like a global digital library.
The power of OER is in its re-use, for various learning and teaching needs. It is important for you to publish the OER you create, so that it is available to others for re-use or re-purposing, to sustain a virtuous cycle of receiving-giving (access->create->publish->access). It is also important to access existing OER, revise them to make them more valuable - you can do this in many ways - such as improving their accuracy or comprehensiveness, or by contextualising them or by translating them, and publish the revised OER. Such re-purposing and publishing is also an important virtuous cycle (access->re-purpose->publish->access).
You can publish your OER, either in popular repositories, depending on their format or purpose. You can also publish all your OER in a single place on the web.
Objectives
By the end of this chapter, you will be able to
- Provide metadata to your OER before you publish
- Contribute your creations to existing OER repositories
- Maintain your own personal web space and make available all your OER at a single location
Providing metadata for your OER
Metadata is defined as 'data about data'. In our context, it means additional information about the OER, which will be useful for others. It will include the following data elements:
- Name of the file
- Name of the author
- License information (you may chose any of the Creative Commons licenses)
- Document date (may be creation date and or publishing date)
- Key words for the OER
It is a useful convention to provide metadata for any OER you create or re-purpose. You should do this before you publish your OER. Of course you can do this at the time of creation or re-purposing itself.
Adding meta data to your text file
You can add meta data to the text file created/edited with LibreOffice Writer, using Writer itself. You can add your name and your organisation name by selecting Tools -> Options (image 1). You can add file title, subject and keywords by selecting File -> Properties (image 2). You can add the license of your document in the Comments section. In addition, you should provide this information at the beginning of your document itself, to make it easily visible to the reader.


Adding meta data to your image file
You can add meta data to your image file using GIMP. You can add your name and your organisation name by selecting Tools -> Options (image ). You can add file title, subject and keywords by selecting File -> Properties (image 3).

Adding meta data to your audio file
You can add meta data to your image file using GIMP. You can add artist name, track number, year, genre, when you export the Audacity project to an audio file by selecting File -> Edit Meta data (image 4). You can add the copyright information in the Comments field.
| Activity time - You should provide metadata including your name, file name, license information, document creation date and keywords for the OER on all your OER documents, created or re-purposed by you. You should make this a habit. |
Contributing your creation to existing repositories
You can publish your OER in popular repositories, some of which have been mentioned earlier in this toolkit. This chapter briefly these discusses repositories where you could publish the OER you create or re-purpose. (Note that some repositories will only allow you to upload OER, such as Wikipedia, while others accept both OER and non OER content, such as Youtube. In any case, you should specify your resource as an OER). This chapter also provides an example for each section, by uploading the OER that we have created in this toolkit on 'Learning Digital Story Telling', on these repositories.
Publishing your text OER on an OER repository
There are OER repositories for uploading your text resources. WikiEducator is an OER repository specially for sharing educational resources. Academia.edu is a repository for sharing articles and academic papers. SlideShare is a popular web site where you can upload your presentation slides and text documents in different formats.

We have uploaded our slide presentation on our SlideShare account. (image 5). It is important to note here that even if you are contributing your resource to a repository that is not OER, you should specify your resources as OER, for anyone to access. You should do this by specifying the license of the OER you upload. If you do not specify any license, then the default license 'all rights reserved' will apply, which will make your content a 'non-OER'. You can choose from a variety of Creative Commons licenses.
| Activity time - Create your account on SlideShare and upload your slide presentation and your text document. You should specify Public' in the 'Privacy' settings, to make the document available to all. You can also provide meta data including name of file, key words and category.
You can use the SlideShare web space to regularly upload your text documents and slide presentation OER on different topics. |
Contributing to collaborative text OER
You can also contribute your text OER to Wikipedia, the most visited OER in the world. This encyclopedia has grown to be the most referred-to encyclopedia, by the collaborative efforts of a world-wide community of Wikipedia editors. Contributing to Wikipedia is even more important if you are creating an OER in a language other than English. Most languages of the world, especially languages spoken in the developing countries, are not well represented on Wikipedia (see List of Wikipedias). Since Wikipedia is a popular encyclopedia, if you could regularly contribute your OER to Wikipedia, it would be useful to many others. You will need to create your account on Wikipedia and follow its editing guidelines. If you have created text OER which is not available in the Wikipedia page for the relevant topic, you should add the content to the existing page, or create a new page, if a page for the topic does not exist.
OER commons is another repository where you can join and create text OER, enriched with media OER; this site also allows you to build lessons and modules.
As we saw earlier, you should publish in formats that are open and easier to edit. A web page is usually in the .html format which is an open format. In case you are uploading a document (file) on-line, you should prefer an odt over a pdf format (editable v/s non-editable format) and over a docx format (open v/s closed formats) for publishing a text document.
| Activity time - If you can type in a language other than English, you should create or edit an existing Wikipedia page related to your topic. Create your account on Wikipedia and add the page or edit the page for your topic. Editing a Wikipedia page is similar to using your LibreOffice text editor. You should refer to the English page for the same topic, as an exemplar, along with following the editing guidelines. If you edit a few times, you may find yourself addicted to it!!
You need not add meta data to your Wikipedia edit, since Wikipedia itself stores your name/login, data and time of modification when your edit is saved. Since all content in Wikipedia is licensed as OER, you do not need to mention it for your edit! |
Publishing your image and audio visual OER
We saw in the earlier chapters different repositories for image, audio and video files. Wikimedia commons is one of the largest repositories of media OER of different kinds - image, audio and video files. See the image of the digital story that we have uploaded on Wikimedia commons here. Other options for image repositories include include pixabay and Flickr.
Audio OER can be uploaded on Soundcloud. We have uploaded our audio file on Soundcloud

Video OER can be uploaded on Youtube. You should ensure to select the Creative Commons license when you upload your video OER (image 6), to ensure that it is available freely to others. We have uploaded our video files on Youtube, see one of these Youtube videos here.
Vimeo is another popular site for uploading OER videos.
OER commons is another repository for sharing your image, audio and video OER.
| Activity time - You should upload your audio files to SoundCloud and your video files to Youtube. Ensure to add meta data when you upload. You can also share the web links (URLs) of the pages where the files have been uploaded, with your colleagues for feedback or their use. Sharing links is much better than emailing the files, since these files can be huge in size. Instead if you only the link is mailed, only those interested can download the file when they want to. |
List of publishing spaces by format of OER
| No | Category | Site for publishing OER on-line |
| 1 | Text OER | Wikipedia, WikiEducator |
| 2 | Text OER – Presentations | Slideshare and Academia.edu |
| 3 | Image OER | Wikimedia commons, Flickr, pixabay |
| 4 | Audio OER | Soundcloud, Yourlisten |
| 5 | Video OER | Youtube, Vimeo |
Note
- Before uploading your OER, you will need to register or create a login id on the site
- You need to ensure that you have not used any non-open (copyright) materials in making your OER.
Creating your own web space and publishing OER
You may want to keep all your OER in a single space on the web, instead of in different repositories. The advantage of uploading your OER in the different popular repositories (as explained above) is that more people are likely to visit these repositories and may find your OER by searching for the topic on which you have uploaded your OER. On the other hand, if you think you would like to actively direct people to a specific place to look for all your OER (and you are a prolific OER creator), then another option is to have your own OER space on the web.
You can create your own (blog) site by registering on Wordpress. If you would like to upload all your OER in a single place to make it available to others, this is a good option. Wordpress is a simple software for you to manage your web content. You could maintain your own blogs on your Wordpress site, with an organized collection of all OER created by you.
.png)
We have uploaded the text document content and the concept map image on our Wordpress site (image 7). You can upload your text and image OER on your Wordpress blog. You need a premium account in Wordpress to upload audio and video. However, you can upload your audio and video files on the audio and video repositories discussed earlier (SoundCloud and Youtube) and provide a hyper-link to those pages on WordPress, to create your complete OER.
| Activity time - Register on Wordpress.com and create your account. Upload your text document as a WordPress page. In this page, provide hyper links to your concept map image, audio and video resources already uploaded by you on the OER repositories, as per the earlier activities in 'publishing OER'. You can create additional pages as required by you, to complete the OER on your topic.
You should mention on the site that all the content on your site is licensed as OER, you can use any of the three CC licenses discussed in an earlier chapter You can treat WordPress as your 'e-journal', in which as a teacher, you can regularly record your experiences and insights. You can invite feedback from your colleagues as well, which can be recorded by them as comments on your blog. |
OER created as part of this toolkit on 'learning digital story telling'
As a part of the toolkit, we worked on creating an OER for the topic 'Learning Digital Story Telling', to demonstrate to you how we could use FOSS applications to create and re-purpose OER. The OER is available on the different pages for text, image and animation, audio and video OER, it is shown below for easy reference:
- Freeplane - Concept Map
- LibreOffice Writer - Text document
- LibreOffice Impress - slide presentation
- Images
- Image edited using GIMP
- Audio recordings using Audacity
- Audio recording of interview - original
- Audio recording (edited) - Moving part of the audio
- Audio recording (edited) - background music added
- Audio recording (edited) - background music Amplification
- Video recordings using RecordMyDesktop
- Video Editing using OpenShot
We have copied the text from the LibreOffice text document onto the WordPress page and inserted the concept map. The web address of an audio and a video OER has been linked on this page. The aim is to demonstrate how you can bring together text, image, audio and video resources relating to one topic on one page on your WordPress site. This will allow all your OER on a topic to be strung together providing greater coherence and quality. You can create any number of such pages on different topics that you are creating and re-purposing OER on.
Our purpose in this exercise has been only to demonstrate to you, how to go about creating, re-purposing and publishing OER. The OER created is not suggested to be in its final or mature form, for that much more work is required add content to complete the text document and the slide presentation. Work is also required to bring together and refine the text, image, audio and video resources together to make a final OER set on 'learning digital story telling'.
Preparing a quality OER is time and effort intensive exercise, you will also need to work quite a bit to revise, refine and finalise your OER. This is likely to be a iterative effort. The applications we have learnt will enable you to go back to the specific OER (file) you are working on, and continue editing the same for further revising and maturing.
Toolkit created as OER, using MediaWiki
This toolkit is created as an OER using MediaWiki, including an extension called Wikibooks. This toolkit has been created in a collaborative manner by members of the IT for Change, the author of this toolkit. The toolkit has OER in different formats (text, image, animation, audio and video) and internal and external hype-links as well. Hence this toolkit is itself an example of creating OER using FOSS
While you can use WordPress to create your own web site, where you can host all the OER you create, MediaWiki is a candidate platform to host OER, which is sought to be collaboratively produced. MediaWiki allows multiple users to edit the same content, it allows embedding of image, animation, audio and video resources. It stores the history of edits, so that at any time, you can roll back to a previous version. It has several reports to give you information about the data and metadata on the OER. It is also possible to define processes of creation-review-curation-publishing on MediaWiki. The power of MediaWiki is what enables the world's most popular OER repository Wikipedia, to support collaboration amongst thousands of creators-editors-reviewers across the world, to create OER in more than a hundred languages.
MediaWiki is thus, most suitable for cases where a group or a community of teachers (could be teachers belonging to one institution or one school system) want to come together to co-create OER. Hence if your institution is keen (or you can persuade your institution) to create a platform for all faculty / teachers to collaborate and create, re-purpose and publish OER, then it should install MediaWiki on its web-space, on which all the institution's and its faculty requirement for OER, could be attempted to be met.
OER to build communities of practice
One of the great challenges that teachers face is isolation in their practice. Communities of practice (COP) has been seen as a method of supporting teacher professional development and reducing isolation. When teachers are supported to interact in a free and open technology environment, they are able to support one another in the creation of open educational resources using multiple tools and processes. Such an environment, supported by online and virtual methods, can build collaboration amongst teachers, thus supporting the community as well. OER creation and re-purposing could thus be the purpose and the output of teacher communities. A free and open technology environment is essential to make this a reality. OER is the 'What', COP is the 'Who' and FOSS is the 'How' of this paradigm.
Wikipedia is an example of a MediaWiki based OER that seeks to meet the information needs of all. The Karnataka Open Educational Resources (KOER) MediaWiki based OER, maintained by IT for Change, the author of this toolkit, aims to meet the needs of teachers of Karnataka. Created by the COP of Government high school teachers across the state, the KOER MediaWiki portal has the contributions from the COP in the subject areas of Mathematics, Science, Social Science and Languages. Thus COP and OER can have a symbiotic relationship and this model of OER creation and re-purposing by a COP can be adopted by other institutions or education systems. The symbiotic model of COP and OER can be adopted by teachers/faculty within an institution to collaborate and use FOSS tools to create OER for their own needs. It can be adopted by teachers who are part of a public education system, to develop OER for their diverse needs.
Creating a graphic view of your PDL
The files created by us as part of the OER creation and re-purposing are stored in folders in our computer. Normally we access these files in a hierarchical manner, by drilling down the folders, sub-folders and sub sub-folders till we reach our files. Freeplane has a feature by which we can import the entire folder/file structure into a concept map. You need to select FILE -> Import -> Folder Structure. (image 8). This concept map will show the hierarchy of folders and files through the child nodes and sibling nodes. Each node will display a pink arrow to the left of the name of the folder or file. Clicking on this arrow will open the folder (or the file, using the relevant application). This way you can easily navigate your PDL using a single concept map (image 9).


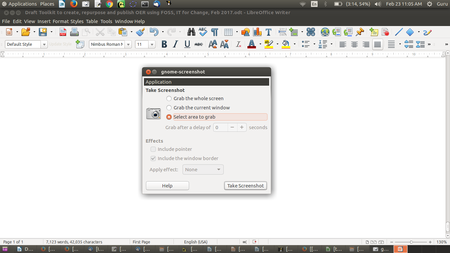
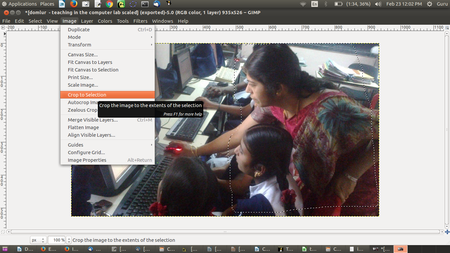
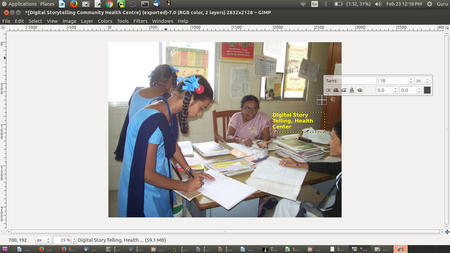
We have created a concept map of our PDL on 'learning digital story telling' using Freeplane, to automatically import the folders, sub-folders and files relating to the text, image, animation, audio and video OER created and re-purposed by us. You too can create a similar concept map of your PDL folders. You can refresh this concept map once in a while.
You can also create a concept map by importing the entire folder structure on your computer by including all your folders and files! This will give you an easy overview of the folders and files on your computer and you can navigate your folders and files using this map. You should refresh this file regularly, so that it can reflect any changes you are making to your folder structures and files.
___________________________________________________________________________________________________________________
The Teachers' toolkit for creating and re-purposing OER using FOSS tools is licensed under CC BY 4.0 license
Annexure
The Annexure to the toolkit provides a training plan for a 3 day workshop to transact this toolkit for a group of teachers. It is possible to transact the toolkit contents at one stretch over three days. Alternatively, the three days could be spaced out over period, this would allow participants to work on the OER creation and re-purposing using the different FOSS applications that they have learnt in one session, and present the OER in the next interaction. Each session could also have discussions on the problems faced by the teachers while working on the OER creation during the interim period and solutions to address these.
The Annexure also provides details of the FOSS applications used in this toolkit, including user manuals and tutorials and references for additional reading. The Annexure provides alternative software applications on platforms other than the Ubuntu GNU/Linux system - this includes the Windows Operating system on your desktop, Android system on your mobile phone and the Web).
A list of resources referred to, in making this toolkit, is provided in the Annexure.
Training plan for a 3 day workshop on the toolkit
A three day (3 days is the minimum period required for a training program on the toolkit, longer periods will give more time for practice and participant presentation cum review of the OER created using the FOSS tools) plan for training teachers on the toolkit is provided in the table below. The following points govern this plan:
- Each day has been divided into 4 sessions, two pre-lunch and two post-lunch to keep it simple. Each session can be around 1.5 to 2 hours, the flexibility is required to cater to diverse learner contexts.
- The content for each session should be taken from the relevant chapters of the toolkit
- The training methodology should be a mix of demonstration/presentation by faculty, hands-on session for participants followed by a review of each session. If the workshop can be planned over 4-5 days, then there can be a sharing and feedback session after each OER session is complete. Participants can either work alone, or in teams of 2-3 participants. If participants work in teams, they can support collaborative working/learning on one topic per team. Teams can also provide feedback to OER created/presented by other teams.
- Assessment consists of session-wise participant feedback, collected at the end of the workshop, portfolio created by the participants (PDL) and published on-line. Faculty can evaluate the portfolios and provide qualitative feedback to the participants for further improvement. Peer feedback from other participants can also be quite useful, this may require more time.
| Day | Session | Topic | Session Plan detailing |
| 1 | 1 | Objectives of workshop | Objectives, agenda, methodology, outcomes |
| 1 | 2 | Basics of ICT | Principles of FOSS and OER - copyright, licensing. Introduction to a Free and Open Environment - Ubuntu and applications
Technology for creating and connecting. Accessing the internet - global digital library. A tour of OER repositories available |
| 1 | 3 | Creating a Text OER 1 | Identify a topic (or topics) on which participant will develop a OER over this course.
Accessing Text OER, Creating a Personal Digital Library (folder, sub-folders and text document) Creating a concept map on identified topic with Freeplane. |
| 1 | 4 | Creating a Text OER 2 | Adding to the Personal Digital Library document and folders
Creating text document and slide presentation with LibreOffice Writer and Impress, on identified topic |
| 2 | 1 | Creating a Image OER | Accessing Image OER
Creating image OER with Screen shot, Tux Paint on identified topic Enriching the Personal Digital Library document and folders |
| 2 | 2 | Combining text and images to create OER | Editing images, creating images using GIMP. Adding text to images
Combining images, photographs with text documents to create OER, on identified topic |
| 2 | 3 | Creating an Audio OER | Accessing Audio OER. Adding to the Personal Digital Library document and folders
Editing audio files with Audacity |
| 2 | 4 | Creating a Video OER 1 | Accessing Video OER,
Creating video OER with RecordMyDesktop. Enriching the Personal Digital Library document and folders |
| 3 | 1 | Creating a Video OER 2 | Creating video resources with OpenShot.
Finalising the text OER with multiple media embedded and linked Finalising the Personal Digital Library document and folders |
| 3 | 2 | Role of community in OER creation | Participant presentation of their PDL
Sharing of OER, feedback, review and revision of OER in true OER spirit How teacher communities can support and benefit from OER creation |
| 3 | 3 | Publishing the OER on-line | Creating ids on the OER repositories and uploading text, image, audio and video OER. Working on one Wikipedia page in English and in native language.
Creating a WordPress id and uploading all OER created and re-purposed on a page on the WordPress site. |
| 3 | 4 | Closure | Presentation of OER and feedback. Review of workshop, sharing experiences, learnings and insights. Formal feedback |
FOSS applications used in the tool-kit
| No | Category | Name | File format | More information (Wikipedia) | Application Home Page |
| 1 | Text OER | Freeplane | .mm | https://en.wikipedia.org/wiki/Freeplane | https://www.freeplane.org/wiki/index.php/Main_Page |
| 2 | Text OER | LibreOffice Writer | .odt | https://en.wikipedia.org/wiki/LibreOffice_Writer | https://libreoffice.org/Main_Page |
| 3 | Text OER | LibreOffice Impress | .odp | https://en.wikipedia.org/wiki/LibreOffice | https://libreoffice.org/Main_Page |
| 4 | Image OER | Screenshot | .png | https://en.wikipedia.org/wiki/Screenshot | - |
| 5 | Image OER | Tux Paint | .png | https://en.wikipedia.org/wiki/Tux_Paint | http://tuxpaint.org |
| 6 | Image OER | GIMP | .png | https://en.wikipedia.org/wiki/GIMP | https://www.gimp.org |
| 7 | Animation OER | Tux Paint | .png | https://en.wikipedia.org/wiki/Tux_Paint | http://tuxpaint.org |
| 8 | Audio OER | Audacity | .wav/.mp3 | https://en.wikipedia.org/wiki/Audacity_(audio_editor) | http://www.audacityteam.org/ |
| 9 | Video OER | Vokoscreen-NG | .ogv | https://en.wikipedia.org/wiki/Screencast | https://linuxecke.volkoh.de/vokoscreen/vokoscreen.html |
| 10 | Video OER | Kdenlive | .ogv/.mp4 | https://en.wikipedia.org/wiki/Kdenlive | https://kdenlive.org/en/ |
Tutorials and User manuals for FOSS applications used in the tool-kit
| No | Category | Name | Tutorials | User Manual |
| 1 | Text OER | Freeplane | https://www.youtube.com/watch?v=AKt9Bm9krBM** | User manual is available within the application, click on Help or press F1 |
| 2 | Text OER | LibreOffice Writer | https://www.youtube.com/playlist?list=PL94682FC0D2ADF410**, http://spoken-tutorial.org/tutorial-search/?search_foss=LibreOffice+Suite+Writer&search_language=English | https://help.libreoffice.org/Writer/Welcome_to_the_Writer_Help |
| 3 | Text OER | LibreOffice Impress | https://www.youtube.com/watch?v=vR7yVoPn2bs**, http://spoken-tutorial.org/tutorial-search/?search_foss=LibreOffice+Suite+Impress&search_language=English | https://help.libreoffice.org/Impress/Instructions_for_Using_Impress |
| 4 | Image OER | Screenshot | https://www.youtube.com/watch?v=ki4SBEkwmM0** | Documentation is available on the Screenshot application interface itself, as a 'Help' button. |
| 5 | Image OER | Tux Paint | https://www.youtube.com/watch?v=O6hKk-0dzKA**, https://www.youtube.com/watch?v=LJcQzGrS9So | http://www.wikihow.com/Use-Tux-Paint-with-Your-Kids |
| 6 | Image OER | GIMP | https://www.youtube.com/watch?v=ZZr8mBLiY8Y**,
https://www.youtube.com/watch?v=8LmW5ndnEqw&index=1&list=PLC5B3750CE8219376**, http://spoken-tutorial.org/tutorial-search/?search_foss=GIMP&search_language=English** |
https://www.gimp.org/docs/ |
| 7 | Animation OER | Tux Paint | https://www.youtube.com/watch?v=O6hKk-0dzKA**, https://www.youtube.com/watch?v=LJcQzGrS9So** | http://www.wikihow.com/Use-Tux-Paint-with-Your-Kids |
| 8 | Audio OER | Audacity | https://www.youtube.com/watch?v=8E5uRJlXgfk** | http://manual.audacityteam.org/man/tutorials.html |
| 9 | Video OER | Vokoscreen-NG | https://www.youtube.com/watch?v=KxVIGNFILbM** | https://linuxecke.volkoh.de/vokoscreen/vokoscreen.html |
| 10 | Video OER | Kdenlive | https://youtu.be/V18BX15KbKs** | https://linuxecke.volkoh.de/vokoscreen/vokoscreen.html |
**These videos are free to view but not to re-use and modify.
FOSS alternatives on other platforms
*These applications are freeware but not free software.
Additional References
- Hatakka, M. (2009). Build it and they will come? - Inhibiting factors for reuse of open content in developing countries. The Electronic Journal on Information Systems in Developing Countries, 37(5), 1-16. Retrieved from http://www.ejisdc.org/ojs2/index.php/ejisdc/article/viewFile/545/279
- Kanwar, A., Kodhandaraman B. & Umar A. (2010). Toward sustainable Open Education Resources: A perspective from the Global South. The American Journal of Distance Education, 24(2), 65-80. DOI: 10.1080/08923641003696588.
- Kumar, K. (1988). Origins of India’s “textbook culture”. Comparative Education Review 32(4), 452-464. Retrieved from https://www.jstor.org/stable/1188251?seq=1#page_scan_tab_contents
- Mishra, P. & Koehler, M.J. (2006). Technological Pedagogical Content Knowledge: A framework for teacher knowledge. Teachers College Record, 108(6), 1017-1054. Retrieved from http://punya.educ.msu.edu/publications/journal_articles/mishra-koehler-tcr2006.pdf
- ROER4D Research Concepts Note. Retrieved from ROER4D portal https://docs.google.com/document/d/1Iz1kVC4CYLFJBtZNm2o5ziFJKW96SjtNjhWHfTKKkbI/edit
- Rothberg, R.A. (1985). Improving school climate and reducing teacher isolation [Abstract]. Retrieved from http://eric.ed.gov/?id=ED270855.
- Sharma, R. . Subject Teacher Forums and the Karnataka Open Educational Resources Programme - A Case Study, in Vignettes of Selected Asian Experience. WOU Press. 2016. Edited by G. Dhanarajan. ISBN 978-983-3910-02-1 (ePub)
___________________________________________________________________________________________________________________
The Teachers' toolkit for creating and re-purposing OER using FOSS tools is licensed under CC BY 4.0 license